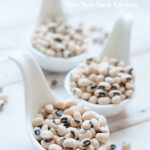
All good Southerners and their friends know that the secret to a prosperous New Year is to eat black eyed peas on New Year’s Day!
Cooking Instructions:
Check beans for debris and organic matter. Rinse thoroughly. Mix beans with aromatic vegetables (celery, carrot, onion, etc.) and a few spoonfuls of olive oil. Cover with two inches of water and then bring to a full boil for 15 minutes. Reduce heat to a simmer and cook gently until done. Salt when beans are soft. A pre-soak will lessen the cooking time.
“Work With What You Got!”
©Tiny New York Kitchen © 2021 All Rights Reserved

Many of us are preserving summer’s bounty to enjoy during colder months.
Here are tips on how to preserve using the hot water bath method. It’s really not difficult if you follow these easy steps.
High acid foods like tomatoes, pickles, salsa, jelly, pie filling, jam, fruit, and chutney are great for canning using the hot water bath method.
Preheat Jars
Fill water bath canner (or large pot) to cover empty jars by at least 1 inch of water. Heat jars to simmer (180 degrees F) to prevent jar breakage.
Fill Jars
Following a canning recipe, fill a hot jar with prepared food leaving enough space between the food and the rim (headspace) as indicated in the recipe.
Tighten Lids And Bands
Wipe any food from the rim of the jar. Center new lid on the jar, then twist on band just until fingertip tight.
Process Jars
Place filled jars onto rack in simmering water. If you don’t have a rack designed for home preserving, use a cake cooking rack. Filled jars should be covered by 1 inch of water. Place lid on canner and heat to a steady boil. Boil jars for the time specified in recipe. Adjust for high altitudes.
Altitude Adjustment
1,001 to 3,000 ft increase processing time 5 minutes; 3,001 to 6,000 ft increase 10 minutes; 6,001 to 8,000 ft increase 15 minutes; 8,001 to 10,000 ft increase 20 minutes.
Cool Down
Turn off heat and remove canner lid. Let jars stand in water for 5 minutes. Remove from water and cool jars upright on cutting board, wire rack or towels on countertop for 12 to 24 hours.
Check The Seal
After cool down, press on center of lid. If jar is fully sealed, the lid will NOT flex up or down. Remove the bands and gently attempt to lift lids off with your fingertips. Properly sealed lids will remain attached. Wipe canning jars, lids, and bands clean. Store sealed jars in pantry for up to 18 months. Jars may be stored with or without bands. If a lid fails to seal within 24 hours, immediately refrigerate the food product.
©Tiny New York Kitchen © 2020 All Rights Reserved

Just What Do Expiration Dates Mean?
Best If Used By/Before: Indicates how long the product will be at its best flavor or quality. After that date, it’s not necessarily unsafe to consume, but the quality might be degraded.
Sell By: Tells the store how long to keep an item on the shelf and when to take it off. Milk is a good example. A grocer has to sell a gallon of milk by that date, but milk past the sell by date is often still usable. When properly stored, milk, like other products will keep for several days after the sell by date. Before tossing, give it the “sniff” test. Odds are it’s still good.
Use By: Is the final recommended day to use the product for best quality. Eggs have a “use by” date which is similar to a “best if used by” date. That’s important; it’s hard to know when eggs go bad.
Absolute Dates: The expiration date on infant formula is absolute. Do not open or use expired formula.
“Work With What You Got!”
©Tiny New York Kitchen © 2020 All Rights Reserved

Happy Independence Day!

The word picnic was originally a 17th Century French word, picque-nique. Its meaning was similar to today’s meaning: a social gathering where each attendee brings a share of the food.
Going on a picnic sounds like a great idea, but it might feel a bit daunting if you haven’t been on one in a long time. Deciding what to eat, where to go and what supplies to take can seem like a big confusing task. Take away any picnic apprehension with some easy pre-planning and a supply checklist and you’ll be headed out for a great day in the sun with family and friends!
Get started with where you would like to go and find out what amenities are available at your chosen location. Are there pavilions with shade and picnic tables? Is there running water? Are grills permitted or available? Do you need to make a reservation? Once you have these core questions answered you’ll be able to plan your menu and supply list.
Supply Check List:
**Blanket, Chairs, Games, Music
**Tablecloth, Paper Towels, Wipes, Hand Sanitizer, Bug Spray, Sunscreen, Trash Bags, First Aid Kit
**Plastic Ware, Plates, Cups, 1 Sharp Knife, Plastic Bags Or Containers For Leftovers
**Cooler Bags Or Large Cooler With Wheels, Ice Packs, Bagged Ice Cubes For Drinks, Bottled Water
Depending on if you will be grilling or need to bring pre-prepared food, you can come up with countless menu options. Sandwiches and cold salads make for great picnic fare, or if grilling is an option, pre-marinated meals and vegetables, hot dogs, and corn on the cob are always delicious prepared outdoors. Remember to pack raw foods separately and keep them in the cooler until ready to cook.
“Work With What You Got!”
©Tiny New York Kitchen © 2019 All Rights Reserved

Let’s face it; most of us eat way too much salt. A high-sodium diet can increase risk of high blood pressure (hypertension), which can lead to cardiovascular and kidney disease. The Dietary Guidelines for Americans recommend limiting sodium intake to less than 2,300 mg per day, which is about 1 teaspoon of salt. The good news is that reducing the amount of salt you use will retrain your taste buds to sense other flavors. You won’t even miss it.
Bland food is such a bore, but how can we keep sodium in check without sacrificing flavor?
Here are some suggestions to reduce salt in your diet:
Remove the salt shaker from the table when you eat.
Limit process foods, including cured, pickled, salted, or brined products.
Focus on fresh or frozen fruits and vegetables without sauces or seasonings.
When choosing canned options, look for “no salt added” or “low sodium.”
Cook at home so you have control over how much salt you add.
Flavored vinegar, onions, garlic, and citrus also add tons of flavor without the sodium.
Herbs and spices are the key to flavor. Add dried varieties during cooking and fresh herbs at the end of cooking or when plating a dish. Thyme, mint, lemongrass, dill, basil, oregano, chives, and parsley are great herbs to use. Spices like pepper, ginger, chili powder, and cinnamon are excellent spices to flavor your food.
“Work With What You Got!”
©Tiny New York Kitchen © 2018 All Rights Reserved

It’s that time of year again, in America, when the beer turns green and the aroma of corned beef and cabbage fills the air. The dish is so comforting, but just what is corned beef? The term has nothing to do with corn, but was the English term for a small granule, such as a grain of salt. In days before modern refrigeration, salting meat was a way to preserve it and keep it from spoiling.
Corned beef is an Americanized addition to the traditional Irish diet. While colcannon (boiled potatoes, cabbage, and leeks in buttermilk flavored with wild garlic) was a common Irish dish, as was brown soda bread, corned beef was produced primarily for export to England. Upon arriving in America, however, it’s thought the Irish chose to celebrate their holiday with food that was typically not available to them in their home country, so corned beef was added to the menu, as was white soda bread studded with currants and caraway.
Corned beef is typically made from beef brisket, which is a cut of meat from the breast or lower chest, but the rump, bottom round, and even tongue, can be used. In America, the term “corned beef” is used to describe both the cured meat and the canned stuff found on grocery store shelves. In Britain, they call the canned stuff “salt beef.”
To make corned beef the meat is simmered in a blend of corned beef spices that usually include peppercorns, garlic, mustard, tarragon, thyme, parsley, cloves, and nutmeg.
In New England, you most often see corned beef served as a St. Patrick’s Day main dish or in a sandwich. As the main ingredient in New England Boiled Dinner, corned beef often pairs with potatoes, carrots, turnips, and cabbage in a hearty, savory, brothy bowl of goodness. When used in a sandwich, the most popular corned beef sandwich is the Reuben. Considered the quintessential Jewish deli sandwich, a Reuben is toasted rye bread stuffed with hot slices of corned beef, usually piled high, and topped with sauerkraut, Swiss cheese, and either Russian or Thousand Island dressing.
In New England, a frequent point of interest is also whether you prefer red vs. gray corned beef. The difference is “Red” brisket is cured with nitrite, which gives the meat its signature color. “Gray” corned beef, which is considered the authentic New England variety, is not cured with nitrate, so color forms naturally as it brines.
If you have corned beef leftovers a New England favorite is corned beef hash, which is typically served for breakfast.
“Work With What You Got!”
©Tiny New York Kitchen © 2018 All Rights Reserved

Going out for dinner on Valentine’s Day is a risky affair. Even the best restaurants can have “overload difficulties” on such a busy night where couples have expectations of restaurant perfection. A better way to manage expectations is to take control of them yourself. Food is a language of love. You know what you like and what your loved one likes. No need to worry about cheesy love songs or a perfumed soaked lady sitting next to you. Nothing says I love you more than taking the time to make a special meal for the person you love. Visit the local farmers’ market, butcher, or seafood shop to buy their favorite seasonal ingredients. Come up with a meal that celebrates love. Turn off the lights, fire up all the candles and put on your favorite music.
Keep it easy and made make it special. Plan out the meal from beginning to end to get organized and make sure you have a solid menu. If you’re not a seasoned cook make sure to keep it simple and I recommend not trying to make complicated dishes that you’ve never made before. Make it easy with three courses. Begin with a beautiful cheese plate. Embrace easy, big impact dishes. Start off with prosciutto-wrapped scallops finished with a squeeze of lemon. Warm things up with braised short ribs or steaks finished off with butter and herbs. Keep desserts simple, but sweet. Decorate bakery cakes with fresh fruit or edible flowers or warm up slices of pie and top with caramel sauce and a gourmet ice cream or try your hand at an easy dessert of chocolate pots de crème. Don’t forget that nice bottle of wine or champagne.
“Work With What You Got!”
©Tiny New York Kitchen © 2018 All Rights Reserved

If you’re preparing for an outdoor party or get-together set the stage ahead of time by purchasing disposable plates, cups, silverware, and napkins. Make sure to have trash bags, paper towels, and cleaning supplies on hand. Clear off the counters and dishwasher in advance, so you have an open work space. If you’re dining al fresco for two then, by all means, use real dishes.
During your party or get-together make sure to leave trash and recycling bins accessible to guests. Because you’re unable to monitor everything, recruit a few people to help you take charge of specific tasks like replenishing drinks and periodically clearing away trash.
For cleanup use large trays for transporting food and supplies back to the house. Pack up leftovers, using resealable bags instead of more bulky plastic containers. Soak pots, pans, grill tools, and dishes to make them easier to clean. Designate a family member to clean one section of the yard.
“Work With What You Got!”
© Victoria Hart Glavin Tiny New York Kitchen © 2017 All Rights Reserved

When making cookies make sure not to overcream the butter and sugar. Unlike cake batter baked in a pan, cookie dough is baked free-form. When the dough is heated and the chemical leaveners expand the air bubbles, the bubbles burst without a pan to force the dough upward, producing flat cookies. For cookies, cream the butter and sugar for only 1 to 2 minutes, just until the mixture is smooth but has not lightened in color.
Another insurance policy against flat cookies, chill butter-based cookie dough before baking. Butter has a low melting point, and starts to soften as soon as it is exposed to oven heat. Refrigerate the chilled dough for at least 30 minutes and up to 2 days before shaping and baking. This only works with dough that uses baking powder for leavening. Don’t do this with dough that includes baking soda as the leavener, which loses its rising power soon after it is mixed with wet ingredients.
Professionals use spring-loaded ice cream scoops to portion cookie dough, making cookies the same size that will bake at the same rate. A tablespoon-size scoop is the right capacity for most recipes.
For even baking and easy cleanup, bake your cookies on heavy-duty, rimmed aluminum baking sheets (half sheet pans) lined with parchment paper. To help the paper adhere, butter the baking sheet first. You can also line baking sheets with silicone baking mats instead of parchment paper.
If you’re using silicone mats, you may want to do a test run. Some cookie bottoms won’t crisp as well on the mat as they do on parchment lined baking sheets. Of course, this can be an advantage if you prefer soft, cakelike cookies.
There is no need to transfer cookies to a wire rack to cool. In fact, more harm can be done by transferring warm, delicate, pliable cookies to a rack than by letting them stand on the baking sheet. If you need to remove the cookies to use the baking sheet again, just let them cool on the sheet until they are firm enough to move.
To discourage overbrowned cookie bottoms (which can happen when an oven heats unevenly), insulate the baking sheet by placing it inside a second baking sheet of the same size. The think layer of air between the baking sheets will protect the top sheet from getting too hot.
Don’t store different types of cookies together or they will exchange flavors and textures. Tin or stainless steel covered containers work best for storage, but plastic containers can also be used as long as they are airtight and fragrance free.
To revive crisp cookies that have softened, bake them for 5 to 10 minutes in a 300 degree oven. Let them cool completely before storing.
To help soft cookies keep their texture, store them in an airtight container with a ceramic brown sugar softener, or with a piece of apple on a piece of aluminum foil, or soft bread. Make sure to remove the apple after 24 hours.
“Work With What You Got!”
© Victoria Hart Glavin Tiny New York Kitchen © 2017 All Rights Reserved


