Cheese Boards are a no-cook, sure-to-please option for any holiday celebration. Build a cheeseboard that’s affordable yet special. Then toast the season with festive cocktails.
A few inexpensive ingredients and simple homemade touches are all you need for a spectacular, special occasion-worthy spread. Here are some smart tips to deck your board with festivity and flavor without breaking the bank.
For a classic, colorful centerpiece, make your own cranberry and herb cheeseball. Start with a container of spreadable cheese and form into a ball. Use a sheet of plastic wrap to avoid messy hands. Roll the ball in a combination of finely chopped dried cranberries, parsley, and chives until thoroughly coated. Let sit at room temperature for 15 minutes before serving.
No need to buy expensive cheeses. Inexpensive cheddar is always a crowd pleaser. Skip the pre-cut cubes and cut the block yourself. Orange or white, mild or extra sharp. Cheddar is always a favorite.
Upgrade affordable goat cheese by rolling the log in herbs and spices, like dried thyme, dried oregano, or crushed rainbow peppercorns for a beautiful, flavorful crust. You could also keep it plain and top with jarred pepper jelly or mango chutney.
Instead of mixed nuts, opt for crunchy snack mixes, which are often less expensive and just as delicious. For the board, look for one with little or no seasoning.
Give a budget-friendly feta or mini mozzarella balls a flavor boost by marinating cubes in olive oil with herbs like parsley, oregano, or rosemary, and other seasonings like sliced chilis, crushed garlic, or lemon zest. Refrigerate overnight or up to 3 days.
Round out your cheese board with other delicious items like fresh or dried fruit (dried apricots, figs, grapes, and sliced pears), pitted olives, and plain crackers.
Pair your cheese board with a festive holiday beverage and enjoy!
©Tiny New York Kitchen © 2020 All Rights Reserved

July has given us bright sunny days, low humidity and cool evening temperatures and a great way to capture summer’s splendor is with a picnic. Whether you find respite under the shade of a magnificent tree, spread a blanket on a sandy beach or enjoy your own patio or yard, dining “en plein air” is a delightful diversion to current world conditions.
Simplicity is key for a pleasant picnic. With farm markets opening, stock up on fresh fruits, berries, and vegetables for the picnic basket. Luscious, seasonal asparagus can be lightly grilled, steamed or roasted, then spritzed with fresh lemon juice and adorned with fresh parmesan cheese shavings for a light and lovely picnic lunch that packs easily. Freshly picked asparagus can also be served raw. Shave each stalk using a vegetable peeler, into long strips and dress with olive oil, rice vinegar, salt and pepper. Embellish at will with goat or feta cheese, pine nuts or almonds and plenty of minced herbs.
Fresh herbs perk up picnic recipes and eliminate the need for excess sodium. Chives will add a slightly sharp bite to potato, egg or pasta salads, as well as a nice little nip of flavor to deviled eggs. Poach a nice piece of salmon and dot it with creamy dill sauce for an elegant picnic entrée. Cilantro and Thai basil elevate rice noodle salads, and the snappy tang of fresh parsley is just the right addition to grain bowls. Fresh basil with ripe tomatoes is a classic combination. For something sweet, pack fresh berries, such as native strawberries, blueberries or raspberries, sprinkled with cinnamon and drizzled with honey.
If your picnic involves grilling use sturdy rosemary to imbue vegetables, meat, and fish with Mediterranean flavor and flair. Marinate chunks of lamb, beef or chicken with fresh rosemary, garlic, and olive oil. Let rest for several hours, then grill as desired.
Have picnic supplies at the ready to take advantage of gorgeous weather. Stash a small roll of garbage bags, hand sanitizer, salt and pepper packets, a small cutting board and knife, bug spray, sunscreen, and a blanket in your picnic basket. Keep small ice packs in the freezer. Gather your food and drink and enjoy the healthy benefits of picnicking all summer long.
“Work With What You Got!”
©Tiny New York Kitchen © 2020 All Rights Reserved

To flavor your food reach for herbs and spices rather than high-sodium table salt. Make sure to read the labels of seasoning mixes because many of them contain salt.
Seasoning Suggestions
Pasta: Basil, Fennel, Garlic, Paprika, Parsley, Sage
Potatoes: Chives, Garlic, Paprika, Parsley, Rosemary
Rice: Cumin, Marjoram, Parsley, Saffron, Tarragon, Thyme, Turmeric
Seafood: Chervil, Dill, Fennel, Tarragon, Parsley
Vegetables: Basil, Caraway, Chives, Dill, Marjoram, Mint, Nutmeg, Oregano, Paprika, Rosemary, Savory, Tarragon, Thyme
“Work With What You Got!”
©Tiny New York Kitchen © 2019 All Rights Reserved
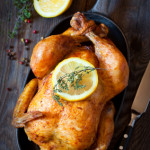
Pulling a tender, juicy roast chicken with crisp, golden brown skin out of the oven is so rewarding. For a simple side, roast a pan of in-season produce like spring onions, ramps, new potatoes or carrots during the last 20 minutes of cooking.
INGREDIENTS
1 Whole Chicken (4 Pound)
1 Teaspoon Sea Salt
1/2 Teaspoon Freshly Ground Pepper
Preheat oven to 425 degrees.
Remove neck and giblets from chicken. Trim off any excess fat from neck and tail end of chicken. Rinse bird with cool running water. Pat dry with paper towels, and season all over with salt and pepper.
Place chicken, breast side up, on a rack in a small-size roasting pan or a 9×13 inch-baking dish. Tuck wings back and behind bird to hold them in place. Roast, basting once or twice with pan juices, until skin is deep golden brown and juices run clear, about 1 1/2 hours.
An instant-read thermometer inserted in the thickest part of the thigh should read 165 degrees. Let chicken rest for 15 minutes and then carve.
To add fragrant flavor, stuff the cavity with a halved lemon or orange and a handful of fresh herbs like rosemary, thyme, and oregano.
Serve with an easy salad of greens topped with cherry tomatoes, mozzarella, and a drizzle of olive oil.
Serves 4
Prep Time: 20 Minutes
Cook Time: 90 Minutes
Total Time: 110 Minutes
“Work With What You Got!”
©Tiny New York Kitchen © 2018 All Rights Reserved

The turkey came originally from America and was first domesticated by the Aztecs in Mexico. The Spanish introduced turkeys into Europe and they soon became a popular choice in France, Italy and Britain.
When early settlers from Britain, France and Holland crossed the Atlantic to North America, the vast flocks of turkey that roamed wild provided them with sustenance. They were plentiful and so easy to trap or shoot that the older children of the family were given the responsibility of catching them. The Native Americans meanwhile taught the new settlers the rudiments of farming, and in November 1621, on the first anniversary of their arrival, the Pilgrims entertained the locals to a feast, at the center of which was the turkey. Ever since, this has been the traditional bird served at Thanksgiving.
Turkeys are available fresh, chilled, or frozen all year round. When buying a whole bird, look for a plump well-rounded breast and legs and clear, soft and evenly colored skin. Avoid birds that are bruised, with blemishes or torn skin or any that have been badly or unevenly plucked. Turkeys vary enormously in weight.
When you’re ready to purchase your turkey it’s easy to get confused on what size to get. A good guild to go by is to figure approximately 1 1/4 pounds per person. This makes enough for the meal and provides a decent amount of leftovers.
To store your turkey place it in a large, deep dish and cover it completely with plastic wrap. Store it in the coolest part of the refrigerator; making sure that it does not come in contact with other foods.
Thaw a frozen turkey in the refrigerator for 2 to 4 days. Estimate 24 hours for every 5 pounds, so 2 days for a 10 pounder, 3 days for a 15 pounder, etc.
And then there is always the frozen turkey emergency that goes like this, “Help, help, it’s Wednesday, and my turkey is still frozen!!!” It’s been a long time, but I’ve been in this predicament. What you do is leave the turkey in its wrapper and put it in a large-size container. A lobster pot works well. Fill the container with cold tap water and let it sit for 30 minutes. Dump out the water and refill. Let it sit another 30 minutes. Repeat until the turkey is thawed, then roast immediately or transfer to the refrigerator.
The good news is that you can brine or dry cure your turkey while it defrosts in the refrigerator. What a Godsend that is! Use a lighter brine solution, which is about 1/2 cup kosher salt per gallon of water, plus sugar and spices). If you’re dry curing, use the standard recipe. You’re turkey should stay below 40 degrees while brining. You don’t need to brine or cure a kosher or butterball type supermarket frozen turkey. These come pre-brined. If you want to be able to put your own flavor stamp on your meal, then get a natural or untreated bird and do it yourself. If you plan on brining for 2 days use the weaker solution that I just mentioned. If you plan to brine for 24 hours or less, then bump it up to 1 cup kosher salt per gallon of water. Then add an equal amount of sugar. I don’t always brine, but when I do I’ve been known to throw an assortment of flavorings in the brine. Flavorings that you could add to your brine could be: apples, lemons, oranges, onions, garlic, shallots, peppercorns, bay leaves, cinnamon sticks, cloves, allspice berries, juniper berries, mustard seeds, fennel seeds, coriander seeds, rosemary, sage, thyme, savory, parsley, or oregano. You can also replace half the water with sweet cider, hard cider, vegetable stock, turkey stock, chicken stock, beer, white wine, or red wine. If you want to dry cure then use about 1/2 teaspoon kosher salt for every pound of turkey. Then add spices to your taste.
Stuffing your turkey is a personal preference. I always stuff the bird because I love how it tastes when cooked inside the turkey. It does slow down the cooking process, however. Never stuff the turkey in advance of cooking. The stuffing can be made in advance, but the turkey should not be stuffed until just before it is placed in the oven. Weigh the stuffing and add this to the weight of the bird before calculating the cooking time. Thoroughly rinse the body cavity of the bird under cold running water, and then drain it well. Wipe the turkey, inside and out, with paper towels. Press the stuffing inside the shallow neck cavity. Make sure not to pack it in too tightly. Turn the bird over and pull the neck skin over the stuffing. Now it’s time for a little turkey bondage and truss the bird (tuck the wing tips under the breast and tie the legs together) and then cook for the calculated time. Never shorten the cooking time because although the meat may appear cooked, extra time must be allowed for cooking the stuffing thoroughly.
If you choose not to stuff your turkey then place aromatics in the body cavity of the bird. Cut a large onion in half and stud each half with 4 to 6 cloves. Place this in the body cavity of the bird. Cut an orange and a lemon into quarters and add these, together with 3 or 4 bay leaves, 4 to 6 fresh sage sprigs, and 2 to 3 fresh thyme sprigs. Add 1 cinnamon stick or 1 blade of mace for a festive hint of warm spice.
Turkeys are super easy to roast, but require a little more attention than smaller birds. Check to make sure the oven shelves are in the correct position before heating the oven. Preheat the oven to 350 degrees. Place the prepared bird on a rack in a large-size roasting pan. Smear the turkey breast generously with butter, season with salt & pepper and place in the oven. Baste the turkey from time to time during cooking. When the breast has browned, cover with foil to protect it and continue cooking. Remove the covering foil for the final 20 minutes of cooking. To check if the meat is cooked, insert a skewer into the thickest part of the thigh. If the juices run clear and the meat is white, it is cooked. If the juices are pink and the meat is soft and pink, the turkey is not ready. Return it to the oven and check again after 20 minutes. Cooking times will differ depending on whether your bird was purchased fresh or frozen. Plan on 20 minutes per pound in a 350 degree oven for a defrosted turkey and 10 to 15 minutes per pound for fresh. Remember to add more time if you’re turkey is stuffed. You should have an instant-read thermometer in your kitchen drawer. Insert the thermometer into the breast (all the way to the bone) and if it reads 160 degrees you’re good to go. You may also measure the thigh by inserting the thermometer into the thickest part, but not touching the bone, and it should read 165 degrees.
Remove the turkey from the oven and cover it closely with foil. Leave it to rest for at least 30 minutes. This will even out the temperature and make it easier to carve. I know some chefs who let it rest for 2 hours, but I don’t think that one needs to wait that long. If you wish to make gravy in the roasting pan, transfer the bird to a carving plate.
When you’ve let your bird rest awhile remove the trussing string. Hold the bird steady in position with a carving fork. Cut off the legs, then cut these in half or carve the meat from the bones. Make a horizontal cut across the breast above the wing. Carve neat and even vertical slices off the breast. Repeat on the other side of the bird. Arrange slices on a warmed platter. Add the turkey legs or sliced meat to the platter or set them aside for serving separately. Scoop out the stuffing and serve with the meat.
“Work With What You Got!”
© Victoria Hart Glavin Tiny New York Kitchen © 2016 All Rights Reserved
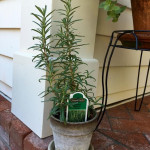
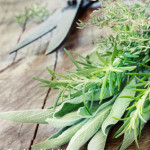
Growing herbs make cooking so much better. When the weather turns cold I bring them inside to my kitchen so they don’t freeze. Tonight I’m making grilled rosemary bone-in pork chops.
Freezing Fresh Herbs
Spring is here and it’s time to grow a variety of herbs, but what do you do when you have an abundance that you don’t want to go to waste? The answer is to freeze them. To freeze hardy herbs like thyme or rosemary, chop the leaves and put them in an ice cube tray. Cover with olive oil and freeze them for up to 6 months. When you’re ready to use them just melt as many as you need in a skillet and use for sautéing.
“Work With What You Got!”
© Victoria Hart Glavin Tiny New York Kitchen © 2016 All Rights Reserved

Shopping a For More Kitchen Herbs!
Roasted Leg of Lamb Roman Style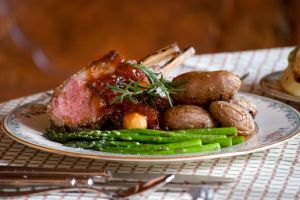
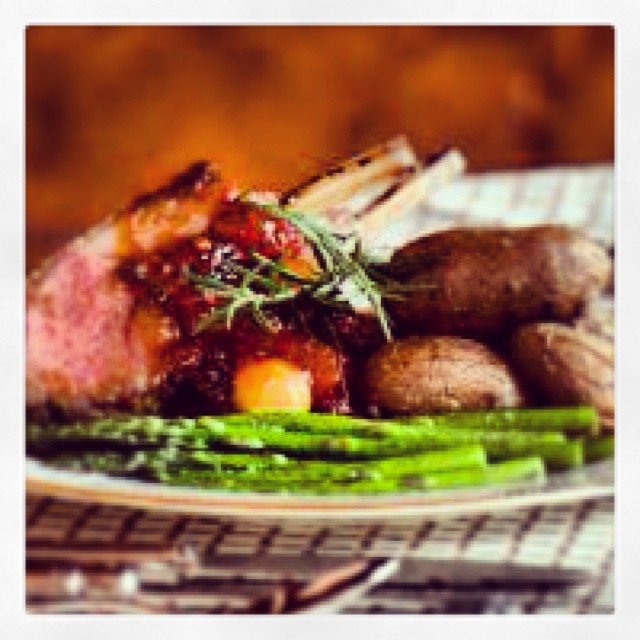
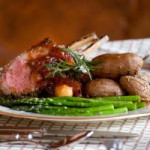
This is such an easy Sunday meal. For this traditional Roman dinner, purchase 1/4 of a nice fat “abbacchio”. In Rome “abbacchio” is a very young lamb, which has been fed only with milk. I usually purchase my “abbacchio” from a nice butcher in the Arthur Avenue area of the Bronx. If you don’t want to buy 1/4 of a young lamb then just get a decent sized leg of lamb that will accommodate the size of your family (make sure it’s not been previously frozen). Insert cloves of garlic, both lean and fatty ham, chopped stalks of rosemary, kosher salt, freshly ground pepper, and brush all over with olive oil. Salt again and roast in a medium hot oven (350 degrees) for 1 hour together with lots of raw potatoes either whole (small potatoes) or cut into pieces (larger potatoes). After about half an hour, add 1 glass of dry white wine and turn the lamb over and cook the other side for another half an hour. When the lamb is done roasting, cut into pieces and serve with the potatoes, steamed asparagus and a nice chicory salad.
Note: By the way, if you’ve never been to Arthur Avenue in the Bronx then you’re really missing quite an experience. Forget Little Italy downtown because Arthur Avenue is the real deal although tourists have discovered it as well. A great time to go is during the Christmas season. Often times they have Frank Sinatra piped Christmas songs blaring from loud speakers posted high up on the lampposts. My Arthur Avenue butcher is a total crackup. He’s in a great mood during the Christmas season because according to him it’s the one time of the year that his wife is “nice” to him if you know what I mean and he’s not shy to chirp about it either. My husband is Italian and looks it so much that they say the map of southern Italy is stamped on his face. One time I needed to pick up a few things on a Saturday during the holidays and it was so busy that there was no parking to be found. My husband found a spot, but the meter was broken. There was a “group” of Italian men donned in the “I can’t fit in my clothes” velour track suits (adorned with gold chains carrying either St. Christopher or the Virgin Mary herself) hanging around by the broken metered parking spot. My husband was inspecting the broken meter worrying about a parking ticket when the guys pipe up, “Heeeey don’t worry bout it. We’ll watch to make sure you don’t get a ticket. We’ll take care of it.” Sure enough we get back to the car after about an hour and no ticket even though we could see the NYC parking police patrolling the streets. My husband said a sincere, “thank you” to which he received a sincere “don’t mention it” and we were on our way.

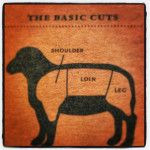
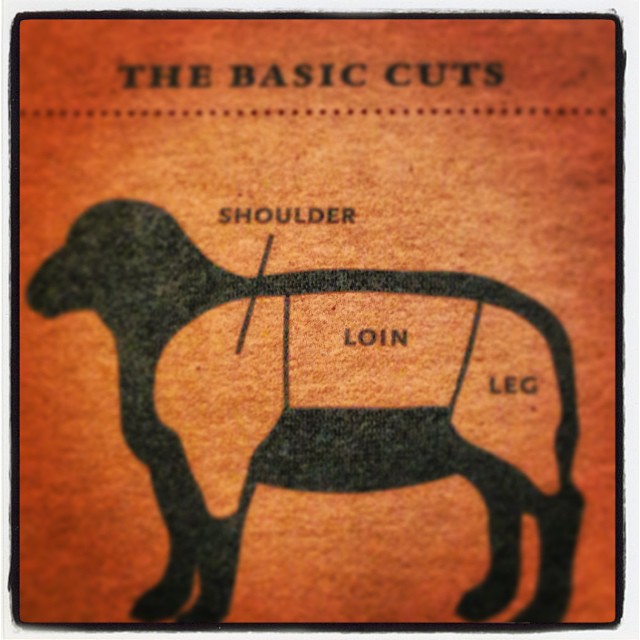
Lamb Cooked 3 Ways
Cooked low and slow, lamb shanks become rich with complex flavors. Lamb shoulder is also a great choice for slow cooking. Good value cuts are: Shoulder Chops, Stew Meat, Ground Lamb, and Leg Steak.
The USDA recommends cooking all whole muscle cuts of lamb to at least these temperatures to ensure that potentially harmful bacteria are destroyed. Some people may choose to cook their meat to lower temperatures, depending on preference. Ground lamb should be cooked to 160 degrees.
Desired Doneness:
Medium – Target Temperature 145 Degrees, Texture Warm/Firm, Center Color Pink
Medium Well – Target Temperature 155 Degrees, Texture Very Warm/Firm, Center Color Gray – Tinged With Pink
Well Done – Target Temperature 165 Degrees, Texture Hot/Dense/Hard, Center Color Gray
Best Cooking Methods For Lamb
Shoulder Blade Chops (Shoulder): Braise, Broil, Grill, Roast, Pan-Fry, And Stew
Rib Chops (Loin): Broil, Grill, Roast, Pan-Fry, And Sauté
Loin Chops (Loin): Broil, Grill, Roast, Pan-Fry, And Sauté
Whole Leg (Leg): Braise
Leg – Boned, Rolled, Tied (Leg): Grill, And Roast
Rack of Lamb (Loin): Broil, Grill, And Roast
Crown Roast (Loin): Roast
Top Round Roast (Leg): Braise, Roast, And Stew
Stew Meat (Various): Braise, And Stew
Sausages (Various): Braise, Grill, Roast, Pan-Fry, And Sauté
Shanks (Leg): Braise, And Stew
Lamb Chops 2 Ways
Classic Broiled: Preheat broiler. Arrange chops on broiler pan and season with kosher salt and pepper. Broil 4 to 5 minutes per side, or until target temperature. Remove pan from broiler, cover with foil and allow chops to rest 10 minutes before serving.
Rosemary Garlic: Puree 6 garlic cloves with 2 Tablespoons fresh rosemary. Add 1/2 cup olive oil, kosher salt and pepper. Marinate chops 30 minutes or overnight. Grill over medium-high heat, or broil according to above directions.
Roast Leg of Lamb With Mint Jelly: Preheat oven to 450 degrees. Combine 2 Tablespoons kosher salt, 1 Tablespoon black pepper, 1 Tablespoon finely chopped fresh rosemary and 1/3 cup olive oil. Rub mixture all over roast. Make a few dozen small slits in lamb and insert garlic slivers. Place lamb in roasting pan and roast 10 minutes, reduce temperature to 325 degrees and roast until target temperature, about 1 1/2 hours. Cover with foil and let rest 15 minutes. Serve with mint jelly.