
Autumn’s bounty is vibrant, varied, and delicious. Apples of all varieties are now available at farmers’ markets and supermarkets, including crunchy, sweet Honeycrisp, gorgeous Galas, MacIntosh mottled with both green and red, pale yellow Ginger Golds, and dark, dusky Paula Reds.
Apples are the perfect snack, satisfying and sweet. Try slicing an apple, place the slices in a plastic baggie, sprinkle liberally with cinnamon, close the bag, and shake until the slices are well coated with cinnamon. The apple slices will stay crisp and white for several days in the refrigerator. Perfect for grab and go school lunches, picnics or work from home snack breaks.
A versatile cooking ingredient, apples go well with both sweet and savory components. Combing apples with plums, cranberries, figs, raspberries or blueberries will yield particularly pleasing desserts, such as pies, puddings, tarts, cobblers, and crisps. Whether baked, poached or sautéed, apples lend marvelous layers of flavor to breads, sauces, slaws, salads, stuffing, coleslaw, chutney, and relishes.
As the weather turns cooler, what could be more comforting than the scent of apples roasting in the oven, mingling with spicy cinnamon. Apples enjoy an easy association with all manner of spices, including allspice, cloves, ginger, and nutmeg.
©Tiny New York Kitchen © 2020 All Rights Reserved

Hungry for halibut or craving clams? There’s an easy way to prepare fish and seafood to perfections. Fish is ready when you can flake it easily with a fork. Shrimp and shellfish are done when they are opaque in color.
Bake: Best for fish fillets. Baking or roasting fish is an easy, hands-off method, especially good if you have a crowd to feed. As with any fish cooking technique, follow the recipe to avoid overcooking.
Wrap: Best for any fish fillet and shellfish. Cooking fish in foil is one of the most versatile ways to prepare fish, resulting in moist, flavor-packed dishes. And because you can load up on tasty ingredients, like herbs, citrus and spices, it’s a great way to cut back on fat and sodium without sacrificing flavor. Plus, cleanup is a breeze.
Poach: Best for any fish fillet and shellfish. Poaching simply means gently cooking the fish in liquid, such as water, broth, beer, or wine. It ads subtle flavor without drying out the fillets or adding any extra fat. To poach, simply cover the fish or seafood with liquid and bring to a simmer, just don’t let the liquid boil. You’ll only need a few minutes for your fish or seafood to be ready. You can also use the poaching liquid as a base for a sauce when you’re done.
Broil: Best for thick and meaty fish fillets, shrimp, and lobster tails. This method is especially good when you want to quickly bake fish and seafood. This is also a good method when you don’t have access to a grill or you’re adding a glaze. To make sure it doesn’t cook or brown too quickly, cook the fish at least 6 inches away from the broiler and watch carefully.
Steam: Best for clams and mussels. The traditional cooking method for clams and mussels, steaming is an easy way to add delicate flavor quickly without overcooking. Just add the seafood to a lidded saucepan with a little liquid like beer, wine, or broth, cover and bring to a simmer until the shells open up. Discard any that don’t open. You can also steam lobster, but it’s worth checking to see if your store’s fish department will steam lobsters for you.
Sear: Best for scallops, shrimp, and fish fillets. Use this cooking method for fish with a crisp, browned crust and a tender interior. Use a non-stick pan if possible and add a little oil before adding your fish, in batches if necessary, Don’t crowd the pan. Cook without stirring or turning for 2 to 3 minutes to brown the fish and crisp up any breading.
Grill: Best for any fish fillet or shellfish. Once grilling season rolls around don’t forget to add fish, shrimp, and even clams and mussels to your summer menus. Fish fillets take well to grilling and are easy to flip. Use a grilling basket for anything that might slip through the grate. Don’t forget skewers, which are the perfect way to grill shrimp.
“Work With What You Got!”
©Tiny New York Kitchen © 2020 All Rights Reserved

To flavor your food reach for herbs and spices rather than high-sodium table salt. Make sure to read the labels of seasoning mixes because many of them contain salt.
Seasoning Suggestions
Pasta: Basil, Fennel, Garlic, Paprika, Parsley, Sage
Potatoes: Chives, Garlic, Paprika, Parsley, Rosemary
Rice: Cumin, Marjoram, Parsley, Saffron, Tarragon, Thyme, Turmeric
Seafood: Chervil, Dill, Fennel, Tarragon, Parsley
Vegetables: Basil, Caraway, Chives, Dill, Marjoram, Mint, Nutmeg, Oregano, Paprika, Rosemary, Savory, Tarragon, Thyme
“Work With What You Got!”
©Tiny New York Kitchen © 2019 All Rights Reserved

Now that the colder weather is here and you’ve put away your beach towel it’s time to winterize your cocktails. One way to achieve this is by using amari, the rich, bitter, herbal European-style liqueurs-before–dinner aperitifs and after-dinner digestifs-that have become more popular and widely available. Amari can add structure and backbone to cocktails and is often the secret behind some of the most iconic classic drinks. Amaro is perfect for colder months, to pair with flavors like honey, citrus, and spices. Adding it is like seasoning food because it enhances flavors and gives the drink more character.
This season bartenders are combining them with brown spirits like dark rum, bourbon, rye, and Scotch for autumn and winter drinks. You could make a variation on the Brooklyn cocktail with bourbon, amaro, maraschino liqueur, dry vermouth, blood orange liqueur, and bitters.
Some add amaro and bourbon to mulled wine or change up that Irish Coffee by using single-malt whiskey, two kinds of amaro, coffee, simple syrup, and topped with whipped cream. Change up the Negroni by keeping the gin, but replacing the Campari with amari and adding amontillado sherry.
Be inventive and try adding amari to your holiday cocktails. You may just create a new classic.
“Work With What You Got!”
©Tiny New York Kitchen © 2018 All Rights Reserved

Let’s face it; most of us eat way too much salt. A high-sodium diet can increase risk of high blood pressure (hypertension), which can lead to cardiovascular and kidney disease. The Dietary Guidelines for Americans recommend limiting sodium intake to less than 2,300 mg per day, which is about 1 teaspoon of salt. The good news is that reducing the amount of salt you use will retrain your taste buds to sense other flavors. You won’t even miss it.
Bland food is such a bore, but how can we keep sodium in check without sacrificing flavor?
Here are some suggestions to reduce salt in your diet:
Remove the salt shaker from the table when you eat.
Limit process foods, including cured, pickled, salted, or brined products.
Focus on fresh or frozen fruits and vegetables without sauces or seasonings.
When choosing canned options, look for “no salt added” or “low sodium.”
Cook at home so you have control over how much salt you add.
Flavored vinegar, onions, garlic, and citrus also add tons of flavor without the sodium.
Herbs and spices are the key to flavor. Add dried varieties during cooking and fresh herbs at the end of cooking or when plating a dish. Thyme, mint, lemongrass, dill, basil, oregano, chives, and parsley are great herbs to use. Spices like pepper, ginger, chili powder, and cinnamon are excellent spices to flavor your food.
“Work With What You Got!”
©Tiny New York Kitchen © 2018 All Rights Reserved

Cut Into Pieces (like you would broccoli)
Steam
Add 1 to 2 Tablespoons, Butter, Ghee or Clarified Butter
Add 1 Tablespoon Spice Mixture Of Your Choice
OR
Preheat Oven to 425 degrees. Line Baking Sheet With Parchment Paper
Scatter Pieces Onto Baking Sheet
Drizzle With Olive Oil
Season With Kosher Salt & Pepper
Place In Oven 15 to 20 Minutes Until Tender
“Work With What You Got!”
©Tiny New York Kitchen © 2018 All Rights Reserved

The turkey came originally from America and was first domesticated by the Aztecs in Mexico. The Spanish introduced turkeys into Europe and they soon became a popular choice in France, Italy and Britain.
When early settlers from Britain, France and Holland crossed the Atlantic to North America, the vast flocks of turkey that roamed wild provided them with sustenance. They were plentiful and so easy to trap or shoot that the older children of the family were given the responsibility of catching them. The Native Americans meanwhile taught the new settlers the rudiments of farming, and in November 1621, on the first anniversary of their arrival, the Pilgrims entertained the locals to a feast, at the center of which was the turkey. Ever since, this has been the traditional bird served at Thanksgiving.
Turkeys are available fresh, chilled, or frozen all year round. When buying a whole bird, look for a plump well-rounded breast and legs and clear, soft and evenly colored skin. Avoid birds that are bruised, with blemishes or torn skin or any that have been badly or unevenly plucked. Turkeys vary enormously in weight.
When you’re ready to purchase your turkey it’s easy to get confused on what size to get. A good guild to go by is to figure approximately 1 1/4 pounds per person. This makes enough for the meal and provides a decent amount of leftovers.
To store your turkey place it in a large, deep dish and cover it completely with plastic wrap. Store it in the coolest part of the refrigerator; making sure that it does not come in contact with other foods.
Thaw a frozen turkey in the refrigerator for 2 to 4 days. Estimate 24 hours for every 5 pounds, so 2 days for a 10 pounder, 3 days for a 15 pounder, etc.
And then there is always the frozen turkey emergency that goes like this, “Help, help, it’s Wednesday, and my turkey is still frozen!!!” It’s been a long time, but I’ve been in this predicament. What you do is leave the turkey in its wrapper and put it in a large-size container. A lobster pot works well. Fill the container with cold tap water and let it sit for 30 minutes. Dump out the water and refill. Let it sit another 30 minutes. Repeat until the turkey is thawed, then roast immediately or transfer to the refrigerator.
The good news is that you can brine or dry cure your turkey while it defrosts in the refrigerator. What a Godsend that is! Use a lighter brine solution, which is about 1/2 cup kosher salt per gallon of water, plus sugar and spices). If you’re dry curing, use the standard recipe. You’re turkey should stay below 40 degrees while brining. You don’t need to brine or cure a kosher or butterball type supermarket frozen turkey. These come pre-brined. If you want to be able to put your own flavor stamp on your meal, then get a natural or untreated bird and do it yourself. If you plan on brining for 2 days use the weaker solution that I just mentioned. If you plan to brine for 24 hours or less, then bump it up to 1 cup kosher salt per gallon of water. Then add an equal amount of sugar. I don’t always brine, but when I do I’ve been known to throw an assortment of flavorings in the brine. Flavorings that you could add to your brine could be: apples, lemons, oranges, onions, garlic, shallots, peppercorns, bay leaves, cinnamon sticks, cloves, allspice berries, juniper berries, mustard seeds, fennel seeds, coriander seeds, rosemary, sage, thyme, savory, parsley, or oregano. You can also replace half the water with sweet cider, hard cider, vegetable stock, turkey stock, chicken stock, beer, white wine, or red wine. If you want to dry cure then use about 1/2 teaspoon kosher salt for every pound of turkey. Then add spices to your taste.
Stuffing your turkey is a personal preference. I always stuff the bird because I love how it tastes when cooked inside the turkey. It does slow down the cooking process, however. Never stuff the turkey in advance of cooking. The stuffing can be made in advance, but the turkey should not be stuffed until just before it is placed in the oven. Weigh the stuffing and add this to the weight of the bird before calculating the cooking time. Thoroughly rinse the body cavity of the bird under cold running water, and then drain it well. Wipe the turkey, inside and out, with paper towels. Press the stuffing inside the shallow neck cavity. Make sure not to pack it in too tightly. Turn the bird over and pull the neck skin over the stuffing. Now it’s time for a little turkey bondage and truss the bird (tuck the wing tips under the breast and tie the legs together) and then cook for the calculated time. Never shorten the cooking time because although the meat may appear cooked, extra time must be allowed for cooking the stuffing thoroughly.
If you choose not to stuff your turkey then place aromatics in the body cavity of the bird. Cut a large onion in half and stud each half with 4 to 6 cloves. Place this in the body cavity of the bird. Cut an orange and a lemon into quarters and add these, together with 3 or 4 bay leaves, 4 to 6 fresh sage sprigs, and 2 to 3 fresh thyme sprigs. Add 1 cinnamon stick or 1 blade of mace for a festive hint of warm spice.
Turkeys are super easy to roast, but require a little more attention than smaller birds. Check to make sure the oven shelves are in the correct position before heating the oven. Preheat the oven to 350 degrees. Place the prepared bird on a rack in a large-size roasting pan. Smear the turkey breast generously with butter, season with salt & pepper and place in the oven. Baste the turkey from time to time during cooking. When the breast has browned, cover with foil to protect it and continue cooking. Remove the covering foil for the final 20 minutes of cooking. To check if the meat is cooked, insert a skewer into the thickest part of the thigh. If the juices run clear and the meat is white, it is cooked. If the juices are pink and the meat is soft and pink, the turkey is not ready. Return it to the oven and check again after 20 minutes. Cooking times will differ depending on whether your bird was purchased fresh or frozen. Plan on 20 minutes per pound in a 350 degree oven for a defrosted turkey and 10 to 15 minutes per pound for fresh. Remember to add more time if you’re turkey is stuffed. You should have an instant-read thermometer in your kitchen drawer. Insert the thermometer into the breast (all the way to the bone) and if it reads 160 degrees you’re good to go. You may also measure the thigh by inserting the thermometer into the thickest part, but not touching the bone, and it should read 165 degrees.
Remove the turkey from the oven and cover it closely with foil. Leave it to rest for at least 30 minutes. This will even out the temperature and make it easier to carve. I know some chefs who let it rest for 2 hours, but I don’t think that one needs to wait that long. If you wish to make gravy in the roasting pan, transfer the bird to a carving plate.
When you’ve let your bird rest awhile remove the trussing string. Hold the bird steady in position with a carving fork. Cut off the legs, then cut these in half or carve the meat from the bones. Make a horizontal cut across the breast above the wing. Carve neat and even vertical slices off the breast. Repeat on the other side of the bird. Arrange slices on a warmed platter. Add the turkey legs or sliced meat to the platter or set them aside for serving separately. Scoop out the stuffing and serve with the meat.
“Work With What You Got!”
© Victoria Hart Glavin Tiny New York Kitchen © 2016 All Rights Reserved

Saffron
Highly prized as a dye, medication and culinary spice since Greek and Roman times, saffron is the stigma of a type of crocus, Crocus sativus, which was once grown all over Europe, including in England. It has a distinctive and lasting aroma, and a pleasant pungency if used sparingly. Because of its striking color, as well as its distinctive flavor, saffron is frequently added to celebration dishes; for example, pilaus from India, Spanish paella and Italian risotto Milanese. Bouillabaisse, the famous French fish and shellfish soup-stew, is flavored with saffron. The spice is also widely used in sweet recipes, including milky rice and sweet custard-like desserts. Baked goods flavored with saffron include breads and cakes.
Saffron threads can be infused (steeped) in a little warm water or milk until the color of the liquid is even. Add the liquid and the threads to the dish, usually towards the end of the cooking process. Saffron powder can be added to food without soaking, but not to hot oil.
“Work With What You Got!”
© Victoria Hart Glavin Tiny New York Kitchen © 2016 All Rights Reserved

Red Split Lentils
The lentil is one of our oldest foods and a staple in many countries around the world. It originated in Asia and North Africa, and continues to be cultivated in those regions, as well as in France and Italy. Lentils are hard even when fresh, so they are always sold dried.
Lentils are a good source of complex carbohydrates and plant protein. They also contain a range of vitamins and essential minerals, including iron, selenium, folate, manganese, zinc, phosphorus and some B vitamins.
Orange-colored red split lentils, sometimes known as Egyptian lentils, are the most familiar variety. They cook relatively quickly, in just 20 to 30 minutes, eventually disintegrating into a wonderful thick, rich purée. They are ideal for thickening soups and casseroles. When cooked with spices, garlic, and onions they make a hot and delicious dhal, a richly flavored purée served as an accompaniment to meat or vegetable curries. In the Middle East, red or yellow lentils are cooked and mixed with spices and vegetables to form balls known as kofte, which are then fried.
“Work With What You Got!”
© Victoria Hart Glavin Tiny New York Kitchen © 2016 All Rights Reserved
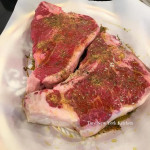
Now That I Have These Beautiful Butcher Shop Steaks I Am About To Put Them On The Grill. Before I Grill Them, However, I Let Them Sit Out For 1 Hour On A Platter So That They Come To Room Temperature. I Drizzle Them With Olive Oil And Sprinkle With A Favorite All-Purpose Spice Mixture That I Created. These Are Thick Steaks So They’ll Cook On The Grill 7 To 10 Minutes Per Side.
“Work With What You Got!”
© Victoria Hart Glavin Tiny New York Kitchen © 2016 All Rights Reserved


