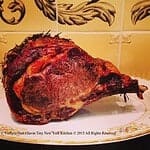
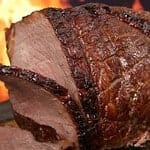
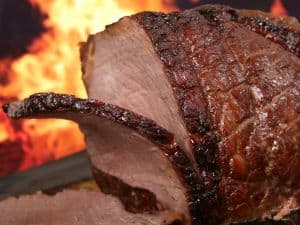
Standing Beef Rib Roast
How Much To Buy: A 54 to 5 Pound Roast Serves 8 to 10
Keep meat at room temperature for an hour or so. Preheat oven to 450 degrees. Rub roast with lots of olive oil, cracked peppercorns, minced garlic, kosher salt, and 2 tablespoons of an herb or spice rub, if desired. Place roast meat-side down in a roasting pan and cook 30 minutes. Reduce heat to 425 degrees. Continue roasting for about 3 minutes per pound. Turn oven back up to 450 degrees and roast another 15 minutes, or until meat thermometer reaches 125 degrees for rare, 140 degrees for medium-rare or 160 degrees for well-done. Remove from oven and let rest 15 minutes. Skin fat from juices, and pour some dry red wine into the pan with the drippings. Over a low heat, stir wine, scraping up any browned bits on bottom of pan. Serve over roast as a sauce.
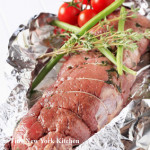
Roasted Beef Tenderloin
How Much To Buy: A 4 to 5 Pound Tenderloin Serves 8
Position oven rack in center. Preheat oven to 425 degrees. Lightly oil a roasting pan. Mix 2 tablespoons olive oil, 1 tablespoon minced garlic, 2 teaspoons each of rosemary and thyme, and kosher salt and freshly ground pepper to taste. Rub over entire surface of meat. Place meat into roasting pan and cook until thermometer inserted into thickest part of the roast reads 125 degrees for rare, 140 degrees for medium-rare or 160 degrees for well-done. This should take 35 to 55 minutes. You may baste with pan juices halfway through cooking, if desired. Remove from oven. Let rest 15 minutes and serve.
“Work With What You Got!”
© Victoria Hart Glavin Tiny New York Kitchen © 2017 All Rights Reserved

Pantry & Freezer Staples
How long do pantry and freezer staples last? Staple items are known for their long shelf life, but they don’t stay fresh forever! Use this handy list to determine how long you should keep them on hand.
Freezer
Hamburger & Stew Meats: Shelf Life: 1 to 2 Days Storage: 3 to 4 Months
Ground Turkey, Veal, Pork, Lamb: Shelf Life: 1 to 2 Days Storage: 3 to 4 Months
Bacon: Shelf Life: 7 Days Storage: 1 Month
Sausage (Raw From Pork, Beef, Chicken or Turkey): Shelf Life: 1 to 2 Days Storage: 1 to 2 Months
Fresh Steaks: Shelf Life: 3 to 5 Days Storage: 6 to 12 Months
Fresh Roasts: Shelf Life: 3 to 5 Days Storage: 4 to 12 Months
Chicken or Turkey (Whole): Shelf Life: 1 to 2 Days Storage: 1 Year
Chicken or Turkey (Cut Up): Shelf Life: 1 to 2 Days Storage: 9 Months
Lean Fish: Shelf Life: 1 to 2 Days Storage: 6 Months
Fatty Fish: Shelf Life: 1 to 2 Days Storage: 2 to 3 Months
Fresh Shrimp, Scallops, Crawfish, Squid: Shelf Life: 1 to 2 Days Storage 3 to 6 Months
Pantry
Baking Powder: Shelf Life: 18 Months Storage: Keep In Dry Place In Airtight Container
Beans (Dried & Uncooked): Shelf Life: 1 Year Storage: Store In Cool & Dry Place
Chocolate (Semisweet & Unsweetened): Shelf Life: 18 Months Storage: Keep In Cool Place
Cocoa: Shelf Life: 1 Year Storage: Keep In Cool Place
Cornstarch: Shelf Life: 18 Months Storage: Store In Airtight Container
Flour (White or Whole Wheat): Shelf Life: 6 to 8 Months Storage: Store In Airtight Container or Freeze To Extend Shelf Life
Nuts (In Shell & Unopened): Shelf Life: 4 Months Storage: Freeze to Extend Shelf Life
Spices & Herbs (Ground): Shelf Life: 6 Months Storage: Store in Airtight Containers In Dry Areas Away From Sunlight & Heat. Before Using, Check Aroma – If Faint Replace.
Sugar (Brown): Shelf Life: 4 Months Storage: Store in Airtight Container
Sugar (Confectioners’): Shelf Life: 18 Months Storage: Store in Airtight Container
Sugar (Granulated): Shelf Life: 2 Years Storage: Store in Airtight Container
Vinegar (Unopened): Shelf Life: 2 Years
“Work With What You Got!”
© Victoria Hart Glavin Tiny New York Kitchen © 2016 All Rights Reserved
Now that the weather has begun to get cooler it’s time for roasts. Standing rib roast is my all-time favorite minus the price tag.
So easy to make, too. Turn oven to roast at 350 degrees. Thyme and basil on top along with garlic and olive oil. Place uncovered in oven until it’s how you like to eat it. Remember to let it stand for a bit when removed from the oven as it will continue to cook while it’s resting.
“Work With What You Got!”
© Victoria Hart Glavin Tiny New York Kitchen © 2015 All Rights Reserved

 Constitution Week – Foods of Our Forefathers Part III
The abundance of meat in America was a major change in the diet of the early settlers. Rabbits and squirrels were available year-round nearly everywhere, plus deer and other large game in many regions. As settlers moved west, buffalo gained importance in the diet. Fish, shellfish and wild fowl became common food, and they were all essentially “free.” The existence of these various forms of game was a literal life saver in times of uncertain crops and unbroken land. The game gradually diminished, of course, as the population expanded and settlers pushed west, but it provided a large share of the diet in early and frontier days.
Ham, of course, appeared on almost every settler’s table, rich or poor. It might be the only meat served at a meal or it might appear in company with more exotic roasts and fowl, but it was always there – breakfast, dinner and supper.
Corn was also a staple of the colonists, either fresh in summer, or as hominy or corn meal all year. Corn was also put to another use by an early Virginian, Captain George Thorpe, who may have been the first food technologist in America as he invented Bourbon whiskey shortly before he was massacred by the Indians in 1622.
Meal patterns for working people in rural early America were very different from those common today. Breakfast was usually early and light which consisted of bread, hominy grits, and sometimes fruit in season. Coffee, which was a new beverage at the time, was popular that is if it was available. A drink made from caramelized grain was sometimes substituted. Chicory was popular in the South, either alone or used to stretch the coffee. Tea was often made from local leaves such as sage, raspberry or dittany. Alcohol in some form was often served.
Breakfast in more elegant homes or large plantations might be later in the morning, and include thinly sliced roast and ham.
Dinner was served somewhere between midday and midafternoon, depending on the family’s circumstances, and was the big meal of the day. There was almost always ham, as well as greens (called sallat), cabbage and other vegetables. In the proper season, special dainties would appear – fresh fruits and berries, or fresh meat at appropriate butchering times.
Desserts could be simple such as a scooped out pumpkin, baked until done and then filled with milk, to be eaten right out of the shell. Or dessert could be more complex such as ice cream or other fruit flavored frozen pudding or a blanc mange. Blanc mange was prepared from milk and loaf sugar, flavored with a tablespoon or two of rosewater, thickened with a solution of isinglass (derived from fish bladder, soaked overnight in boiling water). This mixture was boiled for 15 to 20 minutes, then poured into molds to set.
If isinglass was not available (most was imported from England), homemade calves foot jelly could be substituted, but eh dessert was not as fine.
Various alcoholic beverages, including wines, applejack, “perry” (hard cider made from pears), or beer were commonly consumed.
In winter, peaches and other fruit disappeared from the dinner table, to be replaced by dishes made from stored apples and dried fruit of various sorts. Soups or broths also took their place. Milk grew scarce as cows “dried up” in the short days. Vegetables gradually decreased in variety as stored crops wilted.
Apples quickly became a staple in early America. Orchards were easy to start, required a minimum of care, and apples stored well. Housewives devised a multitude of “receipts,” including sauces and butters for off-season, as well as many using dried apples.
Supper was late and a light bread and butter, some of the left-over roast from dinner, fruit (fresh if in season, pickled and spiced otherwise), and coffee or tea.
To Be Continued…
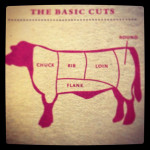

Beef
Just what is dry-aged beef? Dry-aged beef has been stored for 14 to 21 days in a humidity and temperature-controlled environment. Dry aging allows moisture to evaporate and enzymes to break down some of the meat’s fibers. Dry aging intensifies the flavor and creates a tender texture that some describe as buttery or velvety. Only the most valued cuts are used to produce this special product. Dry-aged steaks may cook a little faster than the same non-dry aged-cut but the target doneness temperatures are the same.
Ground meat requires special handling. Whether it is beef, poultry, pork, lamb or veal, ground meat carries the greatest potential risk of food-bourne illness. It should be thoroughly cooked before eating because the grinding process introduces potentially harmful bacteria throughout the meat. The USDA recommends cooking ground meats to a internal temperature of at least 165° F for poultry and 160° F for meat.
One reason that beef raised without artificially stimulating growth hormones costs more is because it takes longer to raise. It takes approximately 20 to 24 months vs. about 16 months, which incurs more feed expense. You should look for grass-fed beef that has been raised on a vegetarian diet (not corn), not confined, pastured raised and no antibiotics or hormones added ever.
The best value beef cuts are: Ground Beef, Skirt Steak, Chuck Roast, Chuck Steak, Top Sirloin, Cube Steak, and Stew Meat.
Cooking Time Estimate For Roasting: Depending on the cut, should be about 20 minutes per pound at 350° F for medium.
Best Cooking Methods For Steak:
Rib Steak (Rib) Grill & Pan-Fry
Filet Mignon (Loin) Broil, Grill, Pan-Fry, Sauté
Porterhouse (Loin) Broil, Grill, Pan-Fry
T-Bone (Loin) Broil, Grill, Pan-Fry, Sauté
Strip Steak (Loin) Broil, Grill, Pan-Fry, Sauté
Top Sirloin (Loin) Braise, Broil, Roast, Pan-Fry
Hanger (Flank) Braise, Broil, Grill, Pan-Fry
Flank (Flank) Braise, Grill
Skirt (Flank) Braise, Grill
Chuck Eye Steak (Chuck) Braise, Broil, Grill, Sauté, Stew
Flat Iron Steak (Chuck) Broil, Grill, Pan-Fry, Sauté
Bottom Round Steak (Round) Braise
Eye Round Steak (Round) Braise, Sauté
Beef Round Cube Steak (Round) Braise, Grill, Sauté
Top Round Steak (Round) Braise, Broil
London Broil (Varies) Braise, Broil, Grill, Roast
Best Cooking Methods For Beef Roasts & Smaller Cuts:
Rib Roast Bone-In (Rib) Roast
Rib Eye Roast (Rib) Grill, Roast
Tenderloin (Loin) Broil, Grill, Roast
Top Sirloin Roast (Loin) Roast
Tri-Tip Roast (Loin) Broil, Grill, Roast
Fresh Brisket (Plate) Braise, Stew
Flat Cut Corned Brisket (Plate) Braise
Shoulder Roast (Chuck) Braise, Stew
Chuck Roast (Chuck) Braise, Stew
Bottom Round Roast (Round) Braise, Roast, Stew
Eye Round Roast (Round) Braise, Roast, Stew
Sirloin Tip Roast (Round) Broil, Grill, Pan-Fry, Sauté
Short Ribs (Flank) Braise, Stew
Beef Kabobs (Variety) Broil, Grill, Sauté
Extra Lean Round Cubes (Round) Grill, Stew
Shank Bone-In (Round) Braise, Stew
Beef Liver Slices (Variety) Sauté
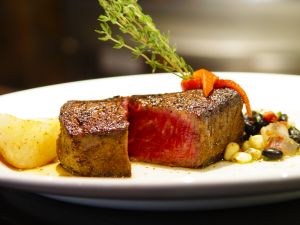
Target Temperatures:
The USDA recommends cooking all whole muscle cuts of beef to at least these internal temperatures to ensure that potentially harmful bacteria are destroyed. Some people may choose to cook their meat to lower temperatures, depending on preference. Ground beef should be cooked to 160° F.
Desired Doneness: Medium Target Temp: 145° F
Texture: Warm/Firm Center Color: Light Pink
Desired Doneness: Medium Well Target Temp: 155° F
Texture: Very Warm/Firm Center Color: Gray, Tinged With Pink
Desired Doneness: Well Done Target Temp: 165° F
Texture: Hot/Dense/Hard Center Color: Grayish Tan
Residual Heat: Residual heat continues to cook meat after you’ve taken it off the grill or out of the oven or pan. It’s important to factor this rise in temperature into your timing and remove the meat from the heat before hitting the target temperatures above – an average of 5° for steaks up to 15° for large roasts.
Roasts
We all know to let steaks rest after cooking, but it’s even more important for larger pieces of meat. The juices need time to settle and resting lets the internal temperature of meat continue to rise. The larger the cut the more it rises which is why it should get pulled out of the oven before it reaches the desired temperature. If you want your beef tenderloin medium-rare (125° F) then take it out of the oven once the internal temperature (use a meat thermometer) hits 120° F. Don’t worry about the meat getting cold. An eight pound or larger roast will stay warm for up to 1 hour tented with foil.
For fast and even cooking a roast needs to sit at room temperature before it goes into the oven. Taking it out of the refrigerator well ahead of cooking allows the temperature of the interior to come closer to that of the exterior which will cook into beautiful pink meat throughout the finished roast. Allot at least 2 hours for a small roast to warm up and no more than 2 hours for a larger one. Any longer than 4 hours is a bit iffy in, the safe department. Only when the roast is at room temperature is it ready to go into a hot oven.


