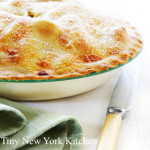
There are four versions of classic pie dough. 1. All butter dough has excellent flavor, but can be tricky to use. 2. Butter and shortening dough is flakier and more tender. It browns slightly faster than all butter dough, but has less shrinkage and holds its shape better during baking. 3. Lard pie dough creates the flakiest, crispiest, and most tender dough of all, but the flavor is fairly bland. This dough also has the least amount of shrinkage when it bakes and it browns more slowly. 4. Butter and lard dough has superb flavor and texture. The ratio of butter to lard or butter to shortening varies from recipe to recipe, but most call for half butter, half alternative fat.
Starting with cold ingredients are key to a flaky crust. Using ice water and cold fat (butter or shortening) is important. Chill the dough for about an hour before rolling to help prevent sticking. When the pie crust goes in the oven, the cold shortening will stay solid long enough for the crust to set, creating small pockets in between the layers of dough as it melts resulting in a flaky crust.
Minimal handling is very important in helping to achieve a tender crust. Handle the dough just enough to mix it and roll it. Proper rolling is another way to avoid excess handling. Roll the dough from the center out, lifting the rolling pin after each roll.
To avoid soggy bottom crust in your fruit pie, get the filling into the piecrust and into the oven quickly. Drain off any excess juice in the bowl before pouring it into the piecrust.
For double crust fruit pies, cut slits in the top crust to allow steam to get out. The escaping moisture will help prevent soggy crusts.
Bake your pie in the lower third of the oven since this will allow the bottom crust to become crisp while the top shouldn’t get overly browned.
To cut down on the sugar in fruit pies, mix in a teaspoon or two of baking soda to the fruit before adding any sweetener. Then start out with adding 1/4 to 1/2 the amount of sugar that you normally would. The baking soda neutralizes the acid in the fruit, which means that it needs much less sweetening.
Allow the pie to cool 2 to 4 hours on a rack to room temperature or until barely warm, before slicing to ensure that the filling is set and will not run.
Slice apples thinly for apple pie. Thick slices promote air space and create a gap between the fruit and the crust and this may lead to a soggy crust.
Cornstarch is a good thickener to use with fruit to make a filling because it does not impart its own flavor and yields the smoothest texture. It also does not thin when reheating a slice of pie.
To enjoy fresh apple pie during the winter, freeze your prepared pie filling. Just cut up and slice your apples and toss them with whatever seasonings and thickener you normally put in your pie filling. Then freeze in a greased pie pan and when the apples are hard, lift them out and wrap for long-term freezing. When you want to enjoy an apple pie, all you have to do is place the ready-frozen pie filling in a crust and bake according to the recipe.
Baking a pie with a raw fruit filling will take a little longer than one with pre-cooked filling, about an hour longer. When using a pre-cooked filling, pies bake at a higher temperature for a shorter period of time, just enough to thoroughly bake the crust and heat the filling.
“Work With What You Got!”
© Victoria Hart Glavin Tiny New York Kitchen © 2016 All Rights Reserve

I love to bake all year long, but during the holidays I’m on “baking overdrive.” To make better cakes here are some simple tips to help you with the best outcome possible.
Don’t use cold eggs. The eggs really should be at room temperature, otherwise the mixture won’t emulsify properly. If you’re short on time place eggs in a bowl of warm water for 15 minutes.
Make sure to measure all ingredients precisely. Baking is an art form, but also a science.
Position pans as close to the center of the oven as possible. If you’re placing more than one pan in the oven, they should not touch each other or the oven walls. If your oven isn’t wide enough to put pans side by side, place them on different racks.
If a recipe calls for 1 cup of sifted flour, then first sift the flour and then measure it. If it calls for 1 cup flour sifted, measure the flour, then sift it. It may seem subtle, but it can make the difference between a light, fluffy cake and a heavy one.
Allow at least 20 minutes for your oven to preheat. It’s best to turn the oven on before you start working on your recipe.
Avoid opening the oven door. Opening the oven door too often can make a cake fall, so use the window in your oven door to check the cake’s process when possible.
Remember that each oven heats differently. Check for doneness 10 minutes before the recipe suggests. For most recipes, a cake is ready when it starts pulling away from the sides of the pan and a toothpick inserted in the center comes out clean.
Invest in wire cooling racks. Cakes cool faster and don’t get soggy when set out on a rack. Leave them in the pans for 10 to 15 minutes before unmolding, and then place on a rack to cool completely before frosting. Angel, chiffon and sponge cakes should be left in the pan to cool to prevent collapsing.
Unfrosted cakes can be stored, well wrapped in plastic, at room temperature for 24 hours. If storing unfrosted cakes for more than 24 hours, it is best to freeze them rather than refrigerate them. Wrap the layers in plastic wrap and then heavy-duty foil to freeze, let cake thaw in the refrigerator before frosting.
To store frosted cakes, keep at room temperature under a cake dome or large bowl unless the recipe specifies refrigeration.
For smooth and easy cake removal, prep your pans properly. When a recipe calls for greasing and flouring, place a piece of parchment or waxed paper on the bottom of a pan (trace and cut it to fit). Coat the sides and bottom with softened butter, and then dust with flour, turning the pan on its side to get full coverage and tapping out the excess. For chocolate cakes, swap in cocoa powder for flour.
Angel, chiffon, and sponge cakes should go into clean, untreated pans since they need to adhere to the sides in order to rise properly.
Happy Baking!
“Work With What You Got!”
© Victoria Hart Glavin Tiny New York Kitchen © 2016 All Rights Reserve
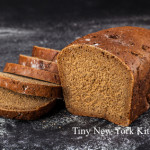
Along with wheat, rye is the other cereal that is widely used to make bread. It is extremely hardy and does well in climates that are too inhospitable to grow wheat. Because of this, rye is a very popular grain for bread making in eastern and northern Europe. There are a countless number of different loaves and the use of rye flour gives them a unique characteristic and tangy flavor.
Kastenbrots are the familiar box-shaped rye breads, and the name actually translates as box bread. The bread is steam-baked for some 20 hours in an enclosed pan, which results in a dense and heavy loaf that is both moist and crumbly with a chewy texture. It has a sour flavor, but with a certain sweet and malty overtone. They are best eaten with strong tasting foods and malty types of drinks such as beer. Among the best-known varieties is pumpernickel, the darkest of the rye breads, vollkornbrot, another strongly flavored rye bread, and roggenbrot.
Weisenkeimbrot, another variety that translates as wheat germ bread, and is made using the wheat germ along with rye grain.
Sonnenblumenbrot is made using a small proportion of wheat flour along with the rye meal and has a distinctive sharp flavor of rye.
Krustenbrot is the popular square rye bread from Germany and is a crusty-style loaf. It is often just known as German rye, but unlike other rye breads it has a pleasant, gentle flavor, owing partly to use of a blend of rye and wheat flours.
Rossisky is made from a sourdough starter, using 100 percent rye flour. It has a distinctive, yet pleasant flavor and is one of the most delicious of all Russian breads.
Borodinsky is another classic Russian bread and is flavored with crushed coriander seeds. It can be made entirely with dark rye or with a blend of rye and wheat meal. Barley meal is also often used, giving an earthy flavor, while buttermilk or yogurt is occasionally added, both of which enhance the naturally tangy sourdough flavor.
Russian Black Bread is a substantial looking loaf flavored with molasses. It is usually made with an equal blend of rye and wheat flour and has a pleasant sweet and sour flavor that is characteristic of many rye breads. The combination of molasses and rye give it a wonderfully dark and moist crumb.
“Work With What You Got!”
© Victoria Hart Glavin Tiny New York Kitchen © 2016 All Rights Reserved

Cannellini beans, which are widely used in Italian cooking, actually originate from Argentina.
These creamy white Italian beans are slightly larger and fatter than the white haricot beans and are more like a kidney in shape. They are related to the larger French Soissons and, like them, have a fluffy texture when cooked. They are a popular addition to classic minestrone and a variety of other soups. Cannellini beans are an essential ingredient for tonno e fagioli (tuna and bean salad) and Florentine fagioli all’uccelletto, where the beans are stewed with sage, tomatoes, and garlic. They are also delicious cooked with olive oil, onion ring slices, garlic, and parsley.
I prefer to cook with dried beans rather than canned beans. I do keep a few cans of beans in my pantry, however, as they’re useful in short notice circumstances. When you purchase canned beans make sure that the ingredients do not include sugar or salt.
To cook Cannellini Beans: Sort and rinse 3/4 cup Cannellini Beans. Place in a medium-size pot with 3 cups water. Cover and bring to a boil. Reduce heat to a medium-low and cook 60 to 90 minutes until beans are soft. Add more water as needed while cooking to keep beans covered. Makes about 2 cups/4 servings.
To reduce cooking time, soak beans in water overnight in the refrigerator. Drain and throw away soaking water before proceeding.
“Work With What You Got!”
© Victoria Hart Glavin Tiny New York Kitchen © 2016 All Rights Reserved

Bread can be either leavened or unleavened. Leavened breads are made with rising agents, like yeast or baking powder, which allows the dough to release gases and expand. Unleavened bread contains no yeast, baking soda, baking powder or other leavening agents that allows dough to rise.
Leavened and unleavened bread are nutritionally similar.
It is generally, not a good idea to refrigerate bread. Although bread will last longer when refrigerated, it tends to dry out faster and to lose its soft texture.
As a general rule, bread should be kept in a somewhat air-tight and dry container or area.
Hot bread should not be put in a sealed container until it cools since the steam will cause dampness, which in turn can cause mold to grow more rapidly.
Storing bread on top of the refrigerator is not recommended. Refrigerator tops are usually very warm and this could either cause your bread to dry out more rapidly or cause condensation in the bag.
“Work With What You Got!”
© Victoria Hart Glavin Tiny New York Kitchen © 2016 All Rights Reserved

December is here and is cookie-baking heaven. Here are some basic tips to make a better cookie.
Split the dough. Work with half of the cookie dough at a time when rolling and cutting cookies. Too much handling of the dough makes cookies tough.
Keep the other half refrigerated since chilled dough is easier to handle.
Bake cookies on flat, shiny, heavy aluminum, baking sheets. These baking sheets with no sides are designed for easily sliding cookies onto a cooling rack. Dark sheets may absorb heat, causing cookies to brown too much on the bottom.
Grease baking sheets with cooking spray or solid shortening instead of butter or margarine.
Don’t overload the oven. Bake one sheet of cookies at a time on the middle oven rack.
Make sure to cool baking sheets between batches before reusing. Wipe the surface of each with a paper towel before reusing.
Cool cookies completely, on wire racks, before storing them in airtight containers.
“Work With What You Got!”
© Victoria Hart Glavin Tiny New York Kitchen © 2016 All Rights Reserved

Remove Turkey From Refrigerator At Least 1 Hour Prior To Roasting.
Preheat Oven To 325 Degrees.
Place Turkey In Sink And Remove Neck & Giblets.
Place In Roasting Pan And Brush With Melted Butter. Season With Salt & Pepper.
Place Turkey In Lower Third Of The Oven And Roast For 10 Minutes Per Pound.
To Determine If Turkey Is Done, Place Thermometer Between Thigh & Breast. Temperature Should Register Between 160 To 165 Degrees And Juices Should Run Clear.
When Turkey Is Done, Remove From Oven, Cover Loosely With Foil, And Allow To Rest 30 To 45 Minutes, Which Allows Time To Heat Side Dishes.
Carve & Enjoy!
Approximate Cooking Times Based On 10 Minutes Per Pound At 325 Degrees:
9 Pound Turkey: 1 1/2 To 1 3/4 Hours
12 Pound Turkey: 2 To 2 1/4 Hours
14 Pound Turkey: 2 1/4 To 2 1/2 Hours
16 Pound Turkey: 2 1/2 To 2 3/4 Hours
18 Pound Turkey: 3 To 3 1/4 Hours
20 Pound Turkey: 3 1/2 To 3 3/4 Hours
22 Pound Turkey: 4 To 4 1/4 Hours
25 Pound Turkey: 4 1/4 To 4 1/2 Hours
If You Have Stuffed Your Turkey Then Add More Time.
“Work With What You Got!”
© Victoria Hart Glavin Tiny New York Kitchen © 2016 All Rights Reserved
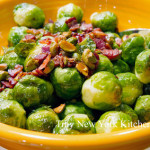
Brussels sprouts have a pronounced and sweet nutty flavor, quite unlike cabbage, although the two are closely related. They are traditionally served at Thanksgiving and Christmas and have an affinity with certain nuts, such as almonds, pistachios, and chestnuts. Brussels sprouts taste great with onions, and ginger, or with nuts.
Brussels sprouts should be small and hard with tightly wrapped leaves. Avoid any that are turning yellow or have loose leaves. They will keep in a cool place or in the salad drawer of a refrigerator for several days.
When preparing and cooking Brussels sprouts trim away the base of the stalk and remove the outer leaves. If the sprouts are large, cut them in half or quarters, or slice thinly for stir-frying. Cook very briefly in small amounts of fast-boiling water. Alternatively, stir-fry with onions and ginger, in a little oil and butter.
“Work With What You Got!”
© Victoria Hart Glavin Tiny New York Kitchen © 2016 All Rights Reserved

The turkey came originally from America and was first domesticated by the Aztecs in Mexico. The Spanish introduced turkeys into Europe and they soon became a popular choice in France, Italy and Britain.
When early settlers from Britain, France and Holland crossed the Atlantic to North America, the vast flocks of turkey that roamed wild provided them with sustenance. They were plentiful and so easy to trap or shoot that the older children of the family were given the responsibility of catching them. The Native Americans meanwhile taught the new settlers the rudiments of farming, and in November 1621, on the first anniversary of their arrival, the Pilgrims entertained the locals to a feast, at the center of which was the turkey. Ever since, this has been the traditional bird served at Thanksgiving.
Turkeys are available fresh, chilled, or frozen all year round. When buying a whole bird, look for a plump well-rounded breast and legs and clear, soft and evenly colored skin. Avoid birds that are bruised, with blemishes or torn skin or any that have been badly or unevenly plucked. Turkeys vary enormously in weight.
When you’re ready to purchase your turkey it’s easy to get confused on what size to get. A good guild to go by is to figure approximately 1 1/4 pounds per person. This makes enough for the meal and provides a decent amount of leftovers.
To store your turkey place it in a large, deep dish and cover it completely with plastic wrap. Store it in the coolest part of the refrigerator; making sure that it does not come in contact with other foods.
Thaw a frozen turkey in the refrigerator for 2 to 4 days. Estimate 24 hours for every 5 pounds, so 2 days for a 10 pounder, 3 days for a 15 pounder, etc.
And then there is always the frozen turkey emergency that goes like this, “Help, help, it’s Wednesday, and my turkey is still frozen!!!” It’s been a long time, but I’ve been in this predicament. What you do is leave the turkey in its wrapper and put it in a large-size container. A lobster pot works well. Fill the container with cold tap water and let it sit for 30 minutes. Dump out the water and refill. Let it sit another 30 minutes. Repeat until the turkey is thawed, then roast immediately or transfer to the refrigerator.
The good news is that you can brine or dry cure your turkey while it defrosts in the refrigerator. What a Godsend that is! Use a lighter brine solution, which is about 1/2 cup kosher salt per gallon of water, plus sugar and spices). If you’re dry curing, use the standard recipe. You’re turkey should stay below 40 degrees while brining. You don’t need to brine or cure a kosher or butterball type supermarket frozen turkey. These come pre-brined. If you want to be able to put your own flavor stamp on your meal, then get a natural or untreated bird and do it yourself. If you plan on brining for 2 days use the weaker solution that I just mentioned. If you plan to brine for 24 hours or less, then bump it up to 1 cup kosher salt per gallon of water. Then add an equal amount of sugar. I don’t always brine, but when I do I’ve been known to throw an assortment of flavorings in the brine. Flavorings that you could add to your brine could be: apples, lemons, oranges, onions, garlic, shallots, peppercorns, bay leaves, cinnamon sticks, cloves, allspice berries, juniper berries, mustard seeds, fennel seeds, coriander seeds, rosemary, sage, thyme, savory, parsley, or oregano. You can also replace half the water with sweet cider, hard cider, vegetable stock, turkey stock, chicken stock, beer, white wine, or red wine. If you want to dry cure then use about 1/2 teaspoon kosher salt for every pound of turkey. Then add spices to your taste.
Stuffing your turkey is a personal preference. I always stuff the bird because I love how it tastes when cooked inside the turkey. It does slow down the cooking process, however. Never stuff the turkey in advance of cooking. The stuffing can be made in advance, but the turkey should not be stuffed until just before it is placed in the oven. Weigh the stuffing and add this to the weight of the bird before calculating the cooking time. Thoroughly rinse the body cavity of the bird under cold running water, and then drain it well. Wipe the turkey, inside and out, with paper towels. Press the stuffing inside the shallow neck cavity. Make sure not to pack it in too tightly. Turn the bird over and pull the neck skin over the stuffing. Now it’s time for a little turkey bondage and truss the bird (tuck the wing tips under the breast and tie the legs together) and then cook for the calculated time. Never shorten the cooking time because although the meat may appear cooked, extra time must be allowed for cooking the stuffing thoroughly.
If you choose not to stuff your turkey then place aromatics in the body cavity of the bird. Cut a large onion in half and stud each half with 4 to 6 cloves. Place this in the body cavity of the bird. Cut an orange and a lemon into quarters and add these, together with 3 or 4 bay leaves, 4 to 6 fresh sage sprigs, and 2 to 3 fresh thyme sprigs. Add 1 cinnamon stick or 1 blade of mace for a festive hint of warm spice.
Turkeys are super easy to roast, but require a little more attention than smaller birds. Check to make sure the oven shelves are in the correct position before heating the oven. Preheat the oven to 350 degrees. Place the prepared bird on a rack in a large-size roasting pan. Smear the turkey breast generously with butter, season with salt & pepper and place in the oven. Baste the turkey from time to time during cooking. When the breast has browned, cover with foil to protect it and continue cooking. Remove the covering foil for the final 20 minutes of cooking. To check if the meat is cooked, insert a skewer into the thickest part of the thigh. If the juices run clear and the meat is white, it is cooked. If the juices are pink and the meat is soft and pink, the turkey is not ready. Return it to the oven and check again after 20 minutes. Cooking times will differ depending on whether your bird was purchased fresh or frozen. Plan on 20 minutes per pound in a 350 degree oven for a defrosted turkey and 10 to 15 minutes per pound for fresh. Remember to add more time if you’re turkey is stuffed. You should have an instant-read thermometer in your kitchen drawer. Insert the thermometer into the breast (all the way to the bone) and if it reads 160 degrees you’re good to go. You may also measure the thigh by inserting the thermometer into the thickest part, but not touching the bone, and it should read 165 degrees.
Remove the turkey from the oven and cover it closely with foil. Leave it to rest for at least 30 minutes. This will even out the temperature and make it easier to carve. I know some chefs who let it rest for 2 hours, but I don’t think that one needs to wait that long. If you wish to make gravy in the roasting pan, transfer the bird to a carving plate.
When you’ve let your bird rest awhile remove the trussing string. Hold the bird steady in position with a carving fork. Cut off the legs, then cut these in half or carve the meat from the bones. Make a horizontal cut across the breast above the wing. Carve neat and even vertical slices off the breast. Repeat on the other side of the bird. Arrange slices on a warmed platter. Add the turkey legs or sliced meat to the platter or set them aside for serving separately. Scoop out the stuffing and serve with the meat.
“Work With What You Got!”
© Victoria Hart Glavin Tiny New York Kitchen © 2016 All Rights Reserved
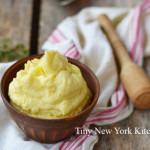
Old-School Mashed Potatoes
Mashed potatoes are as American as Thanksgiving itself. Variations range from sriracha to pumpkin spice foie gras mashed potatoes (I wouldn’t recommend that latter). At Thanksgiving, nothing beats a well-made bowl of classic mashed potatoes, however. As with many other deceptively simple dishes, there are reasons why sometimes you have good mashed potatoes, and other times you have fabulous mashed potatoes. Here are my well-kept secrets to make those fabulous ones, served piping hot, and ready for that giant ladle of gravy.
Potatoes with a high starch content (the kind used for baking) provide the traditional flavor and texture. The same starch that gives a baked potato its fluffy interior also contributes to perfect mashed potatoes. Yellow-fleshed varieties like Yukon golds or yellow Finns are excellent as well, but they turn out the same color as mashed turnips, which may be disconcerting to potato purists. If you live near a farmers’ market, take the potato farmers’ advice on local favorites as they may suggest an interesting heirloom variety that will become your favorite.
Purchase your potatoes about a week ahead of time and age them in a cool, dark place. Do not place them in the refrigerator. Mature potatoes are drier and mash up lighter. Please don’t let them sprout eyes, though.
Make mashed potatoes just before serving. Reheated mashed potatoes leave me shivering.
Make sure not to overcook the potatoes. They should just yield to a sharp knife when pierced. If the drained potatoes seem soggy, just return them to the pot and cook over a low heat for about 2 minutes, stirring constantly until they begin to stick to the bottom of the pot. Doing this forces the excess steam out of the potatoes and dries them out.
Mash the drained potatoes in the still warm cooking pot with HOT milk. A cold bowl and cold milk make for lumpy and lukewarm potatoes. The precise amount of milk is a matter of taste, so use more or less to reach your desired consistency.
You’ll need an efficient mashing utensil. Some cooks swear by a potato ricer (which does make the smoothest potatoes by the way), as long as you enlist another pair of hands to make the job go quickly. You may use an electric hand mixer. If you want to use a low-tech, old school hand potato masher, go to a restaurant supply store and get a big one, or the job will take forever. The potatoes will be cooling off by the second and we don’t want that happening. Never ever mash potatoes in a food processor or you’ll get starchy, sticky, gummy mashed potatoes that could be used for gluing kindergarten craft projects.
Season well with salt and pepper. Use your taste to determine amounts. I use kosher salt mostly, but you may use your favorite type of salt. White pepper is spicier than black pepper, but will give you pristine looking mashed potatoes. But, of course, use black if you want to.
www.tinynewyorkkitchen.com
“Work With What You Got!”
© Victoria Hart Glavin Tiny New York Kitchen © 2016 All Rights Reserved


