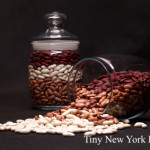
Dried Beans
Purchase dried beans from a source with good turnover. When I’m travel to Tucson I love to stock up on dried beans from Native Seeds, who have a nice selection of beautiful beans (http://shop.nativeseeds.org/collections/beans) The longer the beans are on the shelf, the drier they become, and the longer they will take to cook. If you’ve ever cooked beans that just wouldn’t become tender, they were probably too old. Once you have them home, store them in an airtight container in a cool dark place.
Soaking dried beans reduces the cooking time and helps the beans hold their shape better during cooking. Although soaking isn’t necessary, the shortened cooking time cuts energy use, which is a good enough reason to soak. Spread the beans on a large baking sheet, and sort through them to remove stones or broken beans. Transfer the beans to a bowl and add enough cold water to cover by an inch or two. Let stand for 2 hours; longer will shrivel the beans. Drain before using.
For a quicker soaking method, place the sorted beans in a large saucepan, add cold water to cover, and bring to a full boil. Immediately remove from the heat and cover. Let stand for 1 hour, and then drain before using.
Cooks are divided over when to salt a pot of cooking beans. Some people believe that salting toughens the beans and thus lengthens their cooking time. Others believe that if beans are salted toward the end of cooking, the flavor is dull. So, in the interest of proper seasoning, go ahead and add a reasonable amount of salt at the beginning of cooking (about 1/2 teaspoon per cup of dried beans), as the add cooking time is minimal.
www.tinynewyorkkitchen.com
“Work With What You Got!”
© Victoria Hart Glavin Tiny New York Kitchen © 2016 All Rights Reserved

Rosh Hashanah
Rosh Hashanah is the Jewish New Year (the first day of the Jewish High Holy Days) and is also known as the Feast of Trumpets. The holiday , which is also a day of remembrance, is at once solemn and festive. Joy comes not only from trust in God’s compassion, but also the anticipation of renewal and fresh starts.
The Rosh Hashanah meal becomes more than mere rejoicing as it is also a form of prayer. The table is transformed into an altar to supplicate God, partaking of symbolic foods: honeyed and sugared treats for a sweet year; round foods for a fulfilled year, unbroken broken by tragedy; foods that grow in profusion at this season and those eaten in abundance, such as rice, signifying hopes for fecundity, prosperity, and a wealth of merits.
Dinner begins with a prayer for a sweet year, dipping challah, or other sweet bread, and apples into fragrant honey. Some start with sugared pomegranates, dates, figs, or quince in rose petal syrup.
It is customary for the first course to be fish, which symbolizes fertility and God’s blessings. Seasonal vegetables like leeks, Swiss chard, black-eyed peas, and pumpkins appear throughout the meal in major and supporting roles. Delicious main dishes follow, and usually two or more sweet desserts (such as a plum tart, honey cake, or noodle kugel) conclude the meal.
A few foods, however, are unwelcome at the Rosh Hashanah table. Many Ashkenazi Jews do not eat nuts (because the numerical value of the Hebrew word for nuts is equal to the value of the word for sin). Others do not eat pickles, horseradish, or other sour foods, while Moroccans avoid foods that are black, like olives and grapes (which are considered bad omens).
“Work With What You Got!”
© Victoria Hart Glavin Tiny New York Kitchen © 2016 All Rights Reserved
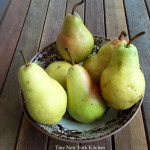
Pears
Season: June to October, but can be cold-stored until spring.
Pears are one of the few fruits that should be picked when under ripe. Buy hard pears a few days before you need them, and let them ripen at room temperature until they have a slight yield when given a gentle squeeze.
To core a pear, cut the pear in half lengthwise, and then scoop out the hard portions with a melon baller. Pear flesh (like apple) oxidizes when exposed to air, so rub the cut areas with lemon juice or white wine to keep them from turning brown.
“Work With What You Got!”
© Victoria Hart Glavin Tiny New York Kitchen © 2016 All Rights Reserved
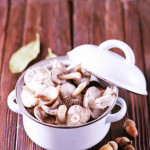
Make The Most Of Mushrooms
Keep fresh mushrooms in perfect condition after purchase. Here is what to do to make these gems last.
Keep The Original Store Packaging
You can’t see it, but the wrap on packaged mushrooms actually has tiny holes that prevent damaging condensation and gases from building up. You can, and should, store commercially grown mushrooms (presliced or whole) in their original container and wrap in the refrigerator, they will keep up to one week.
Keep Moisture At Bay, Wrap Loose Mushrooms In Dry Packaging
Storing mushrooms in a damp towel will shorten the length of time they stay fresh. Instead, refrigerator loose mushrooms in a brown paper bag; it will absorb any moisture and allow them to breathe. A partially opened ziplock plastic bag will also work.
Avoid The Crisper
The refrigerator’s vegetable bin is a moist place, not a friendly area for mushrooms. Instead, keep them in a spot where air can circulate, like an open shelf.
Keep Mushrooms Away From Pungent Foods
Mushrooms can take on the flavors of strong foods that are stored nearby. Keep them away from onions, garlic, and other foods with strong odors.
Rinse With Water
Clean mushrooms under cool, running water right before you’re ready to use them; then pat dry. It’s a myth that mushrooms easily absorb water, but if they’re rinsed too far in advance, they will discolor and deteriorate from the moisture. Cultivated mushrooms grow in sterilized compost, so you can also clean them by simply brushing any bits of dirt with a clean damp towel.
www.tinynewyorkkitchen.com
“Work With What You Got!”
© Victoria Hart Glavin Tiny New York Kitchen © 2016 All Rights Reserved

Growing herbs make cooking so much better. When the weather turns cold I bring them inside to my kitchen so they don’t freeze. Tonight I’m making grilled rosemary bone-in pork chops.
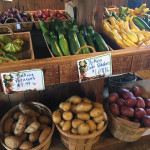
September
September is a wonderful time for enjoying the beautiful array at local farmers’ markets. September is a delightful time for gathering ingredients that will showcase fleeting flavors of summer. A walk among colorful baskets filled with fresh produce is incredibly inspiration.
Blazing scarlet tomatoes, sun-sweetened and fattened from their time on the vine, are joined by zesty green, bright yellow, and almost purple-colored varieties. Turn this beautiful rainbow into a final summer tomato salad by simply cutting thick slices of each colorful variety of tomato, and arranging them on a big platter. Drizzle the slices with olive oil and balsamic vinegar, sprinkle with a bit of sea salt, and finish the dish with finely minced basil.
Fill your shopping cart with crisp cucumbers, glossy purple or creamy white eggplant, pale green or buttery yellow summer squashes, string or wax beans, spicy jalapeno peppers, fragrant peaches, lush melons, sugary corn on the cob and great bunches of finely scented fresh herbs.
As September evenings grow quietly cooler, take pleasure in preparing dishes that feature these ingredients, such as nutmeg-scented roasted peaches, a delectable eggplant parmesan, velvety corn soup, garlic string beans or summer squash stuffed with ground lamb or turkey, breadcrumbs, fresh basil, oregano and parsley, cinnamon and bit of cheese. Cucumbers can be turned into simple refrigerator pickles, jalapeños can be roasted on the grill and packed away in the freezer, ensuring that a bit of summer will still be served as the season marches on.
There is also a hint of fall to be found at the farmers’ market. While all of the summer crops are still available to be savored, the new season is sneaking in. Freshly dug potatoes, dark purple plums, crisp early apples, succulent pears, Brussels sprouts, earthy mushrooms, carrots, cauliflower and kale will provide culinary creativity for weeks to come.
Cooking and eating with the seasons is the most excellent and efficient way to introduce high quality nutrients into the body. When we enjoy what nature has prepared for us, we are giving our bodies the gift of exceptionally luscious flavor, along with important healing properties. I can’t think of a better way to prepare a delicious life.
www.tinynewyorkkitchen.com
“Work With What You Got!”
© Victoria Hart Glavin Tiny New York Kitchen © 2016 All Rights Reserved

5 Ways To Use A Vegetable Peeler
The humble vegetable peeler has hidden talents.
Easily Peel Fruit: To peel soft fruits and vegetables, like tomatoes and peaches, you usually have to briefly dunk them into boiling water. Using a good vegetable peeler is so much easier and faster. Look for peelers with serrated blades for the best results and select not-too-ripe fruit.
Shaved Cheese: Give salads, pastas and roasted vegetables a restaurant-style finish by garnishing with generous amounts of shaved Parmesan or pecorino romano cheese.
Vegetable Pasta: Shave long strips of zucchini, carrots (even sweet potatoes and squash) to transform them into pasta substitutes. Serve raw or briefly steamed with your favorite sauce, or toss with a vinaigrette for a fresh and nutritious salad.
Spreadable Butter: Is there anything worse than trying to butter toast or bread with rock hard butter straight from the fridge? Use a vegetable peeler to scrape off thin and perfectly spreadable butter ribbons.
Chocolate Curls: Peel the edge of a slightly softened chunk of chocolate to create curls, or the flat surface of very cold chocolate to make shavings. Keep your creations in the freezer and use to garnish cakes, pies, puddings and seasonal fruit.
www.tinynewyorkkitchen.com
“Work With What You Got!”
© Victoria Hart Glavin Tiny New York Kitchen © 2016 All Rights Reserved
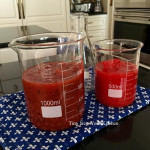
Lately I’ve been working in my kitchen as if it were a creative kitchen laboratory. The kitchen is really a food laboratory isn’t it? I’ve begun to add more science-like tools to my collection of cooking equipment. This week I purchased a bunch of beakers in various sizes. I use them as measuring cups as well as a place to hold liquids and chopped things. I’m not certain exactly why this makes me so joyous, but it does.
“Work With What You Got!”
© Victoria Hart Glavin Tiny New York Kitchen © 2016 All Rights Reserved
Quick Breads
For mouth-watering breads that don’t require a lot of time, turn to quick breads. By using baking powder, baking soda, steam, or air instead of yeast to leaven dough. An advantage of quick breads is their ability to be prepared quickly and reliably, without requiring time-consuming skilled labor and the climate control needed for traditional yeast breads. Quick breads include banana bread, beer bread, biscuits, cornbread, cookies, muffins, cakes, pancakes, brownies, scones, and soda bread.
Almost all quick breads have the same basic ingredients: Flour, leavening, eggs, fat (butter, margarine, shortening, or oil) and a liquid such as milk. Ingredients beyond these basics are added for variations of flavor and texture. The type of bread produced varies based predominantly on the method of mixing, the major flavoring, and the ratio of liquid in the batter. Some batters are thin enough to pour and others are thick enough to mold into lumps.
There are four main types of quick bread batter:
Pour Batters: Such as pancake batter, have a liquid to dry ration of about 1:1 and so pours in a steady stream – also called a “low-ratio” baked good.
Drop Batters: Such as cornbread and muffin batters, have a liquid to dry ratio of about 1:2.
Soft Doughs: Such as many chocolate chip cookie doughs, have a liquid to dry ratio of about 1:3. Soft doughs stick significantly to work surfaces.
Stiff Doughs: Such as pie crust and sugar cookie doughs, have a liquid to dry ratio of 1:8. Stiff doughs are easy to work in that they only minimally stick to work surfaces, including tools and hands – also called “high-ratio” baked goods.
Preparing a quick bread generally involves two mixing containers. On contains all dry ingredients (including chemical leavening agents or agent) and one contains all wet ingredients (possibly including liquid ingredients that are slightly acidic in order to initiate the leavening process). In some variations, the dry ingredients are in a bowl and the wet ingredients are heated sauces in a saucepan off-heat and cooled.
During the chemical leavening process, agents (one or more food-grade chemicals – usually a weak acid and a weak base) are added into the dough during mixing. These agents undergo a chemical reaction to produce carbon dioxide, which increases the baked good’s volume and produces a porous structure and lighter texture. Yeast breads often take hours to rise, and the resulting baked good’s texture can vary greatly based on external factors such as temperature and humidity. By contrast, breads made with chemical leavening agents are relatively uniform, reliable, and quick. Usually, the resulting baked good is softer and lighter than traditional yeast breads.
Chemical leavening agents include a weak base, such as baking soda (sodium bicarbonate) plus a weak acid, such as cream of tartar, lemon juice, or cultured buttermilk, to create an acid-base reaction that releases carbon dioxide. Quick bread leavened specifically with baking soda is often called “soda bread.” Baking powder contains both an acid and a base in dry powdered form, and simply needs a liquid medium in which to react. Other alternative leavening agents are egg whites mechanically beaten to form stiff peaks, as in the case of many waffle recipes, or steam, in the case of cream puffs.
There are three basic methods for making quick breads, which may combine the “rise” of the chemical leavener with advantageous “lift” from other ingredients.
The Stirring Method: Also known as the quick-bread method, blending method, or muffin method is used for pancakes, muffins, corn bread, dumplings, and fritters. This method calls for measurement of dry and wet ingredients separately, then quickly mixing the two. Often the wet ingredients include beaten eggs, which have trapped air that helps the product to rise. In these recipes, the fats are liquid, such as cooking oil. Using mixing is done using a tool with a wide head such as a spoon or spatula to prevent the dough from becoming over-beaten, which would break down the egg’s lift.
The Creaming Method: Frequently used for cake batters. The butter and sugar are “creamed” or beaten together until smooth and fluffy. Eggs and liquid flavorings are mixed in, and finally dry and liquid ingredients are added in. The creaming method combines rise gained from air bubbles in the creamed butter with the rise from the chemical leaveners. Gentle folding in of the final ingredients avoids destroying these air pockets.
The Shortening Method: Also known as the biscuit method, is used for biscuits and scones. This method cuts solid fat (whether lard, butter, or vegetable shortening) into flour and other dry ingredients using a food processor, pastry blender, or two hand-held forks. The layering from this process gives rise and adds flakiness as the fold of fat melts during baking. This technique is said to produce “shortened” cakes and breads, regardless of whether or not the chosen fat is vegetable shortening.
Quick bread originated in the United States at the end of the 18th century. Before the creation of quick bread, baked goods were leavened with either yeast or by mixing dough with eggs. The discovery of chemical leavening agents and their widespread military, commercial, and home utilization in the United States dates back to 1846 with the introduction of commercial baking soda in New York by Church and Dwight of “Arm & Hammer” fame. This development was extended in 1956 by the introduction of commercial baking powder in Massachusetts, although the best known form of baking powder is “Calumet”, which was first introduced in West Hammond and Hammond, Indiana (later Calumet City, Illinois) in 1889. Both forms of food-grade chemical leaveners are still being produced under their original names.
During the American Civil War (1861-1865) the demand for portable and quickly made food was high, while skilled labor for traditional bread making was scarce. This encouraged the adoption of bread, which was rapidly made and leavened with baking soda, instead of yeast. The shortage of chemical leaveners in the American South during the Civil War contributed to a food crisis.
As the Industrial Revolution accelerated, the marketing of mass-produced prepackaged foods was eased by the use of chemical leaveners, which could produce consistent products regardless of variations in source ingredients, time of year, geographical location, weather conditions, and many other factors that could cause problems with environmentally sensitive, temperamental yeast formulations. These factors were traded off against the loss of traditional yeast flavor, nutrition, and texture.
www.tinynewyorkkitchen.com
“Work With What You Got!”
© Victoria Hart Glavin Tiny New York Kitchen © 2016 All Rights Reserved
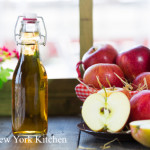
Know Your Vinegar
Pickling season is here and it’s important to know about the various vinegars. Vinegar is usually made by oxidation of the alcohol in wine, cider, or malt. Vinegar provides the tart pucker flavor in pickles, but it also acts as a preservative. If a recipe calls for vinegar, it will most likely call for a particular type. If a recipe does not specify the type, use a vinegar that fits the recipe. White vinegar has a sharp flavor and is used for pickling and in recipes where a clean, strong taste is desired. Cider vinegar, made from apples, has a faint fruity flavor and is used in recipes where a slightly milder taste is preferred. You can replace white vinegar with cider vinegar in pickling recipes, as long as the cider vinegar has a 5% acidity level.
Since vinegar is very acidic, bacteria grow very poorly in it, or not at all. However, vinegar will still deteriorate if exposed to air and/or heat. Keep your vinegar capped and store it in a cool, dark, dry place. Vinegars can be flavored by adding slightly bruised herbs or fruit, heating the vinegar almost to body temperature, and sealing the bottle.
www.tinynewyorkkitchen.com
“Work With What You Got!”
© Victoria Hart Glavin Tiny New York Kitchen © 2016 All Rights Reserved


