
There is no salt in pasta dough, so be sure to put enough salt in the cooking water. First, use plenty of water: about 4 quarts for 1 pound of pasta. Because salt slows the rate at which water comes to a boil, don’t add salt until after water is bubbling. Use a heaping teaspoon for every quart water. No need to measure. Instead just taste the water. You should be able to detect the salt.
Always serve pasta from a warmed serving bowl. Place the bowl in the sink, and set the colander inside the bowl. Drain the pasta, letting the water drain into the bowl. Lift up the pasta in the colander, give it a good shake to drain further, and then pour the pasta into the still warm cooking pot. Add the sauce and combine. Pour out the water from the serving bowl, and dry the bowl. Transfer the pasta to the warm bowl and serve.
“Work With What You Got!”
©Tiny New York Kitchen © 2020 All Rights Reserved
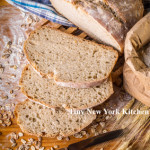
Many people are making bread these days and there’s nothing quite like the smell of bread baking in the house. Here are some answers to frequently asked bread making questions.
Never allow salt to come into direct contact with yeast because it removes the water that yeast needs to live. Instead, add salt to the flour used to make the dough, so the flour can act as a buffer.
A heavy-duty stand mixer is a great appliance for making bread dough. You can use the dough hook for mixing and kneading. If the dough isn’t coming together with the dough hook, switch over to the paddle attachment and mix just until the ingredients are combined, then switch back to the dough hook.
After the dough is mixed, let it rest. Professional bakers call this period, autolyze. It lets the flour fully hydrate and strengthens the gluten in the flour before kneading. Cover the work bowl with plastic and let the dough stand for 20 minutes and then knead on medium speed until the dough is smooth and elastic.
Dough made with a high proportion of whole-grain flour should feel tacky when you are kneading it. In general, moist or even sticky dough makes the best bread. Don’t add too much flour to the dough or the bread will bake up dry and tough.
How can you tell when the dough has been kneaded long enough? Use the windowpane test. Pull off a golf ball knob of dough and pat it into a rectangle. Pulling slowly and consistently from all four corners, stretch the dough into a thin, translucent membrane. If the dough tears easily, knead it longer. This technique won’t work with dough that includes seeds, nuts, or raisins, as they will tear the dough even if it has been kneaded sufficiently. If such ingredients have been used, check for stretchy and resilient dough.
Many bakers use a bowl to hold bread dough, but a straight-sided clear plastic tub is ideal for keeping track of dough as it rises. Mark the beginning level of the dough on the outside with a pen or a piece of tape, and then you can easily see when the dough has doubled. You can also use a glass bowl, but the doubling is a bit harder to define in a slope-sided container. Gently poke a finger into the dough. If the hole doesn’t refill, the dough has probably finished rising.
Many crusty artisanal are baked with steam to help keep the crust soft and pliable, allowing the bread to expand fully. Professional ovens have built-in steam injectors, but home bakers have to be more creative. One recommended method: When you turn on the oven to preheat it, place an empty heavy-duty rimmed baking sheet or pan on a rack near the top of the oven, When the bread dough is added to the oven, toss a handful of ice cubes into the pan and close the door. The ice will melt quickly and create a burst of steam. While the oven door is open, cover the glass on the door with a towel to catch any drips (the cold water could crack the glass) and remove the towel before closing the door.
A common way to test bread for doneness is to rap on the bottom of the loaf and listen for a dull thump. Using a thermometer is more reliable. Insert an instant-read thermometer in the bottom of the loaf, being sure to the tip reaches the center of the loaf. Butter and egg laden breads are finished when their internal temperature reaches 185 to 190 degrees F. Leaner and crispier breads are ready at 200 to 205 degrees F. For breads baked in loaf pans, insert the thermometer just above the rim of the pan, angling the tip down to the center of the loaf.
“Work With What You Got!”
©Tiny New York Kitchen © 2020 All Rights Reserve

Kick up popcorn’s flavor with easy and creative combinations.
ITALIAN STYLE
Toss popcorn with finely grated Parmesan, a sprinkling of Italian seasoning, and red pepper flakes.
SAVORY SESAME
Drizzle lightly buttered popcorn with a small amount of sesame oil, then sprinkle with sesame seeds, and crushed seaweed snacks.
CRABBY CORN
Sprinkle buttered popcorn with Old Bay seasoning, kosher salt, and a small pinch of cayenne.
TEX MEX
Toss buttered popcorn with taco seasoning, garlic powder, and a pinch of chipotle chili powder.
CINNAMON SUGAR
Toss hot popcorn in cinnamon sugar immediately after popping to create a kettle corn-like crunch. Or combine sugar with a small pinch of pumpkin pie spice and toss for pumpkin kettle corn.
ALMOND JOY
Toss popcorn with mini chocolate chips, coconut flakes, and chopped roasted almonds.
SALTED CARAMEL
Sprinkle hot buttered popcorn with turbinado sugar, crushed hard caramel candies, and sea salt.
“Work With What You Got!”
©Tiny New York Kitchen © 2020 All Rights Reserved

Beer isn’t just for drinking. It’s also the secret ingredient in some of Tiny New York Kitchen’s favorite recipes, from stews to pasta sauce.
Depending on which brew you choose, you can add richness to stews and braises, a bright zing to sauces, and make baked goods extra tender and tasty. It’s great with chocolate. You can also pair it with your meals, just like wine, to make your dishes taste even better.
LAGER
Lager is the most popular beer for drinking. Smooth, light-bodied, and slightly floral, it goes with just about any dish, especially cheese. It’s also great to bake with. The bubbles in this beer add extra lightness and tenderness to all sorts of baked goods.
PILSNER
Clean, crisp, and slightly citrusy, this beer is refreshing on its own. Serve it with seafood or a simple tomato and basil pizza. Use it for quickly simmering shrimp because it won’t overwhelm the delicate, sweet flavor of the seafood.
STOUT
This rich dark beer has notes of coffee and caramel, great for sipping in colder weather. Pair it with heartier dishes like chili or steak and potatoes. In baking and cooking, stout makes chocolate cupcakes taste even more chocolaty and slow-cooked meats even richer.
AMBER ALE
You will know this beer by its reddish-brown color. It has a smooth, malty flavor that makes it a crowd-pleasing choice for your next party. Try this beer with grilled or roasted meats and barbecue. For cooking, it’s great in a glaze for pork or in a cheese sauce.
“Work With What You Got!”
©Tiny New York Kitchen © 2020 All Rights Reserved

These freezer essentials will help you with your weekly meal prep as well as last minute meals that you need to get on the table fast.
Bagged frozen vegetables, like mixed peppers, broccoli, and spinach.
Bagged frozen fruit, like blueberries, mangos, bananas, and strawberries.
Bagged frozen pastas, like tortellini and ravioli.
Frozen waffles and pancakes.
Frozen potatoes, like tots, fries, and breakfast potatoes.
Rice and prepared side dishes.
Pre-made dough, pie crusts, and breads.
Frozen foods are not limited to frozen dinners. You can stock your freezer with healthier ingredients to make putting dinner together easy. There are endless possibilities with what you can make with frozen ingredients. As always, be creative and “work with what you got!”
“Work With What You Got!”
©Tiny New York Kitchen © 2020 All Rights Reserved

Many Tiny New York Kitchen baking recipes often call for room temperature eggs, because if all of the ingredients start at the same temperature, they will combine better and bake more evenly. But if you didn’t take your eggs out of the refrigerator early, you can put them in a bowl of lukewarm water for 5 to 10 minutes. When you remove the eggs from the water, they should feel a bit cool in your hand but no longer cold.
“Work With What You Got!”
©Tiny New York Kitchen © 2020 All Rights Reserved

Hungry for halibut or craving clams? There’s an easy way to prepare fish and seafood to perfections. Fish is ready when you can flake it easily with a fork. Shrimp and shellfish are done when they are opaque in color.
Bake: Best for fish fillets. Baking or roasting fish is an easy, hands-off method, especially good if you have a crowd to feed. As with any fish cooking technique, follow the recipe to avoid overcooking.
Wrap: Best for any fish fillet and shellfish. Cooking fish in foil is one of the most versatile ways to prepare fish, resulting in moist, flavor-packed dishes. And because you can load up on tasty ingredients, like herbs, citrus and spices, it’s a great way to cut back on fat and sodium without sacrificing flavor. Plus, cleanup is a breeze.
Poach: Best for any fish fillet and shellfish. Poaching simply means gently cooking the fish in liquid, such as water, broth, beer, or wine. It ads subtle flavor without drying out the fillets or adding any extra fat. To poach, simply cover the fish or seafood with liquid and bring to a simmer, just don’t let the liquid boil. You’ll only need a few minutes for your fish or seafood to be ready. You can also use the poaching liquid as a base for a sauce when you’re done.
Broil: Best for thick and meaty fish fillets, shrimp, and lobster tails. This method is especially good when you want to quickly bake fish and seafood. This is also a good method when you don’t have access to a grill or you’re adding a glaze. To make sure it doesn’t cook or brown too quickly, cook the fish at least 6 inches away from the broiler and watch carefully.
Steam: Best for clams and mussels. The traditional cooking method for clams and mussels, steaming is an easy way to add delicate flavor quickly without overcooking. Just add the seafood to a lidded saucepan with a little liquid like beer, wine, or broth, cover and bring to a simmer until the shells open up. Discard any that don’t open. You can also steam lobster, but it’s worth checking to see if your store’s fish department will steam lobsters for you.
Sear: Best for scallops, shrimp, and fish fillets. Use this cooking method for fish with a crisp, browned crust and a tender interior. Use a non-stick pan if possible and add a little oil before adding your fish, in batches if necessary, Don’t crowd the pan. Cook without stirring or turning for 2 to 3 minutes to brown the fish and crisp up any breading.
Grill: Best for any fish fillet or shellfish. Once grilling season rolls around don’t forget to add fish, shrimp, and even clams and mussels to your summer menus. Fish fillets take well to grilling and are easy to flip. Use a grilling basket for anything that might slip through the grate. Don’t forget skewers, which are the perfect way to grill shrimp.
“Work With What You Got!”
©Tiny New York Kitchen © 2020 All Rights Reserved

Just What Do Expiration Dates Mean?
Best If Used By/Before: Indicates how long the product will be at its best flavor or quality. After that date, it’s not necessarily unsafe to consume, but the quality might be degraded.
Sell By: Tells the store how long to keep an item on the shelf and when to take it off. Milk is a good example. A grocer has to sell a gallon of milk by that date, but milk past the sell by date is often still usable. When properly stored, milk, like other products will keep for several days after the sell by date. Before tossing, give it the “sniff” test. Odds are it’s still good.
Use By: Is the final recommended day to use the product for best quality. Eggs have a “use by” date which is similar to a “best if used by” date. That’s important; it’s hard to know when eggs go bad.
Absolute Dates: The expiration date on infant formula is absolute. Do not open or use expired formula.
“Work With What You Got!”
©Tiny New York Kitchen © 2020 All Rights Reserved

One skillet meals are easy when you have a busy schedule, but want a home cooked meal. Fewer dishes means less cleanup, which makes life a bit easier.
“Work With What You Got!”
©Tiny New York Kitchen © 2020 All Rights Reserved

With cold winter days among us, simple soups are a favorite for weeknight dinners. There are plenty of reasons to love soup: lots of tasty choices, simple to make from scratch, stores well for leftovers, and is a delicious way to warm up on a cold winter’s day. There is something extra cozy about soup cooking on the stove when it’s chilly outside. Warm soup is so comforting and is excellent when battling a pesky winter cold or flu.
Don’t be afraid to look through your refrigerator and make up your own recipe.
Make sure to use a large pot or Dutch oven. This gives everything room to brown and cook evenly. Heat up a few tablespoons of butter or oil. The fat is important to draw out the flavors in the soup. Next start by adding vegetables in order of what needs to cook the longest. Onions are a good base of a soup. Add these first and allow them to cook on their own until they are soft and golden. Next add other vegetables like celery, carrots, and potatoes. They can brown and caramelize a bit in the oil or butter as well.
Once these have had a few minutes in the pot add salt and herbs. Add water or broth. Next you could add lentils, bens, or tomatoes. Allow to boil and then turn down the heat to a gentle simmer with the lit partly on the pot to reduce the amount of steam that escapes.
Once everything has cook you may purée the soup or leave as is. If you want to puree an immersion blender is very helpful. Add black pepper and taste to see if the soup needs a bit more salt. Sometimes a squeeze of lemon or lime or a dash of vinegar will brighten the soup and bring all the flavors together. You may garnish with herbs like chopped cilantro or soft greens like spinach.
Ladle into bowls. Some soups are eve better with a little swirl of plain Greek yogurt or a sprinkle of grated parmesan cheese. Or you may decide to add a bit of cooked rice to each bowl to round out the meal.
“Work With What You Got!”
©Tiny New York Kitchen © 2020 All Rights Reserved


