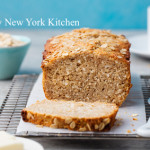
Quick Breads
For mouth-watering breads that don’t require a lot of time, turn to quick breads. By using baking powder, baking soda, steam, or air instead of yeast to leaven dough. An advantage of quick breads is their ability to be prepared quickly and reliably, without requiring time-consuming skilled labor and the climate control needed for traditional yeast breads. Quick breads include banana bread, beer bread, biscuits, cornbread, cookies, muffins, cakes, pancakes, brownies, scones, and soda bread.
Almost all quick breads have the same basic ingredients: Flour, leavening, eggs, fat (butter, margarine, shortening, or oil) and a liquid such as milk. Ingredients beyond these basics are added for variations of flavor and texture. The type of bread produced varies based predominantly on the method of mixing, the major flavoring, and the ratio of liquid in the batter. Some batters are thin enough to pour and others are thick enough to mold into lumps.
There are four main types of quick bread batter:
Pour Batters: Such as pancake batter, have a liquid to dry ration of about 1:1 and so pours in a steady stream – also called a “low-ratio” baked good.
Drop Batters: Such as cornbread and muffin batters, have a liquid to dry ratio of about 1:2.
Soft Doughs: Such as many chocolate chip cookie doughs, have a liquid to dry ratio of about 1:3. Soft doughs stick significantly to work surfaces.
Stiff Doughs: Such as pie crust and sugar cookie doughs, have a liquid to dry ratio of 1:8. Stiff doughs are easy to work in that they only minimally stick to work surfaces, including tools and hands – also called “high-ratio” baked goods.
Preparing a quick bread generally involves two mixing containers. On contains all dry ingredients (including chemical leavening agents or agent) and one contains all wet ingredients (possibly including liquid ingredients that are slightly acidic in order to initiate the leavening process). In some variations, the dry ingredients are in a bowl and the wet ingredients are heated sauces in a saucepan off-heat and cooled.
During the chemical leavening process, agents (one or more food-grade chemicals – usually a weak acid and a weak base) are added into the dough during mixing. These agents undergo a chemical reaction to produce carbon dioxide, which increases the baked good’s volume and produces a porous structure and lighter texture. Yeast breads often take hours to rise, and the resulting baked good’s texture can vary greatly based on external factors such as temperature and humidity. By contrast, breads made with chemical leavening agents are relatively uniform, reliable, and quick. Usually, the resulting baked good is softer and lighter than traditional yeast breads.
Chemical leavening agents include a weak base, such as baking soda (sodium bicarbonate) plus a weak acid, such as cream of tartar, lemon juice, or cultured buttermilk, to create an acid-base reaction that releases carbon dioxide. Quick bread leavened specifically with baking soda is often called “soda bread.” Baking powder contains both an acid and a base in dry powdered form, and simply needs a liquid medium in which to react. Other alternative leavening agents are egg whites mechanically beaten to form stiff peaks, as in the case of many waffle recipes, or steam, in the case of cream puffs.
There are three basic methods for making quick breads, which may combine the “rise” of the chemical leavener with advantageous “lift” from other ingredients.
The Stirring Method: Also known as the quick-bread method, blending method, or muffin method is used for pancakes, muffins, corn bread, dumplings, and fritters. This method calls for measurement of dry and wet ingredients separately, then quickly mixing the two. Often the wet ingredients include beaten eggs, which have trapped air that helps the product to rise. In these recipes, the fats are liquid, such as cooking oil. Using mixing is done using a tool with a wide head such as a spoon or spatula to prevent the dough from becoming over-beaten, which would break down the egg’s lift.
The Creaming Method: Frequently used for cake batters. The butter and sugar are “creamed” or beaten together until smooth and fluffy. Eggs and liquid flavorings are mixed in, and finally dry and liquid ingredients are added in. The creaming method combines rise gained from air bubbles in the creamed butter with the rise from the chemical leaveners. Gentle folding in of the final ingredients avoids destroying these air pockets.
The Shortening Method: Also known as the biscuit method, is used for biscuits and scones. This method cuts solid fat (whether lard, butter, or vegetable shortening) into flour and other dry ingredients using a food processor, pastry blender, or two hand-held forks. The layering from this process gives rise and adds flakiness as the fold of fat melts during baking. This technique is said to produce “shortened” cakes and breads, regardless of whether or not the chosen fat is vegetable shortening.
Quick bread originated in the United States at the end of the 18th century. Before the creation of quick bread, baked goods were leavened with either yeast or by mixing dough with eggs. The discovery of chemical leavening agents and their widespread military, commercial, and home utilization in the United States dates back to 1846 with the introduction of commercial baking soda in New York by Church and Dwight of “Arm & Hammer” fame. This development was extended in 1956 by the introduction of commercial baking powder in Massachusetts, although the best known form of baking powder is “Calumet”, which was first introduced in West Hammond and Hammond, Indiana (later Calumet City, Illinois) in 1889. Both forms of food-grade chemical leaveners are still being produced under their original names.
During the American Civil War (1861-1865) the demand for portable and quickly made food was high, while skilled labor for traditional bread making was scarce. This encouraged the adoption of bread, which was rapidly made and leavened with baking soda, instead of yeast. The shortage of chemical leaveners in the American South during the Civil War contributed to a food crisis.
As the Industrial Revolution accelerated, the marketing of mass-produced prepackaged foods was eased by the use of chemical leaveners, which could produce consistent products regardless of variations in source ingredients, time of year, geographical location, weather conditions, and many other factors that could cause problems with environmentally sensitive, temperamental yeast formulations. These factors were traded off against the loss of traditional yeast flavor, nutrition, and texture.
www.tinynewyorkkitchen.com
“Work With What You Got!”
© Victoria Hart Glavin Tiny New York Kitchen © 2016 All Rights Reserved

Pantry & Freezer Staples
How long do pantry and freezer staples last? Staple items are known for their long shelf life, but they don’t stay fresh forever! Use this handy list to determine how long you should keep them on hand.
Freezer
Hamburger & Stew Meats: Shelf Life: 1 to 2 Days Storage: 3 to 4 Months
Ground Turkey, Veal, Pork, Lamb: Shelf Life: 1 to 2 Days Storage: 3 to 4 Months
Bacon: Shelf Life: 7 Days Storage: 1 Month
Sausage (Raw From Pork, Beef, Chicken or Turkey): Shelf Life: 1 to 2 Days Storage: 1 to 2 Months
Fresh Steaks: Shelf Life: 3 to 5 Days Storage: 6 to 12 Months
Fresh Roasts: Shelf Life: 3 to 5 Days Storage: 4 to 12 Months
Chicken or Turkey (Whole): Shelf Life: 1 to 2 Days Storage: 1 Year
Chicken or Turkey (Cut Up): Shelf Life: 1 to 2 Days Storage: 9 Months
Lean Fish: Shelf Life: 1 to 2 Days Storage: 6 Months
Fatty Fish: Shelf Life: 1 to 2 Days Storage: 2 to 3 Months
Fresh Shrimp, Scallops, Crawfish, Squid: Shelf Life: 1 to 2 Days Storage 3 to 6 Months
Pantry
Baking Powder: Shelf Life: 18 Months Storage: Keep In Dry Place In Airtight Container
Beans (Dried & Uncooked): Shelf Life: 1 Year Storage: Store In Cool & Dry Place
Chocolate (Semisweet & Unsweetened): Shelf Life: 18 Months Storage: Keep In Cool Place
Cocoa: Shelf Life: 1 Year Storage: Keep In Cool Place
Cornstarch: Shelf Life: 18 Months Storage: Store In Airtight Container
Flour (White or Whole Wheat): Shelf Life: 6 to 8 Months Storage: Store In Airtight Container or Freeze To Extend Shelf Life
Nuts (In Shell & Unopened): Shelf Life: 4 Months Storage: Freeze to Extend Shelf Life
Spices & Herbs (Ground): Shelf Life: 6 Months Storage: Store in Airtight Containers In Dry Areas Away From Sunlight & Heat. Before Using, Check Aroma – If Faint Replace.
Sugar (Brown): Shelf Life: 4 Months Storage: Store in Airtight Container
Sugar (Confectioners’): Shelf Life: 18 Months Storage: Store in Airtight Container
Sugar (Granulated): Shelf Life: 2 Years Storage: Store in Airtight Container
Vinegar (Unopened): Shelf Life: 2 Years
“Work With What You Got!”
© Victoria Hart Glavin Tiny New York Kitchen © 2016 All Rights Reserved
English Stew (1860)
English stew is the name given to the following excellent preparation of cold meat. Cut the meat in slices, pepper, salt, and flour them, and lay them in a dish. Take a few pickles of any kind, or a small quantity of pickled cabbage, and sprinkle over the meat. Then take a tea-cup half full of water; add to it a small quantity of the vinegar belonging to the pickles, a small quantity of catsup, if approved of, and any gravy that may be set for use. Stir all together and pour it over the meat. Set the meat before the fire with a tin behind it, or put it in a Dutch oven, or in the oven of the kitchen range, as may be most convenient, for about half an hour before dinner-time. This is a cheap, simple way of dressing cold meat.
“Work With What You Got!”
© Victoria Hart Glavin Tiny New York Kitchen © 2016 All Rights Reserved

Less Stress Holidays
Holiday time is a wonderful time of year, but let’s face it, there is plenty of stress that comes with it. During the holidays, it’s better to keep things as simple as possible.
Appetizers & Hors D’Oeuvres: Keep it simple. Serve a simple, but beautiful cheese platter. Add bowls of dried fruit and nuts, as they’re always very festive. I like to set up a small snack table set with bowls of olives, savory popcorn, and Marcona almonds. I also like to serve a crudité platter for guests who may not want to eat rich foods or are perhaps trying to eat a bit healthier around the holidays.
Plan Your Menu: If you’re having a sit-down dinner, try to make a menu that can be prepared somewhat in advance. Some great options might be a beef Bourguignon, braised short ribs, coq au vin or any other main dish that can be made the day before. I am a big proponent of choosing things to cook that can be prepped ahead of time. I like to start off a dinner party with a nice salad that incorporates some seasonal ingredients like pomegranates, pears, citrus or candied nuts. A winter squash soup is also a nice way to begin a meal. Dessert can be a simple winter fruit crisp or a spice cake served with ice cream.
Get A Head Count: When it comes to a holiday meal, any time of year, depending on the number of guests, a simple yet broad menu works best. For buffet holiday parties with over a dozen people, you might want to offer a couple of different entrees. Add a vegetable and perhaps roasted potatoes or roasted root vegetables. Offering a nice crisp green salad always rounds out the menu as well. Add some delicious small rolls or a sliced baguette and you’re good to go.
Serving A Nice Beverage: Then there are the beverages. Having a festive specialty drink is always welcomed by your guests. If you’re mixing the drinks yourself, keep it simple. Please don’t spend all of your time being a bartender at your own party. That’s no fun! You could mix a nice holiday punch bowl with an adult kick ahead of time. A splash of pomegranate liqueur or elderflower liqueur is a nice addition to prosecco or champagne. A white Christmas cosmo (made with white cranberry juice) is a holiday favorite. Make it in advance and when you’re ready to serve just shake with ice and serve.
Make In Advance: Many things can be done days before the party. Shopping for non-perishable foods like spices, flour, sugar can all be purchased many days before your party. You can also make your holiday cookie dough or pie crusts in advance. All you need to do is to make sure you freeze them until you’re ready to use them.
Keep Calm & Have Fun: The most important thing is to keep calm and have fun. A holiday party of any kind should be a time of joy for everyone, even the host. If you find yourself working way too hard to throw and plan a party then ask friends or family members for help. Perhaps a few good friends could bring a dish or two to help ease the stress on your kitchen. The goal is to have a good time with family and friends.
Happy Holidays From Tiny New York Kitchen!
“Work With What You Got!”
© Victoria Hart Glavin Tiny New York Kitchen © 2015 All Rights Reserved

Quinoa (pronounced KEEN-wah) is the high protein dried fruits and seeds of a goosefoot plant (Chenopodium quinoa); these are used as a food staple and ground into flour. Quinoa is washed before cooking to remove a bitter residue from the spherical seeds. It is treated like a grain, but it is actually the fruit of an herb and it cooks twice as fast as rice. Quinoa produces its own natural insect repellent.
“Work With What You Got!”
© Victoria Hart Glavin Tiny New York Kitchen © 2015 All Rights Reserved
How To Eat More Protein On A Meat-Free Diet
If you’re new to a meat-free diet or you struggle with ways to get the protein you need here are some important tips that may help you. It really isn’t as hard as you might think.
Snack on protein rich munchies and skip the carbs. Eat roasted chickpeas, edamame, roasted peanuts, or raw nuts. Keep away from heavily salted nuts.
If you’re looking for a frozen treat then purée coconut milk, almond butter, cashew butter, honey, and cocoa powder. Freeze in an ice cream maker for a protein rich frozen treat.
Make an easy cream sauce by whisking cashew butter with vegetable stock, garlic, and minced parsley. Toss with cooked pasta.
Crumble tempeh (fermented soybean protein) into pasta sauce or soups, or wherever you might use hamburger meat.
Purée cooked black beans and add to brownies. For blondies or light colored muffins or cakes, use cooked, puréed chickpeas.
Sprout sunflower seeds and add them to salads. Just soak raw seeds overnight in water to cover. Drain and let sprout for 24 to 48 hours.
Add ground flaxseeds to muffins, waffles, breads, or cookies for a protein boast and added omega 3 fats.
Make a protein packed pudding. Purée silken tofu with cocoa powder, honey, and vanilla extract.
Use hemp or rice protein powder instead of flour to make waffles, pancakes, and baked goods. Instead of eggs, use flax as a binder.
Lentils are awesome! Eat lentils more often. They are fast cooking and easy to use. Add to soups, toss in salads, and stir in cooked rice.
Spread sandwiches and wraps with hummus instead of mayonnaise. I do this all the time. Purée hummus with roasted red peppers or chipotle peppers for an added zing.
If you can tolerate gluten, seitan (wheat protein) is a great substitute for sliced deli meat. Use it in wraps or sandwiches for an easy lunch.
“Work With What You Got!”
© Victoria Hart Glavin Tiny New York Kitchen
Gluten-Free Baking
Baking can be tricky when you throw gluten-free into the mix, even the most skilled cooks can be challenged. Here are some tips that can make Gluten-Free Baking less challenging.
Gluten-Free flour mixes can generally replace wheat flour cup for cup. Nut and bean flours may need extra experimentation to find the exact amounts to use.
Consider using smaller pans when baking gluten-free. It’s easier to get the center cooked without the edges burning as can happen with larger pans.
Keep a close watch on baking times. Some gluten-free recipes may take longer to bake than their wheat-containing counterparts.
To help gluten-free recipes taste their best, consider boosting flavor with extra nuts, herbs, spices, and flavor extracts such as vanilla and almond.
If converting a recipe to gluten-free, increase the egg amount by one extra egg to help ingredients bind together.
Gluten-free flours can be dry. You may need to increase a recipe’s liquids.
Xanthan gum keeps gluten-free baked goods moister and less prone to crumbling. Add 1/4 to 1/2 teaspoon xanthan gum for each cup of gluten-free flour.
"Work With What You Got!"
© Victoria Hart Glavin Tiny New York Kitchen

Tips For Baking A Better Cookie
After making thousands and thousands of cookies over the years one learns a few important tricks on how to make a better cookie. Here are some tips from the Tiny New York Kitchen’s kitchen.
Making Dough:
Bring butter to room temperature for 30 minutes to 1 hour before you start (unless otherwise directed). If you’re short on time, cut the butter into pieces and microwave in 5-second intervals, just until butter is soft, but not melted.
To measure flour, spoon it into your measuring cup, then level it with a knife. If you pack flour into the cup, your cookies could turn out dry and heavy.
Check the expiration dates on your baking powder and baking soda, or test the freshness by dropping a pinch into vinegar: If the baking soda or powder foams and bubbles, it’s still good.
Use pure extracts. The imitation stuff just isn’t the same.
Baking Cookies:
Buy an inexpensive oven thermometer and adjust your oven setting accordingly.
If you’re baking more than one tray of cookies at a time, switch the positions of the pans from top to bottom halfway through baking and give each pan a 180-degree turn.
Cool and quickly wash your baking sheets between batches. If you drop dough onto a hot baking sheet, the butter will start melting instantly and the cookies could lose their structure.
Line baking sheets with parchment paper for easy cleanup.
Let cookies cool for a few minutes on the baking sheets (just until they’re firm enough to move), and then remove them to a rack to cool completely (unless otherwise directed). If you leave the cookies on the pan, they could end up too crisp.
"Work With What You Got!”
© Victoria Hart Glavin Tiny New York Kitchen

Substitution Guide
|
Ingredient |
Substitution |
|
Allspice (1 tsp.) |
1/2 tsp. cinnamon + 1/4 tsp. nutmeg + 1/4 tsp. ground clove |
|
Baking Powder (1 tsp.) |
1/4 tsp. baking soda + 1/2 tsp. cream of tartar |
|
Baking Soda (1 tsp.) |
2 tsp double-acting baking powder + replace acidic liquid ingredient in recipe with non-acidic liquid |
|
Balsamic Vinegar |
Equal amount of sherry or cidar vinegar |
|
Bread Crumbs (1 cup) |
3/4 cup cracker crumbs |
|
Brown Sugar (1 cup) |
1 Tbsp. light molasses + enough sugar to fill 1 dry measure cup or 1 cup raw sugar |
|
Butter, salted (1 cup or 2 sticks) |
1 cup or 2 sticks unsalted butter + 1/4 tsp. salt or 1 cup margarine or 7/8 cup lard or vegetable shortening |
|
Buttermilk (1 cup) |
Place 1 Tbsp. white vinegar or lemon juice in a liquid measure. Fill to 1 cup with room temp whole or 2% milk and let stand for 5 minutes or 1 cup milk + 3/4 tsp. cream of tartar or 1 cup plain yogurt |
|
Canola, Sunflower and Vegetable Oils |
Substitute one for one |
|
Chocolate, Bittersweet or Semi-Sweet (1 oz.) |
1/2 oz. Unsweetened chocolate + 1 Tbsp. granulated sugar |
|
Cocoa Powder (3 Tbsp. Dutch-processed) |
1 oz. Unsweetened chocolate + 1/8 tsp. baking soda + reduce fat in recipe by 1 Tbsp. or 3 Tbsp. natural cocoa powder + 1/8 tsp. baking soda |
|
Corn Starch (as a thickener) |
Equal amounts of Minute Tapioca for cornstarch, use slightly less for flour |
|
Cream of Tartar (1/2 tsp.) |
1/2 tsp. white vinegar or lemon juice |
|
Egg (1 whole large egg) |
3-1/2 Tbsp. thawed frozen egg or egg substitute or 2 egg whites |
|
Garlic (1 fresh clove) |
1 tsp. Garlic Salt or 1/8 tsp. Garlic Powder or 1/4 tsp. dried minced garlic |
|
Gingerroot (1 Tbsp. minced) |
1/8 tsp. ground ginger powder or 1 Tbsp. rinsed and chopped candied ginger |
|
Half & Half (1 cup) for cooking or baking |
1-1/2 Tbsp. butter or margarine + enough milk to equal 1 cup |
|
Heavy Cream (1 cup) for cooking or baking |
3/4 cup milk + 1/3 cup butter or margarine |
|
Herbs, Fresh (1 Tbsp.) |
1 tsp. dried herbs |
|
Honey (1 cup) for cooking or baking |
1 1/4 cups granulated sugar + 1/4 cup of liquid appropriate for recipe |
|
Italian Seasoning (1 tsp.) |
1/2 tsp. dried basil + 1/4 tsp. dried oregano + 1/4 tsp. dried thyme |
|
Molasses (1 cup) |
1 cup honey or 1 cup dark corn syrup or 3/4 cup light or dark brown sugar dissolved in 1/4 cup liquid |
|
Mushrooms, fresh (1 cup sliced and cooked) |
1 can (4 oz.) mushrooms, drained |
|
Mustard, Prepared (1 Tbsp.) |
1/2 tsp. dry mustard powder + 2 tsp. white vinegar |
|
Onion (1 small minced) |
1/2 tsp. onion powder |
|
Poultry Seasoning (1 tsp.) |
1/4 tsp. ground thyme + 3/4 tsp. ground sage |
|
Pumpkin Pie Spice (1 tsp.) |
1/2 tsp. ground cinnamon + 1/4 tsp. ground ginger + 1/8 tsp. allspice + 1/8 tsp. nutmeg |
|
Sour Cream (1 cup) |
1 cup plain yogurt or 1 Tbsp. lemon juice and enough evaporated milk to equal 1 cup |
|
Tomato Juice (1 cup) for cooking |
1/2 cup tomato sauce + 1/2 cup water |
|
Tomato Sauce (1 cup) for cooking |
1/2 cup tomato paste + 1/2 cup water |
|
Wine, Red (1 cup) |
1 cup nonalcoholic wine, apple cider, beef broth or water |
|
Wine, White (1 cup) |
1 cup nonalcoholic wine, white grape juice, apple juice, chicken broth or water |
|
Yogurt (1 cup) |
1 cup buttermilk or 1 Tbsp. lemon juice and enough milk to equal 1 cup or 1 cup sour cream |
"Work With What You Got!"
© Victoria Hart Glavin Tiny New York Kitchen


Thanksgiving Emergency Strategies
Help, help, I have extra guests coming! My gravy doesn’t look right! What to do? These are some holiday entertaining questions that I have been asked over the years. Whether this is the first time you’ve hosted Thanksgiving dinner or your 20th time there are always things that seem to come up that feel like emergencies. From lumpy gravy to unexpected guests the pressure can just be too great at times. Not to worry, these are some good strategies that have helped me cope and make everything run smoothly.
Dear Victoria: “My turkey is still a bit frozen and my dinner is in a few hours. What should I do?”
Put that bird into a large pot and run tepid water over it for at least an hour. You can butterfly the turkey so that it cooks faster which should take about an hour and a half at 400 degrees. You can then roast it or grill it. In the future you may want to consider purchasing a fresh turkey and not a frozen one.
Dear Victoria:” I called everyone to the table and started carving the turkey to find that parts of it are still raw or undercooked. How embarrassing! What should I do?”
This situation has happened to most of us at one time or another. Don’t skip a beat and just carry on carving off any parts that are cooked, serve those and put the remaining pieces back in the pan, cover with foil, and cook until done. Most likely the breast meat will be done. Your guests can get a bit of turkey along with your delicious sides while waiting for the rest of the turkey to come out of the oven. In the future you may want to consider carving the turkey first and then cooking it.
Dear Victoria: “I always seem to overcook the turkey. I just don’t know how I keep doing this. Please help!”
For the immediate remedy I suggest you have LOTS of gravy on the table to pour over those dried out pieces of turkey. In the future make sure to invest in a meat thermometer. Insert the thermometer into your cooked turkey through the thickest part of the breast until it hits the breastbone. Remove the turkey from the oven when it reads 160 degrees. Let your turkey rest for about 30 minutes before carving.
Dear Victoria: “I have a small kitchen and don’t have much room in my oven to cook everything. How am I going to get everything done?”
Tiny New York Kitchen knows this situation all too well! First of all there are plenty of things that you can get cooked in advance. Check your menu and see what you can prepare before needing to place your turkey in the oven. If you have an outdoor grill, then by all means grill your bird. Hey, you can play it off as the “hip thing to do.” Let your side dishes cook in the oven while your turkey is grilling out there in the fresh November air!
Dear Victoria: “I made stuffing and it is pretty soggy. How can I make it un-soggy?”
This is a super easy one. Scoop it out of the turkey and/or the baking dish and spread it out on a baking sheet. Place it in the oven and bake it at 350 degrees until it is how you want it. Scoop it back into the serving dish and serve. No one will be the wiser.
Dear Victoria: “Before I call my guests to the table the food starts to get cold. How can I avoid this?”
Cover serving dishes with lids or foil to keep them warm. If a dish actually gets really cold, that is supposed to be hot, then just put it back in the oven for a little bit. Don’t be too concerned, however, as most Thanksgiving dishes are perfectly fine at room temperature.
Dear Victoria: “My side dishes aren’t browned on top? They just don’t look that appetizing. What should I do?”
If a dish is fully cooked, but doesn’t have that delicious looking brown surface (Potatoes, Vegetables, Stuffing, etc.) then simply put them under a hot broiler at least 4 inches away from the heating element. You may want to turn them as needed until browned on top. MAKE SURE that you watch them carefully. You really don’t want them to go from pasty to burned up! Always put the food too far from the broiler rather than too close. If you follow these instructions then you will get a nice browned crust on top of your dishes.
Dear Victoria: “My gravy looks way too lumpy. I can’t serve lumpy gravy! How do I fix it?”
Not to worry. You will just need to put some hard work into it with a good whisk. Whisk those lumps out. It may take a bit of time, but it can be done. If you have really stubborn lumps add just a bit of hot liquid to coax them out while you whisk. If you STILL can’t get them out take a medium weave strainer and set it over a bowl. Pour the grave in and stir. Smooth gravy will flow through the strainer and the lumps will stay behind. For the future make sure you whisk the flour or cornstarch constantly while you are adding the broth or turkey juices to keep lumps from forming.
Dear Victoria: “Help, my gravy is just way to thick. It looks like brown jelly. How do I thin it out?”
This one is super easy. Drizzle in a bit of hot broth or hot water while whisking and then heat up your gravy until it’s piping hot.
Dear Victoria: “My gravy is too thin. It looks watery. I’m horrified. Is there a good solution to this hot mess?”
This problem is just a bit trickier. Brown 1 tablespoon for every cup of gravy by stirring it in a dry frying pan over a medium heat until it turns a nice deep golden brown. Have your gravy in a wide pan on the stove over a medium high heat. Whisk the browned flour into your gravy and cook. Make sure to whisk constantly until your gravy thickens. This should do the trick.
Dear Victoria: “The top of my pumpkin pie is all cracked and looks horrible. What happened? How can I serve a cracked pumpkin pie?”
Your pumpkin pie was over baked which is why it is cracked on top. Not a soul needs to know, however, if you dollop on whipped cream and carry it to the table like the prize pie it is! Sometimes cooking is like acting. If you flub a line you just carry on like that is how it is supposed to be.
Dear Victoria: “My sister called and asked if she could bring extra guests. My goodness, what am I going to do? Dinner is in an hour!”
I’ve certainly encountered this situation plenty throughout my dinner party throwing life. I’ve always kept an open door policy because I figure that not everyone has a place to go on the holidays, which can be very sad and lonely. The good news is that most of us make way too much food for Thanksgiving. Having unexpected guests can impact a meal however. First of all, forget any leftovers that you were counting on. Make more mashed potatoes, rice or pasta. These items take 30 minutes or less to make. Slice the turkey thin. Make a quick soup by combining chicken broth, pureed cooked vegetable(s), fresh herbs, salt and pepper. As soon as you get the call immediately put bowls of nuts and snacks out before dinner.
Dear Victoria: “I have quite a large group coming for dinner and I don’t have enough room at the table. What do I do?”
You can set up dinner buffet style or you can set up multiple tables as auxiliary eating areas. Living room coffee tables and game and/or card tables work. You can let everyone sit where they want or you can seat people by age or alphabetically or however you decide to seat people. Thanksgiving is about spending time with friends and family. People will have fun no matter where they are sitting. Relax and enjoy yourself.


