
Crunchy, juicy, nutrient packed jicama is an unsung hero of the produce aisle. Technically a cousin to green beans, jicama is a root vegetable from Mexico available year-round that is delicious cooked or raw. With a mild, earthy, slightly sweet flavor and an apple like consistency. It’s a great addition to salads, salsas, slaws, and grazing boards. Jicama also works as lighter swap for potatoes in baked and air fried recipes, and it’s delicious sautéed or boiled, too.
If you’ve never tried jicama, don’t be intimidated. Start by choosing one with a smooth, unblemished surface and thin brown skin. The skin should be thin enough to scrape with your thumbnail to reveal the white flesh inside. Avoid thick skinned, bruised, or shriveled jicama, which are signs of aging.
Once you’re ready to prep, start by trimming off the ends of the jicama and slice in half. Then, use a knife to gently peel away the skin.
For Jicama Sticks:
Step 1: Carefully slice off the rounded parts of the jicama, creating a flat surface.
Step 2: Cut each half into 1/4-inch slices.
Step 3: Stack slices and cut evenly into sticks.
Fresh, raw jicama sticks are a great addition to lunchboxes or served on a vegetable platter with your favorite dip. They can also add unexpected, satisfying crunch to cooked dishes, like a noodle salad with jicama and a miso vinaigrette.
Jicama sticks are delicious roasted, too. Their firm texture can withstand the heat, while the edges get golden brown and tender. Toss together with sweet peppers and spices for a simple, satisfying sheet pan side that pairs well with all kinds of meat and fish.
For Diced Jicama:
Step 1: Follow the steps above to create jicama sticks
Step 2: Line up sticks or stack into a pile, then evenly cut into cubes.
Diced jicama is a vitamin and fiber-rich way to add bulk to all kinds of green, grain, and protein-based salads. I love the combination of crunchy jicama with creamy avocado served with grilled chicken.
Moist and mild flavored jicama also plays well with fruit, especially melon. A refreshing combination of watermelon, jicama, and fresh mint falls somewhere between salad and salsa, delicious scooped onto tortilla chips or just spooned straight from the bowl.
Next time you’re at your local grocery store or market pick up jicama and experiment with ways to incorporate it into your recipes.
©Tiny New York Kitchen © 2021 All Rights Reserved
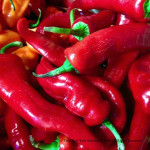
Drying Chili Peppers
As I sit here, on vacation, looking out at the ocean I’m thinking about chili peppers. I tend to think about all sorts of random things, most especially when I have an opportunity to block out the noise of the outside world. Chili peppers…my first REAL exposure to a wide variety of chili peppers was years ago spending time in New Mexico and then later in Arizona. I love the Southwest and very much appreciate the importance of chili peppers. One way to preserve chili peppers for future use is by drying them. There are two basic ways to dry them.
Wash the peppers with warm water and dry thoroughly with a cloth towel. You may want to remove the stems from your peppers. If you’re drying them in the oven or food dehydrator you may wish to slice the peppers length-wise as this will allow them to dry faster. It’s usually a good idea to wear gloves when handling peppers, especially if you are a contact wearer.
If you are in a time crunch, using a dehydrator is the fastest method. I like to let my chili peppers dry on their own for a week to 2 weeks BEFORE putting them in the dehydrator. Lay the peppers out on metal mesh racks and dry them whole. After 10 days slice them open and remove their seeds and stems. You may save the seeds for next year’s planting. Removing the seeds also cuts down on their spiciness. They are then dried in the dehydrator until crisp. This saves energy, as they only need about 12 hours in the dehydrator compared to almost a full day with freshly picked peppers.
Another way to dry chili peppers is by stringing them through the base of their stems with a needle and fishing line and hanging them to dry inside. It will take weeks for the peppers to dry out completely, but in the meantime you get to enjoy the aroma of the peppers. Whole dried chili peppers can last for up to two years for culinary purposes and up to 10 years for decoration. The peppers can be rehydrated and used for blended salsas and mole, used in brines for poultry and pork, or ground into a fine powder for seasoning. Dried chili powder can be used alongside salt and pepper for cooking most foods.
“Work With What You Got!”
© Victoria Hart Glavin Tiny New York Kitchen © 2015 All Rights Reserved
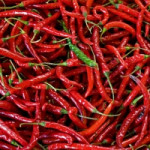
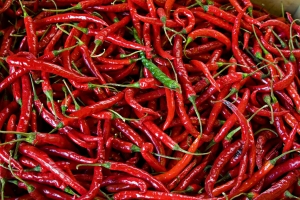 Know Your Chiles
To keep your Mexican dishes authentically delicious, here are some pointers about chiles. If you were asked to identify one characteristic that would singularly describe Mexican dishes, the “chile” would be the answer, namely chile peppers. Whether ground, whole, sliced, diced, pickled, fresh, canned or dried, chile peppers are an inherent part of Mexican dishes.
There are many varieties of chiles, ranging from mild to very hot! Chefs use whatever chiles are available to them. Some varieties are available canned when they aren’t available fresh. Here is a list of some common peppers.
Green Peppers: Also called bell peppers. They are very mild peppers and are used in salads as a garnish and they are used to flavor & color dishes.
Anaheim: Also called California peppers. They are mild, long green chiles. They can be eaten raw and are used in salads.
Jalapenos: They are smaller sized and dark green chiles. They are typically very hot.
Serranos: They are smaller and slimmer than jalapenos, but be warned they are hotter too!
Ancho: These chiles are plump and dark green chiles that range from mild to medium. Ancho means “wide,” that’s why these are usually the best choice for chile rellanos.
Yellow Hots: They are longer than jalapenos and moderately hot. These chiles are used in hot mixes, along with other chiles and are used in salsas. They are also used as a garnish to color dishes.
Wax Chiles: These chiles are small, slender, yellow chiles and are used in pickled mixes, in salsas and as a garnish.
Chilitepins: These chiles are tiny and seedy red peppers. They are used for seasoning in salsas in combination with other chiles. They are also used in pickling. Warning…they are VERY hot!
You can roast chiles over the top burner of your stove. Make sure to turn frequently to keep the chiles from burning. You can cook three to four chiles at a time. When the skins turn dark brown and look blistered then remove them from the heat. Wrap the chiles in a damp kitchen towel or paper towel to make the skins easier to remove.
Chiles can be roasted in an oven as well. Place the chiles onto a parchment paper lined baking sheet. Bake at 350º F. until the skins are brown and blistered. After roasting, wrap the chiles in a damp kitchen towel for a few minutes. Then remove the skins.
You can also dry chiles. To dry chiles, make a chile “garland.” Sting chiles up by their stems to make a cluster. Let them hang to dry by placing them in a very dry place until they become dry. Fresh green chiles turn from green to red when left to dry out. Dried chiles are ready to use when they are crackly-dry.
Chile garlands can also be used for decorations in your kitchen, living room or patio. These sartas or ristras are a characteristic sight in the Southwest.
To use dried chiles, just soak them in a hot water bath until they are softened. Open the chiles up and remove the stem and seeds. Puree them in a food processor or blender. Add small amounts of water to process. If the chiles are hot then add a water and vinegar mixture to help tame the chiles. When a chili paste is made then make sure to pass through a sieve to make a smooth paste. Season the paste as you desire to make salsas or for cooking.


