
Storing Candy
One of the nice things about homemade candy is that it can be eaten when it is at its freshest. In addition, it contains no chemicals, artificial flavoring, or preservatives, although the lack of preservatives does limit its storage capabilities. Most homemade candy, however, will keep well for several weeks if it is stored properly. The exception is divinity, which gets stale quickly and should be eaten within two days of preparation.
Here are some rules for storing candy successfully.
Sticky and chewy candies, like taffy, nougat, and caramels, and hard candies, like butterscotch, should be individually wrapped in waxed paper, plastic wrap, or foil.
All candy keeps best in an airtight container in a cool, dry place. Some chocolate candies, like truffles, are best stored in the refrigerator.
Do not store brittle candies in the same container with soft, creamy candies. The moisture from the soft candies may make the hard candies sticky.
Candy freezes well. Place the candy, individually wrapped if appropriate, in a cardboard box or plastic container. Overwrap the container with freezer paper or foil. To thaw the candy, let it stand for several hours, or overnight, and come to room temperature before opening the container. This will prevent moisture from collecting on the candies because of the temperature change.
"Work With What You Got!"
© Victoria Hart Glavin Tiny New York Kitchen

Making The Best Candy
Candy is not difficult to make. Some candy recipes require little or no cooking at all. Other candy recipes need only careful timing and adequate beating. For some types of candy, however, special care is necessary. Follow these basic instructions and you can become a successful and versatile candy maker.
Always read a recipe through from beginning to end BEFORE starting to cook. This is important with all recipes, but especially candy recipes. You never will know if you need special equipment or a special ingredient until you read the recipe.
Always use the best quality, freshest ingredient available.
Measure ingredients accurately, using standard measuring spoons for small amounts, a fluid measuring cup for liquids, and graduated measuring cups for dry ingredients.
Follow recipes carefully. Use only the ingredients specified and add them in the order and by the method given.
To prevent sugaring, carefully follow directions about stirring and about covering the pan.
Use moderate or low heat, according to instructions in the recipe, so the syrup does not reach the boiling point too quickly.
Always use a saucepan large enough to allow space for the candy to bubble up when boiling. A 2 quart pan is large enough in most cases, but sometimes a 3 quart or even a 4 quart pan is preferable. A pan in which candy is made should be a heavy gauge metal, which holds heat evenly and will prevent sticking.
Candy making involves a lot of stirring and beating. Although an electric mixer may be used in some stages of preparation, such as beating egg whites for divinity, for most candy mixtures a spoon is best. A long handled wooden spoon is preferable, since it will never get too hot to handle. God bless wooden spoons!
A candy thermometer that clips onto the side of the pan is almost a necessity for successful candy making, since it is critical that the candy be removed fro the heat at the moment it reaches the proper temperature. It is best to use a clearly marked, easy to read thermometer with a mercury ball that is set low enough to measure the temperature of the boiling syrup, but does not touch the bottom of the pan.
To use a candy thermometer, be sure it is at room temperature before putting it into the hot syrup. Lower the thermometer gradually into the candy mixture AFTER the sugar is dissolved and the syrup has begun to boil.
The cold-water test is an alternative to a candy thermometer. Many cooks still rely upon this test, although it is not as accurate as a candy thermometer (hard ball/soft ball).
Temperature Tests For Candy
Temperature of Syrup Test Description of Syrup When Dropped Into Very Cold Water
234° to 240 ° Soft Ball Forms a soft ball that flattens on removal from water
244° to 248° Firm Ball Forms a firm ball that does not flatten on removal from water
250° to 266° Hard Ball Forms a hard ball that, on removal from water remains hard enough to hold its shape yet pliable
270° to 290° Soft Crack Separates into threads that are hard, but not brittle, when removed from water
300° to 310° Hard Crack Separates into threads that are hard and very brittle
To water-test, use very cold, but NOT ice, water. Use a clean cup, spoon, and fresh water for each test. Remove the pan from the heat and drop a little of the hot mixture into the water. Use your fingers to gather the drops into a ball and feel its consistency. If the candy is not yet ready, immediately return the pan to the heat.
Avoid making candy on damp or rainy days. High humidity is the candy maker’s enemy. If for any reason you cannot postpone a candy making session, cook the candy 1 or 2 degrees higher on the thermometer than indicated in the recipe.
Altitude also affects candy making. Temperatures given in recipes are typically for sea level. At high altitudes the candy must be cooked about 2 degrees higher.
Be patient and always allow sufficient time. Most candy does take time to make, and there is no way to rush the cooking with disaster.
"Work With What You Got!”
© Victoria Hart Glavin Tiny New York Kitchen
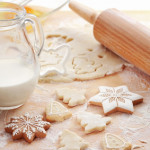
Tips For Baking A Better Cookie
After making thousands and thousands of cookies over the years one learns a few important tricks on how to make a better cookie. Here are some tips from the Tiny New York Kitchen’s kitchen.
Making Dough:
Bring butter to room temperature for 30 minutes to 1 hour before you start (unless otherwise directed). If you’re short on time, cut the butter into pieces and microwave in 5-second intervals, just until butter is soft, but not melted.
To measure flour, spoon it into your measuring cup, then level it with a knife. If you pack flour into the cup, your cookies could turn out dry and heavy.
Check the expiration dates on your baking powder and baking soda, or test the freshness by dropping a pinch into vinegar: If the baking soda or powder foams and bubbles, it’s still good.
Use pure extracts. The imitation stuff just isn’t the same.
Baking Cookies:
Buy an inexpensive oven thermometer and adjust your oven setting accordingly.
If you’re baking more than one tray of cookies at a time, switch the positions of the pans from top to bottom halfway through baking and give each pan a 180-degree turn.
Cool and quickly wash your baking sheets between batches. If you drop dough onto a hot baking sheet, the butter will start melting instantly and the cookies could lose their structure.
Line baking sheets with parchment paper for easy cleanup.
Let cookies cool for a few minutes on the baking sheets (just until they’re firm enough to move), and then remove them to a rack to cool completely (unless otherwise directed). If you leave the cookies on the pan, they could end up too crisp.
"Work With What You Got!”
© Victoria Hart Glavin Tiny New York Kitchen

Ways To Resist Overeating During The Holidays
Tiny New York Kitchen’s new motto is that December is the new January! With countless cocktail parties, cookie exchanges, and holiday meals this time of year, even the most responsible eaters can be tempted to go all out. Here are a few tips that can prevent total diet derailment, and still enjoy yourself, during the holiday season.
Fill your fridge with healthy, protein-rich snacks that will fill you up and keep you full so that you are less likely to indulge during holiday festivities.
Decide which temptations you would like to resist and to what degree. Remember moderation is key!
Indulge wisely. Allow yourself to enjoy those must-have treats that you look forward to all year long. Whether it’s eggnog, mashed potatoes, pecan pie, or red velvet cake – keep in mind that there is no need for an all-out binge-fest. Enjoy a reasonable yet rewarding amount of holiday foods that you absolutely love. Remember that no single meal will wreck your waistline.
Pay attention to how much water you are drinking. Try and consume 8 to 10 glasses of water per day.
Hit the gym. This way if you do indulge a bit at least it can be somewhat “guilt-free.”
Eat breakfast! When you skip breakfast you set yourself up to eat more at the next meal. Whatever you do, eat breakfast!
To recover the day after “food hangover” feeling that follows a rich meal, eat a normal breakfast with protein, such as yogurt or eggs, the next morning. The rest of the day, avoid refined carbs, drink at least 8 to 10 glasses of water to flush out the sodium. Also, fill up on “clean” foods such as fruits, vegetables, and protein.
Freeze those leftovers. Have leftover pecan pie? Freeze it! Storing tempting foods in the freezer to keep them out of sight means you’re much less likely to eat them since you’d have to defrost them first.
Be a smart snacker! Before you head out to those holiday parties, have a nibble of something so you don’t risk becoming starved. A handful of nuts, a mozzarella stick, Greek yogurt, or protein bar will work wonders.
Double up on those drinks! When you arrive at a party, start with a non-alcoholic drink to quench your thirst. Then have a glass of wine, champagne, or cocktail, but always alternate with zero-calorie liquids such as water or club soda. You’ll feel much better at the end of the night, and certainly the next day.
It’s ok to tell lies, but do it politely, of course. It’s hard to say “no” to your boss or your nana when they offer you a treat. Tell them thank you and take it. Tell them how delicious it looks, but that you’ve just eaten and are going to save it for later. Wrap it up and take it with you. If it ends up in the trash or given to someone else then that’s A-Okay!
If you’re going to a holiday party, offer to bring a healthy dish that you love. Bringing something healthy that you love will guarantee that there is something healthy that you can fill your plate with. It will also give you a chance to show your friends, family or coworkers that healthy food can taste great.
Get Up, Stand Up! When you’re at a party or buffet, get one plate, and then step away from the food table, but stay on your feet! Standing up helps with digestion and makes it more difficult to keep piling food on your plate, and burn calories.
Get thyself distracted! After a holiday meal, get your mind off food by offering to help clear the table or do the dishes. Chew a piece of gum or pop a breath mint. Its kind of like brushing your teeth so that you won’t be tempted to ruin your fresh breath for another piece of pecan pie.
Cut those serving portions down. There is no need to ruin a family recipe by reducing sugar or cutting out fatty ingredients. Instead make the real version of your great-grandmother’s famous date-nut cake, but cut it into 18 small slices rather than 10 giant pieces.
If you do overeat don’t beat yourself up, acknowledge it and then let it go. If you do go a little crazy at a party, it’s really not helpful to beat yourself up about it. Each day and each party is like a “reset,” it’s a chance to try again.
Happy Holidays!
"Work With What You Got!”
© Victoria Hart Glavin Tiny New York Kitchen

Each December I head to Shakespeare's Garden in Brookfield, Connecticut to pick up a variety of poinsettias to place around my house during the holidays. It's always such a joy to go to this charming nursury. They also have amazing ornament displays which are fun to look at and, of course, I can't resist picking up a few ornaments.
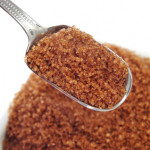
Brown Sugar
Most brown sugars are made of white granulated sugar to which a dark syrup has been added. Dark brown sugar has a mild molasses, and light brown sugar has a milder, lighter syrup, which may also be molasses. Dark brown has a slightly stronger flavor, but they may be used interchangeably.
You can easily make your own brown sugar, as you need it by blending together 1/2 cup of granulated sugar with 2 tablespoons of unsulphured molasses. The yield is equivalent to 1/2 cup of brown sugar.
Brown sugar is moist and if it dries out it will harden. It should be stored airtight at room temperature. If it has small lumps in it they should be strained out. With your fingertips press the sugar through a large strainer over a large bowl. If your brown sugar has been left open and becomes hard, place a dampened (not wet) paper towel inside the airtight container for 12 hours or more. A slice of apple can be used in place of the dampened towel.
"Work With What You Got!"
© Victoria Hart Glavin Tiny New York Kitchen

Summer fading, winter comes –
Frosty mornings, tingling thumbs,
Window robins, winter rooks,
And the picture story-books.
-Robert Louis Stevenson
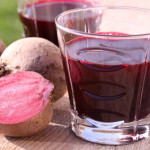
Old Fashioned Food Coloring
Next time you have a need to use food-coloring trying using natural dyes the old fashioned way. Just do what grandma did, and use fresh beet juice for red; turmeric for yellow, and blueberry juice for blue. You’ll save money and have peace of mind that you used truly natural dyes.
"Work With What You Got!”
© Victoria Hart Glavin Tiny New York Kitchen
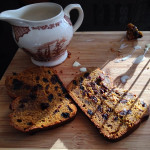
Make Pumpkin Bread Eggnog French Toast Of Course!
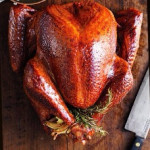
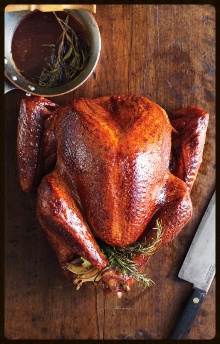
Turkey Roasting Instructions
Remove turkey from refrigerator at least 1 hour prior to roasting.
Preheat oven to 325 degrees.
Place turkey in sink and remove neck and giblets.
Place in roasting pan and brush with melted sage butter and season with kosher salt and pepper.
Place turkey in lower third of oven and roast for 12 minutes per pound.
To determine if turkey is done, place a thermometer between thigh and breast. The temperature should register between 160 to 165 degrees and juices should run clear.
When turkey is done, remove from oven, cover loosely with foil, and allow to “rest” for 30 to 45 minutes which allows you time to heat all your other side dishes.
Carve and enjoy!!
Approximate cooking times for an unstuffed turkey (based on 12 minutes per pound at 325 degrees):
9 Pound Turkey 1 3/4 Hours
12 Pound Turkey 2 1/2 Hours
14 Pound Turkey 2 3/4 Hours
16 Pound Turkey 3 1/4 Hours
18 Pound Turkey 3 1/2 Hours
20 Pound Turkey 4 Hours
22 Pound Turkey 4 1/2 Hours
25 Pound Turkey 5 Hours
"Work With What You Got!"
© Victoria Hart Glavin Tiny New York Kitchen


