
This holiday season, whether you are planning your usual celebrations or making new smaller traditions it is important to balance holiday favorites and healthful options that are delicious. Sticking to wellness goals can be challenging during the holidays. Here are some tips to help you stay on track.
Pack Healthful Snacks For Travel
If you’re traveling this holiday season it can be challenging to eat healthy. Rest stops, gas stations, and airports aren’t known for healthful snack options. Pack your own for holiday trips. Try apples or bananas paired with nut butter, trail mix, or pre-cut vegetables with hummus cups. Be sure to fill up your water battle, too.
Mindful Eating
Mindfulness is the practice of being present and in the moment and can help you fully enjoy each eating experience. Turn off technology, set the table and eat slowly, using all of your senses with each bite. These habits can help you tune into your hunger cues and allow you to savor your meals without overdoing it. Plus, mindfulness can help you fully engage in the time you’re spending with loved ones.
Work In A Workout
When you’re in the thick of holiday prep, your exercise routine may fall by the wayside. Since you can’t add more hours to the day, fit in exercise when you can by parking farther away at the grocery store or taking the stairs at the mall.
Indulge Your Sweet Tooth Mindfully
There are many holiday treats to choose from. Plan to pick out your favorites and truly savor them. That will make it easier to skip the rest. If you stick to your normal healthy eating patterns most of the time, you will come out of the holiday season satisfied but not over stuffed.
©Tiny New York Kitchen © 2020 All Rights Reserved

Holiday baking time is a fun time of the year with the kitchen filled with delicious aromas and an array of treats to share with friends and family. No matter what style or flavor is your favorite, follow these steps for the best cookies you’ve ever baked, every time.
Use Room Temperature Ingredients
Get eggs and butter out of the refrigerator early, so they blend better in your cookie dough. Your cookies will have better texture and volume when all the ingredients are evenly incorporated.
Measure With The Spoon & Sweep Method
Use a spoon to add dry ingredients like flour to a dry (flat edged) measuring cup, then level off with the back of a knife. This method gives you the right amount of flour for the recipe, so your cookies aren’t too dry or dense.
Chill Dough Before Shaping Or Slicing
Refrigerate at least 1 hour or even overnight, so the dough is easier to work with and cookies hold their shape. Giving the ingredients time to meld makes your cookies taste better too.
Flour Your Cookie Cutters As You Go
Keep a small bowl of flour next to your work surface when rolling and shaping cutouts. Dip cookie cutters in flour in between stamping so they release easily and don’t stick to the dough.
Use Parchment Paper To Line Baking Sheets
Ensure that your cookies won’t stick to the baking sheet by using parchment paper liners. Parchment can be used more than once depending on the style of cookie, then can be replaced for more baking and easier cleanup.
Rotate Sheets Halfway Through Baking
All ovens have hot and cold spots. Help cookies bake evenly by switching the sheets between the top and bottom oven racks or rotating the sheets 180 degrees on the rack halfway through the baking time.
Rest On Baking Sheets For 1 To 2 Minutes Before Moving To Cooling Rack
When cookies are removed from the oven, they can still be soft and molten on the inside. Let the cookies settle and cool for a minute or two before transferring to a wire cooling rack with a thin spatula.
Cool Baking Sheets To Room Temperature Between Batches
Unbaked dough can start to melt immediately on a hot baking sheet, causing cookies to spread and overcook in the oven. Let sheets cool to the touch before using again.
Cool Cookies Completely Before Frosting Or Storing
Frosting can soften and melt on warm cookies, while sealing cookies in a container before they are cooled can cause sogginess. Let cookies rest on a rack for at least 1 hour before decorating or packaging.
Add A Small Piece Of Bread Or Orange Peel To the Cookie Tin
The cookies will slowly absorb the moisture from the bread or peel, so they won’t go stale as quickly. Replace the bread or peel every few days as it dries out.
©Tiny New York Kitchen © 2020 All Rights Reserved

Cheese Boards are a no-cook, sure-to-please option for any holiday celebration. Build a cheeseboard that’s affordable yet special. Then toast the season with festive cocktails.
A few inexpensive ingredients and simple homemade touches are all you need for a spectacular, special occasion-worthy spread. Here are some smart tips to deck your board with festivity and flavor without breaking the bank.
For a classic, colorful centerpiece, make your own cranberry and herb cheeseball. Start with a container of spreadable cheese and form into a ball. Use a sheet of plastic wrap to avoid messy hands. Roll the ball in a combination of finely chopped dried cranberries, parsley, and chives until thoroughly coated. Let sit at room temperature for 15 minutes before serving.
No need to buy expensive cheeses. Inexpensive cheddar is always a crowd pleaser. Skip the pre-cut cubes and cut the block yourself. Orange or white, mild or extra sharp. Cheddar is always a favorite.
Upgrade affordable goat cheese by rolling the log in herbs and spices, like dried thyme, dried oregano, or crushed rainbow peppercorns for a beautiful, flavorful crust. You could also keep it plain and top with jarred pepper jelly or mango chutney.
Instead of mixed nuts, opt for crunchy snack mixes, which are often less expensive and just as delicious. For the board, look for one with little or no seasoning.
Give a budget-friendly feta or mini mozzarella balls a flavor boost by marinating cubes in olive oil with herbs like parsley, oregano, or rosemary, and other seasonings like sliced chilis, crushed garlic, or lemon zest. Refrigerate overnight or up to 3 days.
Round out your cheese board with other delicious items like fresh or dried fruit (dried apricots, figs, grapes, and sliced pears), pitted olives, and plain crackers.
Pair your cheese board with a festive holiday beverage and enjoy!
©Tiny New York Kitchen © 2020 All Rights Reserved

Warm Dough
Make sure not to let the dough get warm. Use cold butter and ice water. Refrigerate the dough before you roll it out. If the butter warms it will be absorbed by the flour, become sticky, and make for a tough crust.
Uneven Crust
To get an even, round crust, begin rolling from the middle of the dough round, pushing outward and stopping the pressure 1/4 inch from the edge. Then lift the round, give it a quarter turn and repeat.
Transferring Crust
To transfer your pie dough from the rolling surface to the pie plate, lift it with a bench scraper, gently drape it over a rolling pin, then place it in the pie plate.
©Tiny New York Kitchen © 2020 All Rights Reserved

Sweet potatoes are available year-round, but their true seasons are fall and winter.
When selecting choose firm, unblemished sweet potatoes without any breaks in their thin skin.
Preparing: To bake whole sweet potatoes, scrub them well first and prick their skins in a few places with a fork. Place them on a baking sheet to catch their juices, and bake in a preheated 400-degree oven until they are tender when pierced with a knife, about 45 minutes. They may then be peeled and sliced or cut into chunks for glazing, or puréed. You can also peel uncooked sweet potatoes and cook them in salted boiling water until tender before glazing or pureeing.
Sweet potatoes do not keep well. Store them in a cool, dark place, but plan to use them within a week or so.
©Tiny New York Kitchen © 2020 All Rights Reserved

A tablecloth sets the mood and the tone of whatever meal you’re serving and, as an added bonus, it helps protect the table. Shopping for tablecloths can be pretty confusing though. Often times trying to decide what size and shape to get is a difficult task. Here is a good way to calculate your perfect tablecloth no matter how small or large your table is.
Get Your Table Ready To Be Sized
If you have an extendable table with leaves make sure to extend or shrink your table to the size you will be using before you measure your table for linens. For a casual tablecloth this will probably be the table size you use most frequently. If you’re hosting a formal dinner, it will be the dimensions you plan to use for your special occasion.
Calculate Your Tabletop Dimension
Measure both table length and width. For either, this is most easily accomplished by measuring from the center of your table outward, then multiplying the measurement by two.
Factor In The “Drop” You Want
Determine the desired length of your tablecloth drop (how far over your table you want the cloth to hang. The standard is considered to be 10 inches. Anything less than 6 inches will make your table look out of proportion and your linens too small. You can also extend your drop for a more formal look, but if you do this, you should measure the difference between the table and the chairs to see what will look good when chairs are pushed under the table without gathering too much fabric or draping on your guests’ laps.
Do A Little Table Math
For a rectangular table, multiply your desired drop by two, then add on the actual measurements of the table. For example, if you are going for a 10-inch drop and your table is 68 inches long, your mathematical equation would be 10 (the desired drop, in inches) multiplied by 2 (to factor in both sides of the table) with 68 (the length of your table) added. Your desired tablecloth length would be 88 inches.
For A Round Table
For a round table, calculate the size slightly differently. You will want to multiply your desired drop by two, then measure the table through its diameter from one side to the other, adding that to the total number. For instance, if your round table has a 50-inch diameter and you want a 10-inch drop, your calculation would be (10×2) + 50, which equals 70. Your desired tablecloth size would be a 70-inch round.
If You Don’t Find The Exact Size
If you have a difficult time finding the exact size you want, then simply size up to the next available size.
Rectangular Tablecloth Size Calculator.
Table Length Tablecloth Size
62″ to 72″ 70″ x 90″
80″ to 92″ 70″ x 108″
96″ to 110″ 70″ x 126″
110″ to 126″ 70″ x 144″
Round Tablecloth Size Calculator
Table Size Tablecloth Size
42″ to 55″ Round 70″ Round
55″ to 70″ Round 90″ Round
©Tiny New York Kitchen © 2020 All Rights Reserved
Here in the Northeast we often think of there being a short growing season. In other regions, many people garden as if there’s a beginning and an end as well. But gardening, anywhere you do it, is circular. There may be slow times, but planning ahead for what’s around the bend is crucial.
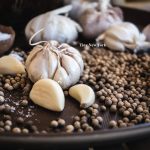
Right now, I’m thinking about next year’s garlic. Here we are, another turn of the season. Cool days and nights are creeping in and it’s really quite wonderful that one of the last planting tasks in the garden is getting garlic in the ground. Planting in general may feel counter to all the other fall tasks, but when you plant garlic you are “putting it to bed,” since it needs a cold cycle to perform well. On the other hand, the very act of planting-looking forward to spring and summer and harvest- brings the cycle of the seasons together quite nicely, proving that a garden never really begins or ends; it only changes.
Ho much you plant depends on what you want out of your crop. One pound of garlic can plant between 15 to 30 feet depending on the variety, and the amount of space you give it. Space rows 12 inches apart in whatever bed system you use.
If you would like to produce your own seed stock and your own eating stock, plan to reserve the top 30% of your harvest for planting. Each pound of garlic can produce between 50 to 75 heads of garlic, since each clove can produce a head.
When following a vegetable rotation schedule, one knows where the garlic will be planted well ahead of time. This gives an opportunity to make sure the beds are well worked, weeded, amended and prepared.
Garlic prefers rich, well-drained, and weed-free soil located in full sun. Ideally, choose a spot that is in full sun from winter through spring. It can be difficult to grow a crop in your weediest beds, so consider this when location scouting during the summer.
Compost, aged manure, and weed-free hay or straw mulch are good choices. Give yourself plenty of time to get this sorted out.
A few days prior to planting, prep your site.
Choose a sunny day in October when the soil is still warm. Try to leave enough time before the ground freezes solid for the garlic to set roots. Garlic can be planted any time before the ground freezes solid, though, ideally 3 to 6 weeks prior.
Begin by breaking apart the heads of garlic into cloves. Count the cloves and determine the amount of space you need. Most hardneck varieties have 50 to 90 cloves per pound. Garlic prefers full sun, so choose a spot that will get full sun for the spring and early summer. Each clove will be planted at 6” spacing, in rows 12” apart. Weed and work a proper amount of garden space. After cultivating the space, mark the rows. Plant cloves root side down, 2” deep, at least 6” apart, in rows 12” apart. Water and cover with mulch. Your garlic will need to be tended to in the spring, once the ground warms and it begins to grow.
Spring growing conditions and care: Garlic begins to poke through the ground as soon as the soil warms. If you covered your garlic with a thick mulch layer, rake it back to help warm the soil faster.
Garlic prefers rich, weed-free soil and ample water. Beginning in the spring, pull weeds when small, taking care not to damage your garlic when pulling them out. Hardneck varieties produce garlic scapes in the spring. If left on the plant, the scapes will draw energy from the bulb, reducing size and quality. Once the scapes emerge, cut them off immediately to direct the plants’ energy into bulb production. The scapes are an edible spring delicacy.
Giving your garlic a nutrient boost in the early spring is highly recommended. Garlic performs well with a nitrogen boost in the form of alfalfa meal, or a light side-dress of compost.
©Tiny New York Kitchen © 2020 All Rights Reserved

With the multicolored cascades of leaves redecorating the landscape, autumn brings family gatherings and get-togethers with friends. At the center of many warm memories is time spent around the table, sharing in the delights of dishes so delicious that they are sure to be requested again and again for seasons to come.
As you ready your home for hospitality, I encourage you to select the freshest ingredients before donning your apron. I hope that you enjoy creating this autumn!
©Tiny New York Kitchen © 2020 All Rights Reserved

Autumn’s bounty is vibrant, varied, and delicious. Apples of all varieties are now available at farmers’ markets and supermarkets, including crunchy, sweet Honeycrisp, gorgeous Galas, MacIntosh mottled with both green and red, pale yellow Ginger Golds, and dark, dusky Paula Reds.
Apples are the perfect snack, satisfying and sweet. Try slicing an apple, place the slices in a plastic baggie, sprinkle liberally with cinnamon, close the bag, and shake until the slices are well coated with cinnamon. The apple slices will stay crisp and white for several days in the refrigerator. Perfect for grab and go school lunches, picnics or work from home snack breaks.
A versatile cooking ingredient, apples go well with both sweet and savory components. Combing apples with plums, cranberries, figs, raspberries or blueberries will yield particularly pleasing desserts, such as pies, puddings, tarts, cobblers, and crisps. Whether baked, poached or sautéed, apples lend marvelous layers of flavor to breads, sauces, slaws, salads, stuffing, coleslaw, chutney, and relishes.
As the weather turns cooler, what could be more comforting than the scent of apples roasting in the oven, mingling with spicy cinnamon. Apples enjoy an easy association with all manner of spices, including allspice, cloves, ginger, and nutmeg.
©Tiny New York Kitchen © 2020 All Rights Reserved

You may try to keep basil through the winter, however, sweet basil is meant to live its life cycle within one year and then go to seed. At the end of the season, though, you may try to keep it alive by moving potted basil indoors to enjoy them for months to come.
Inspect And Transplant
Before you bring your basil indoors make sure to inspect it thoroughly for any insects. Flush the soil with water and rinse off the foliage, using a blast of water from the garden hose to chase away any pests and avoid later problems. Then, you can gently dig up your basil from the garden any time before the ground freezes.
Transfer To A Pot
Select a container large enough to accommodate your basil plus a little room for growth. Place a layer of potting mix on the bottom of the pot, then set the basil on top of that. Fill in the spaces around the roots with more potting mix. Press the soil firmly around the basil’s roots, leaving about an inch between the soil and the rim of the pot. For smaller basil plants, try placing several together in a window box that fits on a sunny sill. After settling your basil into its new container, water until it drains out the bottom of the pot.
Acclimate Your Basil
When bringing your basil indoors, it will need a little time to adjust to the new surroundings. You might notice that your basil drops a few leaves and grow more slowly. Ease your basil into life on the inside by setting them in a spot with indirect light. Don’t put them in bright sun right away. After a couple of weeks, you may move the pots to a spot that will get a least four hours of sun or bright light. If you don’t have a window that provides plenty of sunlight, you can also grow your herbs under fluorescent bulbs or with a grow light setup.
Give Your Basil Some Love
Turn pots once a week or so to help all sides of your basil get enough light. Water when the soil feels dry to a depth of 1 inch. Mist the leaves daily to boost the humidity level. You can also tilt the pots over the sink and gently rinse their foliage with tap water every once in a while, to keep them clean and deter any pests that might show up. You may want to boost the humidity around your basil by placing their pots in a pebble filled tray. Water the pot regularly, allowing excess water to over flow into the tray.
Cuttings
To make sure you always have access to fresh basil throughout the winter, places cuttings in a small vase of water and they will soon develop roots. When the roots are a couple of inches long, put the cuttings to expand you supply of fresh basil. Or you may snip sprigs whenever you need some fresh basil for your favorite dishes. Either way, this will encourage your basil to produce new growth and stay compact until you can move them outdoors again in the spring.
With a little preparation, basil can come indoors for the winter. Growing them in containers will give you a fresh supply for cooking all year long and you will be able to take them back outside and replant when spring arrives.
©Tiny New York Kitchen © 2020 All Rights Reserved


