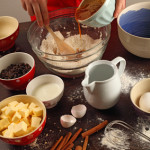
Love The Lumps!
Don’t use an electric mixer when combining wet and dry muffin ingredients. Beating will cause gluten to overdevelop, which will produce tough muffins. Mix just enough to wet the dry ingredients; a lumpy batter is the goal.

Dark Leafy Greens Give You More Nutritional Bang For Your Buck. Add More Greens To Your Diet And Most Likely You’ll Feel Much Better.
Add Cooked Greens To Frittatas, Breakfast Tacos And Poached Eggs.
Stir Greens Into Soups And Stews During The Last Few Minutes Of Cooking.
Start Your Day With A Smoothie Packed With Kale.
Add Greens To Grain dishes Or Serve Grains Over A Bed Of Steamed Chard.
Add Sautéed Greens To Cooked Whole Wheat Pasta Or Stir Into Pasta Sauces.
Make Sure To Wash Dark Leafy Greens In A Sink Full Of Water To Remove Dirt And Sand. Dry Well.
Store Your Greens In A Bag Along With A Paper Towel In The Crisping Drawer Of Your Refrigerator, Or Quickly Blanch And Freeze Greens To Use For Quick Sides And Easy Meal Prep Later.
“Work With What You Got!”
© Victoria Hart Glavin Tiny New York Kitchen © 2017 All Rights Reserved

Most recipes have been perfected for use at seal level. At higher altitudes, adjustments in the cooking time, temperature, and ingredients could be necessary.
At sea level, water boils at 212 degrees. With each additional 500 feet of altitude, the boiling point drops 1 degree. Even though the boiling point is lower, it takes longer to generate the heat required to cook food. Therefore, at high altitudes, foods boiled in water (such as pasta and beans) will take longer to come to a boil and will require longer cooking times than recipes suggest. The processing times for canning foods and the blanching times for freezing vegetables will vary, too.
At high altitudes, cake recipes may need slight adjustments in the proportions of flour, leavening, liquid, eggs, etc. These adjustments will vary from recipe to recipe, and not set guidelines can be given. Many cake mixes now carry special directions on the label for high-altitude preparation.
High altitudes can also affect the rising of doughs and batters, deep-frying, candy making, and other aspects of food preparation. For complete information and special recipes for your area, call or write to the home agent at your county cooperative extension office or to the home economics department of your local utility company or state university.
“Work With What You Got!”
© Victoria Hart Glavin Tiny New York Kitchen © 2017 All Rights Reserved

Making precise slices of softer, smaller foods in a snap, literally, with this tool designed to hold slippery, hard-cooked eggs in its cradle as the wires cut through. Cleanup is just as speedy – use a kitchen brush and warm, soapy water.
It can quick slice soft fruits and vegetables such as peeled kiwis, hulled strawberries, white or cremini mushrooms, and pitted olives.
Create perfect rounds from soft cheeses, like fresh mozzarella balls and goat cheese.
Make even pats from a stick of butter.
Be creative and try using an egg slicer on soft foods that you’re preparing. The possibilities are endless.
“Work With What You Got!”
© Victoria Hart Glavin Tiny New York Kitchen © 2017 All Rights Reserved
Looking to build healthier eating habits? Remember, you don’t have to change everything all at once. Start with small steps that you can feel good about.
The easiest way to cook healthy is to have the proper items on hand. Healthy pantry staples are key ingredients for making healthy meals. Fill your pantry with these shelf basics and then during the week shop for more perishable foods. Try and buy organic when possible.
Dried Beans & Dried Lentils
Canned Beans (No Salt Added)
Whole Grains
Whole Grain Pasta
Rolled Or Steel-Cut Oats
Canned Diced Tomatoes (No Salt Added)
Low Sodium Vegetable Broth
Unsweetened Plain Soy Milk
Unsweetened Plain Almond Milk
Mellow White Miso
Tahini
Peanut Or Almond Butter (No Salt Or Sugar Added)
Raw Nuts (Almonds, Cashews, Walnuts, Pumpkin Seeds, Sunflower Seeds)
Dried Apricots, Dates & Raisins (No Sugar Added)
Dijon Mustard
Cider Vinegar
Nutritional Yeast
Instead of thinking about what not to eat, think about healthy things that you can add to your diet. Strive to incorporate more greens and colorful vegetables into your meals.
Concentrate on whole foods in their natural forms such as fruits and vegetables.
Whole grains are key. Instead of reaching for regular pasta or white bread, look for varieties made with 100 % whole grain flour. Brown rice, quinoa and barley are good choices as well.
Try steaming your vegetables instead of frying in oil.
Think of beans, whole grains, and vegetables as the main event. Keep lean meat and fish at 3 ounces or less.
Remember, there are no quick fixes. Making healthy choices is a process that lasts a lifetime.
www.tinynewyorkkitchen.com
“Work With What You Got!”
© Victoria Hart Glavin Tiny New York Kitchen © 2016 All Rights Reserved

I love to bake all year long, but during the holidays I’m on “baking overdrive.” To make better cakes here are some simple tips to help you with the best outcome possible.
Don’t use cold eggs. The eggs really should be at room temperature, otherwise the mixture won’t emulsify properly. If you’re short on time place eggs in a bowl of warm water for 15 minutes.
Make sure to measure all ingredients precisely. Baking is an art form, but also a science.
Position pans as close to the center of the oven as possible. If you’re placing more than one pan in the oven, they should not touch each other or the oven walls. If your oven isn’t wide enough to put pans side by side, place them on different racks.
If a recipe calls for 1 cup of sifted flour, then first sift the flour and then measure it. If it calls for 1 cup flour sifted, measure the flour, then sift it. It may seem subtle, but it can make the difference between a light, fluffy cake and a heavy one.
Allow at least 20 minutes for your oven to preheat. It’s best to turn the oven on before you start working on your recipe.
Avoid opening the oven door. Opening the oven door too often can make a cake fall, so use the window in your oven door to check the cake’s process when possible.
Remember that each oven heats differently. Check for doneness 10 minutes before the recipe suggests. For most recipes, a cake is ready when it starts pulling away from the sides of the pan and a toothpick inserted in the center comes out clean.
Invest in wire cooling racks. Cakes cool faster and don’t get soggy when set out on a rack. Leave them in the pans for 10 to 15 minutes before unmolding, and then place on a rack to cool completely before frosting. Angel, chiffon and sponge cakes should be left in the pan to cool to prevent collapsing.
Unfrosted cakes can be stored, well wrapped in plastic, at room temperature for 24 hours. If storing unfrosted cakes for more than 24 hours, it is best to freeze them rather than refrigerate them. Wrap the layers in plastic wrap and then heavy-duty foil to freeze, let cake thaw in the refrigerator before frosting.
To store frosted cakes, keep at room temperature under a cake dome or large bowl unless the recipe specifies refrigeration.
For smooth and easy cake removal, prep your pans properly. When a recipe calls for greasing and flouring, place a piece of parchment or waxed paper on the bottom of a pan (trace and cut it to fit). Coat the sides and bottom with softened butter, and then dust with flour, turning the pan on its side to get full coverage and tapping out the excess. For chocolate cakes, swap in cocoa powder for flour.
Angel, chiffon, and sponge cakes should go into clean, untreated pans since they need to adhere to the sides in order to rise properly.
Happy Baking!
“Work With What You Got!”
© Victoria Hart Glavin Tiny New York Kitchen © 2016 All Rights Reserve

Cannellini beans, which are widely used in Italian cooking, actually originate from Argentina.
These creamy white Italian beans are slightly larger and fatter than the white haricot beans and are more like a kidney in shape. They are related to the larger French Soissons and, like them, have a fluffy texture when cooked. They are a popular addition to classic minestrone and a variety of other soups. Cannellini beans are an essential ingredient for tonno e fagioli (tuna and bean salad) and Florentine fagioli all’uccelletto, where the beans are stewed with sage, tomatoes, and garlic. They are also delicious cooked with olive oil, onion ring slices, garlic, and parsley.
I prefer to cook with dried beans rather than canned beans. I do keep a few cans of beans in my pantry, however, as they’re useful in short notice circumstances. When you purchase canned beans make sure that the ingredients do not include sugar or salt.
To cook Cannellini Beans: Sort and rinse 3/4 cup Cannellini Beans. Place in a medium-size pot with 3 cups water. Cover and bring to a boil. Reduce heat to a medium-low and cook 60 to 90 minutes until beans are soft. Add more water as needed while cooking to keep beans covered. Makes about 2 cups/4 servings.
To reduce cooking time, soak beans in water overnight in the refrigerator. Drain and throw away soaking water before proceeding.
“Work With What You Got!”
© Victoria Hart Glavin Tiny New York Kitchen © 2016 All Rights Reserved

Bread can be either leavened or unleavened. Leavened breads are made with rising agents, like yeast or baking powder, which allows the dough to release gases and expand. Unleavened bread contains no yeast, baking soda, baking powder or other leavening agents that allows dough to rise.
Leavened and unleavened bread are nutritionally similar.
It is generally, not a good idea to refrigerate bread. Although bread will last longer when refrigerated, it tends to dry out faster and to lose its soft texture.
As a general rule, bread should be kept in a somewhat air-tight and dry container or area.
Hot bread should not be put in a sealed container until it cools since the steam will cause dampness, which in turn can cause mold to grow more rapidly.
Storing bread on top of the refrigerator is not recommended. Refrigerator tops are usually very warm and this could either cause your bread to dry out more rapidly or cause condensation in the bag.
“Work With What You Got!”
© Victoria Hart Glavin Tiny New York Kitchen © 2016 All Rights Reserved

December is here and is cookie-baking heaven. Here are some basic tips to make a better cookie.
Split the dough. Work with half of the cookie dough at a time when rolling and cutting cookies. Too much handling of the dough makes cookies tough.
Keep the other half refrigerated since chilled dough is easier to handle.
Bake cookies on flat, shiny, heavy aluminum, baking sheets. These baking sheets with no sides are designed for easily sliding cookies onto a cooling rack. Dark sheets may absorb heat, causing cookies to brown too much on the bottom.
Grease baking sheets with cooking spray or solid shortening instead of butter or margarine.
Don’t overload the oven. Bake one sheet of cookies at a time on the middle oven rack.
Make sure to cool baking sheets between batches before reusing. Wipe the surface of each with a paper towel before reusing.
Cool cookies completely, on wire racks, before storing them in airtight containers.
“Work With What You Got!”
© Victoria Hart Glavin Tiny New York Kitchen © 2016 All Rights Reserved

Remove Turkey From Refrigerator At Least 1 Hour Prior To Roasting.
Preheat Oven To 325 Degrees.
Place Turkey In Sink And Remove Neck & Giblets.
Place In Roasting Pan And Brush With Melted Butter. Season With Salt & Pepper.
Place Turkey In Lower Third Of The Oven And Roast For 10 Minutes Per Pound.
To Determine If Turkey Is Done, Place Thermometer Between Thigh & Breast. Temperature Should Register Between 160 To 165 Degrees And Juices Should Run Clear.
When Turkey Is Done, Remove From Oven, Cover Loosely With Foil, And Allow To Rest 30 To 45 Minutes, Which Allows Time To Heat Side Dishes.
Carve & Enjoy!
Approximate Cooking Times Based On 10 Minutes Per Pound At 325 Degrees:
9 Pound Turkey: 1 1/2 To 1 3/4 Hours
12 Pound Turkey: 2 To 2 1/4 Hours
14 Pound Turkey: 2 1/4 To 2 1/2 Hours
16 Pound Turkey: 2 1/2 To 2 3/4 Hours
18 Pound Turkey: 3 To 3 1/4 Hours
20 Pound Turkey: 3 1/2 To 3 3/4 Hours
22 Pound Turkey: 4 To 4 1/4 Hours
25 Pound Turkey: 4 1/4 To 4 1/2 Hours
If You Have Stuffed Your Turkey Then Add More Time.
“Work With What You Got!”
© Victoria Hart Glavin Tiny New York Kitchen © 2016 All Rights Reserved


