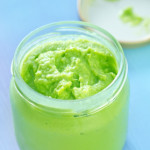
Wasabi is a rare and expensive root, primarily grown in Japan. It is difficult to grow because it requires a rocky stream or riverbed. The best sushi restaurants prepare it fresh. Once wasabi is grated it loses its complex flavor in just fifteen minutes. More often than not, it is replaced by either prepared wasabi paste, a mix of flavored powder and water, or dyed horseradish, a close relative.
“Work With What You Got!”
© Victoria Hart Glavin Tiny New York Kitchen © 2017 All Rights Reserved

Just a few fresh berries add color and nutrients to a salad, cocktail, or mocktail.
Stock up on fresh berries, wash and freeze them in a single layer on a sheet pan. Then transfer to a freezer bag for future smoothies and baked goods.
Add a handful of berries to a parfait, with yogurt for breakfast or ice cream for dessert.
Gently fold berries into muffin and pancake batter. Cook a big batch and freeze some for easy breakfasts later.
Make into a savory salsa and serve as a dip or over grilled chicken or wild-caught salmon.
“Work With What You Got!”
© Victoria Hart Glavin Tiny New York Kitchen © 2017 All Rights Reserved
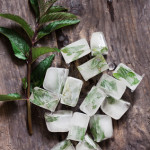
Make prep a snap with herb ice cubes, ready to toss in the pan.
Freezing herbs is an excellent way of preserving fresh delicate herbs that cannot be successfully dried. They will lose their fresh appearance and texture, but are still suitable for use in cooking. They should keep for up to 3 months.
To freeze chopped herbs, half-fill ice cube trays with chopped herbs and top up with water. Freeze, and then remove the cubes from the tray and place in freezer bags.
To use, add the appropriate number of frozen cubes to soups, stews, and stocks. Heat until melted. A standard sized ice cube tray will hold about 1 tablespoon chopped herbs.
Alternately, pack chopped herbs in plastic containers and freeze. Sprinkle them directly into soups and stews.
To freeze whole sprigs or leaves, place in freezer bags, expel any air, tightly seal and freeze.
Alternately, open freeze whole sprigs or leaves on trays. When the herbs are frozen, transfer them carefully to freezer bags, expel any air, seal tightly and return to the freezer until ready to use.
Delicate herbs that cannot be dried successfully, but that are suitable for freezing, include: basil, chives, tarragon, chervil, coriander (cilantro), dill and parsley.
“Work With What You Got!”
© Victoria Hart Glavin Tiny New York Kitchen © 2017 All Rights Reserve

The labels of many chocolate brands now state the amount of cacao (which means cocoa beans or any part of the beans, including cocoa butter) in their chocolate. The higher the cacao content, the less sugar the chocolate contains. You will also see chocolate described as bittersweet or semisweet. The USDA puts all sweetened dark chocolate, with cacao with a minimum of 35 percent chocolate liquor (ground cocoa beans without any additives), in the same category. These designations vary from brand to brand: one manufacturer’s bittersweet chocolate can be another manufacturer’s semisweet.
The average supermarket chocolate has 55 to 60 percent cacao. Chocolate with more than 60 percent cacao has what is considered a high cacao percentage. You may appreciate its bracing bitterness for eating, but because it contains so much more cacao than traditional chocolate, it can cause problems in cooking. Some contemporary cookbooks include the desired cacao percentage for the chocolate called for in their recipes, a plus for users. Unless a recipe specifically calls for a high-percentage chocolate, you are safest with a chocolate labeled 55 to 60 percent cacao.
Unsweetened chocolate is 99 to 100 percent cacao with no added sugar (some brands add a miniscule amount of vanilla and the emulsifier lecithin).
Milk chocolate has a minimum 10 percent chocolate liquor and includes dry milk solids and additional sugar to make it extra creamy and sweet. The latest trend is toward a higher percentage of chocolate liquor than in the past.
The best white chocolate has a base of cocoa butter, with sugar and milk solids added. Inferior brands substitute other plant fats, such as hydrogenated palm oil, for the cocoa butter, and are labeled white confectionary coating.
Traditionally, chocolatiers wanting a tiny, delicate chocolate coating for their creations would use couverture chocolate, which has a minimum of 32 percent cocoa butter to help it melt more smoothly and increase its fluidity. This extra measure of cocoa butter separated it from regular eating chocolate. However, the standard of today’s chocolate has improved to the point where virtually all chocolate has enough cocoa butter to be considered couverture, so the term is falling out of use.
Use a serrated knife to chop chocolate. Actually, think of shaving the chocolate from the block rather than hacking at it. Start at the corner of the bar and work backward, moving the knife about 1/4 inch after each cut. When you’ve lost the point of the corner, turn the bar around and start at another corner.
It may sound like a time-saver, but don’t use a food processor to chop chocolate. The chocolate can melt from the heat generated by the friction.
Small chunks of high-quality chocolate (pistoles) are a great time-saver if you need to melt chocolate and want to skip the chopping step. Semisweet chocolate chips may look similar, but they aren’t a good substitute. They contain a high percentage of lecithin, which helps them keep their shape during baking, so they don’t melt.
Chocolate has two enemies, heat and water. Use gentle heat when melting dark chocolate, as it scorches above 120 degrees F (milk and white chocolates scorch at 110 degrees F and need extra attention). Keep all surfaces and utensils dry. If you use a double boiler to melt chocolate, never allow the water to boil. The resulting steam can get into the chocolate and thicken it irretrievably, which is known as seizing.
The traditional method for melting chocolate is in a double boiler. It melts at below body temperature, so very hot water works fine. Just bring about 2 inches of water to a boil in the lower pan of the double boiler, then remove it from the heat. Place the top pan with the chopped chocolate over the low pan, making sure the top pan doesn’t touch the water. Chocolate holds its shape even when warm, so stir the chocolate frequently with a rubber or silicone spatula while it melts to check its progress. Be careful not to overheat chocolate, as it can scorch easily.
A variation on the double boiler method is good for large amounts of chocolate. Put the chopped chocolate in a wide stainless-steel bowl. Now place the bowl in a large skillet of very hot water, taking care not to splash any water in the chocolate. With a larger surface area of the chocolate exposed to heat, the chocolate will melt more quickly than in a double boiler.
You can melt chocolate in a microwave oven, but you must be careful not to overheat it. Use medium (50 percent) power for 40 seconds, and then check the chocolate. If it has not melted, continue to melt it, checking it at 20-second intervals. When you take it out of the microwave, the chocolate may not look melted, but sometimes brief stirring will push all or most of it to the melted stage. If all the chocolate has not melted, return it to the microwave for about 15 seconds at medium power. Because of the wide variability in the power put off by microwave ovens, you will have to learn to judge how quickly your microwave melts chocolate.
“Work With What You Got!”
© Victoria Hart Glavin Tiny New York Kitchen © 2017 All Rights Reserved

The orange carrot we know and love today came originally from Holland, but up until the Middle Ages, all carrots were purple. Gardeners often delight in such oddities, but you will be very lucky to find any purple specimens available in stores or supermarkets.
Carrots contain large amounts of carotene and vitamin A, along with useful amounts of vitamins B3, C and E. When eaten raw, they also provide potassium, calcium, iron and zinc, but these are partly destroyed with cooking.
Almost all vegetables have a better flavor if they are grown organically, but this is particularly true of carrots. If possible, buy organic ones, or look for the young, pencil-thin carrots that still have their feathery tops attached. These young carrots can be eaten raw, or steamed for a few minutes. Older carrots should be unblemished and feel firm. Carrots should not be stored for too long, but they will keep for several days in a cool airy place or in the salad drawer of the refrigerator.
The age of carrots is a guide to how they should be prepared. The valuable nutrients lies either in or just beneath the skin, so if the carrots are young, simply scrub them. Medium-size carrots may need to be scraped with a knife before cooking them and large carrots will need to be scraped or peeled. Carrots can be cooked or eaten raw. To eat raw, they can be cut into julienne strips and tossed with a dressing, or grated into salads and coleslaw. They can bee cooked in almost any way you choose. As an accompaniment, cut them into julienne strips and braise in butter and cider. Roasted carrots are delicious, with a melt-in-the-mouth sweetness. Par-boil large ones first, but younger carrots can be quickly blanched or added direct to the pan with a joint of meat.
“Work With What You Got!”
© Victoria Hart Glavin Tiny New York Kitchen © 2017 All Rights Reserved

Have you ever reached into the cavity of a fresh chicken and found it frozen inside? Poultry can be chilled to 26 degrees and still be considered fresh. Water may freeze at 32 degrees, but poultry flesh doesn’t freeze solid until it reaches 25 degrees. The extra few degrees will lengthen the shelf life of the chicken.
While many cooks are in the habit of rinsing poultry before cooking, it really isn’t necessary. You always cook poultry to a temperature that kills any harmful bacteria. In fact, it could be more dangerous to rinse the poultry, as you can end up splashing contaminated water all over the sink and kitchen counter.
After preparing poultry, reduce the chance of bacteria contamination by washing the cutting board, prep utensils, and your hands with hot, soapy water. It’s a good idea to reserve one cutting board for raw meat and poultry and a second board for other ingredients.
Broiler-fryer chickens are the all-purpose chicken, but you usually see them labeled simply as whole chicken. They used to average 3 1/2 pounds, but these days, you’ll find them up to 5 pounds, which means you get more servings per chicken. Roaster chickens tip the scales at 5 to 7 pounds, and are usually cooked whole in the oven. Even if you are serving a small group, it is worth roasting one of the larger chickens so you have leftovers for other meals.
The standard supermarket chicken is grown according to USDA standards, which allow antibiotics in the feed. Hormones and growth stimulants have been outlawed in poultry production since the 1950s.
Free-range chickens have access to the outdoors, which does not mean they live outdoors. The standards for organic chickens vary from state to state. In general, these birds, which are often also free range, must be fed organically grown feed and raised without antibiotics. Many cooks believe the flavor of free-range or organic birds is superior to that of supermarket chickens.
If you need to roast a chicken in record time, then butterfly it and roast it at a high temperature. With its entire surface exposed to the oven heat, the skin will be crisp and golden brown.
Be sure that whatever vessel you use for roasting a chicken can also be used on the stove top, so you can deglaze the drippings and turn them into a pan sauce. Enameled cast-iron baking dishes are a good choice.
You’ve paid for the entire chicken, so don’t throw anything away. The neck, heart, kidneys, and fat can be turned into quick chicken stock that will make just enough for many recipes, including a sauce for serving with the chicken. Don’t use the liver, as it will make the stock bitter. If you have butterflied the chicken, chop up the backbone and add the pieces to the stock, too. The stock won’t be as rich as a long simmered one, but it’s just fine when combined with pan juices.
Herbs are a wonderful flavoring for roast chicken, but they can burn if simply rubbed onto the skin. Combine the herbs with softened butter, and carefully slip the herb butter under the chicken skin, spreading it evenly. Roast away without worrying about singed herbs.
“Work With What You Got!”
© Victoria Hart Glavin Tiny New York Kitchen © 2017 All Rights Reserved

I don’t know a single person who doesn’t love the taste of melted cheese. Not every cheese oozes the same way. Some just melt better than others. When it comes to classic cheesy dishes, you want a cheese that’s going to melt into something creamy and smooth with a strong flavor.
Basically, the more moisture in a cheese, the better it melts. Cheddars and Goudas with high moisture content can make for a nice fondue. Emmental, Challerhocker, Comté, and Gruyere are excellent for making fondue as well. These cheeses beg to be melted. Their smooth, dense texture and nutty flavor make them the top choice for classic fondue. Bread, pickles, crackers, meats, and charcuterie are perfect fondue pot divers.
Cheddars are, of course, excellent for making mac & cheese, grilled cheese, and cheeseburgers. I tend to go for sharp or extra sharp Cheddars because I like to really taste the tanginess.
Soft cow’s milk cheese like Brie and Camembert don’t take much time to get to that beautiful melted soft texture. Just put them in the oven for a few minutes and you’re good to go. Because they come in their own serving vessel you can dip whatever you like in there.
“Work With What You Got!”
© Victoria Hart Glavin Tiny New York Kitchen © 2017 All Rights Reserved
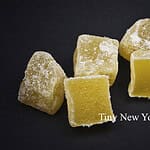
Crystallized ginger is fresh ginger that has been slowly cooked in sugar water and rolled in coarse sugar for preservation. It has a sweet, spicy taste and can easily be made at home.
“Work With What You Got!”
© Victoria Hart Glavin Tiny New York Kitchen © 2017 All Rights Reserved

Frying fish in fat gives fish a delicious crust and cooking is fairly fast.
Sautéing is one of the most useful methods for cooking fish, which has become considerably easier in the recent past, due to the ongoing improvement of nonstick skillets. As a matter of fact, the first rule of sautéing fish is to go purchase a 12-inch nonstick skillet.
When cooking fish in fat measure in teaspoons or tablespoons rather than in cups. You only use the amount that you need to crisp up the fish, give it a nice color, and improve the flavor. The key to sautéing fish is to get the skillet hot before adding anything to it. Place your skillet on the stove over a low heat and let it sit there for awhile or five minutes before you’re ready to being sautéing, preheat the pan over a medium to high heat, depending on your burner. Just before sautéing should you add the fat and then wait a minute. When the fat is hot you may add the fish. When you add the first piece of fish the pan’s temperature may subside a bit, so turn the heat up to full blast as you add the other pieces. Regulate the heat so that the fat is sizzling nicely, but not burning.
Most fish sauté so quickly that as soon as one side is nicely browned, you may turn the fish and brown the other side. You may check the fish by peeking into the interior by using a thin bladed knife. Thick steaks or fish thicker than an inch may need the heat lowered at some point to prevent burning while the inside continues to cook.
“Work With What You Got!”
© Victoria Hart Glavin Tiny New York Kitchen © 2017 All Rights Reserved

Figs are truly fantastic! Dried figs are available all year round and many markets offer luxuriously sweet fresh figs throughout the year as well. Figs are a healthy and portable snack that is packed with nutrition.
Figs are rich in potassium, which helps control blood pressure. They also provide calcium, magnesium, iron, and copper. Because they’re rich in fiber, figs support digestive health and may be helpful for managing a healthy weight. Figs are among the most alkaline foods and help balance the body’s pH.
Fresh figs are highly perishable, so they should be eaten a day or two after you purchase them. Look for figs that have a rich, deep color and are plump and tender, but not mushy. Wash them under cool water and remove the stem. Add fresh or dried figs to oatmeal, salads, cheese, and baked goods.
“Work With What You Got!”
© Victoria Hart Glavin Tiny New York Kitchen © 2017 All Rights Reserved


