
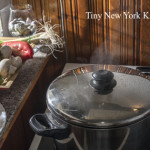
Ways To Make The Most Of Seasonal Citrus
Zest It
Add zip to baked goods, stir-fries or stews. Make citrus salt!
Juice It
Lemons juice helps keep sliced fruits and root vegetables from turning brown. Finish savory dishes with a squeeze of lemon juice to enhance the flavors.
Freeze It
Freeze citrus juice or zest until you’re ready to use it.
Dry It
Bake peels on the lowest possible heat until dry, but still pliable. Use to flavor black tea, roasted chicken or braised meats.
Candy It
Garnish desserts and cocktails with candied peels or enjoy them as a sweet snack.
“Work With What You Got!”
© Victoria Hart Glavin Tiny New York Kitchen © 2016 All Rights Reserved
English Stew (1860)
English stew is the name given to the following excellent preparation of cold meat. Cut the meat in slices, pepper, salt, and flour them, and lay them in a dish. Take a few pickles of any kind, or a small quantity of pickled cabbage, and sprinkle over the meat. Then take a tea-cup half full of water; add to it a small quantity of the vinegar belonging to the pickles, a small quantity of catsup, if approved of, and any gravy that may be set for use. Stir all together and pour it over the meat. Set the meat before the fire with a tin behind it, or put it in a Dutch oven, or in the oven of the kitchen range, as may be most convenient, for about half an hour before dinner-time. This is a cheap, simple way of dressing cold meat.
“Work With What You Got!”
© Victoria Hart Glavin Tiny New York Kitchen © 2016 All Rights Reserved
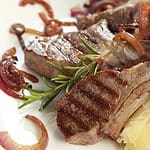
Cooking Lamb
Lamb is versatile and can be prepared quickly for a spur-of-the-moment gathering or roasted to perfection and served with a range of accompaniments.
Let The Cut Determine The Cooking Technique. For tender cuts like a rack, chops, loin, sirloin, or leg it’s best to broil, roast, grill, pan fry or sauté. For less tender cuts like shank or shoulder roast it’s best to braise or stew.
Store Lamb For 1-2 Days In The Refrigerator. Or you may freeze for up to 3 months. Thaw slowly in the refrigerator for a day or two before cooking.
Get Creative With Spice Rubs. Mix garlic, ginger, cardamom, cloves, chili pepper, and fenugreek for an Ethiopian style spice rub. Or create your own custom blend.
Always Test Doneness With A Meat Thermometer. Cook ground lamb to at least 160 degrees and other cuts to at least 145 degrees.
Make “Spring Burgers” With Ground Lamb. Season with dill, mint, or rosemary. Top with chopped fresh tomatoes and feta cheese.
“Work With What You Got!”
© Victoria Hart Glavin Tiny New York Kitchen
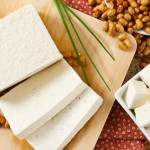
How To Eat More Protein On A Meat-Free Diet
If you’re new to a meat-free diet or you struggle with ways to get the protein you need here are some important tips that may help you. It really isn’t as hard as you might think.
Snack on protein rich munchies and skip the carbs. Eat roasted chickpeas, edamame, roasted peanuts, or raw nuts. Keep away from heavily salted nuts.
If you’re looking for a frozen treat then purée coconut milk, almond butter, cashew butter, honey, and cocoa powder. Freeze in an ice cream maker for a protein rich frozen treat.
Make an easy cream sauce by whisking cashew butter with vegetable stock, garlic, and minced parsley. Toss with cooked pasta.
Crumble tempeh (fermented soybean protein) into pasta sauce or soups, or wherever you might use hamburger meat.
Purée cooked black beans and add to brownies. For blondies or light colored muffins or cakes, use cooked, puréed chickpeas.
Sprout sunflower seeds and add them to salads. Just soak raw seeds overnight in water to cover. Drain and let sprout for 24 to 48 hours.
Add ground flaxseeds to muffins, waffles, breads, or cookies for a protein boast and added omega 3 fats.
Make a protein packed pudding. Purée silken tofu with cocoa powder, honey, and vanilla extract.
Use hemp or rice protein powder instead of flour to make waffles, pancakes, and baked goods. Instead of eggs, use flax as a binder.
Lentils are awesome! Eat lentils more often. They are fast cooking and easy to use. Add to soups, toss in salads, and stir in cooked rice.
Spread sandwiches and wraps with hummus instead of mayonnaise. I do this all the time. Purée hummus with roasted red peppers or chipotle peppers for an added zing.
If you can tolerate gluten, seitan (wheat protein) is a great substitute for sliced deli meat. Use it in wraps or sandwiches for an easy lunch.
“Work With What You Got!”
© Victoria Hart Glavin Tiny New York Kitchen
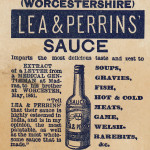
Season With Worcestershire Sauce
Think of Worcestershire sauce as the “Fish Sauce” of American cooking. Worcestershire sauce is probably one of the most underused condiments. The sauce is a fermented mix of vinegar, molasses, anchovies, and other seasonings that adds great flavor to a dish without adding many calories. I often add a splash to salad dressings, marinades, and sauces, or use it to season ground meat for meatloaf or burgers. Just go easy because it’s high in sodium.
"Work With What You Got!"
© Victoria Hart Glavin Tiny New York Kitchen
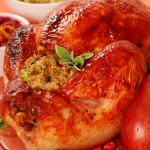
Turkey Roasting Guide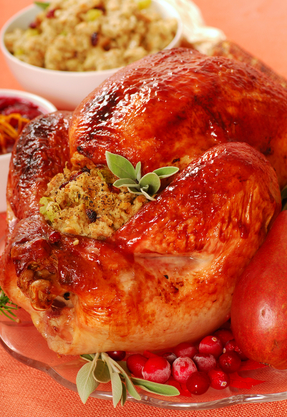
Every year I tell everyone not to overcook his or her turkey and to purchase a meat thermometer AND USE IT! The objective, of course, is to have moist and juicy breast meat with succulent thighs! The turkey is the main attraction after all.
Start with a completely defrosted bird or better yet purchase an organic fresh turkey. If your turkey is frozen, however, allow 24 hours in the fridge for every 5 pounds. This is the safest way to defrost your turkey.
The turkeys of today tend to be young, moist and tender and take much less time to cook than tougher turkeys that I grew up on. If a turkey is dry, then it has been cooked too long. The breast meat is what tends to suffer the most.
A stuffed turkey may cook at the same rate as an unstuffed one, but be prepared to allow 30 to 50 minutes more. Most turkeys take about the same time to roast in regular ovens, but a convection oven does a much better job of browning the turkey all over.
When removing the turkey legs, if you find that the meat around the thigh joint is still too pink, then cut off the drumsticks from the thighs and put the thighs into a shallow pan, place in a 450 degree oven for 10 to 20 minutes until no longer pink.
Always use a meat thermometer to gauge doneness. For a stuffed turkey, use the meat thermometer to check the temperature of the stuffing. The center of the stuffing inside the turkey must reach a temperature of 165 degrees. For an unstuffed turkey, place the meat thermometer in the thickest part of the thigh, taking care that it does not touch any bone. Roast the turkey until the meat thermometer reaches 165 degrees. Don’t forget to let the turkey rest for at least 30 minutes before carving to allow the juices to re-absorb into the flesh. You do not want the moisture to drain out.
This chart will help you determine approximately how long to roast a stuffed or unstuffed turkey.
Roasting times are for a preheated 325 degrees oven:
Approximate Roasting Times For Stuffed Turkey
Turkey Weight: 6 to 8 Pounds 3 to 3 1/2 Hours
Turkey Weight: 8 to 12 Pounds 3 1/2 to 4 1/2 Hours
Turkey Weight: 12 to 16 Pounds 4 1/2 to 5 1/2 Hours
Turkey Weight: 16 to 20 Pounds 5 1/2 to 6 Hours
Turkey Weight: 20 to 24 Pounds 6 to 6 1/2 Hours
Approximate Roasting Times For Unstuffed Turkey
Turkey Weight: 6 to 8 Pounds 2 ½ to 3 Hours
Turkey Weight: 8 to 12 Pounds 3 to 4 Hours
Turkey Weight: 12 to 16 Pounds 4 to 5 Hours
Turkey Weight: 16 to 20 Pounds 5 to 5 1/2 Hours
Turkey Weight: 20 to 24 Pounds 5 1/2 to 6 Hours

 Constitution Week – Foods of Our Forefathers Part III
The abundance of meat in America was a major change in the diet of the early settlers. Rabbits and squirrels were available year-round nearly everywhere, plus deer and other large game in many regions. As settlers moved west, buffalo gained importance in the diet. Fish, shellfish and wild fowl became common food, and they were all essentially “free.” The existence of these various forms of game was a literal life saver in times of uncertain crops and unbroken land. The game gradually diminished, of course, as the population expanded and settlers pushed west, but it provided a large share of the diet in early and frontier days.
Ham, of course, appeared on almost every settler’s table, rich or poor. It might be the only meat served at a meal or it might appear in company with more exotic roasts and fowl, but it was always there – breakfast, dinner and supper.
Corn was also a staple of the colonists, either fresh in summer, or as hominy or corn meal all year. Corn was also put to another use by an early Virginian, Captain George Thorpe, who may have been the first food technologist in America as he invented Bourbon whiskey shortly before he was massacred by the Indians in 1622.
Meal patterns for working people in rural early America were very different from those common today. Breakfast was usually early and light which consisted of bread, hominy grits, and sometimes fruit in season. Coffee, which was a new beverage at the time, was popular that is if it was available. A drink made from caramelized grain was sometimes substituted. Chicory was popular in the South, either alone or used to stretch the coffee. Tea was often made from local leaves such as sage, raspberry or dittany. Alcohol in some form was often served.
Breakfast in more elegant homes or large plantations might be later in the morning, and include thinly sliced roast and ham.
Dinner was served somewhere between midday and midafternoon, depending on the family’s circumstances, and was the big meal of the day. There was almost always ham, as well as greens (called sallat), cabbage and other vegetables. In the proper season, special dainties would appear – fresh fruits and berries, or fresh meat at appropriate butchering times.
Desserts could be simple such as a scooped out pumpkin, baked until done and then filled with milk, to be eaten right out of the shell. Or dessert could be more complex such as ice cream or other fruit flavored frozen pudding or a blanc mange. Blanc mange was prepared from milk and loaf sugar, flavored with a tablespoon or two of rosewater, thickened with a solution of isinglass (derived from fish bladder, soaked overnight in boiling water). This mixture was boiled for 15 to 20 minutes, then poured into molds to set.
If isinglass was not available (most was imported from England), homemade calves foot jelly could be substituted, but eh dessert was not as fine.
Various alcoholic beverages, including wines, applejack, “perry” (hard cider made from pears), or beer were commonly consumed.
In winter, peaches and other fruit disappeared from the dinner table, to be replaced by dishes made from stored apples and dried fruit of various sorts. Soups or broths also took their place. Milk grew scarce as cows “dried up” in the short days. Vegetables gradually decreased in variety as stored crops wilted.
Apples quickly became a staple in early America. Orchards were easy to start, required a minimum of care, and apples stored well. Housewives devised a multitude of “receipts,” including sauces and butters for off-season, as well as many using dried apples.
Supper was late and a light bread and butter, some of the left-over roast from dinner, fruit (fresh if in season, pickled and spiced otherwise), and coffee or tea.
To Be Continued…


Today is Constitution Day (Constitution Week is from Sept 17th – Sept 23rd), which commemorates the formation, and signing of the U.S. Constitution by thirty-nine brave men on September 17, 1787, recognizing all who, are born in the U.S. or by naturalization, have become citizens. Our Constitution was signed on September 17, 1787, and after an extended period of national conversation and with the promise of a bill of rights, it became the supreme law of the land. We are a proud Nation of immigrants. Throughout our history, immigrants have embraced the spirit of liberty, equality, and justice for all – the same ideals that stirred the patriots of 1776 to rise against an empire, guided the Framers as they built a stronger republic, and moved generations to bridge our founding promise with the realities of time.
Many people wonder what it was like in those days. What did people eat? Today, it is possible to travel from coast to coast, at any time of the year, without feeling any need to change your eating habits. Sophisticated processing and storage techniques, fast transport, and a creative variety of formulated convenience food products have made it possible to ignore regional and seasonal differences in food production – if it is desirable or necessary for personal reasons.
It was not always so. As early Americans moved about, they had to change their eating habits to fit local conditions. Climate was one of the major limiting factors, but soil water and other vegetation play a part. It’s easy to romanticize the food supply of early America, and there is no question that in many ways it was a vast improvement over that available in many of the immigrant’s homelands. Inadequate yields, seasonal availability of produce, nutrition-robbing preservation techniques, constant labor, continual attention to schedules and danger of contamination were some of the factors bearing on the food supply that sustained our forefathers and foremothers as they developed our country.
Most early immigrants from Europe were accustomed to a limited, monotonous diet. Fresh meat was an infrequent main course on the tables of the working classes. Two meal’s worth of meat per week was regarded as good treatment for a servant. Game was the property of the Royal Family in most countries, and killing a deer was a capital offense. “Milk, butter and cheese are the laborers dyet, and a pot of good beer quickens his spirit,” said Breton, an English author, in 1626.
Only a handful of vegetables were known in Europe, prior to the discovery and settling of the New World. The short list included root vegetables such as beets, carrots, radishes, turnips and parsnips, plus cabbages, onions, leeks and lentils. There was a considerable variety of fruits and berries, but they were available only during a short harvest.
To Be Continued…


Knives
Whenever you have finished using a knife, you should hone, or sharpen, it briefly with a honing steel before you put it away. The steel, which is a long, metal rod, actually shaves off the tiniest bit of metal to improve the edge. Every 6 months or so, most knives should be sharpened either by a professional or with an at-home mechanical or manual sharpener (such as a sharpening stone).
Knife Set Essentials
Beyond the essentials, build your collection of knives based on the kind of cooking you like to do. If you roast meat a lot, then a carving knife may be more necessary than a thin-bladed vegetable cleaver.
Start With
8 Inch Chef’s Knife
3 1/2 Inch Paring Knife
9 Inch Serrated Bread Knife
Add
10 Inch Chef’s Knife
5 1/2 Inch Santoku (Metal or Ceramic)
Kitchen Shears
Nice To Have
Boning Knife
9 Inch Carving Knife
Thin-Bladed Vegetable Cleaver
Serrated Tomato Knife
4 Inch Paring Knife
The edge of a knife is made at a 20-degree angle. So, to properly hone a knife, hold the knife at a 20-degree angle to the steel and run each side of the cutting edge across and along the steel three or four times.
If you don’t have a honing steel handy, you can use a ceramic plate or mug. Turn the plate over and draw the knife along the edge of the unglazed bottom ring, holding the blade at a steady 20-degree angle. The ring of the plate will turn gray, but it will clean up with the wipe of a moist sponge.
When knives are stored in a wooden knife block, the blades are hidden, which can make it difficult to identify knives that have similar handles. To help distinguish one knife from another, use red or white nail polish to mark the heel of each knife with an initial, i.e., C for carving, S for serrated, or U for utility.

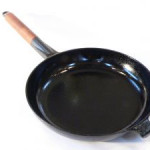
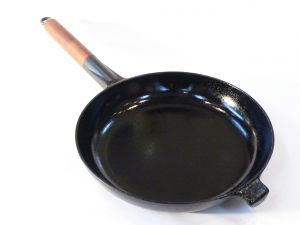 Sautéing Tips
Some foods need moist, long cooking to tenderize them while others just require a quick sauté in a skillet. Sauté means “jump” in French which describes the tossing and turning in the skillet during the cooking process. There are a few basic secrets to perfect sautéing that will help you get better cooking results.
The trick to successful sautéing is to use a medium-high heat and a small amount of oil. As a matter of fact meats and other protein-based foods should not be turned too often because extended contact with the hot skillet will brown the surface of the food which will deliver extra flavor. Heat the skillet over a medium-high heat and if the pan is too hot you will burn the outside of the food before the inside is cooked so turn down the heat a bit.
Do not use butter for sautéing. Use oil. Butter contains milk solids that burn and smoke at high temperatures. Some cookbooks call for mixing butter and oil which supposedly increases the smoke point of the butter. This does not remove the milk solids that are the problem. You can, however, use clarified butter, but it is easier to use oil for cooking meats. If you want a butter flavor then use it in a pan sauce.
Thick cuts of meat can be difficult to cook through when sautéing. You may want to use a double-cooking method for thick cuts. Double-cut pork and lamb chops, porterhouse steaks, and large bone-in, skin-on chicken breast halves are too thick to cook through in a skillet on the stove top. It is best to brown them in the skillet, and then finish cooking them in a 400° F oven. Be sure that your skillet is ovenproof.
Make a pan sauce to take advantage of the browned bits in the pan which are loaded with delicious flavor. Remove the meat from the skillet and tent loosely with aluminum foil to keep the meat warm. Pour off the fat from the skillet and return the skillet to the medium-high heat. Add a couple of tablespoons of minced shallots and a tablespoon of butter. Do not add the butter alone as the skillet may be too hot and the butter will burn. The shallots will act as insulation. Cook for a minute or so to soften the shallots and then add about 1 cup of an appropriate stock. Wine may seem like a good choice, but it can be too strong. Boil the stock, scraping up the bits in the pan with a wooden spoon or spatula until it is reduced to about 1/2 cup. Remove from the heat and whisk in 1to 2 tablespoons of cold butter (a tablespoon at a time) to thicken the sauce lightly.


