
Pantry & Freezer Staples
How long do pantry and freezer staples last? Staple items are known for their long shelf life, but they don’t stay fresh forever! Use this handy list to determine how long you should keep them on hand.
Freezer
Hamburger & Stew Meats: Shelf Life: 1 to 2 Days Storage: 3 to 4 Months
Ground Turkey, Veal, Pork, Lamb: Shelf Life: 1 to 2 Days Storage: 3 to 4 Months
Bacon: Shelf Life: 7 Days Storage: 1 Month
Sausage (Raw From Pork, Beef, Chicken or Turkey): Shelf Life: 1 to 2 Days Storage: 1 to 2 Months
Fresh Steaks: Shelf Life: 3 to 5 Days Storage: 6 to 12 Months
Fresh Roasts: Shelf Life: 3 to 5 Days Storage: 4 to 12 Months
Chicken or Turkey (Whole): Shelf Life: 1 to 2 Days Storage: 1 Year
Chicken or Turkey (Cut Up): Shelf Life: 1 to 2 Days Storage: 9 Months
Lean Fish: Shelf Life: 1 to 2 Days Storage: 6 Months
Fatty Fish: Shelf Life: 1 to 2 Days Storage: 2 to 3 Months
Fresh Shrimp, Scallops, Crawfish, Squid: Shelf Life: 1 to 2 Days Storage 3 to 6 Months
Pantry
Baking Powder: Shelf Life: 18 Months Storage: Keep In Dry Place In Airtight Container
Beans (Dried & Uncooked): Shelf Life: 1 Year Storage: Store In Cool & Dry Place
Chocolate (Semisweet & Unsweetened): Shelf Life: 18 Months Storage: Keep In Cool Place
Cocoa: Shelf Life: 1 Year Storage: Keep In Cool Place
Cornstarch: Shelf Life: 18 Months Storage: Store In Airtight Container
Flour (White or Whole Wheat): Shelf Life: 6 to 8 Months Storage: Store In Airtight Container or Freeze To Extend Shelf Life
Nuts (In Shell & Unopened): Shelf Life: 4 Months Storage: Freeze to Extend Shelf Life
Spices & Herbs (Ground): Shelf Life: 6 Months Storage: Store in Airtight Containers In Dry Areas Away From Sunlight & Heat. Before Using, Check Aroma – If Faint Replace.
Sugar (Brown): Shelf Life: 4 Months Storage: Store in Airtight Container
Sugar (Confectioners’): Shelf Life: 18 Months Storage: Store in Airtight Container
Sugar (Granulated): Shelf Life: 2 Years Storage: Store in Airtight Container
Vinegar (Unopened): Shelf Life: 2 Years
“Work With What You Got!”
© Victoria Hart Glavin Tiny New York Kitchen © 2016 All Rights Reserved

Paleo Diet
The Paleo Diet (short for Paleolithic) is fashioned around the eating habits and available foods of our hunter-gatherer ancestors. These ancestors had to nourish themselves with the meat, fish, fruits, vegetables, nuts, and fats available to them in nature. With the benefit of large supermarkets, it’s easy today to mimic these foods in wider variety. Specific recommendations for eating Paleo will vary; however, the main ideas are the same: Reduce the risk of debilitating diseases and optimize health by eating whole, fresh, unprocessed foods and avoid foods that were not available prior to the advent of modern agriculture.
Research studies looking at the Paleo Diet have noted that eating a Paleo Diet for a short term improved the glucose control and lipid profiles in people with type 2 diabetes, compared to eating a diet containing low-fat dairy, moderate salt intake, whole grains, and legumes. Additional research indicates similar results may be possible in people without type 2 diabetes as well. The Paleo diet may result in higher levels of satiety (fullness) throughout the day when compared with a low-fat, low-calorie diet.
Paleo Do’s
Eat plenty of non-starchy vegetables and fruits.
Make fresh meat, poultry, fish, and seafood your primary sources calories.
Avoid highly processed meats that contain preservatives, artificial flavors, and sugar, such as some sausages, bacon, deli meats, and smoked fish products.
Consume nuts and seeds.
Use coconut oil, grass-fed butter, olive oil, avocado oil, nut and seed oils, and animal fats, such as goose fat or duck fat, for cooking and eating.
Balance the intake of acid-producing foods (meats, fish, salt, and cheese) with base-producing foods (fruits and vegetables) for optimal health.
Use sea salt to season foods, but try to decrease sodium intake in general.
Paleo Don’ts
Consume highly processed packaged foods.
Get heavy handed with the salt shaker.
Eat grains of any kinds. Quinoa, bulgur, rice, wheat, bread, pasta, etc., are all out.
Consume sugar (including honey and maple syrup), sweets, candy, or desserts.
Use artificial sweeteners, such as monk fruit extract, stevia, NutraSweet or Equal (aspartame), Splenda (sucralose), or sugar alcohols, such as xylitol, sorbitol, or maltitol.
Eat legumes, beans, peas, lentils, or soy, or foods make from soybeans.
Use canola or soybean oils or consume hydrogenated oils (trans fats).
Consume dairy, with the exception of fermented dairy or raw milk cheese on occasion.
“Work With What You Got!”
© Victoria Hart Glavin Tiny New York Kitchen © 2016 All Rights Reserved

Cooking With Lemons
Lemons are a chef’s secret ingredient. Most chefs will tell you that acidity elevates any dish. There is no need to get all fancy by using twenty year old balsamic vinegar. Just finish most of your dishes with a humble squeeze of lemon juice. Most line cooks have quart containers of wedges at their stations for juicing in the moment. Why lemon? Aside from the fact that you can always find one, you’ll taste what it does to the food, not the lemon itself. Along with salt and pepper, it’s all you need to season everything from simple pastas to grilled fish, roasted meats, and sautéed vegetables, as well as pan sauces, grain salads, and even run of the mill lentil soup. In your own kitchen cut lemon wedges ahead of time, then squeeze as you cook for the brightest flavor.
“Work With What You Got!”
© Victoria Hart Glavin Tiny New York Kitchen © 2016 All Rights Reserved
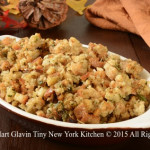
Dressing & Stuffing
I get asked this question every year about this time, “what’s the difference between dressing and stuffing?” The answer is that if you live north of the Mason-Dixon line, you probably call this side dish, baked inside a turkey, stuffing. If you’re a Southerner, you probably call it dressing. In classic cooking, it’s called forcemeat. Until Victorian times it was just called stuffing and then all of a sudden “stuffing” seemed indecent, and “dressing” was the new name.
For many years roast turkey meant stuffed turkey. Then all of a sudden health concerns arose about whether or not stuffed birds were safe. While these concerns are real, they shouldn’t affect careful cooks who follow food safety practices. Here are a few simple rules to follow while stuffing your bird.
Stuffing should always be cooked to at least 160 degrees in order to kill any potentially harmful bacteria. When the turkey is done, insert the meat thermometer deep into the center of the body cavity to check the temperature of the stuffing. If it isn’t at least 160 degrees then scoop the stuffing out of the cavity and transfer to a casserole dish. Cover and bake at 350 degrees until the stuffing reaches 160 degrees.
Always prepare your stuffing just before filling and roasting the turkey. NEVER stuff a bird the night before roasting as the turkey cavity provides a warm, moist environment that encourages bacterial growth. To save time on Thanksgiving morning, you can prepare stuffing ingredients the night before. Chop the vegetables, toast the nuts, etc. and then store them in zip lock bags in the refrigerator. If you are super pressed for time you may cook, cool, and refrigerate the seasoning meat and vegetables the night before. Reheat them thoroughly in a large-size skillet before adding to the bread or grains.
Stuffing should be warm when placed in the turkey. Cold stuffing may not cook to 160 degrees by the time the turkey is ready.
NEVER mix raw meat or vegetables into a stuffing. All meat and vegetables should be thoroughly cooked.
To serve the stuffing, remove it from the turkey and place in a serving bowl. Do not allow the stuffing or turkey to stand at room temperature for longer than 2 hours. Refrigerate any leftover stuffing separately from the turkey and use within 2 days. Reheat leftover stuffing thoroughly before serving.
“Work With What You Got!”
© Victoria Hart Glavin Tiny New York Kitchen © 2015 All Rights Reserved

Washington D.C.’s Chinatown Express
I don’t know why, but I’m fascinated with Chinatowns so whenever I’m in a different city I like to check out that city’s Chinatown. Washington D.C.’s Chinatown is rather small, but has character all the same.
Chinatown Express is one of Washington D.C.’s most authentic Chinese restaurants, which has been serving locals and tourists for nearly 25 years. As a family run restaurant they pride themselves on serving delicious hand pulled noodles, individually folded dumplings, and roasted meats. As you can see here in the window employees are hard at work making dumplings and noodles.
Location is in the heart of Chinatown – 746 6th Street NW, Washington D.C. 20001 – (202) 638-0424
“Work With What You Got!”
© Victoria Hart Glavin Tiny New York Kitchen All Rights Reserved
Perplexing Foodstuffs
There are those foods that can be rather difficult to figure out how to eat without looking like you were born in a cave. Here are some useful tips for properly eating perplexing foodstuffs.
Artichokes
Pluck off artichoke leaves and scrape the tender part (not the prickly point) between your teeth (preferably after dipping in melted butter). Work your way to the delicate inner leaves, and then use a knife to cut off the remaining small leaves and feathery innards. Cut the artichoke “heart” into bite-sized pieces and eat with a fork.
Asparagus
Eat asparagus with your fingers if served raw as crudités. Eat with a fork and knife if served with dinner.
Bread
Break bread into bite-sized pieces, and butter it or dip it into olive oil just one piece at a time.
Crab (Soft-Shelled)
Eat entire crab, including shell, either in sandwich form or using a fork and knife. Remove inedible pieces from your mouth with a fork.
Fajitas
Place meats, vegetables, and other fillings on a flat tortilla. Roll up and use your fingers to eat fajitas from one end.
Fondue
Spear bread, vegetables, or fruit with a fondue spear and dip into cheese or sauce. Remove food from spear using a dinner fork, and eat from a plate. DO NOT double dip. Spear uncooked meat cubes and place spear into fondue broth or sauce. When cooked, transfer meat to a plate using a dinner fork and cut into smaller pieces to eat.
Lobster
Wear a lobster bib to avoid fishy splatters, Crack shells with shellfish crackers and extract meat with a small fork or pick. Cut larger pieces with a knife, and eat with a fork after dipping in melted butter. Clean your hands by dipping fingers into finger bowls, and use lemon (if provided) to cut extra grease. Dry your hands with your napkin.
Peas
Use a knife to push peas onto a fork. Do not mash peas before eating, or eat peas from a knife.
Raw Shellfish
Use a small fork to extract mussels, clams, or oysters from the half-shell. Season with fresh lemon or cocktail sauce. In informal settings, you may quietly slurp shellfish from shells.
Soup
Using a soup spoon, spoon soup away from your body and then quietly sip from side of spoon. Tilt bowl away from you to spoon up remaining drops.
Spaghetti
Twirl pasta with fork tines into bite-sized portions, and allow any dangling pieces to fall back onto your fork. You may also rest fork tines against the bowl of a spoon while you twirl pasta.
Steamers
Extract clam from shell using a small fork, and use a fork and knife to remove inedible neck. In informal settings, it is permissible to use fingers.
“Work With What You Got!”
© Victoria Hart Glavin Tiny New York Kitchen
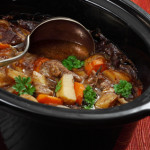
Slow-Cooker Meat Cuts
It’s winter and there’s nothing quite like coming home to a hot meal. You count on your slow-cooker for delicious, almost no effort dinners and it can be tempting to throw just about any ingredients into these amazing appliances. BUT for the tastiest results, you need to know which meats do best in it. Delivering low, even heat over a long period of time, slow-cookers break down the connective tissue in typically tough cuts of meat, making them extremely tender. Here is a quick guide to great cuts of meat for your slow-cooker. The good news is that these cuts are often less expensive which, along with saving you time and energy, will also save you money.
Beef: Slowly cooked brisket becomes incredibly tender. Look for marbling. The white steaks of fat are what adds flavor. Beef chuck is another favorite for long braises.
Chicken: Go with dark meat. Thighs and drumsticks are cheaper and richer in flavor than white meat and stand out in soups and stews. Brown or remove the skin before cooking for the best results.
Lamb: Cooked low and slow, lamb shanks become rich and complex flavors. Have your butcher slice them crosswise to fit into your slow-cooker. Lamb shoulder is also a great choice for slow-cooking.
Pork: Always a classic, pork shoulder is a tough cut that becomes silky and flavorful after hours spent simmering in its own juices.
For most of us, it’s cold outside so bring out your slow-cooker and let it work its magic while you’re busy doing other things.
"Work With What You Got!"
© Victoria Hart Glavin Tiny New York Kitchen

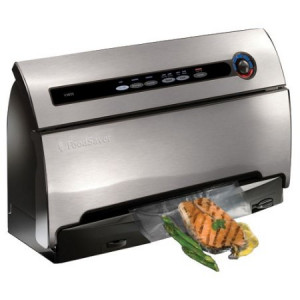 A Word About Vacuum Sealers
Freezing is an easy way to enjoy fruits and vegetables from gardens or farmers’ markets well into the winter. There are a variety of freezer bags to use for storing and freezing. I think that using a vacuum sealer is the best freezer method out there. Vacuum sealers protect foods by removing the extra air and creating a tight teal. If you want to preserve your fruits, vegetables, and meats through long-term freezing, a vacuum sealer is an investment to consider. Conventional storage bags and containers trap air in the container with the food, which can cause damage from frost and freezer burn. Because the sealer sucks all the air out of the bag before creating a tight seal, the food in the bags is better protected against the elements. A vacuum sealer costs between $75 and $200 and requires the purchase of special bags designed for this use. Besides preserving garden produce, this is a great tool to help you maximize the shelf life of other food items you buy in bulk at club stores or on sale.


