
On fall evenings I often like to sit by the fire and sip a nice glass of wine or a sweet & tart cocktail.

I like to eat seasonal fruits and vegetables. Brussels sprouts are a hearty winter vegetable and are sweetest and most tender after a hard frost. They are a good source of fiber, antioxidants, and vitamin C. Look for young, small green sprouts that have tightly formed buds. Avoid any yellowing, which means that the sprouts will be bitter, sulfurous, and tough. Use fresh sprouts within a few days after purchasing. Sprouts sold on the stalk tend to keep longer. Brussels sprouts can be boiled, braised, or steamed. Cut an X at the base of each sprout to allow for a more even cooking. Add a bit of butter, olive oil, salt, pepper, garlic, onions, or herbs of your choice. Brussels sprouts also make a nice addition to stir fry, noodles, and other dishes. As always, be creative and “work with what you got!”
“Work With What You Got!”
© Victoria Hart Glavin Tiny New York Kitchen © 2017 All Rights Reserved

Steaming eggs is the secret to hard-boiled eggs that are consistently perfect.
Don’t place an egg in boiling water. That lowers the temperature of the water and makes it hard to nail down a precise cooking time.
Do steam in a steamer basket. The eggs don’t touch the water, which means they don’t lower the water temperature, so you get consistently perfect results.
Bring 1 inch water to rolling boil in medium-size saucepan over a high heat. Place eggs in steamer basket. Transfer basket to saucepan. Cover, reduce heat to a medium-low and cook eggs for 13 minutes. When eggs are almost finished cooking, combine 2 cups ice cubes and 2 cups cold water in medium-size bowl. Use tongs or spoon to transfer eggs to ice bath. Let sit for 15 minutes. Peel before using.
“Work With What You Got!”
© Victoria Hart Glavin Tiny New York Kitchen © 2017 All Rights Reserved

We’re coming to the end of the last wave of beautiful warm weather. It’s a perfect time to take advantage of wonderful days and delicious late summer crops. Farmers’ markets are bursting with baskets of delectable produce that can be preserved in many ways. If you have plenty of peppers they can be roasted in the oven or grilled to get that fabulous smokiness to both sweet and hot varieties. Whichever method of heat you choose, continually turn peppers until they are blackened on all sides. Place the charred peppers into a paper bag and let them steam for at least thirty minutes. When cooked, remove the skins with a gentle rubbing motion, slice the peppers into strips, remove the ribs and seeds, and place the strips in small freezer containers. To each container add several peeled garlic cloves, fresh basil, oregano, and thyme. Cover with olive oil. Cover containers and let the peppers infuse on your countertop for a day. Store in the refrigerator for up to a week or place in the freezer to use over the winter months. Use the smoky, sweet strips to enliven a winter antipasto, add rich flavor to sandwiches or crostini or a vibrant soup that will remind you of summer.
“Work With What You Got!”
© Victoria Hart Glavin Tiny New York Kitchen © 2017 All Rights Reserved

Whether you’re baking summer pies or getting ready for holiday baking it’s important to have some key information about pie dough.
Blind Baking
Blind baking is prebaking a crust before you add an unbaked or especially wet filling. To ensure that your crust turns out crisp while blind baking, you can either dock it or use pie weights.
Docking
Docking is pricking the dough all over with the tines of a fork. The tiny holes allow steam to escape, so that the crust doesn’t puff up. After rolling out your dough and pressing it into the pan, gently prick it, leaving an inch or two between each mark. Be sure to check your crust several times throughout its bake time. If you notice it puffing up in any way, simply prick the puffy spots a few times and keep baking.
Pie Weights
Pie weights are tiny ceramic or metal balls or a thin metal chain that prevent the bottom of your crust from forming air pockets and bubbling up while baking. While docking is less fussy than using pie weights, I prefer pie weights because of the additional support they give the crust. Line your unbaked crust with parchment paper or aluminum foil before adding the weights to keep them from baking into the dough. I prefer parchment paper because its permeable structure allows the crust to breathe and brown more evenly. If you don’t own pie weights, dried beans work just as well.
Blind Bake Ahead
You can blind bake a crust up to three days ahead of time. Allow the crust to cool completely in the pan, wrap with plastic wrap, and store at room temperature until you are ready to fill and serve.
Happy Pie Baking!
“Work With What You Got!”
© Victoria Hart Glavin Tiny New York Kitchen © 2017 All Rights Reserved

The end of summer is fresh produce heaven, which includes delicious vine ripened tomatoes. What do you do when you have a tomato abundance?
Here are some tips for making the most of the end of summer tomatoes.
Sliced: Incorporate into sandwiches or add to basil and mozzarella for a Caprese Salad.
Chopped: You only need a few chopped heirloom tomatoes, mozzarella, chopped basil, and olive oil for a colorful no-cook pasta sauce.
Puréed: There’s nothing like an icy cold gazpacho on a warm day.
Salsa: Fresh salsa is a must have condiment for grilled steaks or shrimp, brown rice and beans, scrambled eggs, and of course, chips.
Grilled: Toss cherry tomatoes with olive oil, garlic, and herbs. Then cook in a grill basket until charred. Top fish, chicken, pasta, and charred slices of bread.
Stored: Keep tomatoes at room temperature until ripe and then use within a day or two. Don’t put them in the refrigerator as it affects their flavor and texture.
Preserved: Roasted, dehydrated, or stewed – savor the season by saving a taste of summer for later.
“Work With What You Got!”
© Victoria Hart Glavin Tiny New York Kitchen © 2017 All Rights Reserved

Even though summer is not technically over I’m in the fall baking mood. Yesterday was a rainy day here in New England. I made Gooey Rocky Road Brownies and I had to stop myself from eating the entire batch.

From Concord to Emperor, there are so many delicious grape varieties available.
Whether tossed in a salad, baked into a dessert, or straight off the vine, these bite-size globes are packed with flavor.
Bursting with fiber, vitamin C, and loads of antioxidants, this fruit packs a nutritional punch as big as flavor. Grapes make an ideal portable snack in less than 100 calories per cup.
Look for firm grapes that are brightly colored and securely attached to their stems. Avoid bundles with wrinkled, dull skin or packages that have a lot of fruit floating at the bottom of the bag. When all else fails, try one.
Although there are thousands of varieties of grapes, the most popular are Thompson and Emperor seedless. Thompson grapes are sweet and crisp with vibrant green skin, amazing for snacking. Emperor red grapes have a sweet and tart flavor and are super juicy, making them great for baking.
Emperor or Flame: With their sweet flavor and long shelf life, these large seedless grapes are one of the most popular varieties.
Thompson Green: In America, 90% of these classic green grapes are produced in California. They are used for snacking, making wine, and raisins.
Concord: Created in Concord, Massachusetts, these grapes are known for their thick, blush skin and sweet candy-like flavor.
Freeze Them: Pick grapes off the vine and place them in a resealable plastic bag. Freeze overnight for a healthy, frosty treat.
Bake Them: To make raisins at home, cook grapes for 30 seconds in boiling water and place in a bowl of ice water. Preheat the oven to 170 degrees and place grapes on a parchment paper lined baking sheet. Bake until they have dried out completely. Toss grapes halfway through to prevent sticking.
Blend Them: Blend grapes with a bit of water and pour through a fine mesh strainer for a fresh glass of grape juice.
“Work With What You Got!”
© Victoria Hart Glavin Tiny New York Kitchen © 2017 All Rights Reserved
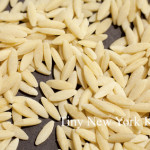
Orzo is the Italian word for barley; however, orzo is not made from barley at all, but rather from semolina, which is a course ground flour made from durum wheat. With its shape reminiscent of slivered almonds, orzo cooks up in about half the time of rice, making it a speedy standby to have on hand to add heartiness to meals.
Just bring 3 quarts of lightly salted water to a boil. Add 8 ounces ( 1 1/2 cups) dried orzo and boil about 10 minutes until it has a firm, chewy texture. Stir occasionally to prevent it from sticking together. Drain orzo in colander and serve immediately.
Rinse orzo only if it will be baked or served cold in a salad. Otherwise, do not rinse as rinsing removes a light coating of starch that helps sauces and seasonings cling to the pasta.
For the best texture and flavor serve orzo immediately after cooking. If your orzo gets done before the rest of the meal, you can keep it warm by returning the cooked drained pasta to the warm cooking pan. Stir in a little butter or olive oil to prevent it from sticking together. Cover the pasta with a lid and let it stand no more than 14 minutes.
“Work With What You Got!”
© Victoria Hart Glavin Tiny New York Kitchen © 2017 All Rights Reserved

Mahatma Gandhi, as you know, walked barefoot most of the time, which produced an impressive set of calluses on his feet. He also ate very little, which made him rather frail and, with his odd diet, he suffered from bad breath. This made him a super calloused fragile mystic hexed by halitosis.
“Work With What You Got!”
© Victoria Hart Glavin Tiny New York Kitchen © 2017 All Rights Reserved


