
Use a cherry pitter to pit olives. If you don’t have a cherry pitter (or an olive pitter) use a flat meat pounder or the bottom of a small skillet to squash the olive on a work surface, crushing the flesh so that you can remove the pit. There are very few recipes that all for perfectly pitted olives, anyway.
If you’re a martini drinker, toss out the olive brine from the jar, and replace it with dry vermouth. You will improve both your olives and your martinis.
A melon baller can be used to pull olives out of the jar. The small hole on the baller drains the brine, too.
“Work With What You Got!”
©Tiny New York Kitchen © 2021 All Rights Reserved

The turkey came originally from America and was first domesticated by the Aztecs in Mexico. The Spanish introduced turkeys into Europe and they soon became a popular choice in France, Italy and Britain.
When early settlers from Britain, France and Holland crossed the Atlantic to North America, the vast flocks of turkey that roamed wild provided them with sustenance. They were plentiful and so easy to trap or shoot that the older children of the family were given the responsibility of catching them. The Native Americans meanwhile taught the new settlers the rudiments of farming, and in November 1621, on the first anniversary of their arrival, the Pilgrims entertained the locals to a feast, at the center of which was the turkey. Ever since, this has been the traditional bird served at Thanksgiving.
Turkeys are available fresh, chilled, or frozen all year round. When buying a whole bird, look for a plump well-rounded breast and legs and clear, soft and evenly colored skin. Avoid birds that are bruised, with blemishes or torn skin or any that have been badly or unevenly plucked. Turkeys vary enormously in weight.
When you’re ready to purchase your turkey it’s easy to get confused on what size to get. A good guild to go by is to figure approximately 1 1/4 pounds per person. This makes enough for the meal and provides a decent amount of leftovers.
To store your turkey place it in a large, deep dish and cover it completely with plastic wrap. Store it in the coolest part of the refrigerator; making sure that it does not come in contact with other foods.
Thaw a frozen turkey in the refrigerator for 2 to 4 days. Estimate 24 hours for every 5 pounds, so 2 days for a 10 pounder, 3 days for a 15 pounder, etc.
And then there is always the frozen turkey emergency that goes like this, “Help, help, it’s Wednesday, and my turkey is still frozen!!!” It’s been a long time, but I’ve been in this predicament. What you do is leave the turkey in its wrapper and put it in a large-size container. A lobster pot works well. Fill the container with cold tap water and let it sit for 30 minutes. Dump out the water and refill. Let it sit another 30 minutes. Repeat until the turkey is thawed, then roast immediately or transfer to the refrigerator.
The good news is that you can brine or dry cure your turkey while it defrosts in the refrigerator. What a Godsend that is! Use a lighter brine solution, which is about 1/2 cup kosher salt per gallon of water, plus sugar and spices). If you’re dry curing, use the standard recipe. You’re turkey should stay below 40 degrees while brining. You don’t need to brine or cure a kosher or butterball type supermarket frozen turkey. These come pre-brined. If you want to be able to put your own flavor stamp on your meal, then get a natural or untreated bird and do it yourself. If you plan on brining for 2 days use the weaker solution that I just mentioned. If you plan to brine for 24 hours or less, then bump it up to 1 cup kosher salt per gallon of water. Then add an equal amount of sugar. I don’t always brine, but when I do I’ve been known to throw an assortment of flavorings in the brine. Flavorings that you could add to your brine could be: apples, lemons, oranges, onions, garlic, shallots, peppercorns, bay leaves, cinnamon sticks, cloves, allspice berries, juniper berries, mustard seeds, fennel seeds, coriander seeds, rosemary, sage, thyme, savory, parsley, or oregano. You can also replace half the water with sweet cider, hard cider, vegetable stock, turkey stock, chicken stock, beer, white wine, or red wine. If you want to dry cure then use about 1/2 teaspoon kosher salt for every pound of turkey. Then add spices to your taste.
Stuffing your turkey is a personal preference. I always stuff the bird because I love how it tastes when cooked inside the turkey. It does slow down the cooking process, however. Never stuff the turkey in advance of cooking. The stuffing can be made in advance, but the turkey should not be stuffed until just before it is placed in the oven. Weigh the stuffing and add this to the weight of the bird before calculating the cooking time. Thoroughly rinse the body cavity of the bird under cold running water, and then drain it well. Wipe the turkey, inside and out, with paper towels. Press the stuffing inside the shallow neck cavity. Make sure not to pack it in too tightly. Turn the bird over and pull the neck skin over the stuffing. Now it’s time for a little turkey bondage and truss the bird (tuck the wing tips under the breast and tie the legs together) and then cook for the calculated time. Never shorten the cooking time because although the meat may appear cooked, extra time must be allowed for cooking the stuffing thoroughly.
If you choose not to stuff your turkey then place aromatics in the body cavity of the bird. Cut a large onion in half and stud each half with 4 to 6 cloves. Place this in the body cavity of the bird. Cut an orange and a lemon into quarters and add these, together with 3 or 4 bay leaves, 4 to 6 fresh sage sprigs, and 2 to 3 fresh thyme sprigs. Add 1 cinnamon stick or 1 blade of mace for a festive hint of warm spice.
Turkeys are super easy to roast, but require a little more attention than smaller birds. Check to make sure the oven shelves are in the correct position before heating the oven. Preheat the oven to 350 degrees. Place the prepared bird on a rack in a large-size roasting pan. Smear the turkey breast generously with butter, season with salt & pepper and place in the oven. Baste the turkey from time to time during cooking. When the breast has browned, cover with foil to protect it and continue cooking. Remove the covering foil for the final 20 minutes of cooking. To check if the meat is cooked, insert a skewer into the thickest part of the thigh. If the juices run clear and the meat is white, it is cooked. If the juices are pink and the meat is soft and pink, the turkey is not ready. Return it to the oven and check again after 20 minutes. Cooking times will differ depending on whether your bird was purchased fresh or frozen. Plan on 20 minutes per pound in a 350 degree oven for a defrosted turkey and 10 to 15 minutes per pound for fresh. Remember to add more time if you’re turkey is stuffed. You should have an instant-read thermometer in your kitchen drawer. Insert the thermometer into the breast (all the way to the bone) and if it reads 160 degrees you’re good to go. You may also measure the thigh by inserting the thermometer into the thickest part, but not touching the bone, and it should read 165 degrees.
Remove the turkey from the oven and cover it closely with foil. Leave it to rest for at least 30 minutes. This will even out the temperature and make it easier to carve. I know some chefs who let it rest for 2 hours, but I don’t think that one needs to wait that long. If you wish to make gravy in the roasting pan, transfer the bird to a carving plate.
When you’ve let your bird rest awhile remove the trussing string. Hold the bird steady in position with a carving fork. Cut off the legs, then cut these in half or carve the meat from the bones. Make a horizontal cut across the breast above the wing. Carve neat and even vertical slices off the breast. Repeat on the other side of the bird. Arrange slices on a warmed platter. Add the turkey legs or sliced meat to the platter or set them aside for serving separately. Scoop out the stuffing and serve with the meat.
“Work With What You Got!”
© Victoria Hart Glavin Tiny New York Kitchen © 2016 All Rights Reserved
Basics of Meat & Poultry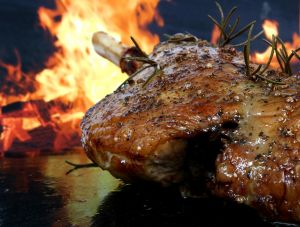
Many people ask me how long they can keep fresh meat and poultry. You can refrigerate whole meat cuts for 2 to 3 days and raw ground meats for 1 to 2 days. Raw poultry for 1 to 2 days. If you’re not cooking your meat or poultry within these time frames, freeze it. We never want to risk getting food poisoning.
How do you know when your particular meat is done cooking? The safest way is to use a meat thermometer, inserting into the thickest part of the meat, but never touching bone.
Meat Cooking Terms
Braise: Moist cooking in a pot with a lid and a small amount of liquid. This method works well either on the stove top or in the oven, rendering tougher cuts moist and extremely tender by melting the tough collagen between fibers, but allowing the fibers themselves to retain moisture. Examples: Pot Roast, Boeuf Bourguignon, Cacciatore, Most Curries.
Brine: Similar to marinating, meat or poultry is soaked in a salt-water mixture prior to cooking to enhance flavor, moisture and tenderness. Examples: Brined Turkey, Chicken or Pork.
Broil: Dry cooking under intense direct heat, sort of like grilling from the top down. Great for tender steaks and chops, boneless chicken, kabobs. Example: London Broil.
Deep Fry: Cooking pieces of meat, often coated with batter or crumbs, submerged in very hot oil. Example: Southern Fried Chicken.
Grill: Cooking over direct heat, usually outdoors. Grill pans and electric grills don’t require much additional oil, and create nice looking char marks, but lack the crust and smoky flavor of outdoor grilling. Grilling can be fast or slow. Examples: Grilled Steaks, Barbecued Chicken, You Name It!
Pan-Roast or Pan-Fry: A technique that begins on the stove top and often ends under the broiler or in the oven. Combination cooking creates a flavorful browned exterior and allows for finer control of doneness. Great for thick chops and steaks or larger pieces of poultry. Examples: Filet Mignon, Pork Tenderloin, Pan-Roasted Veal Chops.
Poach: Simmer at a point less than boiling to produce just a slight movement in the liquid. Examples: Poached Chicken Breasts.
Roast: Dry cooking in ambient oven heat. Creates a flavorful, browned outside and a tender, juicy interior. Ideal for larger tender roasts, whole poultry, most stuffed roasts. Examples: Roast Beef, Thanksgiving Turkey, Crown Roast.
Sauté: Quick stove-top cooking in a skim of oil in a heavy, low-sided skillet, frying pan or sauté pan. Great for tender steakhouse cuts and chops, chicken or duck breast, boneless cutlets. Examples: Sandwich Steaks, Wiener Schnitzel, Chicken Cutlets.
Smoke: Food is cooked or flavored before cooking by exposure to smoldering wood, herbs or tea. Examples: Tea-Smoked Chicken, Mesquite-Smoked Pork Chops.
Stir Fry: An Asian technique of cooking small pieces of food over very high heat, usually with oil, using constant stirring and tossing motion to prevent burning. Examples: A Profusion of Meat, Seafood and Poultry Dishes From China, Thailand and Vietnam.
Simmer: See Braise & Also See Stew
Stew: Slow cooking, Submerged in flavorful liquid, usually after browning on the surface. Stewing is similar to braising except that stews usually have more liquid, which is an important part of the finished dish. Best for cubes coming from tougher cuts. Examples: Beef Stew, Chili, Gumbo.
Sous-vide: A method of cooking food sealed in airtight plastic bags in a water bath for longer than normal cooking times (72 hours in some cases). The temperature is regulated and much lower than normally used for cooking, typically around 55° F to 60° F for meats. The intention is to cook the item evenly, and not to overcook the outside while still keeping the inside at the same doneness, keeping the food juicier. Examples: Beef Brisket and Short Ribs.

Easy Non-Salad Radish Ideas
I love radishes and am always drawn to the pretty color of a pile of radishes. Most of us just slice them into a green salad and the left-over radishes die a fateful death in the fridge. Here are some non-salad ideas that will expand your radish repertoire.
Radish Sauté – It doesn’t really occur to many people that you can cook radishes (as with cucumbers). It’s so simple to sauté radishes in olive oil or butter. They are delicious and make you appreciate radishes in a while new way.
Kimchi – Sprinkle the radishes with a bit of kosher salt and a little chili paste. Toss together and then pack them into a glass jar. Place in the back of the fridge for two weeks. Excellent on top of a burger.
Butter & Sea Salt – A fine butter and a pinch of sea salt on top of a radish slice make the perfect summer bite.
Radish “Sauerkraut” – Slice 1 pound of radishes and toss with 1 tablespoon of kosher salt. Pack tightly into a glass jar. Weigh down with a wrapped can and place on a shelf for two weeks. Makes a great addition to a sandwich.
Shaved & Lightly Poached In A Tasty Liquid – Slivers of radish dropped in a simmering stock and/or wine for 10 seconds are a great compliment to fresh fish. They let go of their bite, but retain some of their unique crunch we all know and love.
Braised – Sauté a little onion and garlic. Add in some radish quarters and a healthy splash of red wine. Cover and simmer for 20 minutes. Finish with a squeeze of lemon or dash of vinegar. Excellent draped over a grilled steak or pork chop.
Pickled – Slice some 1/4 inch coins and throw them into a jar. Pour brine over them (1 teaspoon kosher salt, 1/2 teaspoon sugar, 1/2 cup water and 1 1/2 cups cider vinegar). You may want to throw in a few dried chilis if you want a bit of spice. Let sit in your fridge for a week.
Soup – Simmered for 30 minutes in a soup. The radishes will take on a sweet and velvety character.
Grated – Grate the radishes along with some freshly grated ginger and use as a condiment with any oily fish such as trout or mackerel.
Roasted – Quarter and toss with a little olive oil. Season with kosher salt and freshly ground pepper. Roast in an oven at 425º F for 20 minutes. They should be a little brown and will become sweet. Toss them with some toasted nuts. They are a great side dish at any potluck picnic.

 Easter Menu Ideas
The greatest feast of the Christian Church takes its name from that of Eastre, the Anglo-Saxon goddess of the dawn. The feast, however, has another name, the Pasch, the Greek word coming from the Hebrew pesakh, the Passover. This is the term for the feast which is used in nearly every language except English and German, but even these two languages use the words Paschal candle and Paschaltide. In the churches of the Eastern Orthodox the feast of Easter comes somewhat later than in the Western calendar, but the observance is as great, if not greater. Here are some Easter feast ideas that may be useful in your home this Sunday.
Easter Breakfast Or Brunch
Mini Frittatas: Cheddar, Asparagus, Sun-Dried Tomato, Swiss, Bacon or Mushroom
Spring Onion Quiches With Gruyere Cheese: Cooked Leeks & Onions With Cheese & A Savory Egg Custard Baked In A Tart Shell
Asparagus, Arugula & Goat Cheese Quiche: Asparagus, Baby Arugula & Goat Cheese Mixed With Egg Custard Baked In a Flaky Crust
Fresh Fruit Platter: Sliced Cantaloupe, Honeydew, Watermelon , Pineapple, Grapes & Berries
Easter Appetizers
Asparagus Rolled In Pancetta
Mini Spinach & Ricotta Calzone
Bruschetta
Crudites Platter: Celery, Broccoli, Cauliflower, Green & Yellow Squash, Sliced Cucumbers, Red/Yellow/Green Bell Peppers, Grape Tomatoes And Baby Carrots
Cheese Platter: Classic American & European Cheeses Cubes & Wedges For Snacking. Serve With Almonds & Crostini
Shrimp Cocktail: Cook, Devein & De-shell Large Shrimp Serve with Lemons & Cocktail Sauce
Smoked Salmon Platter: Sliced Salmon With Chopped Red Onions, Capers, Cornichons, Mustard Sauce & Horseradish Sauce
Whole Boneless Poached Salmon: Poached In White Wine With A Light & Creamy Dill Sauce
Soups
Spring Pea & Onion Soup: Pureed Spring Pea & Onion Soup Made With Celery, Leeks, Garlic & Thyme
Carrot & Fennel Soup: Carrots, Fennel & Tomatoes Cooked In Vegetable Broth. Pureed Smooth
Salads & Side Dishes
Shrimp, Spring Pea & Morel Salad: Shrimp With Crispy Spring Peas, Morel Mushrooms & Tomatoes Lightly Tossed In A Lemon Vinaigrette
Golden Beet, Radish & Frisee Salad: Golden Beets, Radishes, Frisee Served With Goat Cheese, Pecans & Champagne Vinaigrette.
Grilled Asparagus: Marinate In Olive Oil & Kosher Salt. Grill
Gnocchi, Peas & Pancetta: Gnocchi, Peas, Panchetta, Ricotta Salata, Baby Arugula & Lemon Zest
Entrees
Honey Spiced Turkey Breast: Brine, Slow Roast Finished With Spices & Honey Glaze
Apricot Bourbon Glazed Ham: Apricot Jam, Honey, Dijon Mustard & Bourbon Combined & Poured On Top Of Ham Then Baked
Victoria’s Apricot Pork Tenderloin
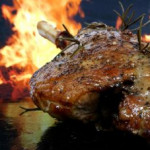
Rosemary Rubbed Leg Of Lamb: Boneless Leg Of Lamb Marinated In Olive Oil & Herbs Then Roasted To Medium Rare
Grilled Salmon With Crispy Potato & Leek Fondue: Grilled Salmon Topped With Melted Spring Leeks With A Touch Of Cream & Crispy Fingerling Potatoes
Rack Of Lamb: Roasted With A Variety Of Spices
Desserts
Carrot Cake With Cream Cheese Frosting
Chocolate Cake
Yellow Cake With White Chocolate Ganache
Victoria’s Caramel & Chocolate Pecan Bars
Fruit Tarts
Hot Cross Buns


