
When cooking meats, it’s important to know the various temperatures.
Beef: Rare 120F to 125F (45C to 50C), Medium Rare 130F to 135F (55C t 60C), Medium 140F to 145F (60C to 65C), Medium-Well 150F to 155F (65C to 70C), Well Done 160F and above (70C and above)
Pork: Medium Rare 145F (63C), Medium 160F (70C), Well Done 170F (76C)
Poultry: Well Done 165F (75C)
Lamb: Medium Rare 145F (65C), Medium 160F (70C), Well Done 170F (76C)
Fish: Well Done 145F (65C)
To find out what temperature your meat is at, remove food from oven, turn on the digital display by pressing the on/off button. Select F/C. Insert thermometer in the thickest part of the meat, immersing the stem at least 1 inch, but not to contact with bone, fat or gristle and wait for the temperature to stabilize.
The digital display will automatically give you the cooking temperature. If additional cooking time is needed, remove the thermometer from the food and return the dish to the oven.
“Work With What You Got!”
©Tiny New York Kitchen © 2021 All Rights Reserved

Look for thicker pork chops (about 1/2-inch-thick) for roasting as they are less likely to dry out in the oven. Save cutlets and thin cut chops for searing and stir fries.
“Work With What You Got!”
©Tiny New York Kitchen © 2021 All Rights Reserved

The heat of late summer calls for lighter meals packed with fresh produce. Fortunately, there is an abundance of delicious, seasonal produce to pick from. Not only are seasonal items packed with flavor and beneficial nutrients, they tend to be more affordable as well.
Finding unique ways to use summer favorites can help combat any recipe fatigue you may have experienced in recent months. From packing picnics for the beach to firing up the grill to assembling no-cook meals, use Tiny New York Kitchen’s search function to help you find quick and tasty meals for all to enjoy.
Mix up your meals and fuel your family throughout the long days of summer with these ideas:
Grill Seasonal Vegetables
Add some color (along with vitamins, minerals, and fiber) to your menu by tossing fresh vegetables on the grill. Zucchini and summer squash are ideal as they can be diced and cooked in foil, on skewers or cut into uniform planks and placed directly on the grates. Regardless of the method, coat them with a little bit of olive oil and your favorite herbs and spices for the tastiest result.
Enjoy Something Sweet Any Time Of The Day
Melon is the perfect summer treat. Watermelon, cantaloupe and honeydew have just the right amount of sweetness this time of year, plus they have high water content, helping you to hydrate with each bite. Cut up slices for an easy snack on the go or scoop out melon balls to add to a fruit salad for a refreshing dessert.
Take Advantage Of Fresh Herbs
One of the best ways to add flavor to dishes, without added sodium, is to use herbs and spices. Basil, mint, oregano, and cilantro are excellent during warmer months as they pair perfectly with seasonal produce and light proteins such as fish.
Choose A New Fruit Or Vegetable
Pick out a new fruit or vegetable for your family to try during the remaining summer months. Kids love to choose by color! Then, plan a meal around your new produce pick.
Build A Picky Eater Snack Plate
Not only will this quick meal hack keep you out of a hot kitchen, but it is a great way to encourage picky eaters to get a bit more adventurous. Mix & match favorite fruits and vegetables with new options available this time of year. Have a strawberry lover? Put one or two blackberries next to them on the plate. Does your child devour cherry tomatoes? Try adding a few cucumber slices, too. They just may be tempted to try a bite of something new. Then, add in a no-fuss protein, like a hard-boiled egg or shredded rotisserie chicken and some easy whole grains such as crackers, popcorn or pita bread. Round it out with dairy favorites such as string cheese or yogurt. There you have a balanced plate without much hassle.
“Work With What You Got!”
©Tiny New York Kitchen © 2021 All Rights Reserved

Use a cherry pitter to pit olives. If you don’t have a cherry pitter (or an olive pitter) use a flat meat pounder or the bottom of a small skillet to squash the olive on a work surface, crushing the flesh so that you can remove the pit. There are very few recipes that all for perfectly pitted olives, anyway.
If you’re a martini drinker, toss out the olive brine from the jar, and replace it with dry vermouth. You will improve both your olives and your martinis.
A melon baller can be used to pull olives out of the jar. The small hole on the baller drains the brine, too.
“Work With What You Got!”
©Tiny New York Kitchen © 2021 All Rights Reserved

Extra Virgin Olive Oil, Coconut Oil, Butter, Avocado Oil, Sesame Oil, and Walnut Oil are the fats that you should be cooking with. Try to avoid Canola, Soybean, Corn, Peanut, Sunflower, Safflower, Cottonseed, and Grapeseed Oil as they go through intense processing.
Extra Virgin Olive Oil
The benefits of this mainly monounsaturated, anti-inflammatory and antibacterial, protects against heart disease and raises HDL cholesterol. It has a medium smoke point (the heat at which an oil starts to degrade), so it’s fine for sautéing, but not for cooking at very high temperatures. It excels in sauces and salad dressings.
Coconut Oil
While coconut oil is saturated, it’s a type that operates differently in your body than animal based saturated fats. It also may have special benefits. It boosts fat burning and contains medium chain triglycerides (MCTs), which go straight to the liver to be used as a quick source of energy or turned into ketones.
Butter
Now that margarine has been banished to the neverland of trans fats, butter has made a slow and steady comeback. Butter can create magic in cooking and is completely keto friendly. But it has a low smoke point, so if you want to cook at higher heats, use ghee (clarified butter) instead. You can purchase ghee or make your own.
Avocado Oil
Whole avocados are keto gold and the oil pressed from the fruit is equally healthful. It’s also incredibly versatile, with just about the highest smoke point of any oil (520 degrees) meaning that you can cook at very high heat without having it break down or burn.
Sesame Oil
Sesame seeds have been pressed to extract their oils for thousands of years. They bring a distinctive flavor, particularly savory in Asian inspired dishes, along with hefty omega-3 values and compounds called phytosterols that reduce cholesterol uptake in the body.
Walnut Oil
Walnuts are stars of a keto diet, and so is the oil they provide, which is rich in omega-3 fatty acids as well as vitamins like manganese, niacin, potassium, and zinc. It doesn’t cook well at high heat. Its rich, nutty flavor is better served as a star ingredient in sauces, salad dressings or toppings for grilled meats.
“Work With What You Got!”
©Tiny New York Kitchen © 2021 All Rights Reserved

English peas (sometimes called garden peas or pod peas) have a fresh, slightly grassy flavor that is the essence of spring. English peas are wonderful puréed and made into a creamy soup or spread. They add bright points of color and flavor to pilafs, risotto, fried rice, pasta, and soups. Steamed and sprinkled with fresh mint or parsley, they make a wonderful side dish.
Pods should be bright green and feel heavy. Each 1 pound of whole pods yields about 1 cup of shelled peas so make sure to pay attention to the desired measurement in your recipe. Their sugars convert quickly to starch so English peas are best eaten the day that they are purchased. If needed, store them in an airtight container in the refrigerator for up to 3 days. To prepare, shell peas right before cooking them in order to keep them from drying out. Once shelled, peas can be briefly cooked in 1/4 inch of steaming water for 3 to 4 minutes. They will quickly turn soggy and lose their vibrant color, so it is important not to overcook them.
“Work With What You Got!”
©Tiny New York Kitchen © 2021 All Rights Reserved

Though they are available year-round in grocery stores the best strawberries are to be found in farmer’s markets in spring and early summer.
Look for smaller berries, preferably organic ones, with a rich, glossy red color and shiny green leaves. Avoid berries with white or green shoulders and brown or limp leaves. Never buy them if they are moist, overly soft or show signs of mold. Do not buy berries if their cartons are leaking and wet, a sure sign that unseen fruits will be moldy.
Although fresh strawberries should be rinsed, do not soak them for any length of time since they will absorb the water and turns mushy. For eating on their own, strawberries, even very large ones, should be left whole. Hull strawberries before freezing them or using them for most preparations. Use a small paring knife or a strawberry huller to carve out the white center core from the stem end of each berry. To improve the flavor of lackluster strawberries, hull and slice them, place in a bowl and sprinkle with a tablespoon or two of sugar for every pint. Let stand at room temperature for at least 15 minutes. The sugar draws moisture from the berries to make a sweet natural syrup.
Fresh strawberries are fragile so handle them with care. Don’t wash the berries until just before you are ready to eat them, as the moisture will encourage mold. To store strawberries, line a glass or plastic container with paper towels, carefully arrange the berries inside and cover with the lid. They will keep in the refrigerator for up to 1 week.
©Tiny New York Kitchen © 2021 All Rights Reserved

Crunchy, juicy, nutrient packed jicama is an unsung hero of the produce aisle. Technically a cousin to green beans, jicama is a root vegetable from Mexico available year-round that is delicious cooked or raw. With a mild, earthy, slightly sweet flavor and an apple like consistency. It’s a great addition to salads, salsas, slaws, and grazing boards. Jicama also works as lighter swap for potatoes in baked and air fried recipes, and it’s delicious sautéed or boiled, too.
If you’ve never tried jicama, don’t be intimidated. Start by choosing one with a smooth, unblemished surface and thin brown skin. The skin should be thin enough to scrape with your thumbnail to reveal the white flesh inside. Avoid thick skinned, bruised, or shriveled jicama, which are signs of aging.
Once you’re ready to prep, start by trimming off the ends of the jicama and slice in half. Then, use a knife to gently peel away the skin.
For Jicama Sticks:
Step 1: Carefully slice off the rounded parts of the jicama, creating a flat surface.
Step 2: Cut each half into 1/4-inch slices.
Step 3: Stack slices and cut evenly into sticks.
Fresh, raw jicama sticks are a great addition to lunchboxes or served on a vegetable platter with your favorite dip. They can also add unexpected, satisfying crunch to cooked dishes, like a noodle salad with jicama and a miso vinaigrette.
Jicama sticks are delicious roasted, too. Their firm texture can withstand the heat, while the edges get golden brown and tender. Toss together with sweet peppers and spices for a simple, satisfying sheet pan side that pairs well with all kinds of meat and fish.
For Diced Jicama:
Step 1: Follow the steps above to create jicama sticks
Step 2: Line up sticks or stack into a pile, then evenly cut into cubes.
Diced jicama is a vitamin and fiber-rich way to add bulk to all kinds of green, grain, and protein-based salads. I love the combination of crunchy jicama with creamy avocado served with grilled chicken.
Moist and mild flavored jicama also plays well with fruit, especially melon. A refreshing combination of watermelon, jicama, and fresh mint falls somewhere between salad and salsa, delicious scooped onto tortilla chips or just spooned straight from the bowl.
Next time you’re at your local grocery store or market pick up jicama and experiment with ways to incorporate it into your recipes.
©Tiny New York Kitchen © 2021 All Rights Reserved
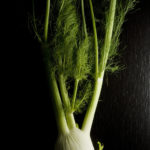
Fennel is a member of the carrot family, though it is not a root vegetable. The base of its long stalk weaves together to form a thick and crisp bulb that grows above ground. Fennel’s leaves, seeds, and stems all have a sweet, faintly anise like flavor. The stems of fennel swell and overlap at the base of the plant to form a bulb with white to pale green ribbed layers that are similar to celery in appearance and texture. Light and feathery, the pretty green leaves slightly resemble fresh dill. Use them as a bed for steaming fish or in small amounts as a garnish.
Originating in the Mediterranean, the fennel bulb appears often in Italian and Scandinavian cuisines. It can be eaten raw, grilled, baked, braised, or sautéed. While grilling, you can toss a handful of dried or fresh fennel stems onto the charcoal to infuse meat or fish with a light anise flavor.
When selecting fennel choose fresh bulbs that are smooth and tightly layered with cracks or bruises. Fat, rounded bulbs with white and pale green color will tend to be more succulent than thin or yellow ones. Avoid any with wilted leaves or dried layers. Now available year-round, fennel is at its peak from late fall through winter. Grocers sometimes incorrectly liable fennel as sweet anise.
When storing, keep fennel bulbs in a perforated plastic bag in the refrigerator for up to 5 days. If kept too long, they will lose their flavor and toughen.
When preparing, remove the green stems and leaves, saving them to flavor or garnish other dishes such as soups or fish. Discard the outer layer of the bulb if it is tough and cut away any discolored areas. Cut the bulb in half lengthwise and remove the base of the core as it is thick and solid. Gently separate the layers with your hands and rinse well to remove any grit between them. Slice or cut as your recipe directs.
©Tiny New York Kitchen © 2021 All Rights Reserved
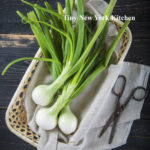
One of the wonderful things about spring is access to spring onions. Spring onions are typically planted at the end of summer so that they grow over the winter months, ready for harvesting in the spring.
Spring onions are more mature than both scallions and green onions, but are still a type of young onion, which are picked before they have a chance to grow larger. You can identify a spring onion by the small, round, white bulb at its base. While it appears similar to scallions and green onions, its rounded bulb gives it way.
Spring onions are also slightly stronger in flavor than scallions and green onions due to their maturity. They still have a gentler flavor than regular onions, which have been left in the ground much longer and grow much larger.
To prepare spring onions wash them under running water to free them of any dirt and grit. Trim the root end, but only the very, very end. Every last bit of white packs a lot of flavor. If you’re braising or grilling them whole just trim off the top most inch of the greens and you’re done.
If you are using spring onions where you would use scallions the prep is nearly the same. Slice them thinly crosswise for adding to a salad or a vinaigrette. If you’re using them in a stir-fry, cut them on the bias.
©Tiny New York Kitchen © 2021 All Rights Reserved


