
Making precise slices of softer, smaller foods in a snap, literally, with this tool designed to hold slippery, hard-cooked eggs in its cradle as the wires cut through. Cleanup is just as speedy – use a kitchen brush and warm, soapy water.
It can quick slice soft fruits and vegetables such as peeled kiwis, hulled strawberries, white or cremini mushrooms, and pitted olives.
Create perfect rounds from soft cheeses, like fresh mozzarella balls and goat cheese.
Make even pats from a stick of butter.
Be creative and try using an egg slicer on soft foods that you’re preparing. The possibilities are endless.
“Work With What You Got!”
© Victoria Hart Glavin Tiny New York Kitchen © 2017 All Rights Reserved

Remove Turkey From Refrigerator At Least 1 Hour Prior To Roasting.
Preheat Oven To 325 Degrees.
Place Turkey In Sink And Remove Neck & Giblets.
Place In Roasting Pan And Brush With Melted Butter. Season With Salt & Pepper.
Place Turkey In Lower Third Of The Oven And Roast For 10 Minutes Per Pound.
To Determine If Turkey Is Done, Place Thermometer Between Thigh & Breast. Temperature Should Register Between 160 To 165 Degrees And Juices Should Run Clear.
When Turkey Is Done, Remove From Oven, Cover Loosely With Foil, And Allow To Rest 30 To 45 Minutes, Which Allows Time To Heat Side Dishes.
Carve & Enjoy!
Approximate Cooking Times Based On 10 Minutes Per Pound At 325 Degrees:
9 Pound Turkey: 1 1/2 To 1 3/4 Hours
12 Pound Turkey: 2 To 2 1/4 Hours
14 Pound Turkey: 2 1/4 To 2 1/2 Hours
16 Pound Turkey: 2 1/2 To 2 3/4 Hours
18 Pound Turkey: 3 To 3 1/4 Hours
20 Pound Turkey: 3 1/2 To 3 3/4 Hours
22 Pound Turkey: 4 To 4 1/4 Hours
25 Pound Turkey: 4 1/4 To 4 1/2 Hours
If You Have Stuffed Your Turkey Then Add More Time.
“Work With What You Got!”
© Victoria Hart Glavin Tiny New York Kitchen © 2016 All Rights Reserved
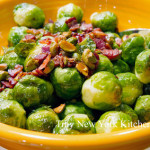
Brussels sprouts have a pronounced and sweet nutty flavor, quite unlike cabbage, although the two are closely related. They are traditionally served at Thanksgiving and Christmas and have an affinity with certain nuts, such as almonds, pistachios, and chestnuts. Brussels sprouts taste great with onions, and ginger, or with nuts.
Brussels sprouts should be small and hard with tightly wrapped leaves. Avoid any that are turning yellow or have loose leaves. They will keep in a cool place or in the salad drawer of a refrigerator for several days.
When preparing and cooking Brussels sprouts trim away the base of the stalk and remove the outer leaves. If the sprouts are large, cut them in half or quarters, or slice thinly for stir-frying. Cook very briefly in small amounts of fast-boiling water. Alternatively, stir-fry with onions and ginger, in a little oil and butter.
“Work With What You Got!”
© Victoria Hart Glavin Tiny New York Kitchen © 2016 All Rights Reserved

5 Ways To Use A Vegetable Peeler
The humble vegetable peeler has hidden talents.
Easily Peel Fruit: To peel soft fruits and vegetables, like tomatoes and peaches, you usually have to briefly dunk them into boiling water. Using a good vegetable peeler is so much easier and faster. Look for peelers with serrated blades for the best results and select not-too-ripe fruit.
Shaved Cheese: Give salads, pastas and roasted vegetables a restaurant-style finish by garnishing with generous amounts of shaved Parmesan or pecorino romano cheese.
Vegetable Pasta: Shave long strips of zucchini, carrots (even sweet potatoes and squash) to transform them into pasta substitutes. Serve raw or briefly steamed with your favorite sauce, or toss with a vinaigrette for a fresh and nutritious salad.
Spreadable Butter: Is there anything worse than trying to butter toast or bread with rock hard butter straight from the fridge? Use a vegetable peeler to scrape off thin and perfectly spreadable butter ribbons.
Chocolate Curls: Peel the edge of a slightly softened chunk of chocolate to create curls, or the flat surface of very cold chocolate to make shavings. Keep your creations in the freezer and use to garnish cakes, pies, puddings and seasonal fruit.
www.tinynewyorkkitchen.com
“Work With What You Got!”
© Victoria Hart Glavin Tiny New York Kitchen © 2016 All Rights Reserved
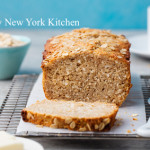
Quick Breads
For mouth-watering breads that don’t require a lot of time, turn to quick breads. By using baking powder, baking soda, steam, or air instead of yeast to leaven dough. An advantage of quick breads is their ability to be prepared quickly and reliably, without requiring time-consuming skilled labor and the climate control needed for traditional yeast breads. Quick breads include banana bread, beer bread, biscuits, cornbread, cookies, muffins, cakes, pancakes, brownies, scones, and soda bread.
Almost all quick breads have the same basic ingredients: Flour, leavening, eggs, fat (butter, margarine, shortening, or oil) and a liquid such as milk. Ingredients beyond these basics are added for variations of flavor and texture. The type of bread produced varies based predominantly on the method of mixing, the major flavoring, and the ratio of liquid in the batter. Some batters are thin enough to pour and others are thick enough to mold into lumps.
There are four main types of quick bread batter:
Pour Batters: Such as pancake batter, have a liquid to dry ration of about 1:1 and so pours in a steady stream – also called a “low-ratio” baked good.
Drop Batters: Such as cornbread and muffin batters, have a liquid to dry ratio of about 1:2.
Soft Doughs: Such as many chocolate chip cookie doughs, have a liquid to dry ratio of about 1:3. Soft doughs stick significantly to work surfaces.
Stiff Doughs: Such as pie crust and sugar cookie doughs, have a liquid to dry ratio of 1:8. Stiff doughs are easy to work in that they only minimally stick to work surfaces, including tools and hands – also called “high-ratio” baked goods.
Preparing a quick bread generally involves two mixing containers. On contains all dry ingredients (including chemical leavening agents or agent) and one contains all wet ingredients (possibly including liquid ingredients that are slightly acidic in order to initiate the leavening process). In some variations, the dry ingredients are in a bowl and the wet ingredients are heated sauces in a saucepan off-heat and cooled.
During the chemical leavening process, agents (one or more food-grade chemicals – usually a weak acid and a weak base) are added into the dough during mixing. These agents undergo a chemical reaction to produce carbon dioxide, which increases the baked good’s volume and produces a porous structure and lighter texture. Yeast breads often take hours to rise, and the resulting baked good’s texture can vary greatly based on external factors such as temperature and humidity. By contrast, breads made with chemical leavening agents are relatively uniform, reliable, and quick. Usually, the resulting baked good is softer and lighter than traditional yeast breads.
Chemical leavening agents include a weak base, such as baking soda (sodium bicarbonate) plus a weak acid, such as cream of tartar, lemon juice, or cultured buttermilk, to create an acid-base reaction that releases carbon dioxide. Quick bread leavened specifically with baking soda is often called “soda bread.” Baking powder contains both an acid and a base in dry powdered form, and simply needs a liquid medium in which to react. Other alternative leavening agents are egg whites mechanically beaten to form stiff peaks, as in the case of many waffle recipes, or steam, in the case of cream puffs.
There are three basic methods for making quick breads, which may combine the “rise” of the chemical leavener with advantageous “lift” from other ingredients.
The Stirring Method: Also known as the quick-bread method, blending method, or muffin method is used for pancakes, muffins, corn bread, dumplings, and fritters. This method calls for measurement of dry and wet ingredients separately, then quickly mixing the two. Often the wet ingredients include beaten eggs, which have trapped air that helps the product to rise. In these recipes, the fats are liquid, such as cooking oil. Using mixing is done using a tool with a wide head such as a spoon or spatula to prevent the dough from becoming over-beaten, which would break down the egg’s lift.
The Creaming Method: Frequently used for cake batters. The butter and sugar are “creamed” or beaten together until smooth and fluffy. Eggs and liquid flavorings are mixed in, and finally dry and liquid ingredients are added in. The creaming method combines rise gained from air bubbles in the creamed butter with the rise from the chemical leaveners. Gentle folding in of the final ingredients avoids destroying these air pockets.
The Shortening Method: Also known as the biscuit method, is used for biscuits and scones. This method cuts solid fat (whether lard, butter, or vegetable shortening) into flour and other dry ingredients using a food processor, pastry blender, or two hand-held forks. The layering from this process gives rise and adds flakiness as the fold of fat melts during baking. This technique is said to produce “shortened” cakes and breads, regardless of whether or not the chosen fat is vegetable shortening.
Quick bread originated in the United States at the end of the 18th century. Before the creation of quick bread, baked goods were leavened with either yeast or by mixing dough with eggs. The discovery of chemical leavening agents and their widespread military, commercial, and home utilization in the United States dates back to 1846 with the introduction of commercial baking soda in New York by Church and Dwight of “Arm & Hammer” fame. This development was extended in 1956 by the introduction of commercial baking powder in Massachusetts, although the best known form of baking powder is “Calumet”, which was first introduced in West Hammond and Hammond, Indiana (later Calumet City, Illinois) in 1889. Both forms of food-grade chemical leaveners are still being produced under their original names.
During the American Civil War (1861-1865) the demand for portable and quickly made food was high, while skilled labor for traditional bread making was scarce. This encouraged the adoption of bread, which was rapidly made and leavened with baking soda, instead of yeast. The shortage of chemical leaveners in the American South during the Civil War contributed to a food crisis.
As the Industrial Revolution accelerated, the marketing of mass-produced prepackaged foods was eased by the use of chemical leaveners, which could produce consistent products regardless of variations in source ingredients, time of year, geographical location, weather conditions, and many other factors that could cause problems with environmentally sensitive, temperamental yeast formulations. These factors were traded off against the loss of traditional yeast flavor, nutrition, and texture.
www.tinynewyorkkitchen.com
“Work With What You Got!”
© Victoria Hart Glavin Tiny New York Kitchen © 2016 All Rights Reserved
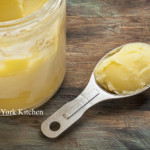
How To Clarify Butter
Some recipes call for clarified butter. To make it, just melt butter over a medium-low heat until the milk solids separate and rise to the top, 3 to 5 minutes. Let cool, then skim off the white foam and discard. Spoon remaining clarified (clear) butter into a bowl; discard the solids left at the bottom of the pan.
“Work With What You Got!”
© Victoria Hart Glavin Tiny New York Kitchen © 2016 All Rights Reserved
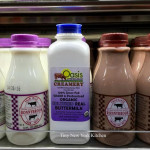
In the old days, buttermilk was what was left in the butter churn. Nowadays, it’s manufactured with healthy bacteria much like yogurt. Buttermilk is made with very little fat or none at all. Either way, it adds a nice fresh tang and texture to baked goods. In the summer it’s nice to purée peaches with a little sugar, add buttermilk, and freeze in an ice cream maker to create a healthy low-fat homemade version of frozen yogurt. Buttermilk will keep for several weeks in the coldest part of your refrigerator.
“Work With What You Got!”
© Victoria Hart Glavin Tiny New York Kitchen © 2016 All Rights Reserved

French Toast Toppings
Ok, most of us love maple syrup on our pancakes and French toast, but sometimes it’s fun to change it up a bit. Here are some interesting alternatives that just may become your new favorites.
Apples & Thyme
Sauté 2 large Gala apples (cut into 1/2 inch thick pieces(, 1 tablespoon fresh thyme leaves and 1/4 teaspoon sugar in 2 tablespoons unsalted butter for 6 minutes until just tender.
Sweet & Spicy Bacon
Cook 1 pound bacon (cut into 1/2 inch pieces) in large-size skillet over a medium heat 10 minutes until nearly crisp. Using a slotted spoon transfer bacon to plate lined with paper towels. Wipe out skillet. Return bacon to skillet and cook 1 minute. Sprinkle with 1 tablespoon brown sugar and cook, tossing, until sugar melts. Drizzle with 2 tablespoons maple syrup and sprinkle with 1/8 teaspoon cayenne. Toss to coat.
Herbed Goat Cheese
In bowl combine 4 ounces goat cheese (at room temperature), 1 tablespoon chopped fresh tarragon and 1 tablespoon fresh parsley, 1 teaspoon lemon zest, and 1/4 teaspoon crushed red pepper flakes.
“Work With What You Got!”
© Victoria Hart Glavin Tiny New York Kitchen © 2016 All Rights Reserved

Buttered Cabbage
Civil War deprivations did not stop women from sharing recipes (receipts) with one another. This recipe for Buttered Cabbage was published in Godey’s Lady’s Book in 1862.
“Boil the cabbage with a quantity of onions, then chop them together, season with pepper and salt, and fry them in butter. It is a rather homely, but savory dish, and frequently used either with fried sausages laid over it or as an accompaniment to roast beef, and forms part of bubble and squeak.”
“Work With What You Got!”
© Victoria Hart Glavin Tiny New York Kitchen © 2016 All Rights Reserved
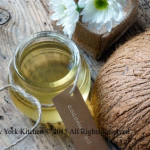
5 Reasons To Love Coconut Oil
Coconut oil is an edible oil extracted from the kernel or meat of mature coconuts harvested from the coconut palm. Because of its high saturated fat content, it is slow to oxidize and is resistant to spoiling.
1. Butter Replacement. Coconut oil can replace butter, which is great for vegans, who up until now have had few good choices when converting non-vegan recipes that contain butter.
2. Great For Athletes. Coconut oil is great for athletes because it converts to energy faster than many other fats, making it a smart addition to workout snacks.
3. Weight Loss. Coconut oil may help you slim down. A study undertaken a few years ago suggests that coconut oil may help you lose weight, when consumed in small quantities instead of other fats.
4. Sautéing. Coconut oil is great for sautéing. Use coconut oil occasionally instead of olive oil to add a subtle flavor that is delicious in tropical or Indian recipes.
5. Good Cholesterol. Coconut oil boosts good cholesterol. While coconut oil is full of saturated fat, about half is medium-chain fatty acids, which seem to help raise HDL (good) cholesterol. Coconut oil is still high in fat, however, so consume in moderation.
“Work With What You Got!”
© Victoria Hart Glavin Tiny New York Kitchen © 2015 All Rights Reserved


