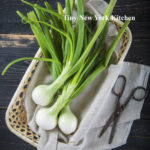
One of the wonderful things about spring is access to spring onions. Spring onions are typically planted at the end of summer so that they grow over the winter months, ready for harvesting in the spring.
Spring onions are more mature than both scallions and green onions, but are still a type of young onion, which are picked before they have a chance to grow larger. You can identify a spring onion by the small, round, white bulb at its base. While it appears similar to scallions and green onions, its rounded bulb gives it way.
Spring onions are also slightly stronger in flavor than scallions and green onions due to their maturity. They still have a gentler flavor than regular onions, which have been left in the ground much longer and grow much larger.
To prepare spring onions wash them under running water to free them of any dirt and grit. Trim the root end, but only the very, very end. Every last bit of white packs a lot of flavor. If you’re braising or grilling them whole just trim off the top most inch of the greens and you’re done.
If you are using spring onions where you would use scallions the prep is nearly the same. Slice them thinly crosswise for adding to a salad or a vinaigrette. If you’re using them in a stir-fry, cut them on the bias.
©Tiny New York Kitchen © 2021 All Rights Reserved
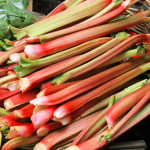
Rhubarb is a fabulous spring crop. The sour sweetness of rhubarb is absolutely nice in cakes, breads, pies, cobblers and jams, as well as sweet and savory compotes, chutneys, and sauces. Savory rhubarb chutney, cooked with onions and hot pepper is an exciting accompaniment to grilled pork, chicken, or shrimp. Sweeter versions employing brown sugar and lemon peel are superb served with pancakes, French toast, waffles or pound cake. Ladled atop frozen yogurt or ice cream, sweet rhubarb sauce is perfect for a spring sundae when the sun burns bright. This same sauce can be strained to yield a perfectly pink syrup. Combine with cold sparkling water or seltzer for a refreshing mocktail, or add to prosecco for a beautiful brunch beverage.
Rich in fiber, protein, vitamin C, potassium and calcium, rhubarb provides many valuable nutrients. A natural laxative, rhubarb may help east constipation. In fact, it is written that rhubarb was utilized in ancient Chinese medicine for treating stomach ailments. The vitamin K found in rhubarb may help strengthen bones, as well as possibly inhibiting inflammation in the brain. Rhubarb also supplies the body with vitamin A, which may help diminish signs of aging, particularly skin damage.
When choosing rhubarb at the supermarket or farm markets, look for glossy, firm stalks. Trim the leaves off when you bring your rhubarb home, as they are toxic. Store the stalks wrapped in a paper towel in your vegetable drawer. Wash before using. Rhubarb freezes beautifully, place chopped stalks on a parchment paper lined baking sheet and place in the freezer. When the chunks are frozen, store them in freezer bags and use within one year.
“Work With What You Got!”
©Tiny New York Kitchen © 2020 All Rights Reserved

Tabouli (.تبولة also tabbouleh, tabouleh, tabbouli, taboulah) is a Levantine vegetarian dish made mostly of finely chopped parsley with tomatoes, mint, onions, bulgur (that is soaked not cooked), and seasoned with olive oil, lemon juice, salt, and sweet pepper. Some variations add cucumbers, lettuce, or use semolina instead of bulgur. Tabouli is traditionally served as part of a mezze (small dishes served as appetizers) in the Arab world, but its popularity has grown tremendously in Western cultures.
Originally from the mountains of Lebanon and Syria, tabouli has become one of the most popular salads in the Middle East. The wheat variety salamouni was cultivated in the Beqaa Valley region in Lebanon and was considered, in the mid-19th century) as well-suited for making bulgur, a basic ingredient of tabouli.
In the Middle East, particularly Syria, Lebanon, Palestine, Jordan, Egypt, and Iraq, it is usually served as part of a meze. The Syrian and the Lebanese use more parsley than bulgur wheat in their dish. A Turkish variation of the dish known as kisir and a similar Armenian dish known as eetch use far more bulgur than parsley. Another ancient variant is called terchots. In Cyprus, where the dish was introduced by the Lebanese, it is known as tambouli. In the Dominican Republic, a local version introduced by Syrian and Lebanese immigrants is called Tipile.
“Work With What You Got!”
©Tiny New York Kitchen © 2020 All Rights Reserved

Pulling a tender, juicy roast chicken with crisp, golden brown skin out of the oven is so rewarding. For a simple side, roast a pan of in-season produce like spring onions, ramps, new potatoes or carrots during the last 20 minutes of cooking.
INGREDIENTS
1 Whole Chicken (4 Pound)
1 Teaspoon Sea Salt
1/2 Teaspoon Freshly Ground Pepper
Preheat oven to 425 degrees.
Remove neck and giblets from chicken. Trim off any excess fat from neck and tail end of chicken. Rinse bird with cool running water. Pat dry with paper towels, and season all over with salt and pepper.
Place chicken, breast side up, on a rack in a small-size roasting pan or a 9×13 inch-baking dish. Tuck wings back and behind bird to hold them in place. Roast, basting once or twice with pan juices, until skin is deep golden brown and juices run clear, about 1 1/2 hours.
An instant-read thermometer inserted in the thickest part of the thigh should read 165 degrees. Let chicken rest for 15 minutes and then carve.
To add fragrant flavor, stuff the cavity with a halved lemon or orange and a handful of fresh herbs like rosemary, thyme, and oregano.
Serve with an easy salad of greens topped with cherry tomatoes, mozzarella, and a drizzle of olive oil.
Serves 4
Prep Time: 20 Minutes
Cook Time: 90 Minutes
Total Time: 110 Minutes
“Work With What You Got!”
©Tiny New York Kitchen © 2018 All Rights Reserved

Let’s face it; most of us eat way too much salt. A high-sodium diet can increase risk of high blood pressure (hypertension), which can lead to cardiovascular and kidney disease. The Dietary Guidelines for Americans recommend limiting sodium intake to less than 2,300 mg per day, which is about 1 teaspoon of salt. The good news is that reducing the amount of salt you use will retrain your taste buds to sense other flavors. You won’t even miss it.
Bland food is such a bore, but how can we keep sodium in check without sacrificing flavor?
Here are some suggestions to reduce salt in your diet:
Remove the salt shaker from the table when you eat.
Limit process foods, including cured, pickled, salted, or brined products.
Focus on fresh or frozen fruits and vegetables without sauces or seasonings.
When choosing canned options, look for “no salt added” or “low sodium.”
Cook at home so you have control over how much salt you add.
Flavored vinegar, onions, garlic, and citrus also add tons of flavor without the sodium.
Herbs and spices are the key to flavor. Add dried varieties during cooking and fresh herbs at the end of cooking or when plating a dish. Thyme, mint, lemongrass, dill, basil, oregano, chives, and parsley are great herbs to use. Spices like pepper, ginger, chili powder, and cinnamon are excellent spices to flavor your food.
“Work With What You Got!”
©Tiny New York Kitchen © 2018 All Rights Reserved

I like to eat seasonal fruits and vegetables. Brussels sprouts are a hearty winter vegetable and are sweetest and most tender after a hard frost. They are a good source of fiber, antioxidants, and vitamin C. Look for young, small green sprouts that have tightly formed buds. Avoid any yellowing, which means that the sprouts will be bitter, sulfurous, and tough. Use fresh sprouts within a few days after purchasing. Sprouts sold on the stalk tend to keep longer. Brussels sprouts can be boiled, braised, or steamed. Cut an X at the base of each sprout to allow for a more even cooking. Add a bit of butter, olive oil, salt, pepper, garlic, onions, or herbs of your choice. Brussels sprouts also make a nice addition to stir fry, noodles, and other dishes. As always, be creative and “work with what you got!”
“Work With What You Got!”
© Victoria Hart Glavin Tiny New York Kitchen © 2017 All Rights Reserved

Grilling season is officially here, although I grill all year round, and many are dusting off their grills. I grill everything from meats to fruits and vegetables, but I’m partial to grilling sausages.
The great thing about sausages is that the work is already done. It’s the quick cooking, preseasoned protein your dinner has been waiting for. Here are ways to use that beautiful & delicious sausage.
Potato Salad: Add lightly charred andouille to potato salad.
Burgers: Form loose spicy turkey sausage into patties, then cook. You’ll have instant burgers.
Kebabs: Skewer sliced smoked kielbasa for easy kebabs.
Tacos: Wrap grilled fresh chorizo in a tortilla with avocado and pico de gallo for instant tacos.
Sandwiches: Grill bratwurst with onions and peppers and throw it inside a roll.
Main Dish: Serve grilled merguez (North African sausage) with cucumbers and mint with a dollop of yogurt.
www.tinynewyorkkitchen.com
“Work With What You Got!”
© Victoria Hart Glavin Tiny New York Kitchen © 2017 All Rights Reserved

Cannellini beans, which are widely used in Italian cooking, actually originate from Argentina.
These creamy white Italian beans are slightly larger and fatter than the white haricot beans and are more like a kidney in shape. They are related to the larger French Soissons and, like them, have a fluffy texture when cooked. They are a popular addition to classic minestrone and a variety of other soups. Cannellini beans are an essential ingredient for tonno e fagioli (tuna and bean salad) and Florentine fagioli all’uccelletto, where the beans are stewed with sage, tomatoes, and garlic. They are also delicious cooked with olive oil, onion ring slices, garlic, and parsley.
I prefer to cook with dried beans rather than canned beans. I do keep a few cans of beans in my pantry, however, as they’re useful in short notice circumstances. When you purchase canned beans make sure that the ingredients do not include sugar or salt.
To cook Cannellini Beans: Sort and rinse 3/4 cup Cannellini Beans. Place in a medium-size pot with 3 cups water. Cover and bring to a boil. Reduce heat to a medium-low and cook 60 to 90 minutes until beans are soft. Add more water as needed while cooking to keep beans covered. Makes about 2 cups/4 servings.
To reduce cooking time, soak beans in water overnight in the refrigerator. Drain and throw away soaking water before proceeding.
“Work With What You Got!”
© Victoria Hart Glavin Tiny New York Kitchen © 2016 All Rights Reserved
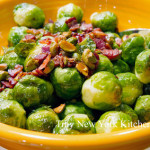
Brussels sprouts have a pronounced and sweet nutty flavor, quite unlike cabbage, although the two are closely related. They are traditionally served at Thanksgiving and Christmas and have an affinity with certain nuts, such as almonds, pistachios, and chestnuts. Brussels sprouts taste great with onions, and ginger, or with nuts.
Brussels sprouts should be small and hard with tightly wrapped leaves. Avoid any that are turning yellow or have loose leaves. They will keep in a cool place or in the salad drawer of a refrigerator for several days.
When preparing and cooking Brussels sprouts trim away the base of the stalk and remove the outer leaves. If the sprouts are large, cut them in half or quarters, or slice thinly for stir-frying. Cook very briefly in small amounts of fast-boiling water. Alternatively, stir-fry with onions and ginger, in a little oil and butter.
“Work With What You Got!”
© Victoria Hart Glavin Tiny New York Kitchen © 2016 All Rights Reserved

The turkey came originally from America and was first domesticated by the Aztecs in Mexico. The Spanish introduced turkeys into Europe and they soon became a popular choice in France, Italy and Britain.
When early settlers from Britain, France and Holland crossed the Atlantic to North America, the vast flocks of turkey that roamed wild provided them with sustenance. They were plentiful and so easy to trap or shoot that the older children of the family were given the responsibility of catching them. The Native Americans meanwhile taught the new settlers the rudiments of farming, and in November 1621, on the first anniversary of their arrival, the Pilgrims entertained the locals to a feast, at the center of which was the turkey. Ever since, this has been the traditional bird served at Thanksgiving.
Turkeys are available fresh, chilled, or frozen all year round. When buying a whole bird, look for a plump well-rounded breast and legs and clear, soft and evenly colored skin. Avoid birds that are bruised, with blemishes or torn skin or any that have been badly or unevenly plucked. Turkeys vary enormously in weight.
When you’re ready to purchase your turkey it’s easy to get confused on what size to get. A good guild to go by is to figure approximately 1 1/4 pounds per person. This makes enough for the meal and provides a decent amount of leftovers.
To store your turkey place it in a large, deep dish and cover it completely with plastic wrap. Store it in the coolest part of the refrigerator; making sure that it does not come in contact with other foods.
Thaw a frozen turkey in the refrigerator for 2 to 4 days. Estimate 24 hours for every 5 pounds, so 2 days for a 10 pounder, 3 days for a 15 pounder, etc.
And then there is always the frozen turkey emergency that goes like this, “Help, help, it’s Wednesday, and my turkey is still frozen!!!” It’s been a long time, but I’ve been in this predicament. What you do is leave the turkey in its wrapper and put it in a large-size container. A lobster pot works well. Fill the container with cold tap water and let it sit for 30 minutes. Dump out the water and refill. Let it sit another 30 minutes. Repeat until the turkey is thawed, then roast immediately or transfer to the refrigerator.
The good news is that you can brine or dry cure your turkey while it defrosts in the refrigerator. What a Godsend that is! Use a lighter brine solution, which is about 1/2 cup kosher salt per gallon of water, plus sugar and spices). If you’re dry curing, use the standard recipe. You’re turkey should stay below 40 degrees while brining. You don’t need to brine or cure a kosher or butterball type supermarket frozen turkey. These come pre-brined. If you want to be able to put your own flavor stamp on your meal, then get a natural or untreated bird and do it yourself. If you plan on brining for 2 days use the weaker solution that I just mentioned. If you plan to brine for 24 hours or less, then bump it up to 1 cup kosher salt per gallon of water. Then add an equal amount of sugar. I don’t always brine, but when I do I’ve been known to throw an assortment of flavorings in the brine. Flavorings that you could add to your brine could be: apples, lemons, oranges, onions, garlic, shallots, peppercorns, bay leaves, cinnamon sticks, cloves, allspice berries, juniper berries, mustard seeds, fennel seeds, coriander seeds, rosemary, sage, thyme, savory, parsley, or oregano. You can also replace half the water with sweet cider, hard cider, vegetable stock, turkey stock, chicken stock, beer, white wine, or red wine. If you want to dry cure then use about 1/2 teaspoon kosher salt for every pound of turkey. Then add spices to your taste.
Stuffing your turkey is a personal preference. I always stuff the bird because I love how it tastes when cooked inside the turkey. It does slow down the cooking process, however. Never stuff the turkey in advance of cooking. The stuffing can be made in advance, but the turkey should not be stuffed until just before it is placed in the oven. Weigh the stuffing and add this to the weight of the bird before calculating the cooking time. Thoroughly rinse the body cavity of the bird under cold running water, and then drain it well. Wipe the turkey, inside and out, with paper towels. Press the stuffing inside the shallow neck cavity. Make sure not to pack it in too tightly. Turn the bird over and pull the neck skin over the stuffing. Now it’s time for a little turkey bondage and truss the bird (tuck the wing tips under the breast and tie the legs together) and then cook for the calculated time. Never shorten the cooking time because although the meat may appear cooked, extra time must be allowed for cooking the stuffing thoroughly.
If you choose not to stuff your turkey then place aromatics in the body cavity of the bird. Cut a large onion in half and stud each half with 4 to 6 cloves. Place this in the body cavity of the bird. Cut an orange and a lemon into quarters and add these, together with 3 or 4 bay leaves, 4 to 6 fresh sage sprigs, and 2 to 3 fresh thyme sprigs. Add 1 cinnamon stick or 1 blade of mace for a festive hint of warm spice.
Turkeys are super easy to roast, but require a little more attention than smaller birds. Check to make sure the oven shelves are in the correct position before heating the oven. Preheat the oven to 350 degrees. Place the prepared bird on a rack in a large-size roasting pan. Smear the turkey breast generously with butter, season with salt & pepper and place in the oven. Baste the turkey from time to time during cooking. When the breast has browned, cover with foil to protect it and continue cooking. Remove the covering foil for the final 20 minutes of cooking. To check if the meat is cooked, insert a skewer into the thickest part of the thigh. If the juices run clear and the meat is white, it is cooked. If the juices are pink and the meat is soft and pink, the turkey is not ready. Return it to the oven and check again after 20 minutes. Cooking times will differ depending on whether your bird was purchased fresh or frozen. Plan on 20 minutes per pound in a 350 degree oven for a defrosted turkey and 10 to 15 minutes per pound for fresh. Remember to add more time if you’re turkey is stuffed. You should have an instant-read thermometer in your kitchen drawer. Insert the thermometer into the breast (all the way to the bone) and if it reads 160 degrees you’re good to go. You may also measure the thigh by inserting the thermometer into the thickest part, but not touching the bone, and it should read 165 degrees.
Remove the turkey from the oven and cover it closely with foil. Leave it to rest for at least 30 minutes. This will even out the temperature and make it easier to carve. I know some chefs who let it rest for 2 hours, but I don’t think that one needs to wait that long. If you wish to make gravy in the roasting pan, transfer the bird to a carving plate.
When you’ve let your bird rest awhile remove the trussing string. Hold the bird steady in position with a carving fork. Cut off the legs, then cut these in half or carve the meat from the bones. Make a horizontal cut across the breast above the wing. Carve neat and even vertical slices off the breast. Repeat on the other side of the bird. Arrange slices on a warmed platter. Add the turkey legs or sliced meat to the platter or set them aside for serving separately. Scoop out the stuffing and serve with the meat.
“Work With What You Got!”
© Victoria Hart Glavin Tiny New York Kitchen © 2016 All Rights Reserved


