Warm Dough
Make sure not to let the dough get warm. Use cold butter and ice water. Refrigerate the dough before you roll it out. If the butter warms it will be absorbed by the flour, become sticky, and make for a tough crust.
Uneven Crust
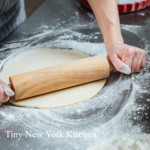
To get an even, round crust, begin rolling from the middle of the dough round, pushing outward and stopping the pressure 1/4 inch from the edge. Then lift the round, give it a quarter turn and repeat.
Transferring Crust
To transfer your pie dough from the rolling surface to the pie plate, lift it with a bench scraper, gently drape it over a rolling pin, then place it in the pie plate.
©Tiny New York Kitchen © 2020 All Rights Reserved

Tips & Tricks
While many foods are naturally gluten-free, gluten can be especially difficult to avoid in baked goods. Gluten is a complex protein found in wheat (and other grains) that functions like glue in baked goods and pastas. Gluten’s elastic structure helps baked goods rise and become light and fluffy by trapping gas produced by yeast. It’s the key ingredient that makes breads, pizza crusts, and quick breads tender and chewy. But gluten-free enthusiasts and savvy bakers are reaching new heights by getting creative in the kitchen.
Measure By Weight
In most recipes, a blend of gluten-free ingredients is necessary to create baked goods with a conventional shape and texture. For this reason, most health food stores and many grocers sell blended, all-purpose gluten-free flour mixes that simplify gluten-free baking. There are some notable differences when baking with gluten-free substitutes, including a few that break the conventional rules of baking. Gluten-free flours are, in general, milled finer than wheat-based flours. The fine grind helps gluten-free flours blend better with other ingredients and prevents your baked goods from becoming gritty. On the other hand, the fine flour is more difficult to evenly pack into measuring cups and dense gluten-free flours have different weight to volume ratios than conventional wheat flours. In short, you can’t always substitute a cup of gluten-free flour for a cup of wheat flour, and you’re better off using a kitchen scale to measure gluten-free flour for accurate measurements. The labels on most gluten-free flours feature a cup-to-grams conversion to ensure accuracy.
Consistency & Shape
Even with the right flour mix and measurements, a gluten-free batter or dough won’t usually handle exactly like a conventional dough. For example, gluten-free pie crust tends to be more crumbly and is more apt to split when you try to fold it. To keep the dough in one piece, roll it between two sheets of wax or parchment paper, which also makes it easier to transfer the dough to a pie plate. Be sure to use and egg wash on pie dough, instead of a milk wash, as a milk wash will more easily soak into the dough instead of resting on its surface. With gluten free breads, be sure to use a pan with sides, because the dough typically won’t stand easily on its own.
Moisture Matters
The strong and sticky bonds formed by gluten play many roles in baking, including moisture retention. While gluten-free flours typically include gums and starches to hold moisture, the resulting dough still tends to dry out faster. To avoid a tough texture or crummy edge on cakes and cookies, consider adding things like egg yolks, yogurt, and fruits (where appropriate) to increase moisture and add flavor. After baking, you can freeze gluten-free baked goods (tightly wrapped in freezer-safe bags) to prevent them from drying out.
Times & Temps
Traditional doneness indicators, such as a clean, dry toothpick in a cake or the hollow sounds when thumping a loaf of bread, are not always accurate for gluten-free baked goods. In fact, some gluten-free baked goods might feel soft to the touch and look wet inside even though they’re completely cooked – requiring a cool-down time to firm up. Follow the time and temperature recommendations in gluten-free recipes closely, because the traditional visual cues aren’t the same as wheat-based goods. Oftentimes, gluten-free recipes feature lower oven temperatures and extended baking times to drive out excess moisture.
Try It
If you’re new to gluten-free baking, don’t be intimidated, but do follow reliable recipes closely – as gluten-free recipes don’t always take well to adjustments, swaps, and add-ins. There are some good gluten-free cookbooks out to help with finding good recipes. I suggest, Gluten-Free Baking Classics, by Annalise Roberts for beginners, who know they need (or just want) to switch over to gluten-free or alternative flours when baking, but aren’t totally sure how to make the conversion. Gluten-Free Baking With the Culinary Institute of America: 150 Flavorful Recipes From The World’s Premier Culinary Collage, by Richard J Coppedge Jr.is geared toward professional bakers or those with an interest in the food-science side of things.
“Work With What You Got!”
©Tiny New York Kitchen © 2018 All Rights Reserved
Whether you’re baking summer pies or getting ready for holiday baking it’s important to have some key information about pie dough.
Blind Baking
Blind baking is prebaking a crust before you add an unbaked or especially wet filling. To ensure that your crust turns out crisp while blind baking, you can either dock it or use pie weights.
Docking
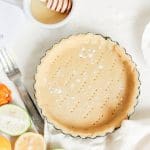
Docking is pricking the dough all over with the tines of a fork. The tiny holes allow steam to escape, so that the crust doesn’t puff up. After rolling out your dough and pressing it into the pan, gently prick it, leaving an inch or two between each mark. Be sure to check your crust several times throughout its bake time. If you notice it puffing up in any way, simply prick the puffy spots a few times and keep baking.
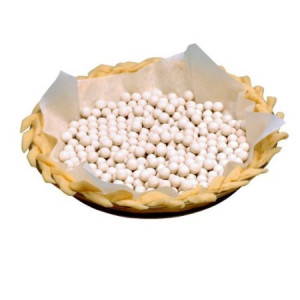
Pie Weights
Pie weights are tiny ceramic or metal balls or a thin metal chain that prevent the bottom of your crust from forming air pockets and bubbling up while baking. While docking is less fussy than using pie weights, I prefer pie weights because of the additional support they give the crust. Line your unbaked crust with parchment paper or aluminum foil before adding the weights to keep them from baking into the dough. I prefer parchment paper because its permeable structure allows the crust to breathe and brown more evenly. If you don’t own pie weights, dried beans work just as well.
Blind Bake Ahead
You can blind bake a crust up to three days ahead of time. Allow the crust to cool completely in the pan, wrap with plastic wrap, and store at room temperature until you are ready to fill and serve.
Happy Pie Baking!
“Work With What You Got!”
© Victoria Hart Glavin Tiny New York Kitchen © 2017 All Rights Reserved

 Pre-Baked Pie Crust: Five Steps For A Perfect Pie Crust
A pre-baked pie crust (sometimes called a blind baked pastry case) is one that has been partially baked without a filling so it can still cook and crisp thoroughly if the filling needs a shorter time to bake than the pastry. Pre-baking a pie crust also stops the pastry from getting soggy by a moist filling.
- Prick the base of the pie crust all over with a fork to stop the pastry from bubbling up and getting out of shape.
- Chill the pie crust in the refrigerator for at least 15 minutes before baking. This will stop it from shrinking during baking. Preheat your oven to 350º F.
- Place a large piece of parchment paper inside the pie crust, then fill with baking beans or uncooked rice. Ceramic beans or pie weights are available from most cooking stores or Amazon. Make sure that the paper is touching the pastry, eve at the edges.
- Bake for 10 to 15 minutes for a large pie crust or 8 to 10 minutes for a small one until the pastry is cooked and opaque.
- Carefully remove the parchment paper and the beans/rice/weights and then return the empty pie crust back in the oven for 10 minutes for a large pie crust or 4 to 5 minutes for a small one. When it is ready the base will be a sandy color, dry and crisp. The top edges of the pie crust should be golden. Leave in the pie tin or pie plate and continue with your chosen recipe.