
Sundays, post summer, are all about Sunday dinners. For me pot roast is the poster child of Sunday dinner because growing up this is what we had. Many of us revert to cooking the foods that we grew up on. There’s something intriguing about food memory and trying to capture the childhood tastes that signify love and warmth. For me, this is Sunday pot roast with roasted winter vegetables.
Thanksgiving Emergency Strategies
Help, help, I have extra guests coming! My gravy doesn’t look right! What to do? These are some holiday entertaining questions that I have been asked over the years. Whether this is the first time you’ve hosted Thanksgiving dinner or your 20th time there are always things that seem to come up that feel like emergencies. From lumpy gravy to unexpected guests the pressure can just be too great at times. Not to worry, these are some good strategies that have helped me cope and make everything run smoothly.
Dear Victoria: “My turkey is still a bit frozen and my dinner is in a few hours. What should I do?”
Put that bird into a large pot and run tepid water over it for at least an hour. You can butterfly the turkey so that it cooks faster which should take about an hour and a half at 400 degrees. You can then roast it or grill it. In the future you may want to consider purchasing a fresh turkey and not a frozen one.
Dear Victoria:” I called everyone to the table and started carving the turkey to find that parts of it are still raw or undercooked. How embarrassing! What should I do?”
This situation has happened to most of us at one time or another. Don’t skip a beat and just carry on carving off any parts that are cooked, serve those and put the remaining pieces back in the pan, cover with foil, and cook until done. Most likely the breast meat will be done. Your guests can get a bit of turkey along with your delicious sides while waiting for the rest of the turkey to come out of the oven. In the future you may want to consider carving the turkey first and then cooking it.
Dear Victoria: “I always seem to overcook the turkey. I just don’t know how I keep doing this. Please help!”
For the immediate remedy I suggest you have LOTS of gravy on the table to pour over those dried out pieces of turkey. In the future make sure to invest in a meat thermometer. Insert the thermometer into your cooked turkey through the thickest part of the breast until it hits the breastbone. Remove the turkey from the oven when it reads 160 degrees. Let your turkey rest for about 30 minutes before carving.
Dear Victoria: “I have a small kitchen and don’t have much room in my oven to cook everything. How am I going to get everything done?”
Tiny New York Kitchen knows this situation all too well! First of all there are plenty of things that you can get cooked in advance. Check your menu and see what you can prepare before needing to place your turkey in the oven. If you have an outdoor grill, then by all means grill your bird. Hey, you can play it off as the “hip thing to do.” Let your side dishes cook in the oven while your turkey is grilling out there in the fresh November air!
Dear Victoria: “I made stuffing and it is pretty soggy. How can I make it un-soggy?”
This is a super easy one. Scoop it out of the turkey and/or the baking dish and spread it out on a baking sheet. Place it in the oven and bake it at 350 degrees until it is how you want it. Scoop it back into the serving dish and serve. No one will be the wiser.
Dear Victoria: “Before I call my guests to the table the food starts to get cold. How can I avoid this?”
Cover serving dishes with lids or foil to keep them warm. If a dish actually gets really cold, that is supposed to be hot, then just put it back in the oven for a little bit. Don’t be too concerned, however, as most Thanksgiving dishes are perfectly fine at room temperature.
Dear Victoria: “My side dishes aren’t browned on top? They just don’t look that appetizing. What should I do?”
If a dish is fully cooked, but doesn’t have that delicious looking brown surface (Potatoes, Vegetables, Stuffing, etc.) then simply put them under a hot broiler at least 4 inches away from the heating element. You may want to turn them as needed until browned on top. MAKE SURE that you watch them carefully. You really don’t want them to go from pasty to burned up! Always put the food too far from the broiler rather than too close. If you follow these instructions then you will get a nice browned crust on top of your dishes.
Dear Victoria: “My gravy looks way too lumpy. I can’t serve lumpy gravy! How do I fix it?”
Not to worry. You will just need to put some hard work into it with a good whisk. Whisk those lumps out. It may take a bit of time, but it can be done. If you have really stubborn lumps add just a bit of hot liquid to coax them out while you whisk. If you STILL can’t get them out take a medium weave strainer and set it over a bowl. Pour the grave in and stir. Smooth gravy will flow through the strainer and the lumps will stay behind. For the future make sure you whisk the flour or cornstarch constantly while you are adding the broth or turkey juices to keep lumps from forming.
Dear Victoria: “Help, my gravy is just way to thick. It looks like brown jelly. How do I thin it out?”
This one is super easy. Drizzle in a bit of hot broth or hot water while whisking and then heat up your gravy until it’s piping hot.
Dear Victoria: “My gravy is too thin. It looks watery. I’m horrified. Is there a good solution to this hot mess?”
This problem is just a bit trickier. Brown 1 tablespoon for every cup of gravy by stirring it in a dry frying pan over a medium heat until it turns a nice deep golden brown. Have your gravy in a wide pan on the stove over a medium high heat. Whisk the browned flour into your gravy and cook. Make sure to whisk constantly until your gravy thickens. This should do the trick.
Dear Victoria: “The top of my pumpkin pie is all cracked and looks horrible. What happened? How can I serve a cracked pumpkin pie?”
Your pumpkin pie was over baked which is why it is cracked on top. Not a soul needs to know, however, if you dollop on whipped cream and carry it to the table like the prize pie it is! Sometimes cooking is like acting. If you flub a line you just carry on like that is how it is supposed to be.
Dear Victoria: “My sister called and asked if she could bring extra guests. My goodness, what am I going to do? Dinner is in an hour!”
I’ve certainly encountered this situation plenty throughout my dinner party throwing life. I’ve always kept an open door policy because I figure that not everyone has a place to go on the holidays, which can be very sad and lonely. The good news is that most of us make way too much food for Thanksgiving. Having unexpected guests can impact a meal however. First of all, forget any leftovers that you were counting on. Make more mashed potatoes, rice or pasta. These items take 30 minutes or less to make. Slice the turkey thin. Make a quick soup by combining chicken broth, pureed cooked vegetable(s), fresh herbs, salt and pepper. As soon as you get the call immediately put bowls of nuts and snacks out before dinner.
Dear Victoria: “I have quite a large group coming for dinner and I don’t have enough room at the table. What do I do?”
You can set up dinner buffet style or you can set up multiple tables as auxiliary eating areas. Living room coffee tables and game and/or card tables work. You can let everyone sit where they want or you can seat people by age or alphabetically or however you decide to seat people. Thanksgiving is about spending time with friends and family. People will have fun no matter where they are sitting. Relax and enjoy yourself.
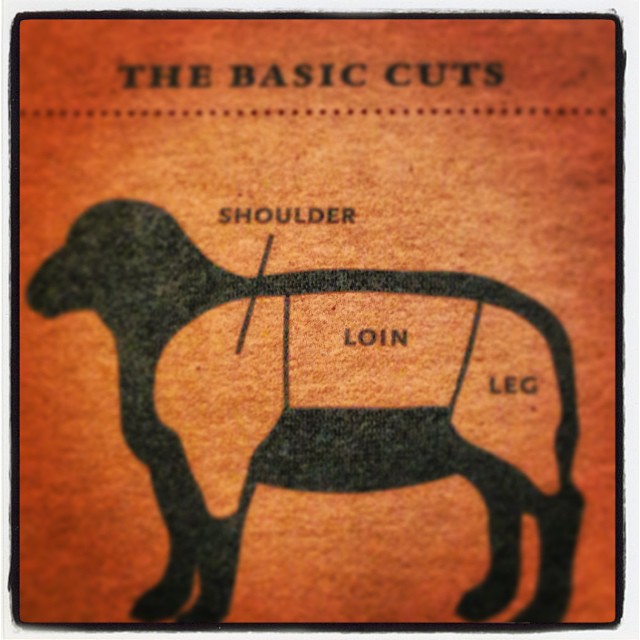
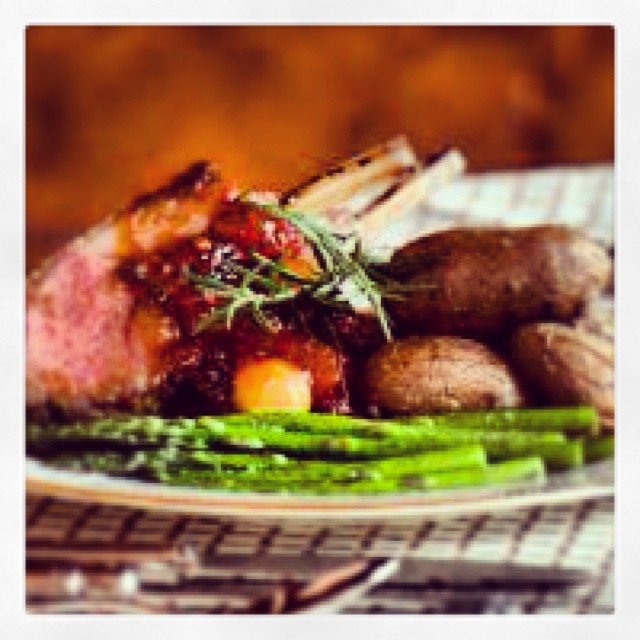
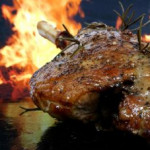
Lamb Cooked 3 Ways
Cooked low and slow, lamb shanks become rich with complex flavors. Lamb shoulder is also a great choice for slow cooking. Good value cuts are: Shoulder Chops, Stew Meat, Ground Lamb, and Leg Steak.
The USDA recommends cooking all whole muscle cuts of lamb to at least these temperatures to ensure that potentially harmful bacteria are destroyed. Some people may choose to cook their meat to lower temperatures, depending on preference. Ground lamb should be cooked to 160 degrees.
Desired Doneness:
Medium – Target Temperature 145 Degrees, Texture Warm/Firm, Center Color Pink
Medium Well – Target Temperature 155 Degrees, Texture Very Warm/Firm, Center Color Gray – Tinged With Pink
Well Done – Target Temperature 165 Degrees, Texture Hot/Dense/Hard, Center Color Gray
Best Cooking Methods For Lamb
Shoulder Blade Chops (Shoulder): Braise, Broil, Grill, Roast, Pan-Fry, And Stew
Rib Chops (Loin): Broil, Grill, Roast, Pan-Fry, And Sauté
Loin Chops (Loin): Broil, Grill, Roast, Pan-Fry, And Sauté
Whole Leg (Leg): Braise
Leg – Boned, Rolled, Tied (Leg): Grill, And Roast
Rack of Lamb (Loin): Broil, Grill, And Roast
Crown Roast (Loin): Roast
Top Round Roast (Leg): Braise, Roast, And Stew
Stew Meat (Various): Braise, And Stew
Sausages (Various): Braise, Grill, Roast, Pan-Fry, And Sauté
Shanks (Leg): Braise, And Stew
Lamb Chops 2 Ways
Classic Broiled: Preheat broiler. Arrange chops on broiler pan and season with kosher salt and pepper. Broil 4 to 5 minutes per side, or until target temperature. Remove pan from broiler, cover with foil and allow chops to rest 10 minutes before serving.
Rosemary Garlic: Puree 6 garlic cloves with 2 Tablespoons fresh rosemary. Add 1/2 cup olive oil, kosher salt and pepper. Marinate chops 30 minutes or overnight. Grill over medium-high heat, or broil according to above directions.
Roast Leg of Lamb With Mint Jelly: Preheat oven to 450 degrees. Combine 2 Tablespoons kosher salt, 1 Tablespoon black pepper, 1 Tablespoon finely chopped fresh rosemary and 1/3 cup olive oil. Rub mixture all over roast. Make a few dozen small slits in lamb and insert garlic slivers. Place lamb in roasting pan and roast 10 minutes, reduce temperature to 325 degrees and roast until target temperature, about 1 1/2 hours. Cover with foil and let rest 15 minutes. Serve with mint jelly.
Basics of Meat & Poultry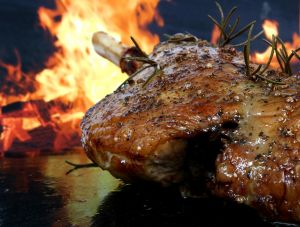
Many people ask me how long they can keep fresh meat and poultry. You can refrigerate whole meat cuts for 2 to 3 days and raw ground meats for 1 to 2 days. Raw poultry for 1 to 2 days. If you’re not cooking your meat or poultry within these time frames, freeze it. We never want to risk getting food poisoning.
How do you know when your particular meat is done cooking? The safest way is to use a meat thermometer, inserting into the thickest part of the meat, but never touching bone.
Meat Cooking Terms
Braise: Moist cooking in a pot with a lid and a small amount of liquid. This method works well either on the stove top or in the oven, rendering tougher cuts moist and extremely tender by melting the tough collagen between fibers, but allowing the fibers themselves to retain moisture. Examples: Pot Roast, Boeuf Bourguignon, Cacciatore, Most Curries.
Brine: Similar to marinating, meat or poultry is soaked in a salt-water mixture prior to cooking to enhance flavor, moisture and tenderness. Examples: Brined Turkey, Chicken or Pork.
Broil: Dry cooking under intense direct heat, sort of like grilling from the top down. Great for tender steaks and chops, boneless chicken, kabobs. Example: London Broil.
Deep Fry: Cooking pieces of meat, often coated with batter or crumbs, submerged in very hot oil. Example: Southern Fried Chicken.
Grill: Cooking over direct heat, usually outdoors. Grill pans and electric grills don’t require much additional oil, and create nice looking char marks, but lack the crust and smoky flavor of outdoor grilling. Grilling can be fast or slow. Examples: Grilled Steaks, Barbecued Chicken, You Name It!
Pan-Roast or Pan-Fry: A technique that begins on the stove top and often ends under the broiler or in the oven. Combination cooking creates a flavorful browned exterior and allows for finer control of doneness. Great for thick chops and steaks or larger pieces of poultry. Examples: Filet Mignon, Pork Tenderloin, Pan-Roasted Veal Chops.
Poach: Simmer at a point less than boiling to produce just a slight movement in the liquid. Examples: Poached Chicken Breasts.
Roast: Dry cooking in ambient oven heat. Creates a flavorful, browned outside and a tender, juicy interior. Ideal for larger tender roasts, whole poultry, most stuffed roasts. Examples: Roast Beef, Thanksgiving Turkey, Crown Roast.
Sauté: Quick stove-top cooking in a skim of oil in a heavy, low-sided skillet, frying pan or sauté pan. Great for tender steakhouse cuts and chops, chicken or duck breast, boneless cutlets. Examples: Sandwich Steaks, Wiener Schnitzel, Chicken Cutlets.
Smoke: Food is cooked or flavored before cooking by exposure to smoldering wood, herbs or tea. Examples: Tea-Smoked Chicken, Mesquite-Smoked Pork Chops.
Stir Fry: An Asian technique of cooking small pieces of food over very high heat, usually with oil, using constant stirring and tossing motion to prevent burning. Examples: A Profusion of Meat, Seafood and Poultry Dishes From China, Thailand and Vietnam.
Simmer: See Braise & Also See Stew
Stew: Slow cooking, Submerged in flavorful liquid, usually after browning on the surface. Stewing is similar to braising except that stews usually have more liquid, which is an important part of the finished dish. Best for cubes coming from tougher cuts. Examples: Beef Stew, Chili, Gumbo.
Sous-vide: A method of cooking food sealed in airtight plastic bags in a water bath for longer than normal cooking times (72 hours in some cases). The temperature is regulated and much lower than normally used for cooking, typically around 55° F to 60° F for meats. The intention is to cook the item evenly, and not to overcook the outside while still keeping the inside at the same doneness, keeping the food juicier. Examples: Beef Brisket and Short Ribs.
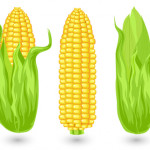
 Corn Basics
Fresh sweet corn is one of life’s pleasures indeed. While corn is available all year-round here in America its true peak season is July through September. This is when corn is at its best.
Buying Tips: Buy ears that are firm and well-shaped under fresh-looking husks with shiny, moist milk. Unshucked corn stays fresh longer. Pick ears that look plump, with kernels running to the tops of the ears. Tiny kernels indicate immaturity, but very large deep yellow kernels can be chewy. The fresher the corn, the sweeter the kernels. With age, the sugar in corn converts to starch. Frozen and canned corn kernels are good substitutes for fresh. Canned baby corn is used in Asian stir-fries. One medium ear of corn yields about 1/2 cup of corn kernels.
Storing: Cook and eat corn as soon as possible after picking. If you must, refrigerate in the crisper drawer up to one or two days.
Preparing: Shuck the corn and remove the silk just before cooking. An exception is corn grilled with the husks intact. To remove the kernels, trim the tips so you can stand the ear on end, then slice down to cut off the kernels, cutting close to the cob.
Cooking: Corn is one of the most versatile vegetables. Sauté the kernels alone or with other vegetables; stir into puddings, fritters, or other batters; or roast, microwave, or boil on the cob. To boil, in a large saucepot, heat 3 inches of water to boiling over a high heat; add the shucked corn and heat to boiling. Do not add salt as it toughens the corn. Reduce the heat to low. Cover and simmer for 5 minutes. Drain.


