
Crunchy, juicy, nutrient packed jicama is an unsung hero of the produce aisle. Technically a cousin to green beans, jicama is a root vegetable from Mexico available year-round that is delicious cooked or raw. With a mild, earthy, slightly sweet flavor and an apple like consistency. It’s a great addition to salads, salsas, slaws, and grazing boards. Jicama also works as lighter swap for potatoes in baked and air fried recipes, and it’s delicious sautéed or boiled, too.
If you’ve never tried jicama, don’t be intimidated. Start by choosing one with a smooth, unblemished surface and thin brown skin. The skin should be thin enough to scrape with your thumbnail to reveal the white flesh inside. Avoid thick skinned, bruised, or shriveled jicama, which are signs of aging.
Once you’re ready to prep, start by trimming off the ends of the jicama and slice in half. Then, use a knife to gently peel away the skin.
For Jicama Sticks:
Step 1: Carefully slice off the rounded parts of the jicama, creating a flat surface.
Step 2: Cut each half into 1/4-inch slices.
Step 3: Stack slices and cut evenly into sticks.
Fresh, raw jicama sticks are a great addition to lunchboxes or served on a vegetable platter with your favorite dip. They can also add unexpected, satisfying crunch to cooked dishes, like a noodle salad with jicama and a miso vinaigrette.
Jicama sticks are delicious roasted, too. Their firm texture can withstand the heat, while the edges get golden brown and tender. Toss together with sweet peppers and spices for a simple, satisfying sheet pan side that pairs well with all kinds of meat and fish.
For Diced Jicama:
Step 1: Follow the steps above to create jicama sticks
Step 2: Line up sticks or stack into a pile, then evenly cut into cubes.
Diced jicama is a vitamin and fiber-rich way to add bulk to all kinds of green, grain, and protein-based salads. I love the combination of crunchy jicama with creamy avocado served with grilled chicken.
Moist and mild flavored jicama also plays well with fruit, especially melon. A refreshing combination of watermelon, jicama, and fresh mint falls somewhere between salad and salsa, delicious scooped onto tortilla chips or just spooned straight from the bowl.
Next time you’re at your local grocery store or market pick up jicama and experiment with ways to incorporate it into your recipes.
©Tiny New York Kitchen © 2021 All Rights Reserved

Many of us are preserving summer’s bounty to enjoy during colder months.
Here are tips on how to preserve using the hot water bath method. It’s really not difficult if you follow these easy steps.
High acid foods like tomatoes, pickles, salsa, jelly, pie filling, jam, fruit, and chutney are great for canning using the hot water bath method.
Preheat Jars
Fill water bath canner (or large pot) to cover empty jars by at least 1 inch of water. Heat jars to simmer (180 degrees F) to prevent jar breakage.
Fill Jars
Following a canning recipe, fill a hot jar with prepared food leaving enough space between the food and the rim (headspace) as indicated in the recipe.
Tighten Lids And Bands
Wipe any food from the rim of the jar. Center new lid on the jar, then twist on band just until fingertip tight.
Process Jars
Place filled jars onto rack in simmering water. If you don’t have a rack designed for home preserving, use a cake cooking rack. Filled jars should be covered by 1 inch of water. Place lid on canner and heat to a steady boil. Boil jars for the time specified in recipe. Adjust for high altitudes.
Altitude Adjustment
1,001 to 3,000 ft increase processing time 5 minutes; 3,001 to 6,000 ft increase 10 minutes; 6,001 to 8,000 ft increase 15 minutes; 8,001 to 10,000 ft increase 20 minutes.
Cool Down
Turn off heat and remove canner lid. Let jars stand in water for 5 minutes. Remove from water and cool jars upright on cutting board, wire rack or towels on countertop for 12 to 24 hours.
Check The Seal
After cool down, press on center of lid. If jar is fully sealed, the lid will NOT flex up or down. Remove the bands and gently attempt to lift lids off with your fingertips. Properly sealed lids will remain attached. Wipe canning jars, lids, and bands clean. Store sealed jars in pantry for up to 18 months. Jars may be stored with or without bands. If a lid fails to seal within 24 hours, immediately refrigerate the food product.
©Tiny New York Kitchen © 2020 All Rights Reserved

Eating well just got easier. Use one or more ingredients from each of the five categories. Stick with one international flavor profile. Find a sauce in your market’s global-foods section: ssamjang, chutney, hot sauce, salsa, pesto, chimichurri, romesco, aioli, tahini, or peanut sauce. Save money by using leftovers. Save time by using prechopped fresh vegetables.
CHOOSE A BASE INGREDIENT
1/2 Cup
Cooked Brown Rice, Quinoa, Millet, Bulgur, Farro, Barley, Whole Grain Pasta
CHOOSE A LEAN PROTEIN
3 To 4 Ounces
Cooked Meat, Poultry, Seafood, Legumes, Eggs, Tofu
CHOOSE VEGETABLES
1 To 2 Cups
Vary Colors And Textures
CHOOSE A SAUCE
1 To 3 Tablespoons
Sriracha, Harissa, Soy, Sweet Chili, Ssamjang, Chutney, Hot Sauce, Salsa, Pesto, Chimichurri, Romesco, Aioli, Tahini, Peanut Sauce
Bowl Ideas
Korean: Cooked noodles or rice, shredded carrot, sliced cucumber, sliced daikon radish, bean sprouts, sliced grilled beef, runny fried egg, ssamjang, kimchi
Middle Eastern: Cooked bulgur, roasted eggplant, roasted cauliflower, sautéed spinach, cooked chickpeas, grilled chicken, minted yogurt sauce, roasted pumpkin seeds, za’atar spice blend
Italian: Cooked faro, sautéed zucchini, sautéed kale, roasted red peppers, roasted cherry tomatoes, tuna, pesto, olives, marinated artichoke hearts, pine nuts
“Work With What You Got!”
©Tiny New York Kitchen © 2019 All Rights Reserved

The end of summer is fresh produce heaven, which includes delicious vine ripened tomatoes. What do you do when you have a tomato abundance?
Here are some tips for making the most of the end of summer tomatoes.
Sliced: Incorporate into sandwiches or add to basil and mozzarella for a Caprese Salad.
Chopped: You only need a few chopped heirloom tomatoes, mozzarella, chopped basil, and olive oil for a colorful no-cook pasta sauce.
Puréed: There’s nothing like an icy cold gazpacho on a warm day.
Salsa: Fresh salsa is a must have condiment for grilled steaks or shrimp, brown rice and beans, scrambled eggs, and of course, chips.
Grilled: Toss cherry tomatoes with olive oil, garlic, and herbs. Then cook in a grill basket until charred. Top fish, chicken, pasta, and charred slices of bread.
Stored: Keep tomatoes at room temperature until ripe and then use within a day or two. Don’t put them in the refrigerator as it affects their flavor and texture.
Preserved: Roasted, dehydrated, or stewed – savor the season by saving a taste of summer for later.
“Work With What You Got!”
© Victoria Hart Glavin Tiny New York Kitchen © 2017 All Rights Reserved

Grilled pineapple is so very versatile because you can use it for savory or sweet, hot or cold dishes. Grill over indirect heat and the sugars in the pineapple concentrate bringing out a sweet and meaty fruit that is ideal for endless summer recipes.
6 Ways To Use Grilled Pineapple
Slice and serve with grilled pork or fish.
Cut into chunks and toss with salt and lime juice for a smoky fruit salad.
Muddle and use as the base for a sweet-savory cocktail.
Dice and mix with chopped cilantro and chiles for salsa.
Purée and spoon over vanilla ice cream or good Greek yogurt.
Top with ice cream or sorbet.
“Work With What You Got!”
© Victoria Hart Glavin Tiny New York Kitchen © 2017 All Rights Reserved

Just a few fresh berries add color and nutrients to a salad, cocktail, or mocktail.
Stock up on fresh berries, wash and freeze them in a single layer on a sheet pan. Then transfer to a freezer bag for future smoothies and baked goods.
Add a handful of berries to a parfait, with yogurt for breakfast or ice cream for dessert.
Gently fold berries into muffin and pancake batter. Cook a big batch and freeze some for easy breakfasts later.
Make into a savory salsa and serve as a dip or over grilled chicken or wild-caught salmon.
“Work With What You Got!”
© Victoria Hart Glavin Tiny New York Kitchen © 2017 All Rights Reserved

5 Ways to Make the Most of Seasonal Stone Fruit
Ripen: Ripen peaches, nectarines and apricots at room temperature. Once ripe, they can be refrigerated for just a few days to help keep them at their best.
Speed Up: Speed up the ripening process by placing fruit in a brown paper bag on the counter, checking a few times each day.
Can: Preserve stone fruits by canning them (make jam, syrup or salsa) to enjoy the taste of summer year-round.
Dry: Bake or grill halves or slices at 200 degrees for about 3 hours, turning every 30 minutes or so, until dehydrated yet still soft. Store in the refrigerator.
Freeze: Lightly poach halved and pitted fruit in water (sugar optional), portion and freeze for later use in smoothies, baking, desserts or fruit sauce for pancakes.
“Work With What You Got!”
© Victoria Hart Glavin Tiny New York Kitchen © 2015 All Rights Reserved
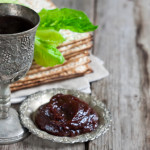
Passover Menu Ideas
If you’re wondering what to serve for Passover here are some handy menu ideas.
Soups & Appetizers
Matzo Ball Soup
Matzo Balls
Chopped Chicken Liver
Side Dishes
Quinoa Salad (Avocado, Mandarin Oranges, Toasted Walnuts, Citrus Vinaigrette)
Spiced Applesauce
Potato Kugel
Potato, Carrot & Prune Tzimmes
Walnut, Fig & Apple Haroset
Potato Latkes
Haricots Verts With Wild Mushrooms
Mélange Of Asparagus, English Peas, Carrots & Pearl Onions
Honey Roasted Baby Carrots
Main Courses
Black Angus Brisket With Caramelized Pearl Onions & Dried Apricots
Roasted Salmon With Mango Pineapple Salsa
Brined & Roasted Turkey Breast With Peach Cranberry Chutney
Roasted Chicken Breast With Apricot Ginger Glaze
Desserts
Baked Apples Stuffed With Walnuts & Dried Cranberries
Individual Pavlovas (Flourless Meringue Shells Filled With Lemon Curd & Fresh Berries)
Chocolate Truffle Cake
Apple Walnut Honey Cake With Matzo Crust
Chocolate Covered Matzos
Flourless Assorted Macarons (Lemon, Raspberry & Peach)
“Work With What You Got!”
© Victoria Hart Glavin Tiny New York Kitchen


Tacos Your Way!
There are many ways to make tacos depending on your taste and mood. From fish tacos to pork spare-rib tacos the possibilities are endless. I have to say that I was certainly spoiled with outstanding Mexican food while living on the West Coast for many years. More and more I am finding better Mexican food here in the Northeast, but as you know I like to cook up my own food more often than not. Here are some ways to stuff your tacos (hard or soft) and by all means experiment yourself. The bonus is that making tacos can also be a great way to use up those leftovers staring at you when you open the fridge.
Cod Tacos: Baked or Sautéed Cod, Grated Red Cabbage & Salsa
Smoked Salmon Tacos: Smoked Salmon, Grated Red Cabbage & Salsa
Catfish Tacos: Sautéed Catfish, Romaine Lettuce, Salsa & Sour Cream
Fried Oyster Tacos: Fried Oysters, Romaine Lettuce & Salsa
Marlin Tacos: Sautéed or Baked Marlin, Mangos & Salsa
Lobster Tacos: Lobster, Mangos, Jalapenos & Guacamole
Fried Chicken Tacos: Shredded Fried Chicken Breasts, Jalapenos, Lime Juice & Shredded Lettuce
BBQ Carnitas Tacos: Smoked or Roasted Pork, Barbeque Sauce, Sautéed Onions & Fried Pickles
Indian Tacos: Shredded Buffalo, Seared Green Chiles & Salsa
Brisket Tacos: Shredded Brisket, Jalapenos, Shredded Green Cabbage, Lime Juice & Salsa


Grilled Steak 3 Ways
Honestly, you don’t need a barbeque to make grilled steaks. Just go out and get yourself a grill pan and you will be wonder what took you so long in getting one. If you do want to throw your steaks on the barbeque then I certainly hope that you’re using a charcoal grill!
Classic
Rib Eye, Filet Mignon, Porterhouse, T-Bone or Strip Steaks
Olive Oil
Kosher Salt
Freshly Ground Pepper
Buy 1 steak per person. Bring steaks to room temperature. Preheat your grill or grill pan to a medium-high heat. Brush with olive oil, sprinkle with kosher salt, and pepper. Grill, turning 3 times (for crosshatch grill marks), until target temperature is reached – anywhere from about 5 to 15 minutes, depending on thickness. Remove from heat and allow to rest off heat for 10 to 15 minutes before serving.
Black Pepper Crusted
Rib Eye, Filet Mignon, Porterhouse, T-Bone or Strip Steaks
Olive Oil
Coarse Ground Black Peppercorns
Buy 1 steak per person. You will need about 2 tablespoons coarse ground black peppercorns per steak. Preheat your grill or grill pan to a medium-high heat. Brush steaks with olive oil and coat with peppercorns. Grill, turning 2 times (for crosshatch grill marks), until target temperature is reached –anywhere from about 5 to 15 minutes, depending on thickness. Remove from heat and allow to rest off heat for 10 to 15 minutes before serving.
Carne Asada Tacos
2 Pounds Flank or Skirt Steak
Marinade:
5 Cloves Minced Garlic
1 Diced Jalapeno Pepper
2 Teaspoons Cumin
1/2 Cup Chopped Cilantro
Juice of 2 Limes
1/3 Cup Canola Oil
1 Teaspoon Kosher Salt
Place the steaks in large ziplock bag. Pour in the marinade. Place in the fridge for 2 to 12 hours. Preheat grill or grill pan. Grill over a medium-high heat, 3 to 5 minutes per side to target temperature. Medium-rare is suggested. Remove from the heat and let rest 10 to 15 minutes. Slice thinly across the grain, serve with tortillas, salsa, and avocado.


