Here in the Northeast we often think of there being a short growing season. In other regions, many people garden as if there’s a beginning and an end as well. But gardening, anywhere you do it, is circular. There may be slow times, but planning ahead for what’s around the bend is crucial.
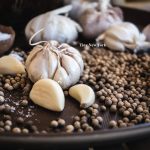
Right now, I’m thinking about next year’s garlic. Here we are, another turn of the season. Cool days and nights are creeping in and it’s really quite wonderful that one of the last planting tasks in the garden is getting garlic in the ground. Planting in general may feel counter to all the other fall tasks, but when you plant garlic you are “putting it to bed,” since it needs a cold cycle to perform well. On the other hand, the very act of planting-looking forward to spring and summer and harvest- brings the cycle of the seasons together quite nicely, proving that a garden never really begins or ends; it only changes.
Ho much you plant depends on what you want out of your crop. One pound of garlic can plant between 15 to 30 feet depending on the variety, and the amount of space you give it. Space rows 12 inches apart in whatever bed system you use.
If you would like to produce your own seed stock and your own eating stock, plan to reserve the top 30% of your harvest for planting. Each pound of garlic can produce between 50 to 75 heads of garlic, since each clove can produce a head.
When following a vegetable rotation schedule, one knows where the garlic will be planted well ahead of time. This gives an opportunity to make sure the beds are well worked, weeded, amended and prepared.
Garlic prefers rich, well-drained, and weed-free soil located in full sun. Ideally, choose a spot that is in full sun from winter through spring. It can be difficult to grow a crop in your weediest beds, so consider this when location scouting during the summer.
Compost, aged manure, and weed-free hay or straw mulch are good choices. Give yourself plenty of time to get this sorted out.
A few days prior to planting, prep your site.
Choose a sunny day in October when the soil is still warm. Try to leave enough time before the ground freezes solid for the garlic to set roots. Garlic can be planted any time before the ground freezes solid, though, ideally 3 to 6 weeks prior.
Begin by breaking apart the heads of garlic into cloves. Count the cloves and determine the amount of space you need. Most hardneck varieties have 50 to 90 cloves per pound. Garlic prefers full sun, so choose a spot that will get full sun for the spring and early summer. Each clove will be planted at 6” spacing, in rows 12” apart. Weed and work a proper amount of garden space. After cultivating the space, mark the rows. Plant cloves root side down, 2” deep, at least 6” apart, in rows 12” apart. Water and cover with mulch. Your garlic will need to be tended to in the spring, once the ground warms and it begins to grow.
Spring growing conditions and care: Garlic begins to poke through the ground as soon as the soil warms. If you covered your garlic with a thick mulch layer, rake it back to help warm the soil faster.
Garlic prefers rich, weed-free soil and ample water. Beginning in the spring, pull weeds when small, taking care not to damage your garlic when pulling them out. Hardneck varieties produce garlic scapes in the spring. If left on the plant, the scapes will draw energy from the bulb, reducing size and quality. Once the scapes emerge, cut them off immediately to direct the plants’ energy into bulb production. The scapes are an edible spring delicacy.
Giving your garlic a nutrient boost in the early spring is highly recommended. Garlic performs well with a nitrogen boost in the form of alfalfa meal, or a light side-dress of compost.
©Tiny New York Kitchen © 2020 All Rights Reserved
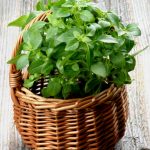
You may try to keep basil through the winter, however, sweet basil is meant to live its life cycle within one year and then go to seed. At the end of the season, though, you may try to keep it alive by moving potted basil indoors to enjoy them for months to come.
Inspect And Transplant
Before you bring your basil indoors make sure to inspect it thoroughly for any insects. Flush the soil with water and rinse off the foliage, using a blast of water from the garden hose to chase away any pests and avoid later problems. Then, you can gently dig up your basil from the garden any time before the ground freezes.
Transfer To A Pot
Select a container large enough to accommodate your basil plus a little room for growth. Place a layer of potting mix on the bottom of the pot, then set the basil on top of that. Fill in the spaces around the roots with more potting mix. Press the soil firmly around the basil’s roots, leaving about an inch between the soil and the rim of the pot. For smaller basil plants, try placing several together in a window box that fits on a sunny sill. After settling your basil into its new container, water until it drains out the bottom of the pot.
Acclimate Your Basil
When bringing your basil indoors, it will need a little time to adjust to the new surroundings. You might notice that your basil drops a few leaves and grow more slowly. Ease your basil into life on the inside by setting them in a spot with indirect light. Don’t put them in bright sun right away. After a couple of weeks, you may move the pots to a spot that will get a least four hours of sun or bright light. If you don’t have a window that provides plenty of sunlight, you can also grow your herbs under fluorescent bulbs or with a grow light setup.
Give Your Basil Some Love
Turn pots once a week or so to help all sides of your basil get enough light. Water when the soil feels dry to a depth of 1 inch. Mist the leaves daily to boost the humidity level. You can also tilt the pots over the sink and gently rinse their foliage with tap water every once in a while, to keep them clean and deter any pests that might show up. You may want to boost the humidity around your basil by placing their pots in a pebble filled tray. Water the pot regularly, allowing excess water to over flow into the tray.
Cuttings
To make sure you always have access to fresh basil throughout the winter, places cuttings in a small vase of water and they will soon develop roots. When the roots are a couple of inches long, put the cuttings to expand you supply of fresh basil. Or you may snip sprigs whenever you need some fresh basil for your favorite dishes. Either way, this will encourage your basil to produce new growth and stay compact until you can move them outdoors again in the spring.
With a little preparation, basil can come indoors for the winter. Growing them in containers will give you a fresh supply for cooking all year long and you will be able to take them back outside and replant when spring arrives.
©Tiny New York Kitchen © 2020 All Rights Reserved


