
Making precise slices of softer, smaller foods in a snap, literally, with this tool designed to hold slippery, hard-cooked eggs in its cradle as the wires cut through. Cleanup is just as speedy – use a kitchen brush and warm, soapy water.
It can quick slice soft fruits and vegetables such as peeled kiwis, hulled strawberries, white or cremini mushrooms, and pitted olives.
Create perfect rounds from soft cheeses, like fresh mozzarella balls and goat cheese.
Make even pats from a stick of butter.
Be creative and try using an egg slicer on soft foods that you’re preparing. The possibilities are endless.
“Work With What You Got!”
© Victoria Hart Glavin Tiny New York Kitchen © 2017 All Rights Reserved

When purchasing greens, choose those that look the freshest and have no brown spots. Use greens as soon as you can after purchase.
To wash your greens, first remove and discard the roots, then separate the leaves. Swirl leaves around in a bowl or clean sink filled with cold water for about 30 seconds. Remove leaves and shake them gently to let dirt and other debris fall into the water. Repeat the process, using fresh water each time, until the water remains clear.
Dry lettuce is important. The drier it is the better dressings cling to it. A salad spinner works wonders for drying greens. Many spinners start with the touch of a button and stop on their own when the greens are dry. If you don’t have access to one, pat each leaf dry with a clean paper towel. Once the greens are dry, do not cut or tear them until you use them. Washed greens can be stored in the refrigerator in a resealable bag lined with paper towels.
When cutting or tearing greens for a salad, be sure the resulting pieces are uniformly bite size. If they are too large it makes for messy and difficult eating. If tossing greens with vinaigrette or other dressing, do so just before serving so your greens don’t wilt. Some salads that have mayonnaise-based dressings actually benefit from standing overnight to let the flavors blend.
If you’re running short on time, choose a salad mix from the produce section of your supermarket. Not only do these handy mixes shave minutes from your prep time, they allow you to add variety to any salad. Because they are packaged in a specially designed wrapper that allows the greens to “breathe,” store any leftovers in the original bag. If refrigerated immediately, unopened packages will keep for up to 14 days. Even if the package label says the greens have been prewashed, be sure to wash them again to remove all dirt and grit.
“Work With What You Got!”
© Victoria Hart Glavin Tiny New York Kitchen © 2016 All Rights Reserved

Looking to build healthier eating habits? Remember, you don’t have to change everything all at once. Start with small steps that you can feel good about.
The easiest way to cook healthy is to have the proper items on hand. Healthy pantry staples are key ingredients for making healthy meals. Fill your pantry with these shelf basics and then during the week shop for more perishable foods. Try and buy organic when possible.
Dried Beans & Dried Lentils
Canned Beans (No Salt Added)
Whole Grains
Whole Grain Pasta
Rolled Or Steel-Cut Oats
Canned Diced Tomatoes (No Salt Added)
Low Sodium Vegetable Broth
Unsweetened Plain Soy Milk
Unsweetened Plain Almond Milk
Mellow White Miso
Tahini
Peanut Or Almond Butter (No Salt Or Sugar Added)
Raw Nuts (Almonds, Cashews, Walnuts, Pumpkin Seeds, Sunflower Seeds)
Dried Apricots, Dates & Raisins (No Sugar Added)
Dijon Mustard
Cider Vinegar
Nutritional Yeast
Instead of thinking about what not to eat, think about healthy things that you can add to your diet. Strive to incorporate more greens and colorful vegetables into your meals.
Concentrate on whole foods in their natural forms such as fruits and vegetables.
Whole grains are key. Instead of reaching for regular pasta or white bread, look for varieties made with 100 % whole grain flour. Brown rice, quinoa and barley are good choices as well.
Try steaming your vegetables instead of frying in oil.
Think of beans, whole grains, and vegetables as the main event. Keep lean meat and fish at 3 ounces or less.
Remember, there are no quick fixes. Making healthy choices is a process that lasts a lifetime.
www.tinynewyorkkitchen.com
“Work With What You Got!”
© Victoria Hart Glavin Tiny New York Kitchen © 2016 All Rights Reserved

“What You Put Up With, You End Up With. What Are You Tolerating In Your Life?”
Tiny New York Kitchen ?

The modern day Christmas tree was developed in early modern Germany, with predecessors that can be traced to the 16th and even possibly the 15th century. Devout Christians brought decorated trees into their homes. During the second half of the 19th century Christmas trees (also known as the Yule-tree) became popular beyond Germany, at first among the upper classes. Trees were traditionally decorated with apples, nuts, and other foods. During the 18th century people began to add illuminated candles, which were ultimately replaced by Christmas lights after the invention of electrification. During the early 19th century the Christmas tree became very common in the United States due to German immigrants settling Eastern and Midwestern towns. News spread of the Christmas tree between 1850 to 1860 by “Godey’s Lady’s Book,” and soon it became a common Christmas tradition.
www.tinynewyorkkitchen.com
“Work With What You Got!”
© Victoria Hart Glavin Tiny New York Kitchen © 2016 All Rights Reserved

Everyone who’s cooking for the holidays wonders what he or she should make for the holidays. I like to keep it simple and typically follow the “don’t experiment on your guests” rule.
Hors D’oeuvres
Mini Crab Cakes With Remoulade Sauce
Cold Seafood Platter (Lobster Tails, Jumbo Shrimp, Jumbo Lump Crab Meat)
Stuffed Mushrooms (Crab, Sausage, Cheese Stuffing)
Chicken Tenders With Honey Mustard Sauce
Chicken & Beef Satay With Asian Dipping Sauces
Jumbo Shrimp Cocktail Platter With Cocktail Sauce
Grilled Shrimp With Aioli
Mini Southwest Chicken Quesadillas With Salsa
Beef Franks In a Blanket With Whole Grain Mustard Sauce
Antipasto Platter With Imported Meats, Cheese, Peppers, And Olives
Assorted Mini Quiche
Bacon Wrapped Sea Scallops
Grilled Citrus Shrimp With Mango Aioli
Tenderloin Of Beef On Crostini With Horseradish Sauce
Salads
Mesclun Salad With Goat Cheese, Maple Candied Walnuts, Dried Cranberries And Balsamic Vinaigrette
Traditional Caesar Salad With Croutons & Shaved Parmesan Cheese
Traditional Caesar Salad With Shrimp Or Chicken
Dinner
Chicken Or Veal Marsala (Sautéed With Fresh Mushrooms & Red Roasted Peppers With Marsala Wine)
Chicken Or Veal Francese (Bathed In Light Egg Batter & Sautéed With White Wine & Lemon Sauce)
Chicken Or Veal Picata (Sautéed With Artichoke Hearts With Lemon Caper & White Wine Sauce)
Chicken Or Veal Parmigiana (Breaded & Sautéed Crispy, Topped With Marinara Sauce, Mozzarella & Parmesan Cheese)
Poached Salmon With Dijon Dill Sauce
Stuffed Filet Of Sole (Stuffed With Crabmeat & Baked With Lemon, Butter & White Wine)
Roasted Tenderloin Of Beef (Serve With Mushroom Sauce Or Creamy Horseradish Sauce & Oven Roasted Potatoes)
Roasted Turkey Breast (Serve With Traditional Stuffing, Gravy & Mashed Potatoes)
Smoked Country Ham (Serve With Roasted Sweet Potatoes & Whole Grain Mustard)
Cheese Ravioli With Marinara Or Bolognese Sauce
Manicotti Stuffed With Ricotta Cheese, Spices & Parmesan Cheese (Topped With Marinara Or Bolognese Sauce)
Stuffed Shells With Ricotta & Parmesan Cheese (Topped With Marinara Or Bolognese Sauce)
Baked Rigatoni With Herb Ricotta & Topped With Mozzarella Cheese
Classic Meat Lasagna
Vegetarian Lasagna
Flour Cheese Lasagna (Ricotta, Parmesan, Romano & Mozzarella)
Eggplant Parmigiana
Eggplant Rollatini
Sausage & Peppers In Tomato Sauce
Sausage & Broccoli Rabe Sautéed In Olive Oil & Garlic
Tuscan Sausage Cook With Broccoli Rabe & Cannelloni Beans In Creamy Tomato Sauce
Desserts
Pies
Cakes
Cookies
Zabaglione
www.tinynewyorkkitchen.com
“Work With What You Got!”
© Victoria Hart Glavin Tiny New York Kitchen
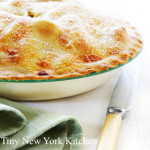
There are four versions of classic pie dough. 1. All butter dough has excellent flavor, but can be tricky to use. 2. Butter and shortening dough is flakier and more tender. It browns slightly faster than all butter dough, but has less shrinkage and holds its shape better during baking. 3. Lard pie dough creates the flakiest, crispiest, and most tender dough of all, but the flavor is fairly bland. This dough also has the least amount of shrinkage when it bakes and it browns more slowly. 4. Butter and lard dough has superb flavor and texture. The ratio of butter to lard or butter to shortening varies from recipe to recipe, but most call for half butter, half alternative fat.
Starting with cold ingredients are key to a flaky crust. Using ice water and cold fat (butter or shortening) is important. Chill the dough for about an hour before rolling to help prevent sticking. When the pie crust goes in the oven, the cold shortening will stay solid long enough for the crust to set, creating small pockets in between the layers of dough as it melts resulting in a flaky crust.
Minimal handling is very important in helping to achieve a tender crust. Handle the dough just enough to mix it and roll it. Proper rolling is another way to avoid excess handling. Roll the dough from the center out, lifting the rolling pin after each roll.
To avoid soggy bottom crust in your fruit pie, get the filling into the piecrust and into the oven quickly. Drain off any excess juice in the bowl before pouring it into the piecrust.
For double crust fruit pies, cut slits in the top crust to allow steam to get out. The escaping moisture will help prevent soggy crusts.
Bake your pie in the lower third of the oven since this will allow the bottom crust to become crisp while the top shouldn’t get overly browned.
To cut down on the sugar in fruit pies, mix in a teaspoon or two of baking soda to the fruit before adding any sweetener. Then start out with adding 1/4 to 1/2 the amount of sugar that you normally would. The baking soda neutralizes the acid in the fruit, which means that it needs much less sweetening.
Allow the pie to cool 2 to 4 hours on a rack to room temperature or until barely warm, before slicing to ensure that the filling is set and will not run.
Slice apples thinly for apple pie. Thick slices promote air space and create a gap between the fruit and the crust and this may lead to a soggy crust.
Cornstarch is a good thickener to use with fruit to make a filling because it does not impart its own flavor and yields the smoothest texture. It also does not thin when reheating a slice of pie.
To enjoy fresh apple pie during the winter, freeze your prepared pie filling. Just cut up and slice your apples and toss them with whatever seasonings and thickener you normally put in your pie filling. Then freeze in a greased pie pan and when the apples are hard, lift them out and wrap for long-term freezing. When you want to enjoy an apple pie, all you have to do is place the ready-frozen pie filling in a crust and bake according to the recipe.
Baking a pie with a raw fruit filling will take a little longer than one with pre-cooked filling, about an hour longer. When using a pre-cooked filling, pies bake at a higher temperature for a shorter period of time, just enough to thoroughly bake the crust and heat the filling.
“Work With What You Got!”
© Victoria Hart Glavin Tiny New York Kitchen © 2016 All Rights Reserve

I love to bake all year long, but during the holidays I’m on “baking overdrive.” To make better cakes here are some simple tips to help you with the best outcome possible.
Don’t use cold eggs. The eggs really should be at room temperature, otherwise the mixture won’t emulsify properly. If you’re short on time place eggs in a bowl of warm water for 15 minutes.
Make sure to measure all ingredients precisely. Baking is an art form, but also a science.
Position pans as close to the center of the oven as possible. If you’re placing more than one pan in the oven, they should not touch each other or the oven walls. If your oven isn’t wide enough to put pans side by side, place them on different racks.
If a recipe calls for 1 cup of sifted flour, then first sift the flour and then measure it. If it calls for 1 cup flour sifted, measure the flour, then sift it. It may seem subtle, but it can make the difference between a light, fluffy cake and a heavy one.
Allow at least 20 minutes for your oven to preheat. It’s best to turn the oven on before you start working on your recipe.
Avoid opening the oven door. Opening the oven door too often can make a cake fall, so use the window in your oven door to check the cake’s process when possible.
Remember that each oven heats differently. Check for doneness 10 minutes before the recipe suggests. For most recipes, a cake is ready when it starts pulling away from the sides of the pan and a toothpick inserted in the center comes out clean.
Invest in wire cooling racks. Cakes cool faster and don’t get soggy when set out on a rack. Leave them in the pans for 10 to 15 minutes before unmolding, and then place on a rack to cool completely before frosting. Angel, chiffon and sponge cakes should be left in the pan to cool to prevent collapsing.
Unfrosted cakes can be stored, well wrapped in plastic, at room temperature for 24 hours. If storing unfrosted cakes for more than 24 hours, it is best to freeze them rather than refrigerate them. Wrap the layers in plastic wrap and then heavy-duty foil to freeze, let cake thaw in the refrigerator before frosting.
To store frosted cakes, keep at room temperature under a cake dome or large bowl unless the recipe specifies refrigeration.
For smooth and easy cake removal, prep your pans properly. When a recipe calls for greasing and flouring, place a piece of parchment or waxed paper on the bottom of a pan (trace and cut it to fit). Coat the sides and bottom with softened butter, and then dust with flour, turning the pan on its side to get full coverage and tapping out the excess. For chocolate cakes, swap in cocoa powder for flour.
Angel, chiffon, and sponge cakes should go into clean, untreated pans since they need to adhere to the sides in order to rise properly.
Happy Baking!
“Work With What You Got!”
© Victoria Hart Glavin Tiny New York Kitchen © 2016 All Rights Reserve
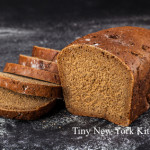
Along with wheat, rye is the other cereal that is widely used to make bread. It is extremely hardy and does well in climates that are too inhospitable to grow wheat. Because of this, rye is a very popular grain for bread making in eastern and northern Europe. There are a countless number of different loaves and the use of rye flour gives them a unique characteristic and tangy flavor.
Kastenbrots are the familiar box-shaped rye breads, and the name actually translates as box bread. The bread is steam-baked for some 20 hours in an enclosed pan, which results in a dense and heavy loaf that is both moist and crumbly with a chewy texture. It has a sour flavor, but with a certain sweet and malty overtone. They are best eaten with strong tasting foods and malty types of drinks such as beer. Among the best-known varieties is pumpernickel, the darkest of the rye breads, vollkornbrot, another strongly flavored rye bread, and roggenbrot.
Weisenkeimbrot, another variety that translates as wheat germ bread, and is made using the wheat germ along with rye grain.
Sonnenblumenbrot is made using a small proportion of wheat flour along with the rye meal and has a distinctive sharp flavor of rye.
Krustenbrot is the popular square rye bread from Germany and is a crusty-style loaf. It is often just known as German rye, but unlike other rye breads it has a pleasant, gentle flavor, owing partly to use of a blend of rye and wheat flours.
Rossisky is made from a sourdough starter, using 100 percent rye flour. It has a distinctive, yet pleasant flavor and is one of the most delicious of all Russian breads.
Borodinsky is another classic Russian bread and is flavored with crushed coriander seeds. It can be made entirely with dark rye or with a blend of rye and wheat meal. Barley meal is also often used, giving an earthy flavor, while buttermilk or yogurt is occasionally added, both of which enhance the naturally tangy sourdough flavor.
Russian Black Bread is a substantial looking loaf flavored with molasses. It is usually made with an equal blend of rye and wheat flour and has a pleasant sweet and sour flavor that is characteristic of many rye breads. The combination of molasses and rye give it a wonderfully dark and moist crumb.
“Work With What You Got!”
© Victoria Hart Glavin Tiny New York Kitchen © 2016 All Rights Reserved

Cannellini beans, which are widely used in Italian cooking, actually originate from Argentina.
These creamy white Italian beans are slightly larger and fatter than the white haricot beans and are more like a kidney in shape. They are related to the larger French Soissons and, like them, have a fluffy texture when cooked. They are a popular addition to classic minestrone and a variety of other soups. Cannellini beans are an essential ingredient for tonno e fagioli (tuna and bean salad) and Florentine fagioli all’uccelletto, where the beans are stewed with sage, tomatoes, and garlic. They are also delicious cooked with olive oil, onion ring slices, garlic, and parsley.
I prefer to cook with dried beans rather than canned beans. I do keep a few cans of beans in my pantry, however, as they’re useful in short notice circumstances. When you purchase canned beans make sure that the ingredients do not include sugar or salt.
To cook Cannellini Beans: Sort and rinse 3/4 cup Cannellini Beans. Place in a medium-size pot with 3 cups water. Cover and bring to a boil. Reduce heat to a medium-low and cook 60 to 90 minutes until beans are soft. Add more water as needed while cooking to keep beans covered. Makes about 2 cups/4 servings.
To reduce cooking time, soak beans in water overnight in the refrigerator. Drain and throw away soaking water before proceeding.
“Work With What You Got!”
© Victoria Hart Glavin Tiny New York Kitchen © 2016 All Rights Reserved


