
Here is another use for the whole grains and seeds that you’re seeing at the store. Top off with delicious flavoring, which are also tasty on oatmeal.
Amaranth (3/4 Cup)
Bring 2 1/4 cups water or milk to boil in saucepan. Stir in amaranth. Reduce heat to low, cover and simmer until tender. Cooking time is 25 to 30 minutes. Stir occasionally. Remove from heat and mix in or top with dried cherries, coconut sugar, macadamia nuts, vanilla, banana, or cacao nibs. Serves 2
Millet (3/4 Cup)
Bring 1 1/2 cups water or milk to boil in saucepan. Stir in millet. Reduce heat to low, cover and simmer until tender. Cooking time is 15 to 20 minutes. Stir occasionally. Remove from heat and mix in or top with chopped dates, demerara sugar, hazelnuts, cloves, clementine, or granola. Serves 2
Quinoa (3/4 Cup)
Bring 1 1/2 cups water or milk to boil in saucepan. Stir in quinoa. Reduce heat to low, cover and simmer until tender. Cooking time is 15 to 20 minutes. Stir occasionally. Remove from heat and mix in or top with dried apricots, agave syrup, pine nuts, cardamom, blueberries, or toasted coconut.
Serves 2
“Work With What You Got!”
©Tiny New York Kitchen © 2018 All Rights Reserved

The labels of many chocolate brands now state the amount of cacao (which means cocoa beans or any part of the beans, including cocoa butter) in their chocolate. The higher the cacao content, the less sugar the chocolate contains. You will also see chocolate described as bittersweet or semisweet. The USDA puts all sweetened dark chocolate, with cacao with a minimum of 35 percent chocolate liquor (ground cocoa beans without any additives), in the same category. These designations vary from brand to brand: one manufacturer’s bittersweet chocolate can be another manufacturer’s semisweet.
The average supermarket chocolate has 55 to 60 percent cacao. Chocolate with more than 60 percent cacao has what is considered a high cacao percentage. You may appreciate its bracing bitterness for eating, but because it contains so much more cacao than traditional chocolate, it can cause problems in cooking. Some contemporary cookbooks include the desired cacao percentage for the chocolate called for in their recipes, a plus for users. Unless a recipe specifically calls for a high-percentage chocolate, you are safest with a chocolate labeled 55 to 60 percent cacao.
Unsweetened chocolate is 99 to 100 percent cacao with no added sugar (some brands add a miniscule amount of vanilla and the emulsifier lecithin).
Milk chocolate has a minimum 10 percent chocolate liquor and includes dry milk solids and additional sugar to make it extra creamy and sweet. The latest trend is toward a higher percentage of chocolate liquor than in the past.
The best white chocolate has a base of cocoa butter, with sugar and milk solids added. Inferior brands substitute other plant fats, such as hydrogenated palm oil, for the cocoa butter, and are labeled white confectionary coating.
Traditionally, chocolatiers wanting a tiny, delicate chocolate coating for their creations would use couverture chocolate, which has a minimum of 32 percent cocoa butter to help it melt more smoothly and increase its fluidity. This extra measure of cocoa butter separated it from regular eating chocolate. However, the standard of today’s chocolate has improved to the point where virtually all chocolate has enough cocoa butter to be considered couverture, so the term is falling out of use.
Use a serrated knife to chop chocolate. Actually, think of shaving the chocolate from the block rather than hacking at it. Start at the corner of the bar and work backward, moving the knife about 1/4 inch after each cut. When you’ve lost the point of the corner, turn the bar around and start at another corner.
It may sound like a time-saver, but don’t use a food processor to chop chocolate. The chocolate can melt from the heat generated by the friction.
Small chunks of high-quality chocolate (pistoles) are a great time-saver if you need to melt chocolate and want to skip the chopping step. Semisweet chocolate chips may look similar, but they aren’t a good substitute. They contain a high percentage of lecithin, which helps them keep their shape during baking, so they don’t melt.
Chocolate has two enemies, heat and water. Use gentle heat when melting dark chocolate, as it scorches above 120 degrees F (milk and white chocolates scorch at 110 degrees F and need extra attention). Keep all surfaces and utensils dry. If you use a double boiler to melt chocolate, never allow the water to boil. The resulting steam can get into the chocolate and thicken it irretrievably, which is known as seizing.
The traditional method for melting chocolate is in a double boiler. It melts at below body temperature, so very hot water works fine. Just bring about 2 inches of water to a boil in the lower pan of the double boiler, then remove it from the heat. Place the top pan with the chopped chocolate over the low pan, making sure the top pan doesn’t touch the water. Chocolate holds its shape even when warm, so stir the chocolate frequently with a rubber or silicone spatula while it melts to check its progress. Be careful not to overheat chocolate, as it can scorch easily.
A variation on the double boiler method is good for large amounts of chocolate. Put the chopped chocolate in a wide stainless-steel bowl. Now place the bowl in a large skillet of very hot water, taking care not to splash any water in the chocolate. With a larger surface area of the chocolate exposed to heat, the chocolate will melt more quickly than in a double boiler.
You can melt chocolate in a microwave oven, but you must be careful not to overheat it. Use medium (50 percent) power for 40 seconds, and then check the chocolate. If it has not melted, continue to melt it, checking it at 20-second intervals. When you take it out of the microwave, the chocolate may not look melted, but sometimes brief stirring will push all or most of it to the melted stage. If all the chocolate has not melted, return it to the microwave for about 15 seconds at medium power. Because of the wide variability in the power put off by microwave ovens, you will have to learn to judge how quickly your microwave melts chocolate.
“Work With What You Got!”
© Victoria Hart Glavin Tiny New York Kitchen © 2017 All Rights Reserved
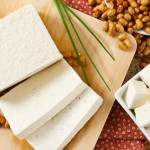
How To Eat More Protein On A Meat-Free Diet
If you’re new to a meat-free diet or you struggle with ways to get the protein you need here are some important tips that may help you. It really isn’t as hard as you might think.
Snack on protein rich munchies and skip the carbs. Eat roasted chickpeas, edamame, roasted peanuts, or raw nuts. Keep away from heavily salted nuts.
If you’re looking for a frozen treat then purée coconut milk, almond butter, cashew butter, honey, and cocoa powder. Freeze in an ice cream maker for a protein rich frozen treat.
Make an easy cream sauce by whisking cashew butter with vegetable stock, garlic, and minced parsley. Toss with cooked pasta.
Crumble tempeh (fermented soybean protein) into pasta sauce or soups, or wherever you might use hamburger meat.
Purée cooked black beans and add to brownies. For blondies or light colored muffins or cakes, use cooked, puréed chickpeas.
Sprout sunflower seeds and add them to salads. Just soak raw seeds overnight in water to cover. Drain and let sprout for 24 to 48 hours.
Add ground flaxseeds to muffins, waffles, breads, or cookies for a protein boast and added omega 3 fats.
Make a protein packed pudding. Purée silken tofu with cocoa powder, honey, and vanilla extract.
Use hemp or rice protein powder instead of flour to make waffles, pancakes, and baked goods. Instead of eggs, use flax as a binder.
Lentils are awesome! Eat lentils more often. They are fast cooking and easy to use. Add to soups, toss in salads, and stir in cooked rice.
Spread sandwiches and wraps with hummus instead of mayonnaise. I do this all the time. Purée hummus with roasted red peppers or chipotle peppers for an added zing.
If you can tolerate gluten, seitan (wheat protein) is a great substitute for sliced deli meat. Use it in wraps or sandwiches for an easy lunch.
“Work With What You Got!”
© Victoria Hart Glavin Tiny New York Kitchen
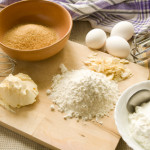
Gluten-Free Baking
Baking can be tricky when you throw gluten-free into the mix, even the most skilled cooks can be challenged. Here are some tips that can make Gluten-Free Baking less challenging.
Gluten-Free flour mixes can generally replace wheat flour cup for cup. Nut and bean flours may need extra experimentation to find the exact amounts to use.
Consider using smaller pans when baking gluten-free. It’s easier to get the center cooked without the edges burning as can happen with larger pans.
Keep a close watch on baking times. Some gluten-free recipes may take longer to bake than their wheat-containing counterparts.
To help gluten-free recipes taste their best, consider boosting flavor with extra nuts, herbs, spices, and flavor extracts such as vanilla and almond.
If converting a recipe to gluten-free, increase the egg amount by one extra egg to help ingredients bind together.
Gluten-free flours can be dry. You may need to increase a recipe’s liquids.
Xanthan gum keeps gluten-free baked goods moister and less prone to crumbling. Add 1/4 to 1/2 teaspoon xanthan gum for each cup of gluten-free flour.
"Work With What You Got!"
© Victoria Hart Glavin Tiny New York Kitchen
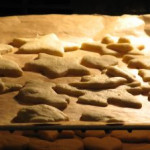
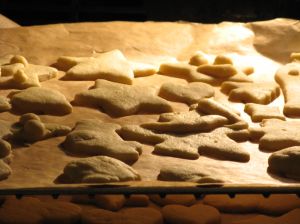 Butter Cookies
It’s time to start thinking about making Christmas cookies.
1 1/2 Cups Softened Butter
1 1/2 Cups Sugar
2 Eggs Lightly Beaten
3 Cups Unbleached Flour
1/3 Teaspoon Kosher Salt
1/2 Teaspoon Vanilla Extract
1/4 Cup Sifted Powdered Sugar (Optional)
Cookie Press
Preheat your oven to 375° F. In a large size bowl cream the butter and sugar together. Add the beaten eggs. In a separate bowl mix the flour and salt. Gradually add the flour mixture to the sugar mixture. Blend well and then add the vanilla. Fill the cookie press with 1/4 of the cookie dough at a time. Press the cookies onto a parchment paper covered cookie sheet 2 inches apart. Bake for 10 minutes. Remove from the oven and allow the cookies to cool for 10 minutes while still on the cookie sheet. Transfer to a cooling rack to cool completely. Dust with the powdered sugar if you want to. Makes 48 cookies.


