
Have you ever found yourself making a recipe and realize that you don’t have an ingredient that it’s calling for? Here are a few ingredient alternatives that you might have on hand instead.
Mayonnaise
For 1 cup of mayonnaise use 1 cup sour cream or 1 cup plain yogurt with a pinch of salt.
Honey
For 1/4 cup of honey use 1/4 cup maple syrup or light corn syrup.
Buttermilk
For 1 cup of buttermilk use 1 tablespoon vinegar or lemon juice mixed with enough milk or plant-based milk to reach 1 cup.
Butter
If butter is used for baking or in a solid form, solid coconut oil is a good 1 to 1 substitution. If it’s melted or for cooking use olive oil.
Oil
When it comes to oil for baking, applesauce is a great substitute. For 1 cup of oil, use 3/4 cup applesauce mixed with 1/4 cup melted butter. In cooking, any neutral refined oils like canola, olive, vegetable, corn, and peanut oils are interchangeable.
Breadcrumbs
For 1 cup of breadcrumbs use 1 cup of cracker crumbs, finely crushed potato chips, tortilla chips, or pretzels pulsed in your food processor.
Brown Sugar
For 1 cup of light brown sugar, use 1 cup white sugar plus 1 tablespoon molasses. For 1 cup of dark brown sugar, use 2 tablespoons molasses. The sugar and molasses should be mixed together thoroughly.
Baking Powder
For 1 teaspoon baking powder, stir or sift together 1/4 teaspoon baking soda plus 5/8 teaspoon cream of tartar.
“Work With What You Got!”
©Tiny New York Kitchen © 2020 All Rights Reserved

Chefs love cast iron’s durability and its ability to evenly retain heat. What’s old is new again. Cast iron comes in all sizes from pans that hold a single fried egg to 20-inch giants that weigh 25 pounds and take up two burners. You can pick up a cast iron pan for $25 to $300. I like 10-inch skillets for everyday cooking, which are between four to six pounds and can comfortably accommodate a pack of chicken thighs. Remember that a bigger pan is a heavier pan, which limits how easily you can maneuver it as you cook.
Make sure to season your cast iron pan. Use a paper towel to rub your pan all over with a very light coat of neutral oil like grapeseed or vegetable oil and then place in a 500-degree oven for an hour. You want your pan to have a matte dark finish. Remove from the oven and let cool. Rub another very light coat of oil all over before storing. The very best thing that you can do to maintain that new seasoning is to get cooking. Each time you cook a steak or chicken thighs, the fat adds another coat to the pan’s surface, which will create a glassy finish over time. Re-season when your pan starts to look dry and dull or if you can’t remember the last time you cooked in it. Always rub you pan down with a thin coat of neutral oil before storing.
Just because you can cook it in cast iron doesn’t mean that you should! There are some foods that you definitely should not cook in your cast iron. Fish is not something that I would cook in cast iron unless I want to infuse next day’s pancakes with the essence of fish. Tomato sauce’s high acidity reacts with cast iron, which creates an unpleasant metallic flavor. I’d skip cooking scrambled eggs in cast iron unless I want to be on dish duty for an hour or two after breakfast.
Wash your pan! Yes, you do need to wash your pan. Each time you cook with cast iron a few burnt and crusty food bits inevitably seem to stick to the pan. If you don’t scrub it clean between uses, those bits will fossilize under subsequent layers of seasoning, which create an irregular surface that will never become truly nonstick (the opposite of what you want). Wash your pan with hot water and a drop of dish soap while it’s still warm. Take care not to let the pan soak in water. Wipe down the pan and then set it over a low flame for a few minutes to fully dry. Rub all over with a very light coat of neutral oil before storing (just like you would after seasoning it). These steps are crucial for keeping your pan in fighting form against Public Enemy Number One – RUST! If you ever do have spot rust just use and old toothbrush dipped in distilled vinegar to scrub it off, let it dry, and then rub in a drop of oil. If you make a regular habit of cleaning your cast iron you’ll have a faithful companion for life.
“Work With What You Got!”
©Tiny New York Kitchen © 2018 All Rights Reserved
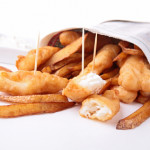
Tips For Deep-Frying
Deep-frying is such a guilty pleasure because no cooking technique gives food that irresistible crunchiness. Because it is also one of the least frequently used cooking methods, here are some important tips to help you achieve Deep-frying nirvana.
Choose the right pot. To deep-fry properly, the food should cook in 2 to 3 inches of hot oil. Choose a pot that is at least 6 inches deep to allow for bubbling without bubbling over. Cast iron (enameled or not) holds the heat well, which makes a good choice.
Use reasonably priced cooking oil. Canola, cottonseed, safflower, or a generic vegetable oil blend will all do. Much is made of the smoke point of oil (the temperature where the oil starts to smoke and break down) for deep-frying, and expensive peanut oil is often singled out as being especially desirable (watch those peanut allergies). Food should not be deep fried at temperatures above 400-degrees because it will burn before it has a chance to cook through. Most refined clear cooking oils have a smoke point of about 425-degrees (except for olive oil), so if you are deep frying at the correct temperature, the oil’s smoke point is not an issue.
Don’t reuse deep frying oil. This is another reason to use reasonably priced oil. Although you can strain the cooled oil for another round or two of deep-frying, this is a sure way of transferring unwanted flavors to your food, and the freshness of the oil obviously is reduced with storage. You don’t want to cook your tortilla chips in the same oil you used for cooking fish and chips. Just budget the price of the oil into the cost of the recipe, throw away after using, and leave it at that.
Use a deep-frying thermometer. It’s the only way to get an accurate reading of the oil temperature. Be sure the end of the thermometer is totally submerged in the oil. Keep the heat on high to maintain the correct oil temperature.
To reduce deep-frying odors, cook outside if possible. There is no reliable way to avoid the odors caused by deep-frying inside. But when the weather is cooperating, plug in an electric kettle and do your frying on your porch or patio.
Let the oil return to its correct frying temperature between batches. In most cases, you may add the food to 375-degree oil, but the temperature will drop to 335-degrees or so for the actual cooking. After removing the food, be sure to reheat the oil over high heat to its original starting temperature.
Use a wire skimmer to remove food from the oil. Also called a spider, these wide-mesh skimmers do a better job of draining away oil than a slotted spoon or slotted skimmer. They are commonly used in Asian cooking, so look for them at kitchenware stores near the woks.
Don’t drain fried foods on paper. Most people use paper towels or brown paper bags to absorb the fat from drained foods. A crunchy coating can soften where it comes into contact with the paper because the steam builds up at the contact point and has nowhere to go but into the coating. For the crispiest result, drain the food on a wire cooling rack set over a rimmed baking sheet, so the food comes into contact only with thin wires.
Keep deep-fried foods warm in the oven before serving. Deep-fried food is best served piping hot right out of the pot, which isn’t always possible when cooking multiple batches. Once you have put the food on the wire rack and baking sheet setup, slip the whole thing into a preheated 200-degree oven for up to 10 minutes.
Add salt JUST before serving. Salt can soften homemade potato chips and other fried foods, so to keep them from losing their crunch, sprinkle on the salt at the last minute.
“Work With What You Got!”
© Victoria Hart Glavin Tiny New York Kitchen
Substitution Guide
|
Ingredient |
Substitution |
|
Allspice (1 tsp.) |
1/2 tsp. cinnamon + 1/4 tsp. nutmeg + 1/4 tsp. ground clove |
|
Baking Powder (1 tsp.) |
1/4 tsp. baking soda + 1/2 tsp. cream of tartar |
|
Baking Soda (1 tsp.) |
2 tsp double-acting baking powder + replace acidic liquid ingredient in recipe with non-acidic liquid |
|
Balsamic Vinegar |
Equal amount of sherry or cidar vinegar |
|
Bread Crumbs (1 cup) |
3/4 cup cracker crumbs |
|
Brown Sugar (1 cup) |
1 Tbsp. light molasses + enough sugar to fill 1 dry measure cup or 1 cup raw sugar |
|
Butter, salted (1 cup or 2 sticks) |
1 cup or 2 sticks unsalted butter + 1/4 tsp. salt or 1 cup margarine or 7/8 cup lard or vegetable shortening |
|
Buttermilk (1 cup) |
Place 1 Tbsp. white vinegar or lemon juice in a liquid measure. Fill to 1 cup with room temp whole or 2% milk and let stand for 5 minutes or 1 cup milk + 3/4 tsp. cream of tartar or 1 cup plain yogurt |
|
Canola, Sunflower and Vegetable Oils |
Substitute one for one |
|
Chocolate, Bittersweet or Semi-Sweet (1 oz.) |
1/2 oz. Unsweetened chocolate + 1 Tbsp. granulated sugar |
|
Cocoa Powder (3 Tbsp. Dutch-processed) |
1 oz. Unsweetened chocolate + 1/8 tsp. baking soda + reduce fat in recipe by 1 Tbsp. or 3 Tbsp. natural cocoa powder + 1/8 tsp. baking soda |
|
Corn Starch (as a thickener) |
Equal amounts of Minute Tapioca for cornstarch, use slightly less for flour |
|
Cream of Tartar (1/2 tsp.) |
1/2 tsp. white vinegar or lemon juice |
|
Egg (1 whole large egg) |
3-1/2 Tbsp. thawed frozen egg or egg substitute or 2 egg whites |
|
Garlic (1 fresh clove) |
1 tsp. Garlic Salt or 1/8 tsp. Garlic Powder or 1/4 tsp. dried minced garlic |
|
Gingerroot (1 Tbsp. minced) |
1/8 tsp. ground ginger powder or 1 Tbsp. rinsed and chopped candied ginger |
|
Half & Half (1 cup) for cooking or baking |
1-1/2 Tbsp. butter or margarine + enough milk to equal 1 cup |
|
Heavy Cream (1 cup) for cooking or baking |
3/4 cup milk + 1/3 cup butter or margarine |
|
Herbs, Fresh (1 Tbsp.) |
1 tsp. dried herbs |
|
Honey (1 cup) for cooking or baking |
1 1/4 cups granulated sugar + 1/4 cup of liquid appropriate for recipe |
|
Italian Seasoning (1 tsp.) |
1/2 tsp. dried basil + 1/4 tsp. dried oregano + 1/4 tsp. dried thyme |
|
Molasses (1 cup) |
1 cup honey or 1 cup dark corn syrup or 3/4 cup light or dark brown sugar dissolved in 1/4 cup liquid |
|
Mushrooms, fresh (1 cup sliced and cooked) |
1 can (4 oz.) mushrooms, drained |
|
Mustard, Prepared (1 Tbsp.) |
1/2 tsp. dry mustard powder + 2 tsp. white vinegar |
|
Onion (1 small minced) |
1/2 tsp. onion powder |
|
Poultry Seasoning (1 tsp.) |
1/4 tsp. ground thyme + 3/4 tsp. ground sage |
|
Pumpkin Pie Spice (1 tsp.) |
1/2 tsp. ground cinnamon + 1/4 tsp. ground ginger + 1/8 tsp. allspice + 1/8 tsp. nutmeg |
|
Sour Cream (1 cup) |
1 cup plain yogurt or 1 Tbsp. lemon juice and enough evaporated milk to equal 1 cup |
|
Tomato Juice (1 cup) for cooking |
1/2 cup tomato sauce + 1/2 cup water |
|
Tomato Sauce (1 cup) for cooking |
1/2 cup tomato paste + 1/2 cup water |
|
Wine, Red (1 cup) |
1 cup nonalcoholic wine, apple cider, beef broth or water |
|
Wine, White (1 cup) |
1 cup nonalcoholic wine, white grape juice, apple juice, chicken broth or water |
|
Yogurt (1 cup) |
1 cup buttermilk or 1 Tbsp. lemon juice and enough milk to equal 1 cup or 1 cup sour cream |
"Work With What You Got!"
© Victoria Hart Glavin Tiny New York Kitchen


