
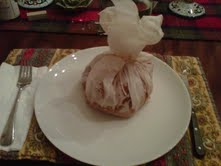
 Nana’s Calzone
Nana’s Calzone is a delicious lunch or it can be served cold on a summer day. When I serve it warm, I top it with a bit of marinara sauce. All that is needed to complete the meal is a nice tossed salad.
INGREDIENTS
1 Pound Prosciutto
2 Pounds Ricotta Cheese
1 Cup Grated Parmesan Cheese
3 Eggs
1/2 Teaspoon Kosher Salt
1/2 Teaspoon Freshly Ground Pepper
Olive Oil
1/2 Pound Cubed Mozzarella Cheese
1 Pound Pizza Dough (Store Bought or Homemade)
1 Cup Marinara Sauce
Preheat your oven to 350° F. In a large size bowl mix together the prosciutto, ricotta, Parmesan, eggs, salt and pepper. Set aside. Stretch the pizza dough to make a 12 to 14 inch round. Leave the dough slightly thick so that the filling will not ooze out. Put the dough on a lightly oiled pizza pan. Avoid the edges of the pan. Spoon the filling onto half of the pizza round and fold the other half of the dough over to form a large turnover. Press the edges tightly together, with your fingertips, until all of the dough is sealed. Moisten the top and sides of the calzone with olive oil by using the palm of your hand to spread it evenly. Cut a few slits in the middle of the calzone. Put some cubes of the mozzarella and a couple tablespoons full of marinara sauce in each of the slits. Use all of the cheese and sauce. Bake the calzone in the oven for 45 minutes until golden brown. I like to use the medium rack in the oven. Remove from the oven and let sit for 20 minutes. This will allow the cheese to set. Cut into slices and serve as a lunch dish or an appetizer. Top with more marinara sauce. As an appetizer serves 8 and as a main course serves 1 to 2.
Basic Pizza Dough
3/4 Cup Lukewarm Water
1 Package Dry Yeast
1/8 Teaspoon Sugar
3 Cups Unbleached Flour
1 Teaspoon Kosher Salt
1/4 Cup Olive Oil
Put the lukewarm water in a small bowl and sprinkle the yeast and sugar over it. Let stand in a warm and draft free place for 15 minutes until a foam forms on the top. Make sure that the water is NOT hot or it will kill the yeast. In a large bowl combine 1 cup of flour and the salt. Add the olive oil to the yeast mixture and pour the mixture into the bowl of flour. Slowly add the second cup of the flour. Stir with a wooden spoon. When the dough begins to pull away from the sides of the bowl turn it out onto a floured board. Gradually knead the rest of the flour into the dough until the dough is smooth and elastic. The dough should no longer be sticky. Depending on how moist your dough is will depend on how much flour you will need. Coat a medium bowl with olive oil and place the dough in it. Roll the dough to coat on all sides. Cover tightly with plastic wrap and set in a warm place for about an hour. The dough should double in size. To test if the dough has doubled gently press your fingers into it. If your fingers leave an impression then the dough is ready.
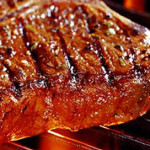
 Garlic Grilled T-Bones
Skip the necktie gift because the way to Dad’s heart is with an unforgettable steak. Celebrate Father’s Day with a “fresh from the grill” steak that he can really sink his teeth into!
INGREDIENTS
15 Chopped Garlic Cloves
2 Tablespoons Olive Oil
1 Teaspoon Kosher Salt
4 T-Bone Steaks
1 Teaspoon Freshly Ground Pepper
Your T-bone steaks should be about 12 ounces each & 3/4 inches thick. In a small size bowl combine the chopped garlic, oil, salt and pepper. Rub the garlic mixture on both sides of the steaks. Prepare your grill and grill the steaks, covered, over a medium heat. Cook for 4 to 7 minutes per side depending on how rare you want them. You can also cook these steaks under your oven broiler 4 inches from the heat. Cook for 4 to 7 minutes. Remove from the heat and serve with a salad, baked potato or grilled romaine hearts. Serves 4
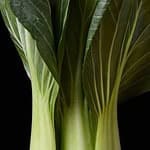
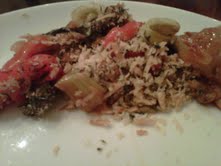
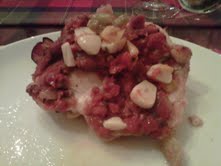
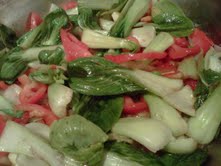 Bok Choy Gratin
I had a bunch of baby bok choy in my fridge that needed to get used before making its way to the trash can. I grew up in a household that didn’t believe in wasting food and it pains me to throw food out. I would rather create a disaster meal then throw food away. This is how I created this dish and it actually turned out quite tasty.
INGREDIENTS
1 Sliced Yellow Onion
1 Diced Tomato
10 Chopped Garlic Cloves
8 Ounces Unsalted Butter
6 Small Bunches Baby Bok Choy
1 Teaspoon Kosher Salt
1 Teaspoon Freshly Ground Pepper
1 Cup Panko Bread Crumbs
1 Cup Grated Parmesan Cheese
Preheat your oven to 350° F. Tear off the bok choy leaves, wash & dry them. In a large skillet melt the butter over a medium low heat. When the butter is melted add the garlic and onions. Stir and cook for 1 minute. Add the tomatoes and bok choy leaves. Season with the salt and pepper. Stir and cook for 2 minutes. Remove from the heat and pour into a large glass baking dish. In a small bowl mix together the panko bread crumbs and Parmesan cheese. Sprinkle the bread crumb mixture over the vegetables. Place, uncovered into the oven and bake for 35 minutes until done. Remove from the oven and serve hot. Serves 4
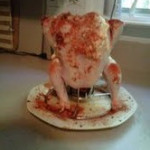

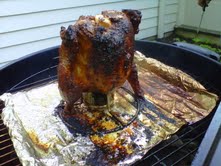
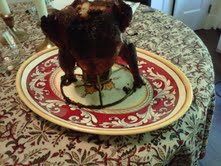
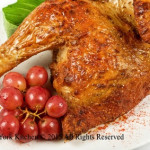
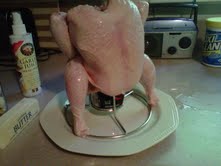 Organic Beer Can Chicken
I love cooking this chicken on a charcoal grill. You can use a gas grill or cook in the oven if you like. Cooking time should be between 1 to 2 hours depending on the size of your chicken and how hot your grill is. Be careful not to spill the HOT beer and burn yourself!
INGREDIENTS
1 Large Organic Whole Chicken
1/3 Cup Victoria’s Dry Rub or Your Favorite Spices
2 Fresh Limes
12 Garlic Cloves
4 Ounces Butter
1/2 Can of Beer
Wash and pat dry your whole chicken. Remove any giblets from the cavity. Pour out half of the contents the beer. You can drink it if you’re thirsty and don’t like to waste good beer! Place the chicken over the half full beer can that you placed in the rack. You can get these beer can chicken racks at hardware stores or online. These racks are about $5 in the hardware stores. Williams Sonoma has one for $30 which is a bit much I think. Stuff the neck cavity with the 12 garlic cloves so that you seal in the vapors. Slice two limes and squeeze the lime juice all over the skin. Mix your spices with the butter and smear all over the bird. Place on a prepared grill and cook, covered, for 1 to 2 hours.The juices should run clear. Remove from the grill and transfer to a serving platter. Let sit for 10 minutes and then serve. The one that I made last night was incredibly moist and full of flavor. Serves 4
If you cook in the oven place the chicken on the rack in a pie pan with a cup of water added to the pie pan. Cook at 350° F for 1 to 2 hours. Use a meat thermometer checking the thigh to make sure that the temperature reaches 180° F. When done use tongs and a long fork to carefully transfer the entire rack in its upright position to a serving platter. Let stand for 10 minutes. Carefully remove the chicken from the rack.
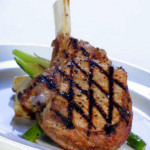
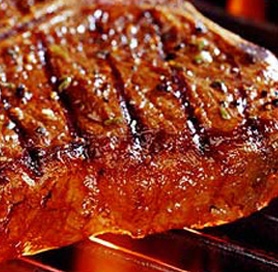
 Grilled Veal Chops
I love a thick grilled veal chop. For many of us, veal is a special treat, because it tastes so good. Veal is one of the leanest meats to eat and has the highest amount of protein of all meats. Veal is an ideal protein compliment to health conscious eaters who don’t want to give up meat.
INGREDIENTS
4 Veal Chops (12 Ounces Each/1 Inch Thick)
1/3 Cup Olive Oil
6 Tablespoons Lemon Juice
5 Crushed Garlic Cloves
1 Teaspoon Kosher Salt
1 Teaspoon Freshly Ground Pepper
In a medium size bowl whisk together the olive oil, lemon juice, garlic cloves, salt and pepper. Arrange the veal chops in a glass baking dish. Pour the marinade over the chops and turn to coat. Let the chops marinate for 1 hour. Turn the chops over after 30 minutes so that both sides absorb the marinade. Prepare your barbecue to a medium high heat. Remove the chops from the marinade. Grill the chops for 6 minutes per side for medium-rare or until cooked to your desired doneness. Transfer the chops to a serving platter and serve with asparagus. Serves 4
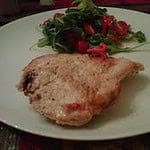
 Greek Yogurt Chicken
Because the chicken has marinated in the yogurt mixture overnight it comes out super moist. I love this recipe. If you don’t have a food processor then use a mixer. All you need is a little time to plan ahead.
INGREDIENTS
4 Chicken Breasts
10 Garlic Cloves
4 Green Onions
16 Ounces Plain Greek Yogurt
1 Teaspoon Kosher Salt
1 Teaspoon Freshly Ground Pepper
1 Teaspoon Red Pepper Flakes
Preheat your oven to 350° F. In a food processor chop the garlic, onions (both white and green parts). Pulse for 30 seconds. Add the plain Greek yogurt, salt, pepper and red pepper flakes. Pulse for another 30 seconds. Pour the yogurt mixture into a large ziplock bag. Add the chicken breasts and put in the refrigerator overnight. When you are ready to cook the chicken remove from the ziplock bag and place on a broiler pan lined with aluminum foil. Throw away the left over marinade. Place the chicken breasts on the broiler pan and let sit for 10 minutes. Place in the oven and cook for 45 minutes. Remove from the oven and transfer to a serving platter. Serves 4
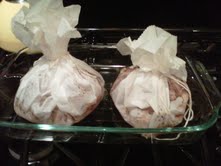
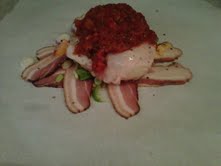
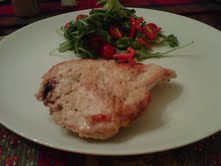
Chicken Breasts Cooked In Parchment Paper
I just cannot believe how easy it is to cook a meal in parchment paper. The chicken breasts came out very tender and flavorful. If you have not tried this method of cooking before you might want to give it a try.
INGREDIENTS
2 Chicken Breasts
8 Strips of Organic Bacon
1/2 Cup Chopped Green Onions
6 Chopped Garlic Cloves
1 Cup Salsa
1/2 Teaspoon Kosher Salt
1/2 Teaspoon Freshly Ground Pepper
1 Chopped Jalapeno Pepper
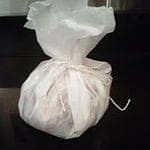
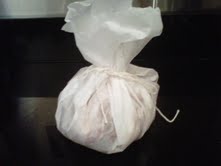
Preheat your oven to 350° F. In two large pieces of parchment paper place 4 strips each of the organic bacon. On top of the bacon sprinkle the chopped green onions, chopped jalapeno and chopped garlic. Place the chicken breasts on top of the bacon pile and salt and pepper the tops of the chicken. Place 1/2 cup salsa on top of each chicken breast. Close up the parchment paper up around the contents and tie the top with butcher string. Place in a baking pan and cook for 1 1/2 hours. Remove from the oven and let sit for 5 minutes. Open the parchment packages and transfer to either a serving platter or individual plates. Serve with a green salad and diced pineapple. Serves 2
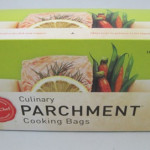
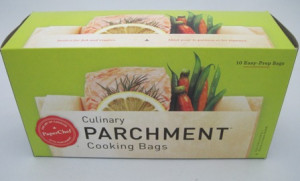 Cooking Parchment
I love cooking in parchment packets or “en papillote.” It gives big rewards without much effort. Cooking chicken or fish with vegetables in a sealed parchment paper packet may look fancy, but it’s actually a great no frills technique. Just place a few ingredients into the packets and let them do their work. You can prepare most ahead of time. They lock in flavor and moisture and are impressive looking. You can fold pretty much any way you want as long as you create a tight seal. Create your own recipes with protein, vegetables and herbs that you have on hand. Cook in the oven or on the grill.
Technique: Fold a 14×12” piece of parchment paper in half. Using kitchen shears cut the parchment into a heart shape. Arrange vegetables and herbs on one side of the paper. Top with fish or chicken. Add olive oil or butter and a splash of wine to keep the meat moist and create a sauce. Season with salt and pepper. Brush the edges of the paper with a beaten egg white for a tighter seal. Working from one end begin by tightly folding the open edge of the paper. Continue folding the paper’s open edge to form a seal. Transfer the packet to a rimmed baking sheet and bake or grill.

 Grilled Split Chicken
I love this recipe. It is so easy to make and absolutely delicious. Goes well with grilled zucchini.
INGREDIENTS
1 Cup Olive Oil
1 Cup Black Olive Tapenade
2 Sprigs Thyme
1 Tablespoon Freshly Ground Pepper
Split a while chicken in half. In a large size bowl combine the olive oil, tapenade, pepper and thyme. Take the split chicken pieces and soak both sides in the olive oil mixture. Keep the chicken in the olive oil mixture, marinating, for 2 to 4 hours or overnight. Cover and place in the refrigerator. Prepare your grill and remove the bowl of chicken. Let the chicken sit out for 15 to 20 minutes and throw away the olive oil marinade. Place on the grill and cook on each side for 20 minutes. Remove from the grill and transfer to a serving platter. Serves 2
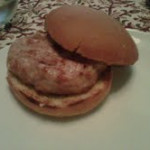
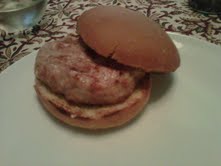
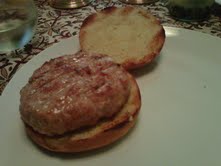 Chicken Asiago Burgers
These burgers are absolutely EXCELLENT! A nice change of pace, but still satisfies the burger urge.
INGREDIENTS
2 Pounds Ground Chicken
1 Teaspoon Kosher Salt
1 Teaspoon Freshly Ground Pepper
1 Teaspoon Garlic Powder
1 Tablespoon Olive Oil
1 Cup Grated Asiago Cheese
4 Hamburger Buns
Mix the ground chicken, salt, pepper, garlic powder, olive oil and Asiago cheese in a large size bowl. Form the mixture into 4 patties. Place the patties on a plate. Cover with plastic wrap and place in the refrigerator for 2 hours. Preheat your grill. When you are ready to grill the burgers remove from the fridge and let sit out for 10 minutes. You want to take the chill off of the meat before putting on the grill. Cook the burgers on the frill for 5 minutes on each side until well done. Place one burger on the bottom half of each bun. Garnish as you like. Serves 4


