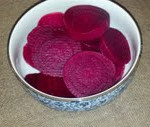
 Simple Beets
Even as a kid I have loved beets and I still love them today. Beets are one of those vegetables that I could eat every day. Whenever I go to the farmer’s market the first thing I usually pick up are an assortment of fresh beets. I usually pickle them, but sometimes I like to make Simple Beets which are basically naked little things. When choosing beets it is important to select small or medium sized beets. The roots should be firm and the skin smooth & deep in color. The smaller beets may be so tender that you may not have to peel them after they are cooked. Pass on beets that are soft or have bruises or spots. These are signs that the roots are old, fibrous and tough.
INGREDIENTS
1 Bunch Beets
1 Tablespoon Kosher Salt
Wash your beets and trim the ends before cooking. Fill a medium size pot with water and add the kosher salt and washed beets. Bring to a boil and cook for 30 minutes or more depending on how large your beets are. Beets are cooked when you can easily insert a fork or the tip of a knife into the beet. When done, remove from the heat and gently rinse under cold running water. The skins should slip right off. Slice the beets and serve warm or at room temperature. You can dress the beets with a vinaigrette dressing or add sweet onion, parsley and hardboiled egg slices for a healthy salad. If you are mixing beets with other vegetables or adding to a salad it is a good idea to cook and dress the beets separately and add them last because their intense color will seep into all of the other vegetables. Beet juice can stain your skin so wearing kitchen gloves may be a good idea when you are handling the beets. If your hands do become stained all you need to do is rub some lemon juice on them to remove the beet stain. Serves 2
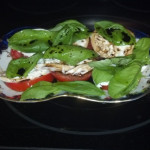
 Burrata, Tomato & Basil Salad
This salad is very similar to a caprese salad. The burrata is silky on the outside and creamy on the inside which boasts a richly sweet and milky flavor. Since burrata is a delicate cheese it should be handled as little as possible. I love this salad so much. It is great as a main dish by itself or layered with strips of grilled steak. It also makes a nice appetizer or side dish. The perfect combination of flavors and textures make this delicious salad truly magical.
INGREDIENTS
3 Ripe Tomatoes
12 Ounces Burrata Cheese
25 Fresh Basil Leaves
Extra Virgin Olive Oil
Balsamic Vinegar
Kosher Salt
Freshly Ground Pepper
Cut the tomatoes into slightly thick slices. Very carefully slice the burrata cheese into slices. On a large shallow platter layer alternating the slices of tomatoes and burrata and top with basil leaves. Drizzle the salad with the olive oil and balsamic vinegar. Season with kosher salt and freshly ground pepper. Serve immediately. Serves 6
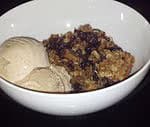
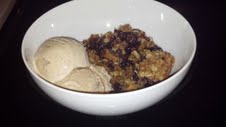
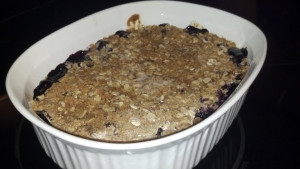 Victoria’s Blueberry Crisp
This is a great dessert to make while blueberries are in season. If you bring my blueberry crisp to a picnic or potluck you are sure to be a big hit.
INGREDIENTS
4 Cups Fresh Blueberries
1/4 Cup Light Brown Sugar
4 Tablespoons Unbleached Flour
1 Teaspoon Ground Cinnamon
Topping:
1/2 Cup Old Fashioned Oats
1/2 Cup Unbleached Flour
1/2 Cup Light Brown Sugar
1/4 Cup Sugar
1/2 Teaspoon Ground Cinnamon
12 Tablespoons Cold Butter
Preheat your oven to 350° F. Pour the blueberries into a 9 inch glass baking dish. In a medium size bowl combine 1/4 cup light brown sugar, 4 tablespoons unbleached flour and 1 teaspoon ground cinnamon. Pour the mixture over the blueberries and gently mix. For the topping combine 1/2 cup old fashioned oats, 1/2 cup unbleached flour, 1/2 cup light brown sugar, 1/4 cup sugar, 1/2 teaspoon ground cinnamon and 12 tablespoons gold butter in a medium size bowl. Cut in the butter until the mixture looks like coarse crumbs. You can achieve this by using either a pastry blender or two forks. Sprinkle the topping over the blueberries and bake in the oven for 50 minutes until your crisp is bubbly around the edges. Serve warm with vanilla ice cream. Serves 6

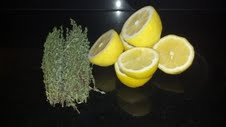 Thyme Lemonade
Since the weather has turned hot I have to admit that I’ve been really into making iced drinks lately. Lemonade is hard to beat as the summer beverage. Here is a nice variation on the much loved basic lemonade. If you want to make this an adult drink then add 6 ounces of vodka and make sure to hide your “amped” lemonade from the kids!
INGREDIENTS
1 Bunch Thyme
1 1/2 Cups Sugar
1 1/2 Cups Water
2 Cups Fresh Lemon Juice
2 Cups Cold Water
Extra Thyme Sprigs For Garnish
Lemon Slices For Garnish
In a medium saucepan bring the thyme, sugar and water to a simmer over a medium heat. Stir until the sugar dissolves. Remove from the heat and let cool for 15 minutes. Strain the sugar water into a pitcher filled with ice. Now stir in the lemon juice and the cold water. Serve over ice with thyme sprigs and lemon slices for garnish. Serves 4
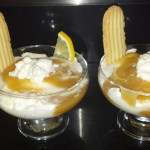
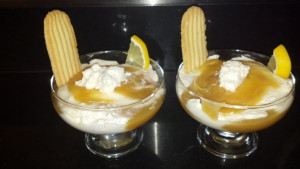 Lemon Parfait
This dessert looks like it took all day to make, but actually is pretty easy. The only trick is that you need to chill for a few hours so you will need to plan ahead a bit.
INGREDIENTS
1/2 Cup Strained Lemon Juice
1 Tablespoon Grated Lemon Rind
3 Large Egg Yolks
1 Cup Sugar
3 Large Egg Whites
1/8 Teaspoon Cream of Tartar
1/8 Teaspoon Kosher Salt
1 Cup Chilled Heavy Cream
3 Tablespoons Powdered Sugar
Quartered Lemon Slices For Garnish
8 Small Shortbread Cookies
In a small saucepan combine the egg yolks, 1/2 cup sugar, lemon juice and lemon rind. Beat well until combined. Cook over a medium heat. Stir CONSTANTLY until the mixture gets thick, but do not let it boil. Remove from the heat and pour into a large bowl to cool. In a separate large bowl beat the egg whites with the cream of tartar and kosher salt. You want the egg whites to have peaks. Now, add the remaining 1/2 cup sugar a little bit at a time. Fold the egg white mixture into the lemon mixture. In a chilled bowl beat the whipping cream until it has peaks. Always be careful not to over beat so you don’t end up with butter. Beat in the powdered sugar. Take 4 parfait glasses and place 1 broken shortbread cookie at the bottom of each glass. Place the lemon mixture over the broken cookie and alternate with the whipped cream until you come to the top of your parfait glass. Do this to all 4 parfait glasses. Garnish with quartered lemons and 1 whole shortbread cookie. Chill for 3 hours. Serves 4
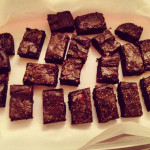
Root Beer Brownies
The small amount of root beer extract really brings out the chocolate in these brownies. Wow, what a dessert!
INGREDIENTS
12 Ounces Softened Butter
2 1/4 Cups Sugar
1 1/4 Cups Cocoa
1/2 Teaspoon Kosher Salt
1 Teaspoon Baking Powder
1 Tablespoon Vanilla Extract
4 Tablespoons Root Beer Extract
1/4 Cup Cold Brewed Coffee
4 Large Eggs
1 1/2 Cups Unbleached Flour
2 Cups Semi-Sweet Chocolate Chips
1/2 Cup Demerara Sugar
Preheat your oven to 350° F. Line a 9×13 inch baking pan with parchment paper. In a large size bowl place the softened butter. Add the sugar to the butter and mix until combined. Add the eggs and beat until smooth. Add the coffee, vanilla and root beer extract and stir. In a separate large bowl combine the cocoa, salt, baking powder and flour. Stir until well combined. Finally add the chocolate chips and stir. Spoon the batter into the prepared pan. Sprinkle the top of the batter with the demerara sugar. Bake the brownies for 30 minutes. The brownies should feel set both on the edges and in the center. Remove from the oven and cool completely on a wire rack before cutting and serving. Makes 24 Root Beer Brownies.
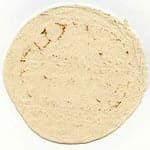
 Homemade Tortillas
INGREDIENTS
2 Cups Unbleached Flour
1 Teaspoon Kosher Salt
1/4 Cup Lard
1 Tablespoon Vegetable Oil
1/2 Cup Warm Water
In a large bowl stir together the flour with the salt. With a pastry blender cut in the lard until the mixture looks like meal. Drizzle the vegetable oil over the mixture and then stir in the warm water with a fork to form the dough. On a lightly floured surface knead the dough for 4 minutes until the dough is smooth and elastic. For the dough into a ball and cover with plastic wrap. Let rest for 1 hour. Heat a dry skillet over a medium low heat until hot. Cut the dough into 12 equal pieces and form into 12 balls. On a lightly floured surface roll out the balls one at a time. Use just enough to prevent from sticking. Keep the remaining dough covered with the plastic wrap. You will want each ball rolled out to about 7 inches round and the thickness should be even. Cook one tortilla while you roll out the next one. Cook for 45 seconds on each side. Move the tortilla around to make sure that the tortilla is evenly cooked. Remove from the skillet and transfer to a clean kitchen towel to stack when done cooking each one. Cover with the kitchen towel until ready to serve. Makes 12 tortillas.

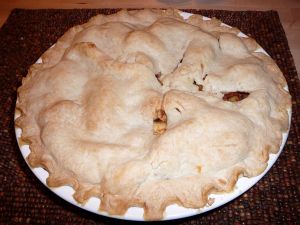 4th of July Apple Pie
What is more American than Apple Pie? No 4th of July celebration is complete without a delicious homemade Apple Pie. The secret here is to use a combination of tart apples, like Winesap or Granny Smith, and sweet apples like Fuji, Jonagold, Idared or Mutsu. Your patriotic crowd will love this pie.
INGREDIENTS
3 Tablespoons Unbleached Flour
2 Teaspoons Grated Lemon Zest
1/2 Teaspoon Cinnamon
1/4 Teaspoon Ground Allspice
1/8 Teaspoon Kosher Salt
2/3 Cup Sugar
1 Tablespoon Sugar
2 1/2 Pounds Apples Cut Into Wedges
1 Tablespoon Fresh Lemon Juice
Pastry Dough
1 Lightly Beaten Egg
Preheat your oven to 425° F. Place a large baking sheet in the middle of the oven.
In a large bowl whisk together the flour, lemon zest, cinnamon, allspice, salt and 2/3 cup sugar. Gently toss with the apples and lemon juice. Roll out 1 piece of your dough on a lightly floured surface with a lightly floured rolling pin. You want your dough to be about 13 inches round to fit into a 9 inch glass pie plate. Keep the other piece of dough in the refrigerator. Trim the edge making sure to leave a 1/2 inch overhang. Chill the shell while rolling out the dough for the top crust. Roll out the top piece of dough on the lightly floured surface into an 11 inch round. Now you are ready to spoon your filling into the pastry shell. Cover with the top and trim leaving a 1/2 inch overhang. Press the edges together then crimp. Lightly brush the top of the pie with the egg and then sprinkle all over with the remaining tablespoon of sugar. Cut 3 steam vents in the top of the crust with a small sharp knife. Bake the pie on the hot baking sheet for 20 minutes. Then reduce the oven temperature to 375° F. and continue to bake for 40 minutes until the crust is golden and the filling is bubbling. Remove from the oven and cool your yummy pie on a rack for at least 2 hours. Serves 6
Pastry Dough
INGREDIENTS
4 Cups Unbleached Flour
1 3/4 Cups Shortening
1 Tablespoon Sugar
2 Teaspoons Salt
1 Large Slightly Beaten Egg
1 Teaspoon Red Wine Vinegar
1/2 Cup Water
Mix the flour, shortening, sugar, salt, egg, red wine vinegar and the water together. Place in a ziplock bag. Let the mixture sit in the fridge for 1 hour. Separate into 4 balls of dough. Roll out on a floured surface and place in 9 inch pie pans. Bake in a preheated 425° F oven for 12 minutes for the unfilled crust or use the recipe for a filled pie crust. Makes 2 crusts with tops. The unbaked dough may be kept for 1 week in a ziplock bag in the fridge.

 Nana’s Calzone
Nana’s Calzone is a delicious lunch or it can be served cold on a summer day. When I serve it warm, I top it with a bit of marinara sauce. All that is needed to complete the meal is a nice tossed salad.
INGREDIENTS
1 Pound Prosciutto
2 Pounds Ricotta Cheese
1 Cup Grated Parmesan Cheese
3 Eggs
1/2 Teaspoon Kosher Salt
1/2 Teaspoon Freshly Ground Pepper
Olive Oil
1/2 Pound Cubed Mozzarella Cheese
1 Pound Pizza Dough (Store Bought or Homemade)
1 Cup Marinara Sauce
Preheat your oven to 350° F. In a large size bowl mix together the prosciutto, ricotta, Parmesan, eggs, salt and pepper. Set aside. Stretch the pizza dough to make a 12 to 14 inch round. Leave the dough slightly thick so that the filling will not ooze out. Put the dough on a lightly oiled pizza pan. Avoid the edges of the pan. Spoon the filling onto half of the pizza round and fold the other half of the dough over to form a large turnover. Press the edges tightly together, with your fingertips, until all of the dough is sealed. Moisten the top and sides of the calzone with olive oil by using the palm of your hand to spread it evenly. Cut a few slits in the middle of the calzone. Put some cubes of the mozzarella and a couple tablespoons full of marinara sauce in each of the slits. Use all of the cheese and sauce. Bake the calzone in the oven for 45 minutes until golden brown. I like to use the medium rack in the oven. Remove from the oven and let sit for 20 minutes. This will allow the cheese to set. Cut into slices and serve as a lunch dish or an appetizer. Top with more marinara sauce. As an appetizer serves 8 and as a main course serves 1 to 2.
Basic Pizza Dough
3/4 Cup Lukewarm Water
1 Package Dry Yeast
1/8 Teaspoon Sugar
3 Cups Unbleached Flour
1 Teaspoon Kosher Salt
1/4 Cup Olive Oil
Put the lukewarm water in a small bowl and sprinkle the yeast and sugar over it. Let stand in a warm and draft free place for 15 minutes until a foam forms on the top. Make sure that the water is NOT hot or it will kill the yeast. In a large bowl combine 1 cup of flour and the salt. Add the olive oil to the yeast mixture and pour the mixture into the bowl of flour. Slowly add the second cup of the flour. Stir with a wooden spoon. When the dough begins to pull away from the sides of the bowl turn it out onto a floured board. Gradually knead the rest of the flour into the dough until the dough is smooth and elastic. The dough should no longer be sticky. Depending on how moist your dough is will depend on how much flour you will need. Coat a medium bowl with olive oil and place the dough in it. Roll the dough to coat on all sides. Cover tightly with plastic wrap and set in a warm place for about an hour. The dough should double in size. To test if the dough has doubled gently press your fingers into it. If your fingers leave an impression then the dough is ready.
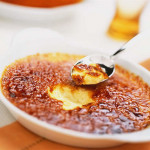
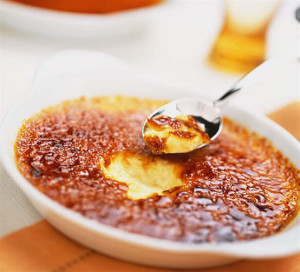 Classic Crème Brûlée
Crème Brûlée is also known as burnt cream, crema catalana or Trinity cream. Consisting of a rich custard base topped with a layer of hard caramel it is normally served cold. Crème Brûlée is traditionally flavored with vanilla, but it is sometimes flavored with lemon or orange zest. The earliest known Crème Brûlée appeared in François Massialot's cookbook written in 1691. Wherever Crème Brûlée got its start and whatever it is called I know one thing for sure I love this dessert.
INGREDIENTS
1 Quart Heavy Cream
1 Split & Scraped Vanilla Bean
1 Cup Vanilla Sugar (Divided)
6 Large Egg Yolks
2 Quarts Hot Water
Preheat your oven to 325° F. In a medium saucepan pour the cream and add the vanilla bean and its scraped contents. Cook over a medium high heat and bring it to a boil. Remove from the heat and cover with a lid. It will need to sit for 15 minutes. Take out the vanilla bean and either throw it away or save for another use. In a medium size bowl whisk together the egg yolks and 1/2 cup of the sugar. Make sure that the sugar and egg yolks are well blended and just begin to lighten in color. Add the cream a little bit at a time making sure to stir constantly. Pour into six 8 ounce ramekins. Put the ramekins into a large roasting pan. Pour the hot water into the roasting pan just until it hits halfway up the sides of the ramekins. Bake for 40 to 45 minutes just until the Crème Brûlée is set, but still a bit wobbly in the center. Remove the ramekins from the pan and put into the refrigerator for 3 hours. When you are ready to serve take out of the fridge at least 30 minutes before browning the sugar on the top. Take the left over 1/2 cup of vanilla sugar and divide equally among the 6 ramekins. Spread evenly on top. Using a torch melt the sugar to form a crispy top. If you do not have a torch then you can use the broiler. Before serving let the Crème Brûlée sit for 5 minutes. Serves 6


