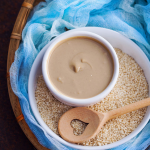
Tahini, a roasted sesame seed paste, is the key ingredient in hummus recipes, but you can also use tahini these ways:
Nut-Free Peanut Sauce
Combine with soy sauce, lime juice, brown sugar, and crushed red pepper. Check labels to be certain that your tahini is nut-free.
Veggie Burgers
Add a spoonful to help bind bean or lentil burger mixture together instead of using an egg.
Oatmeal
Drizzle over a bowl of oatmeal topped with sliced bananas, a dollop of yogurt, and maple syrup.
Dressing
Stir together with lemon juice, olive oil, and minced garlic as a dressing for salads or grain bowls.
Brownies
Swirl into a pan of brownie batter before baking to balance the sweetness of the chocolate.
©Tiny New York Kitchen © 2021 All Rights Reserved

Build A S’Mores Tray
Here’s a great way to take everything from your kitchen to the campfire. Get all your ingredients together on one tray. It also lets everyone pick and choose what they want and makes cleanup easy.
Add a flavor to the classic s’more or invent a new combination with these ingredients.
Choose A Base: Graham crackers, wafers, cookies, or plain crackers.
Add A Flavor: Jams, fresh fruit, nut butters, spreads, or a dash of cinnamon.
Add A Chocolate: White chocolate morsels, milk chocolate bars, peanut butter cups or caramel filled chocolate squares.
Top It Off: Finish with a toasted marshmallow and another cracker or cookie.
“Work With What You Got!”
©Tiny New York Kitchen © 2020 All Rights Reserved

Kick up popcorn’s flavor with easy and creative combinations.
ITALIAN STYLE
Toss popcorn with finely grated Parmesan, a sprinkling of Italian seasoning, and red pepper flakes.
SAVORY SESAME
Drizzle lightly buttered popcorn with a small amount of sesame oil, then sprinkle with sesame seeds, and crushed seaweed snacks.
CRABBY CORN
Sprinkle buttered popcorn with Old Bay seasoning, kosher salt, and a small pinch of cayenne.
TEX MEX
Toss buttered popcorn with taco seasoning, garlic powder, and a pinch of chipotle chili powder.
CINNAMON SUGAR
Toss hot popcorn in cinnamon sugar immediately after popping to create a kettle corn-like crunch. Or combine sugar with a small pinch of pumpkin pie spice and toss for pumpkin kettle corn.
ALMOND JOY
Toss popcorn with mini chocolate chips, coconut flakes, and chopped roasted almonds.
SALTED CARAMEL
Sprinkle hot buttered popcorn with turbinado sugar, crushed hard caramel candies, and sea salt.
“Work With What You Got!”
©Tiny New York Kitchen © 2020 All Rights Reserved

Beer isn’t just for drinking. It’s also the secret ingredient in some of Tiny New York Kitchen’s favorite recipes, from stews to pasta sauce.
Depending on which brew you choose, you can add richness to stews and braises, a bright zing to sauces, and make baked goods extra tender and tasty. It’s great with chocolate. You can also pair it with your meals, just like wine, to make your dishes taste even better.
LAGER
Lager is the most popular beer for drinking. Smooth, light-bodied, and slightly floral, it goes with just about any dish, especially cheese. It’s also great to bake with. The bubbles in this beer add extra lightness and tenderness to all sorts of baked goods.
PILSNER
Clean, crisp, and slightly citrusy, this beer is refreshing on its own. Serve it with seafood or a simple tomato and basil pizza. Use it for quickly simmering shrimp because it won’t overwhelm the delicate, sweet flavor of the seafood.
STOUT
This rich dark beer has notes of coffee and caramel, great for sipping in colder weather. Pair it with heartier dishes like chili or steak and potatoes. In baking and cooking, stout makes chocolate cupcakes taste even more chocolaty and slow-cooked meats even richer.
AMBER ALE
You will know this beer by its reddish-brown color. It has a smooth, malty flavor that makes it a crowd-pleasing choice for your next party. Try this beer with grilled or roasted meats and barbecue. For cooking, it’s great in a glaze for pork or in a cheese sauce.
“Work With What You Got!”
©Tiny New York Kitchen © 2020 All Rights Reserved
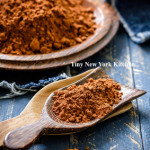
Cocoa powder is mostly used for pudding and cakes. 100% cocao powder also adds rich earthiness to rubs for roasted or grilled meat.
“Work With What You Got!”
©Tiny New York Kitchen © 2019 All Rights Reserve

Going out for dinner on Valentine’s Day is a risky affair. Even the best restaurants can have “overload difficulties” on such a busy night where couples have expectations of restaurant perfection. A better way to manage expectations is to take control of them yourself. Food is a language of love. You know what you like and what your loved one likes. No need to worry about cheesy love songs or a perfumed soaked lady sitting next to you. Nothing says I love you more than taking the time to make a special meal for the person you love. Visit the local farmers’ market, butcher, or seafood shop to buy their favorite seasonal ingredients. Come up with a meal that celebrates love. Turn off the lights, fire up all the candles and put on your favorite music.
Keep it easy and made make it special. Plan out the meal from beginning to end to get organized and make sure you have a solid menu. If you’re not a seasoned cook make sure to keep it simple and I recommend not trying to make complicated dishes that you’ve never made before. Make it easy with three courses. Begin with a beautiful cheese plate. Embrace easy, big impact dishes. Start off with prosciutto-wrapped scallops finished with a squeeze of lemon. Warm things up with braised short ribs or steaks finished off with butter and herbs. Keep desserts simple, but sweet. Decorate bakery cakes with fresh fruit or edible flowers or warm up slices of pie and top with caramel sauce and a gourmet ice cream or try your hand at an easy dessert of chocolate pots de crème. Don’t forget that nice bottle of wine or champagne.
“Work With What You Got!”
©Tiny New York Kitchen © 2018 All Rights Reserved

The origins of the Yule log can be traced back to the Norsemen of northern Europe. Jol or Jule (pronounced “Yule”) was a festival celebrated on the Winter Solstice in honor of Joinir, also known as Odin, the god of ecstasy and death. Feasting and drinking would take place around bonfires, and fires would be lit in hearths.
This tradition spread to other parts of Europe, where tree worship was already part of pagan rituals. Households would venture into the woods on Christmas Eve and cut a log from an oak tree, which was then transported home, with much singing and merrymaking along the way. The log would be put on the fire, which would be kept burning for twelve days. This was believed to bring health and productivity to the family and their crops for the coming year and protect them from witchcraft and demons. When the fire was finally extinguished, a small piece of wood would be kept and used to light the next year’s log. Often the ashes would be scattered over the fields to ensure fertility.
Later on, the yule log was used as a decorative centerpiece for the Christmas table, and as stoves replaced giant household hearths, the pastry or chocolate logs we are familiar with today came into being.
“Work With What You Got!”
© Victoria Hart Glavin Tiny New York Kitchen © 2017 All Rights Reserved

The labels of many chocolate brands now state the amount of cacao (which means cocoa beans or any part of the beans, including cocoa butter) in their chocolate. The higher the cacao content, the less sugar the chocolate contains. You will also see chocolate described as bittersweet or semisweet. The USDA puts all sweetened dark chocolate, with cacao with a minimum of 35 percent chocolate liquor (ground cocoa beans without any additives), in the same category. These designations vary from brand to brand: one manufacturer’s bittersweet chocolate can be another manufacturer’s semisweet.
The average supermarket chocolate has 55 to 60 percent cacao. Chocolate with more than 60 percent cacao has what is considered a high cacao percentage. You may appreciate its bracing bitterness for eating, but because it contains so much more cacao than traditional chocolate, it can cause problems in cooking. Some contemporary cookbooks include the desired cacao percentage for the chocolate called for in their recipes, a plus for users. Unless a recipe specifically calls for a high-percentage chocolate, you are safest with a chocolate labeled 55 to 60 percent cacao.
Unsweetened chocolate is 99 to 100 percent cacao with no added sugar (some brands add a miniscule amount of vanilla and the emulsifier lecithin).
Milk chocolate has a minimum 10 percent chocolate liquor and includes dry milk solids and additional sugar to make it extra creamy and sweet. The latest trend is toward a higher percentage of chocolate liquor than in the past.
The best white chocolate has a base of cocoa butter, with sugar and milk solids added. Inferior brands substitute other plant fats, such as hydrogenated palm oil, for the cocoa butter, and are labeled white confectionary coating.
Traditionally, chocolatiers wanting a tiny, delicate chocolate coating for their creations would use couverture chocolate, which has a minimum of 32 percent cocoa butter to help it melt more smoothly and increase its fluidity. This extra measure of cocoa butter separated it from regular eating chocolate. However, the standard of today’s chocolate has improved to the point where virtually all chocolate has enough cocoa butter to be considered couverture, so the term is falling out of use.
Use a serrated knife to chop chocolate. Actually, think of shaving the chocolate from the block rather than hacking at it. Start at the corner of the bar and work backward, moving the knife about 1/4 inch after each cut. When you’ve lost the point of the corner, turn the bar around and start at another corner.
It may sound like a time-saver, but don’t use a food processor to chop chocolate. The chocolate can melt from the heat generated by the friction.
Small chunks of high-quality chocolate (pistoles) are a great time-saver if you need to melt chocolate and want to skip the chopping step. Semisweet chocolate chips may look similar, but they aren’t a good substitute. They contain a high percentage of lecithin, which helps them keep their shape during baking, so they don’t melt.
Chocolate has two enemies, heat and water. Use gentle heat when melting dark chocolate, as it scorches above 120 degrees F (milk and white chocolates scorch at 110 degrees F and need extra attention). Keep all surfaces and utensils dry. If you use a double boiler to melt chocolate, never allow the water to boil. The resulting steam can get into the chocolate and thicken it irretrievably, which is known as seizing.
The traditional method for melting chocolate is in a double boiler. It melts at below body temperature, so very hot water works fine. Just bring about 2 inches of water to a boil in the lower pan of the double boiler, then remove it from the heat. Place the top pan with the chopped chocolate over the low pan, making sure the top pan doesn’t touch the water. Chocolate holds its shape even when warm, so stir the chocolate frequently with a rubber or silicone spatula while it melts to check its progress. Be careful not to overheat chocolate, as it can scorch easily.
A variation on the double boiler method is good for large amounts of chocolate. Put the chopped chocolate in a wide stainless-steel bowl. Now place the bowl in a large skillet of very hot water, taking care not to splash any water in the chocolate. With a larger surface area of the chocolate exposed to heat, the chocolate will melt more quickly than in a double boiler.
You can melt chocolate in a microwave oven, but you must be careful not to overheat it. Use medium (50 percent) power for 40 seconds, and then check the chocolate. If it has not melted, continue to melt it, checking it at 20-second intervals. When you take it out of the microwave, the chocolate may not look melted, but sometimes brief stirring will push all or most of it to the melted stage. If all the chocolate has not melted, return it to the microwave for about 15 seconds at medium power. Because of the wide variability in the power put off by microwave ovens, you will have to learn to judge how quickly your microwave melts chocolate.
“Work With What You Got!”
© Victoria Hart Glavin Tiny New York Kitchen © 2017 All Rights Reserved

There’s nothing like the smell of freshly brewed morning coffee whether it’s perked, dripped or pressed, it’s the most favorite part of my day. Coffee is my morning ritual, but coffee is not just for mornings. If you have a bit of extra brewed coffee or grounds lying around then you can “perk” up the flavor of pretty much anything. The earthy flavor works in everything from meat marinades, sweet syrups, and many savory and sweet recipes using coffee as an ingredient, from tangy sauces for a tender filet mignon to a few teaspoons flavoring your favorite cakes or cookies. When added to a chocolate cake or a cookie, coffee brings out the flavor especially in chocolate. When the recipe calls for water just use what’s leftover in the pot. In many recipes you can just add a teaspoon of instant coffee or even espresso powder.
Add flavor fast to a roast by using that leftover coffee in your marinade, which also helps tenderize the meat. You can also use it to the braising liquid for beef short ribs. As the liquid cooks down, the coffee caramelized adds a delicious bittersweet dimension to the dish. I also like to stir a bit of coffee into barbecue sauce for grilled chicken or add some to homemade chili to round out the flavor.
Add coffee grounds to your spice shelf! The combination of ground coffee, kosher salt, and paprika will add flavor to your dishes. Use it to make a crusted pork or brisket dish. Rub the coffee ground spice combination to burgers before grilling them.
I like using instant espresso powder in my desserts. Unlike coffee grounds, espresso powder dissolves completely in hot water, eliminating grittiness that you may not want in most baked goods. Keep in mind that it packs a powerful punch, so a little goes a long way. Add a small amount to brownies or cakes. Freeze it with sugar for an easy granita or reduce it with sugar and cream to create a rich glaze.
“Work With What You Got!”
© Victoria Hart Glavin Tiny New York Kitchen © 2017 All Rights Reserved
German Chocolate is an American creation, created in 1852 when American Samuel German developed a dark baking chocolate for the American Baker’s Chocolate Company. The brand name of the product, “Baker’s German’s Sweet Chocolate,” was named in Samuel German’s honor.
The first published recipe for German’s chocolate cake appeared in a Dallas Morning Star newspaper on June 13, 1957 as the “Recipe of the Day.” Mrs. George Calay, a Texas homemaker, created the recipe. Mrs. Caley’s creation quickly caught on and its recipe, together with the delicious photos, spread all over the country, which is how America fell in love with German Chocolate Cake. The possessive form (German’s) was dropped in subsequent publications, which created the name of German Chocolate Cake that we know today and giving the false impression of German origin.
Thank you Samuel German and Mrs. Caley!
“Work With What You Got!”
© Victoria Hart Glavin Tiny New York Kitchen © 2016 All Rights Reserved


