
Tips to make every experience in the kitchen successful!
1. Set up your workspace by gathering clean tools, bowls, and utensils. Make sure to keep a trashcan within reach.
2. To create an egg wash, whisk together a large egg with one tablespoon of water until smooth. Use as a glue to seal pastries, then brush on top for a glossy appearance.
3. Peel tomatoes with ease by cutting an X in the top, and then simmer in a pot of hot water for 15 to 30 seconds. Cool down and the skin will fall right off.
4. Get comfortable. Wear comfortable clothes and an apron when you work in the kitchen and you won’t have to worry about getting dirty.
5. Invest in a baking scale. Scales are not only an accurate way to measure your cooking ingredients, but they streamline the entire process.
6. Always read and re-read your recipes before you start cooking.
7. Clean as you go.
8. Use 2 skewers instead of 1 when grilling or roasting to prevent your food from spinning.
9. Learn to practice the rule of thumb to check the readiness of steak.
10. To prevent butter from over-browning in your pan, add a little bit of lemon juice.
11. Embrace salt. Don’t be afraid to use salt. It pulls the flavors out of your dishes. Cook with kosher salt and season with sea salt.
12. No luck finding shallots? Replace with a combination of onions and garlic.
13. After handling garlic, rub your fingers on stainless steel, like your skink, to get rid of the odor.
14. Ovens can lie. Place a second thermometer in your oven to ensure proper preheating temperatures.
15. Ignore cooking times. Check your dishes by using your own senses (smell, taste, touch) to decide when they are done.
16. The most versatile and important tool is a sharp chef’s knife.
17. Learn all the different ways to cook an egg.
18. When poaching an egg, add a teaspoon of white vinegar to simmering water to help keep the yolk from breaking.
19. For a great hardboiled egg every time, bring your pot to a boil and then turn off the heat. Let your eggs sit in the heated pot for 12 minutes and then transfer to cold water.
20. Crack eggs on a paper towel on the counter (no shells and makes for easy cleanup.
21. Make an ideal sunny-side egg by covering your pan with a lid and letting the steam cook your egg. No flipping required.
22. Always taste your food before seasoning.
23. Anchor your cutting board to the counter with a damp paper towel to keep things steady and safe. You could also use a dish towel instead of a paper towel.
24. Hold a knife properly. Pinch the blade instead of gripping the handle.
25. Don’t rinse pasta.
26. Substitute half a lemon and half an orange as a replacement for a Meyer lemon.
27. When sautéing garlic, use sliced garlic instead of minced to prevent burning.
28. Invest in a seasoned cast iron skillet. This kitchen staple distributes heat evenly and is easy to clean.
29. Remove tough stems on leafy greens by pinching the stem and gently pulling off the leaves with your other hand.
30. If your recipe calls for buttermilk, you can use regular milk with lemon juice.
31. Prepping salad before serving is a huge time saver. Layer all the ingredients in a bowl and don’t add the dressing when it’s time to serve.
32. Keep your spices away from sources of heat like the stove or lights. Herbs and spices can lose their flavor when exposed to humidity and heat.
33. Save old, stale bread to make breadcrumbs in a food processor. You can freeze them for up to 6 months.
34. Let steaks come to room temperature before seasoning and grilling.
35. Store fresh herbs in a glass of water in your refrigerator.
36. To prevent tears, cut off the root of the onion before you slice.
37. For crispy fries or chips; slice the potato, then remove the starch by soaking in water for one hour before baking.
38. Celery getting floppy? Try wrapping it in aluminum foil before storing in the refrigerator.
39. Soften hard brown sugar by placing a piece of dry bread in the bag overnight.
40. Roll citrus on the counter using the palm of your hand to help release all of the juice pockets.
41. -50. Kitchen Pantry Essentials: Olive Oil, Flour, Broth, Salt, Brown Rice or Pasta, Beans, Vinegar, Sugar, Eggs, and Soy Sauce.
51. Increase the shelf life of a halved avocado by keeping the pit intact and placing it in your refrigerator.
52. To prevent sliced apples from browning, lightly squeeze lemon or lime juice on the pieces.
53. You can store butter in the freezer for up to 6 months.
54. Honey is a natural preservative and will never spoil.
55. To last longer, opened flour bags can be stored in the freezer.
56. Mushrooms should be kept dry, as they can easily soak and store water.
57. Never overcrowd your skillet with food. The heat will not distribute evenly.
58. Use an egg slicer to cut small fruits like kiwis.
59. Recipes are only a guideline. Feel free to substitute items that cater to your personal preferences.
60. To rehydrate sun-dried tomatoes, soak them in hot water or stock for about 20 minutes.
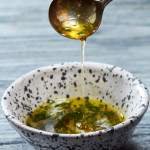
61. The basic ratio to make a classic vinaigrette is 3 parts oil to 1 part vinegar.
62. To keep garlic from going rancid, always store it at room temperature.
63. Keep knives sharp by using a sharpening tool frequently. A sharp knife is important for safety and efficiency.
64. Purchasing and preparing a whole chicken is cost-effective and resourceful.
65. Honey stuck in a jar? Place the container in hot water for about 5 minutes to loosen up the sticky residue.
66. Safely chop odd-shaped vegetables by cutting off both ends for an even surface.
67. Create simple syrup by simmering 1 cup of water and 1 cup of sugar in a medium heated pot until the sugar dissolves. Bottle and store in the refrigerator for up to 2 weeks.
68. Freeze leftover tomato paste in small ice cube containers.
69. To soften butter, cut slices into a bowl and let sit at room temperature for 10 to 15 minutes.
70. When serving ice cream to large groups, ditch the ice cream scoop. Break oven the whole container and slice the ice cream into portions.
71. If you need to grate soft cheeses, freeze the cheese for 30 minutes for a cleaner slice.
72. A cutting tool called a mandolin can be your best friend. It allows you to perfectly julienne, slice, and dice vegetables every time. Always slice slowly and use the safety guard to prevent you from cutting your finger.
73. When sautéing, it is important to first heat the pan, then heat the oil, then add the ingredients.
74. Moisturize dried coconut by adding a sprinkle of milk and letting it sit for 10 minutes.
75. Prevent bacteria growth by cooling hot food in a shallow dish.
76. Make stock in large quantities and freeze in plastic bags for later use.
77. Use Greek yogurt as a healthy substitute for mayo, sour cream, heavy cream and more.
78. Before baking, remove butter and eggs from the refrigerator and let them reach room temperature.
79. Invest in high-quality extra virgin olive oil for special meals or to drizzle over dishes to accent flavors.
80. Let cooked or grilled meat rest at room temperature before serving.
81. Plunge vegetables in ice water after blanching to help maintain a bright color.
82. For easy clean-up, line baking sheets with parchment paper.
83. Save money by purchasing in-season fruit and vegetables. You can freeze and store in airtight containers to save for later.
84. Always taste your dishes before serving.
85. Never over-season seafood. You want to still be able to taste the flavor of the fish. Simply use lemon juice, salt, and pepper.
86. Look for ground beef that has been freshly ground.
87. To preserve flavor and prevent burning, it’s important to cook slow and keep your heat low.
88. Always measure when baking. Baking is a science and any wrong measurements can be disastrous.
89. Rice Cookers can be your personal kitchen assistants. Let them do all the tedious work and you will never worry about monitory and watching boil.
90. To make leafy greens last longer, wrap them in damp paper towels and place in a sealable plastic bag before storing.
91. Test oil in a pan before adding all of your ingredients. Throw a small piece in and make sure it sizzles before adding the rest.
92. When cooking with chile peppers, protect your hands and eyes by wearing rubber gloves. Or coat your hands in vegetable oil and wash them with soap and water immediately after handling.
93. Homemade meals are good for the heart and soul. Cook often and cook with others.
94. To prevent sogginess, do not dress salads for large parties. Serve, then allow guests to add their own dressing.
95. Seafood should never smell overwhelmingly fishy; that’s a sure sign that it’s starting to go bad.
96. Chill cookie dough before putting it on a baking sheet. This will help prevent your butter from flattening and losing its fluffy texture.
97. Remove seeds from chile peppers to help reduce heat.
98. Keep key kitchen appliances, like a blender, on your countertop to encourage frequent use.
99. Overcooked vegetables lose important enzymes and nutrients.
100. Disinfect wood cutting boards by hand washing with vinegar.
101. Always keep it simple and work with what you got!
“Work With What You Got!”
©Tiny New York Kitchen © 2019 All Rights Reserved

Turn out amazing treats with these easy tips and tricks to help you bake your best every time.
Measure Flour Accurately
Using a measuring cup to scoop directly from the bag can pack in too much flour, leading to dry, dense baked goods. Use the “spoon and sweep” method by gently stirring the flour in the bag with a spoon. Spoon the flour into your measuring cup. With the back of a knife, level off the cup and sweep the excess back into the bag.
Warm Eggs To Room Temperature
Room temperature eggs blend more easily in batter and dough, and whites whip up with bigger volume. Take eggs out of the refrigerator a couple hours before baking or add cold eggs to a large-size bowl. Cover with warm, not hot, tap water. Rest for 5 to 7 minutes while you measure other ingredients.
Test Your Baking Soda And Baking Powder
These leaveners help baked goods rise. If they aren’t active, quick breads and pancakes will be flat instead of fluffy. Spoon baking powder and baking soda into separate small bowls. Pour boiling water into baking powder. Pour distilled white vinegar into baking soda. If the ingredients fizz, they’re still active.
Measure Liquid And Dry Ingredients Separately
Too much or too little liquid can change the texture and taste of the finished recipe. Liquid measuring cups give you room to pour right up to the fill line without spilling. Use clear measuring cups with pour spouts for liquids. Use flat-bottomed measuring cups for dry ingredients and use the “spoon and sweep method.”
Prevent Overbaking
Know your oven’s quirks. All ovens run slightly differently, and some spots are hotter than others. Keep an eye on how your baked goods are browning, the temperature, and the time to make the best estimate. Use an oven thermometer to see if your oven runs hot or cold (a few degrees above or below what the dial says), and adjust accordingly. Set a kitchen timer, and check for doneness a few minutes early. Rotate your pan halfway through for even baking.
“Work With What You Got!”
©Tiny New York Kitchen © 2019 All Rights Reserved

As much as I love this hand-held summer superstar teamed or grilled, a little effort goes a long way in creating a more substantial summer side. I love cutting corn right off the cob, getting chunky clumps of corn kernels that I then lightly sauté – this brings out a bold sweetness. Sautéing tends to brighten the corn, and it holds up well on its own or tossed with other ingredients.
Please don’t open any ear of corn at the market looking for perfection. You can feel if it is a big intact fat ear. Corn holds up best cold and in its own packaging, the husk.
As soon as corn begins to warm, the sugars break down and corn gets starchy. Tearing it open exposes and warms the cob, and you’re ruining it for everyone.
To slice, hold the pointed stalk end in your hand like a handle, with the flat end on a clean cutting surface. Slice corn off the cob starting about halfway down, holding firmly running a knife down the cob. Go around the cob, then turn over to get the other half.
When sautéing, do not overcook. As soon as the corn darkens from its yellow-milky tone to a darker shiny kernel it is done. Remove from heat and to stop the cooking process, spread out on a sheet pan, and refrigerate just to cool.
“Work With What You Got!”
©Tiny New York Kitchen © 2019 All Rights Reserved

In theory, it should make little difference to your health whether you cook for yourself or let someone else do the work. But unless you can afford to hire a private chef to prepare meals exactly to your specifications, letting other people cook for you means losing control over your eating life, the portions as much as the ingredients. Cooking for yourself is the only sure way to take back control of your diet from the food scientists and food processors, and to guarantee you’re eating real food and not edible foodlike substances, with their unhealthy oils, high-fructose corn syrup, and surfeit of salt. Not surprisingly, the decline in home cooking closely parallels the rise in obesity, and research suggests that people who cook are more likely to eat a more healthful diet.
“Work With What You Got!”
©Tiny New York Kitchen © 2019 All Rights Reserved

Shop the peripheries of the supermarket and stay out of the middle. Most supermarkets are laid out the same way. Processed food products dominate the center aisles of the store, while the cases of mostly fresh food (produce, meat, fish, dairy) line the walls, Keep to the edges of the store and you’ll be much more likely to wind up with real food in your shopping cart. This strategy is not foolproof, however, since things like high-fructose corn syrup have crept into the dairy case under the cover of flavored yogurts and the like.

Fresh basil can be dried, but freezing holds the flavor better, and there are two easy methods.
1. Freeze Whole Leaves: Blanch basil leaves in boiling water for two seconds and immediately place in an ice bath. Dry the leaves completely, then place in a freezer-safe container, layered with parchment paper or wax paper, and freeze up to four months. For the best flavor, do not thaw before using.
2. Purée And Freeze: Remove the leaves from the stems and wash and dry them. In a food processor, purée the leaves with olive oil (use about a tablespoon of oil per cup of basil). Freeze the purée in ice cube trays, then transfer to a resealable plastic bag and freeze up to four months. To purée works best in soups, stews, and sauces.
“Work With What You Got!”
©Tiny New York Kitchen © 2019 All Rights Reserved

The word picnic was originally a 17th Century French word, picque-nique. Its meaning was similar to today’s meaning: a social gathering where each attendee brings a share of the food.
Going on a picnic sounds like a great idea, but it might feel a bit daunting if you haven’t been on one in a long time. Deciding what to eat, where to go and what supplies to take can seem like a big confusing task. Take away any picnic apprehension with some easy pre-planning and a supply checklist and you’ll be headed out for a great day in the sun with family and friends!
Get started with where you would like to go and find out what amenities are available at your chosen location. Are there pavilions with shade and picnic tables? Is there running water? Are grills permitted or available? Do you need to make a reservation? Once you have these core questions answered you’ll be able to plan your menu and supply list.
Supply Check List:
**Blanket, Chairs, Games, Music
**Tablecloth, Paper Towels, Wipes, Hand Sanitizer, Bug Spray, Sunscreen, Trash Bags, First Aid Kit
**Plastic Ware, Plates, Cups, 1 Sharp Knife, Plastic Bags Or Containers For Leftovers
**Cooler Bags Or Large Cooler With Wheels, Ice Packs, Bagged Ice Cubes For Drinks, Bottled Water
Depending on if you will be grilling or need to bring pre-prepared food, you can come up with countless menu options. Sandwiches and cold salads make for great picnic fare, or if grilling is an option, pre-marinated meals and vegetables, hot dogs, and corn on the cob are always delicious prepared outdoors. Remember to pack raw foods separately and keep them in the cooler until ready to cook.
“Work With What You Got!”
©Tiny New York Kitchen © 2019 All Rights Reserved
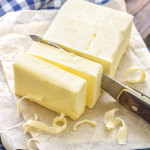
Salted & Unsalted Butter
Butter comes either salted or unsalted (also called sweet). Although all salted butter contains some amount of salt (salt used to be added as a preservative, but today it’s added primarily for flavor), some salted butters are noticeably salty. The problem is the word some. Since the amount of slat can vary from butter to butter, it’s best to use unsalted butter in kitchen and add as much salt as you’d like to each dish. If you prefer salted butter, use it – just remember to adjust the salt in each dish.
Cultured Butter
With this kind of butter, the cream is treated with cultures (like yogurt), allowed to ferment and then churned. The result is a fuller flavor with noticeable acidity. It’s easier to find cultured American butters these days, but as with salted butter, not all cultured butters are the same. A favorite, made by Vermont Creamery, has tang and produces a different sensation on one’s tongue due to its very high butterfat content. Cultured butter is very good to use in baking.
European Butter
The standards for the minimum amount of butterfat in butter are different in Europe and America. Abroad, the minimum is 82 percent; in America it’s 80 percent; everywhere it’s lower for salted butter. When you use European butter you’re likely to have a much richer dish. When I use European butter I don’t make any adjustments to my recipes to make allowances for the difference in butterfat.
Room Temperature Butter
Proper room temperature butter is still slightly cool; it’s really more about texture than temperature. The butter should be soft, but not squishy. The stick should hold it’s shape (a little pressure should leave an indentation), and it should be pliable – if you smash it with a spatula, you shouldn’t have to fight it.
Storing Butter
Keep butter in the refrigerator, well wrapped and away from foods with strong odors. It can be kept in the freezer for almost forever, but let’s call it a year. Defrost overnight in the refrigerator. Butter can keep out at cold room temperature for a day in a butter bell or crock. However, store butter in the refrigerator and then pull it out about 20 minutes before using it.
Clarified Butter
Clarified butter is a magical thing. It’s butter without water (you simmer it away) that won’t burn when used over a high heat. To clarify butter, place the butter in a saucepan, bring it to a simmer, let it bubble gently until it’s covered with foam. Keep simmering the butter until the foam sinks to the bottom and the bubbling just about stops. Line a fine-mesh sieve with cheesecloth or a coffee filter, pour the butter through it into a container, cool and cover. The butter will keep in the fridge for at least 2 months.
“Work With What You Got!”
©Tiny New York Kitchen © 2019 All Rights Reserved

Whether you’re hosting your first Thanksgiving or you’ve been making the family feast for decades, refer to our Thanksgiving timeline checklist to keep your prepping, shopping, and cooking on track for the big day.
1 TO 2 WEEKS BEFORE THANKSGIVING
Confirm the number of guests and plan your menu
Order your turkey
Plan your table setting, serving dishes, and decorations
Read through all your recipes to determine the food and cooking equipment you will need
Make your shopping and to-do lists
Shop for nonperishable food items, plus any cooks’ tools, cooking equipment and tableware you need
A FEW DAYS BEFORE
Prepare the turkey brine, but do not add the turkey, cover and refrigerate
Prepare food that can be made several days ahead of time, such as pie pastry and cranberry sauce
THE DAY BEFORE
Complete your food shopping
If you ordered a fresh turkey, pick it up or have it delivered
If you are brining the turkey, place it in the brine and refrigerate
Prepare dishes that can be made in advance such as soups and pies
Chop vegetables for side dishes; refrigerate in covered bowls or sealable plastic bags
Peel and cut the potatoes, place in cold water and refrigerate
Set the table
THANKSGIVING DAY
Refrigerate wines that need chilling
Prepare the stuffing and other side dishes
Prepare the turkey for roasting and put in the oven at the determined time
If you plan to stuff the turkey, do not stuff it until just before you put it in the oven
While the turkey is roasting, make the mashed potatoes
While the turkey is resting, make the gravy and cook or reheat the side dishes
Carve the turkey and serve your guests
Have a wonderful Thanksgiving!
“Work With What You Got!”
©Tiny New York Kitchen © 2018 All Rights Reserved
In a bowl mix baby greens or baby spinach with 1 peeled, quartered and thinly sliced apple or pear. 1 apple or pear for every 2 people. Pour over enough Maple Mustard Dressing to moisten. Transfer to salad bowls and garnish with toasted chopped pecans and crumbled gorgonzola cheese. Enjoy!
“Work With What You Got!”
©Tiny New York Kitchen © 2018 All Rights Reserved


