
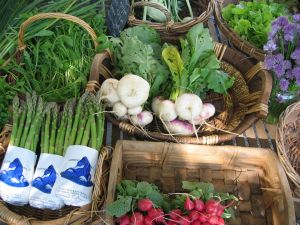
Easy Non-Salad Radish Ideas
I love radishes and am always drawn to the pretty color of a pile of radishes. Most of us just slice them into a green salad and the left-over radishes die a fateful death in the fridge. Here are some non-salad ideas that will expand your radish repertoire.
Radish Sauté – It doesn’t really occur to many people that you can cook radishes (as with cucumbers). It’s so simple to sauté radishes in olive oil or butter. They are delicious and make you appreciate radishes in a while new way.
Kimchi – Sprinkle the radishes with a bit of kosher salt and a little chili paste. Toss together and then pack them into a glass jar. Place in the back of the fridge for two weeks. Excellent on top of a burger.
Butter & Sea Salt – A fine butter and a pinch of sea salt on top of a radish slice make the perfect summer bite.
Radish “Sauerkraut” – Slice 1 pound of radishes and toss with 1 tablespoon of kosher salt. Pack tightly into a glass jar. Weigh down with a wrapped can and place on a shelf for two weeks. Makes a great addition to a sandwich.
Shaved & Lightly Poached In A Tasty Liquid – Slivers of radish dropped in a simmering stock and/or wine for 10 seconds are a great compliment to fresh fish. They let go of their bite, but retain some of their unique crunch we all know and love.
Braised – Sauté a little onion and garlic. Add in some radish quarters and a healthy splash of red wine. Cover and simmer for 20 minutes. Finish with a squeeze of lemon or dash of vinegar. Excellent draped over a grilled steak or pork chop.
Pickled – Slice some 1/4 inch coins and throw them into a jar. Pour brine over them (1 teaspoon kosher salt, 1/2 teaspoon sugar, 1/2 cup water and 1 1/2 cups cider vinegar). You may want to throw in a few dried chilis if you want a bit of spice. Let sit in your fridge for a week.
Soup – Simmered for 30 minutes in a soup. The radishes will take on a sweet and velvety character.
Grated – Grate the radishes along with some freshly grated ginger and use as a condiment with any oily fish such as trout or mackerel.
Roasted – Quarter and toss with a little olive oil. Season with kosher salt and freshly ground pepper. Roast in an oven at 425º F for 20 minutes. They should be a little brown and will become sweet. Toss them with some toasted nuts. They are a great side dish at any potluck picnic.

 Know Your Chiles
To keep your Mexican dishes authentically delicious, here are some pointers about chiles. If you were asked to identify one characteristic that would singularly describe Mexican dishes, the “chile” would be the answer, namely chile peppers. Whether ground, whole, sliced, diced, pickled, fresh, canned or dried, chile peppers are an inherent part of Mexican dishes.
There are many varieties of chiles, ranging from mild to very hot! Chefs use whatever chiles are available to them. Some varieties are available canned when they aren’t available fresh. Here is a list of some common peppers.
Green Peppers: Also called bell peppers. They are very mild peppers and are used in salads as a garnish and they are used to flavor & color dishes.
Anaheim: Also called California peppers. They are mild, long green chiles. They can be eaten raw and are used in salads.
Jalapenos: They are smaller sized and dark green chiles. They are typically very hot.
Serranos: They are smaller and slimmer than jalapenos, but be warned they are hotter too!
Ancho: These chiles are plump and dark green chiles that range from mild to medium. Ancho means “wide,” that’s why these are usually the best choice for chile rellanos.
Yellow Hots: They are longer than jalapenos and moderately hot. These chiles are used in hot mixes, along with other chiles and are used in salsas. They are also used as a garnish to color dishes.
Wax Chiles: These chiles are small, slender, yellow chiles and are used in pickled mixes, in salsas and as a garnish.
Chilitepins: These chiles are tiny and seedy red peppers. They are used for seasoning in salsas in combination with other chiles. They are also used in pickling. Warning…they are VERY hot!
You can roast chiles over the top burner of your stove. Make sure to turn frequently to keep the chiles from burning. You can cook three to four chiles at a time. When the skins turn dark brown and look blistered then remove them from the heat. Wrap the chiles in a damp kitchen towel or paper towel to make the skins easier to remove.
Chiles can be roasted in an oven as well. Place the chiles onto a parchment paper lined baking sheet. Bake at 350º F. until the skins are brown and blistered. After roasting, wrap the chiles in a damp kitchen towel for a few minutes. Then remove the skins.
You can also dry chiles. To dry chiles, make a chile “garland.” Sting chiles up by their stems to make a cluster. Let them hang to dry by placing them in a very dry place until they become dry. Fresh green chiles turn from green to red when left to dry out. Dried chiles are ready to use when they are crackly-dry.
Chile garlands can also be used for decorations in your kitchen, living room or patio. These sartas or ristras are a characteristic sight in the Southwest.
To use dried chiles, just soak them in a hot water bath until they are softened. Open the chiles up and remove the stem and seeds. Puree them in a food processor or blender. Add small amounts of water to process. If the chiles are hot then add a water and vinegar mixture to help tame the chiles. When a chili paste is made then make sure to pass through a sieve to make a smooth paste. Season the paste as you desire to make salsas or for cooking.

“Food, one assumes, provides nourishment; but Americans eat it fully aware that small amounts of poison have been added to improve its appearance and delay its putrefaction.” – John Cage
There has been quite a bit of controversy these days about eating organic. Recent studies state that it really doesn’t matter if you eat organic foods or not. When something is labeled organic, it usually means that a farm has not used pesticides and has taken considerable care to avoid any cross-contamination. Producing organic food undoubtedly costs more money which is passed on to the consumer. Buying organic tends to be quite a bit more expensive than buying non-organic.
Honestly, I don’t care what the studies are saying about eating organic versus eating non-organic. I would rather not put pesticides into my body as well as wanting to support farmers and food companies that are not using pesticides. I love going to farmers’ markets during the spring, summer and fall and when I am shopping in the grocery store I am willing to pay a bit more for organic food.
If you have decided not to buy organic here is a list of foods that have found to be the most and least contaminated.
Most Contaminated
Apples
Bell Peppers
Celery
Cherries
Grapes
Lettuce
Nectarines
Peaches
Pears
Potatoes
Spinach
Strawberries
Least Contaminated
Asparagus
Avocados
Bananas
Broccoli
Cabbage
Corn
Kiwis
Mangos
Onions
Papayas
Peas
Pineapples

 Does Culinary School Help Someone Become A Chef?
Does culinary school help someone become a chef? This question seems to be the hot topic du jour. I have mixed views on this issue as I think that an educated population is very important, but from what I can tell going to culinary school often times doesn’t seem to make much of a difference on getting hired. I can’t tell you how many culinary school graduates that I meet who are working at the gym front desk, but left to pay off steep school loans.
Many working chefs agree that culinary schools churn out uncreative and lazy cooks. When hiring, even in the most prestigious restaurants, it has been said that having a culinary degree makes no difference at all. Working chefs just don’t seem to care about academic training when deciding to hire someone or an employee’s ultimate success. Someone who wants to become a chef can get a job washing dishes and work their way up into prep all the while gathering basic skills to work on the line, master each station and eventually become a head chef. That said, today’s students learning the basics and how to clean a fish which is nothing to sneeze at.
Most culinary schools charge tuitions that are between $20,000 to $30,000 per year. Le Cordon Bleu and The Art Institutes are for profit schools that are owned by Fortune 1000 companies. Le Cordon Bleu U.S. franchise is licensed by Career Education Corporation. The Art Institutes are owned by Education Management Corporation which 41 percent of is owned by Goldman Sachs. CIA (Culinary Institute of America) and Johnson & Wales are both not-for profit institutions. Graduation rates tend to be higher at not-for-profit culinary schools. CIA has a requirement of working in the restaurant business for 6 months as an admission requirement. This requirement is designed to weed out non-serious students. There seems to be a big complaint, however that these schools don’t really foster creativity, radical culinary ideas or experimentation.
I would never tell someone not to go to culinary school, but I think it is worth considering if one wants to end up with a mountain of debt while working for low wages. The average salaries for food workers are: Head Chef $44,780; First-Line Supervisors $31,770; Cooks $23,260; Dishwashers $18,680; Fast Food Workers $18,540. Total tuition to graduation: Le Cordon Bleu $39,900; International Culinary Center (ICC) $41,625; Kendall College $43,092; Art Institute (AI) $44,561; Johnson & Wales $47,910; Culinary Art Institute (CIA) $49,980; New England Culinary Institute (NECI) $51,140.

 Past Inaugural Luncheon Menus
Today President Obama will serve his second inaugural luncheon. Last year he served Lincoln inspired foods such as pheasant, whipped sweet potatoes and cinnamon apple sponge cake.
At President Clinton’s second inaugural luncheon he served shrimp, oyster & scallop pie before serving beggar’s pudding and quince ice cream for dessert.
President Kennedy’s guests dined on American specialties such as Texas ribs and New England boiled lobster.
President Buchanan had 6,000 guests at his inaugural luncheon. His staff made 400 gallons of oysters, 60 saddles of mutton and 125 beef tongues.
President Madison’s first lady, Dolley, loved ice cream so much that he served it for dessert at his second inaugural meal.

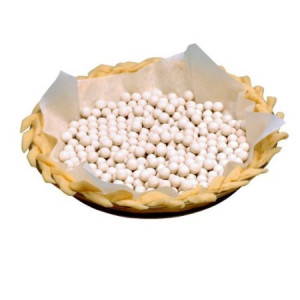
 Pre-Baked Pie Crust: Five Steps For A Perfect Pie Crust
A pre-baked pie crust (sometimes called a blind baked pastry case) is one that has been partially baked without a filling so it can still cook and crisp thoroughly if the filling needs a shorter time to bake than the pastry. Pre-baking a pie crust also stops the pastry from getting soggy by a moist filling.
- Prick the base of the pie crust all over with a fork to stop the pastry from bubbling up and getting out of shape.
- Chill the pie crust in the refrigerator for at least 15 minutes before baking. This will stop it from shrinking during baking. Preheat your oven to 350º F.
- Place a large piece of parchment paper inside the pie crust, then fill with baking beans or uncooked rice. Ceramic beans or pie weights are available from most cooking stores or Amazon. Make sure that the paper is touching the pastry, eve at the edges.
- Bake for 10 to 15 minutes for a large pie crust or 8 to 10 minutes for a small one until the pastry is cooked and opaque.
- Carefully remove the parchment paper and the beans/rice/weights and then return the empty pie crust back in the oven for 10 minutes for a large pie crust or 4 to 5 minutes for a small one. When it is ready the base will be a sandy color, dry and crisp. The top edges of the pie crust should be golden. Leave in the pie tin or pie plate and continue with your chosen recipe.

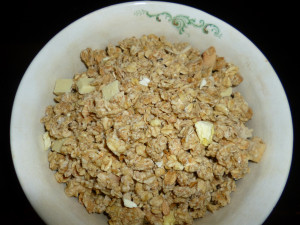 Things To Do With Granola
Granola isn’t just for breakfast. There are so many things you can do with granola.
Mix granola into chocolate chip cookie dough.
Use granola as an ice cream or yogurt topping.
Make your own granola bars by mixing granola with melted peanut butter, honey, syrup or chocolate chips.
Add granola to banana bread mix.
Make a granola pie crust by mixing granola with melted butter and pressing down into a pie pan.
Mix granola into waffle or pancake batter.
Use granola as a fruit salad topper
Sprinkle granola on top of a baked apple.

 Healthy & Whole Foods
Many Americans have been struggling with weight issues for years. People may lose a few pounds by trying various diets, but only to gain a few extra pounds when resuming old eating patterns. As we get older we find that losing weight becomes much more difficult with our metabolisms slowing substantially. Being overweight brings on serious health risks such as diabetes, cancer and heart disease. It is important for us to make a real connection between what we eat and our overall health. Here are some eating tips that typically make a difference in weight loss and, of course, incorporating exercise into your daily routine helps significantly.
Breakfast
Eat a healthy breakfast every day. A healthy breakfast is one that consists of
Protein, fruit and whole grains. Avoid processed foods. Eating breakfast helps
prevent overeating later in the day. Try eating an egg sandwich with a piece of fruit or whole grain cereal with low fat or skim milk and a banana.
Water
Drink more water. Most of us don’t drink enough water. Substitute water for sodas, juices, alcoholic drinks and even diet sodas. Substitute water for those high calorie drinks and you will begin to see the pounds melt away. I like to drink sparkling water when I crave a soda.
Fish
Fish is great for giving you those good omega-3 fatty acids that we all need and
is lower in calories. Stay away from eating processed meats like hot dogs and sausages. Eat fish two to three times per week and eat red meat once a week at most.
Whole Grains
Whole grains are chock full of vitamins, minerals and high in fiber. Eat whole wheat bread, whole wheat pasta and brown rice. Stay away from refined grains such as white bread and white pasta.
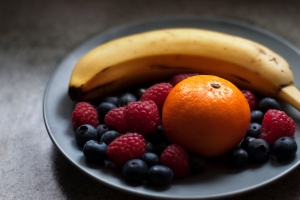
Fruits & Vegetables
We need our fruits and vegetables. They are antioxidant rich foods that help in weight loss. Fresh produce contains water so we feel full and satisfied longer. Berries are great antioxidants.
Dairy
Including low-fat dairy food into our diets is important. These foods are rich in calcium and vitamin D. Many of us are deficient in obtaining these bone building vitamins.
“Diet” Foods
Just because the label says “diet” or “low-fat” or “fat-free” doesn’t mean that they are healthy for us or will promote weight loss. These foods are typically loaded with sugar and are highly processed which means empty calories. It would be better to eat a hand-full of nuts than to turn to these impostors.
Home Cooking
As you know I am big on cooking at home. I rarely use processed foods and would rather cook my own meals. It takes time, money and energy, but in the end it’s worth it. When we eat out in restaurants we truly don’t know how our food is cooked. Chefs tend to put butter on “everything” and that’s why the meals taste good. Also, we tend to eat much larger portions when we go out for dinner. For certain stay away from fast food restaurants.
Portion Sizes
I am a visual person. It sounds ridiculous but the serving size for fruits and vegetables should be fist size. Look at your fist and get a visual of what a fruit/veggie serving size should be. A serving size of meat should be the size of a deck of cards and a serving size of fish should be the size of a checkbook. Eat smaller meals!
Slow Down
Eat slower. We should spend 30 minutes eating a meal. Eat at the table sitting down.
Food Labels
Read those food labels for calories and other nutrients. Scan the food labels for how many grams of sugar an item has. Just because a food item my say it is low in fat it just may have a high amount of sugar.
Snacking
Snacking twice a day on healthy snacks helps from overeating later in the day. Healthy snacks are items such as fruit, carrots or a handful of nuts (not sugar coated candy type nuts). Don’t forget that water!
Gum
Believe it or not chewing gum can help keep that weight off. I like to nibble so when I get the urge to nibble I will pop a couple pieces of gum in my mouth.
Sleep
Sleep at least 7 hours per night.
Exercise
Join a gym and go at least 3 times a week. If you can’t make it to a gym then walk. Go for a walk after lunch or after dinner for 45 minutes to an hour. Incorporate lifting some free weights into your routine.
Foods To Avoid
Butter
Ice Cream
Chips
Crackers
Instant Oatmeal
Fish Sticks
Sugary Cereal
White Pasta
Cereal Bars
Candy Bars
Fried Chicken
Regular Pretzels
Potato Chips
White Bread
White Potatoes
Prepared Salad Dressings
White Rice
Cookies
Foods To Eat
Olive Oil
Greek Yogurt
Nuts
Seeds
Steel Cut Oats
Broiled Salmon
High Fiber Cereal
Whole Wheat Pasta
Blueberries
Piece of Dark Chocolate
Grilled/Roasted Chicken
Whole Wheat Pretzels
Unbuttered Popcorn
Whole Wheat Bread
Sweet Potatoes
Oil & Vinegar Salad Dressing
Brown Rice
Figs
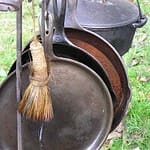
 Tiny New York Kitchen Household Hints Caring For Cast Iron Pans
Cast iron pans have become popular again. It is important to clean them properly. To make your own cast iron skillet cleaner just sprinkle lemon juice and salt on the rusty iron skillet. Wipe out the rust and then season with a lot of oil. Put the skillet into the oven (200° F) for one hour. Remove from the oven and wash the skillet. Dry thoroughly and apply with more oil. Wipe off any excess oil. Never let cast iron air dry or it will rust.
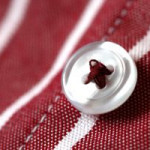
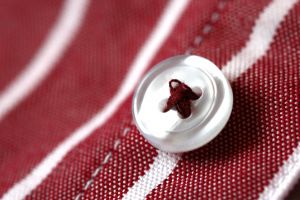 Tiny New York Kitchen Household Hints – Elastic Thread
If you are tired of sewing your buttons back onto your shirts and pants constantly then I have the solution for you. If you sew your buttons on with elastic thread then your shirts/blouses and pants won’t pull or bunch any longer. Sewing buttons on with elastic thread is great for people who are larger in the chest or around the middle. This is also a great solution for older people or small children who find it difficult to button their clothing.


