
 A Few Words About Bacon
Bacon is salted, dried, cured or smoked meat from the back or sides of a pig. The term is derived from the Germanic bache/backe “back meat,” though at first the word referred to any part of a pig. Flitch (or slab bacon) designates a whole chunk of bacon before it is cut into slices. Burned bacon can be dangerous because burning it will produce carcinogens.
If you’re not doing it already then I have 3 words for you…BAKE YOUR BACON! Frying is the traditional way to cook bacon, but as we all know the high heat can make the bacon fat splatter all over the place. Baking applies lower heat, reducing splattering and shrinkage. It is also the best way to cook large amounts of bacon. Arrange the bacon slices side by side on a large, parchment paper lined, baking sheet. It’s a good idea if the baking sheet has a large rim on it. Bake in a preheated oven at 400º F for about 20 minutes or until the bacon is crisp and browned. Cooking food in the oven at this temperature is actually roasting, but there are times when the terms roasting and baking can be used interchangeably. Remove the rendered fat as it accumulates with a bulb baster, if necessary. When done it’s a good idea to transfer the bacon to paper towels to drain.
Generally bacon is about 50% fat. As it cooks, the fat becomes liquid and separates from the meat. This process is called rendering. The rendered fat can be put in a tightly covered container and stored in the fridge or freezer for sautéing or frying other foods.
Purchasing the leanest bacon can be counterproductive, as the fat gives the bacon most of its desirable flavor and crispness. Most of the extra fat melts off during cooking. The fat on bacon should be about 1/2 to 1/3 of the total weight. If you buy bacon from a butcher, you can ask for the rind to be removed and for the bacon to be sliced. A whole slab stays fresher longer. A butcher-cut slab can be stored for two weeks in the fridge or two months in the freezer. The freezing does create ice crystals which causes the bacon to splatter when fried stovetop.
Did you know that bacon can be frozen for up to 4 weeks? The curing process affects the stability of the fat, which means that bacon can turn rancid even when frozen. Although you can freeze the unopened package, it is usually better to separate the slices into conveniently sized amounts (about 4 ounces or so for breakfast). Wrap the bacon tightly in plastic wrap, then overwrap with aluminum foil. For added protection place in a ziplock bag. Long-term freezing is not recommended. Thaw thoroughly in the fridge before cooking.
Once the vacuum pack is opened, bacon will usually keep for only about a week in the fridge, although sometimes it will keep for a couple of weeks. The ends may darken and dry out and they should be sliced off and thrown away before using. To make bacon crumbles, chop the bacon first and then cook it.
Keep Calm and Eat Bacon!


 Know Your Chiles
To keep your Mexican dishes authentically delicious, here are some pointers about chiles. If you were asked to identify one characteristic that would singularly describe Mexican dishes, the “chile” would be the answer, namely chile peppers. Whether ground, whole, sliced, diced, pickled, fresh, canned or dried, chile peppers are an inherent part of Mexican dishes.
There are many varieties of chiles, ranging from mild to very hot! Chefs use whatever chiles are available to them. Some varieties are available canned when they aren’t available fresh. Here is a list of some common peppers.
Green Peppers: Also called bell peppers. They are very mild peppers and are used in salads as a garnish and they are used to flavor & color dishes.
Anaheim: Also called California peppers. They are mild, long green chiles. They can be eaten raw and are used in salads.
Jalapenos: They are smaller sized and dark green chiles. They are typically very hot.
Serranos: They are smaller and slimmer than jalapenos, but be warned they are hotter too!
Ancho: These chiles are plump and dark green chiles that range from mild to medium. Ancho means “wide,” that’s why these are usually the best choice for chile rellanos.
Yellow Hots: They are longer than jalapenos and moderately hot. These chiles are used in hot mixes, along with other chiles and are used in salsas. They are also used as a garnish to color dishes.
Wax Chiles: These chiles are small, slender, yellow chiles and are used in pickled mixes, in salsas and as a garnish.
Chilitepins: These chiles are tiny and seedy red peppers. They are used for seasoning in salsas in combination with other chiles. They are also used in pickling. Warning…they are VERY hot!
You can roast chiles over the top burner of your stove. Make sure to turn frequently to keep the chiles from burning. You can cook three to four chiles at a time. When the skins turn dark brown and look blistered then remove them from the heat. Wrap the chiles in a damp kitchen towel or paper towel to make the skins easier to remove.
Chiles can be roasted in an oven as well. Place the chiles onto a parchment paper lined baking sheet. Bake at 350º F. until the skins are brown and blistered. After roasting, wrap the chiles in a damp kitchen towel for a few minutes. Then remove the skins.
You can also dry chiles. To dry chiles, make a chile “garland.” Sting chiles up by their stems to make a cluster. Let them hang to dry by placing them in a very dry place until they become dry. Fresh green chiles turn from green to red when left to dry out. Dried chiles are ready to use when they are crackly-dry.
Chile garlands can also be used for decorations in your kitchen, living room or patio. These sartas or ristras are a characteristic sight in the Southwest.
To use dried chiles, just soak them in a hot water bath until they are softened. Open the chiles up and remove the stem and seeds. Puree them in a food processor or blender. Add small amounts of water to process. If the chiles are hot then add a water and vinegar mixture to help tame the chiles. When a chili paste is made then make sure to pass through a sieve to make a smooth paste. Season the paste as you desire to make salsas or for cooking.

 Pre-Baked Pie Crust: Five Steps For A Perfect Pie Crust
A pre-baked pie crust (sometimes called a blind baked pastry case) is one that has been partially baked without a filling so it can still cook and crisp thoroughly if the filling needs a shorter time to bake than the pastry. Pre-baking a pie crust also stops the pastry from getting soggy by a moist filling.
- Prick the base of the pie crust all over with a fork to stop the pastry from bubbling up and getting out of shape.
- Chill the pie crust in the refrigerator for at least 15 minutes before baking. This will stop it from shrinking during baking. Preheat your oven to 350º F.
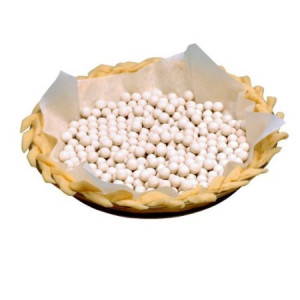
- Place a large piece of parchment paper inside the pie crust, then fill with baking beans or uncooked rice. Ceramic beans or pie weights are available from most cooking stores or Amazon. Make sure that the paper is touching the pastry, eve at the edges.
- Bake for 10 to 15 minutes for a large pie crust or 8 to 10 minutes for a small one until the pastry is cooked and opaque.
- Carefully remove the parchment paper and the beans/rice/weights and then return the empty pie crust back in the oven for 10 minutes for a large pie crust or 4 to 5 minutes for a small one. When it is ready the base will be a sandy color, dry and crisp. The top edges of the pie crust should be golden. Leave in the pie tin or pie plate and continue with your chosen recipe.

 Healthy & Whole Foods
Many Americans have been struggling with weight issues for years. People may lose a few pounds by trying various diets, but only to gain a few extra pounds when resuming old eating patterns. As we get older we find that losing weight becomes much more difficult with our metabolisms slowing substantially. Being overweight brings on serious health risks such as diabetes, cancer and heart disease. It is important for us to make a real connection between what we eat and our overall health. Here are some eating tips that typically make a difference in weight loss and, of course, incorporating exercise into your daily routine helps significantly.
Breakfast
Eat a healthy breakfast every day. A healthy breakfast is one that consists of
Protein, fruit and whole grains. Avoid processed foods. Eating breakfast helps
prevent overeating later in the day. Try eating an egg sandwich with a piece of fruit or whole grain cereal with low fat or skim milk and a banana.
Water
Drink more water. Most of us don’t drink enough water. Substitute water for sodas, juices, alcoholic drinks and even diet sodas. Substitute water for those high calorie drinks and you will begin to see the pounds melt away. I like to drink sparkling water when I crave a soda.
Fish
Fish is great for giving you those good omega-3 fatty acids that we all need and
is lower in calories. Stay away from eating processed meats like hot dogs and sausages. Eat fish two to three times per week and eat red meat once a week at most.
Whole Grains
Whole grains are chock full of vitamins, minerals and high in fiber. Eat whole wheat bread, whole wheat pasta and brown rice. Stay away from refined grains such as white bread and white pasta.
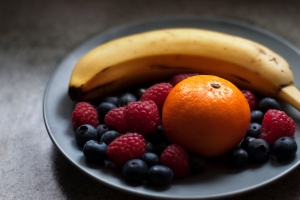
Fruits & Vegetables
We need our fruits and vegetables. They are antioxidant rich foods that help in weight loss. Fresh produce contains water so we feel full and satisfied longer. Berries are great antioxidants.
Dairy
Including low-fat dairy food into our diets is important. These foods are rich in calcium and vitamin D. Many of us are deficient in obtaining these bone building vitamins.
“Diet” Foods
Just because the label says “diet” or “low-fat” or “fat-free” doesn’t mean that they are healthy for us or will promote weight loss. These foods are typically loaded with sugar and are highly processed which means empty calories. It would be better to eat a hand-full of nuts than to turn to these impostors.
Home Cooking
As you know I am big on cooking at home. I rarely use processed foods and would rather cook my own meals. It takes time, money and energy, but in the end it’s worth it. When we eat out in restaurants we truly don’t know how our food is cooked. Chefs tend to put butter on “everything” and that’s why the meals taste good. Also, we tend to eat much larger portions when we go out for dinner. For certain stay away from fast food restaurants.
Portion Sizes
I am a visual person. It sounds ridiculous but the serving size for fruits and vegetables should be fist size. Look at your fist and get a visual of what a fruit/veggie serving size should be. A serving size of meat should be the size of a deck of cards and a serving size of fish should be the size of a checkbook. Eat smaller meals!
Slow Down
Eat slower. We should spend 30 minutes eating a meal. Eat at the table sitting down.
Food Labels
Read those food labels for calories and other nutrients. Scan the food labels for how many grams of sugar an item has. Just because a food item my say it is low in fat it just may have a high amount of sugar.
Snacking
Snacking twice a day on healthy snacks helps from overeating later in the day. Healthy snacks are items such as fruit, carrots or a handful of nuts (not sugar coated candy type nuts). Don’t forget that water!
Gum
Believe it or not chewing gum can help keep that weight off. I like to nibble so when I get the urge to nibble I will pop a couple pieces of gum in my mouth.
Sleep
Sleep at least 7 hours per night.
Exercise
Join a gym and go at least 3 times a week. If you can’t make it to a gym then walk. Go for a walk after lunch or after dinner for 45 minutes to an hour. Incorporate lifting some free weights into your routine.
Foods To Avoid
Butter
Ice Cream
Chips
Crackers
Instant Oatmeal
Fish Sticks
Sugary Cereal
White Pasta
Cereal Bars
Candy Bars
Fried Chicken
Regular Pretzels
Potato Chips
White Bread
White Potatoes
Prepared Salad Dressings
White Rice
Cookies
Foods To Eat
Olive Oil
Greek Yogurt
Nuts
Seeds
Steel Cut Oats
Broiled Salmon
High Fiber Cereal
Whole Wheat Pasta
Blueberries
Piece of Dark Chocolate
Grilled/Roasted Chicken
Whole Wheat Pretzels
Unbuttered Popcorn
Whole Wheat Bread
Sweet Potatoes
Oil & Vinegar Salad Dressing
Brown Rice
Figs
 Tiny New York Kitchen Household Hints – Elastic Thread
If you are tired of sewing your buttons back onto your shirts and pants constantly then I have the solution for you. If you sew your buttons on with elastic thread then your shirts/blouses and pants won’t pull or bunch any longer. Sewing buttons on with elastic thread is great for people who are larger in the chest or around the middle. This is also a great solution for older people or small children who find it difficult to button their clothing.

 Tiny New York Kitchen Household Hints
If you have a door that squeaks then read on.
Doors That Squeak & Stick:
Stop door hinges from squeaking by giving them an application of Vaseline. Rub the part of a door that sticks with yellow soap to make it move more easily.

 Tiny New York Kitchen Household Hints
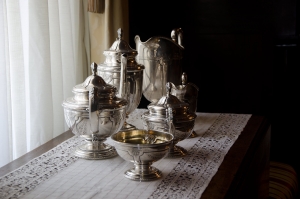
Caring For Your Silver
A simple way to clean your silver is to put it into an aluminum pan with sour milk and let it stand for a few hours. Then rinse in hot water and polish. If your silver is going to be stored for any length of time, then put a piece of camphor with it or rub the silver with Vaseline or sweet oil. When possible to do so, stand the flat silver in large glass top fruit jars with a pad at the bottom. Cover the top with cotton and place a piece of camphor in the jar. Then screw the lid on the jar. This makes an airtight container and keeps the silver perfectly without tarnish.

 Tiny New York Kitchen Household Hints
Caring For Your Waffle Iron:
To temper a new waffle iron or griddle make sure to grease liberally before using. Allow the grease to bake in. Repeat this process several times and the tempering will be more thorough. Never ever wash a waffle iron or griddle. After each baking just wipe with a soft oiled cloth.


 Tiny New York Kitchen Household Hints
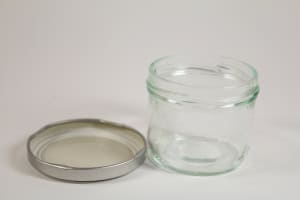
Keep Glass From Cracking
Have you ever cracked a glass or a jar by pouring hot liquid into it? Well, hot water will not crack a glass or jar if it is set on a knife blade and a spoon is put in it before pouring in the hot water. Another way to keep a glass or jar from cracking is to put a wide rubber band around both the top and bottom of the glass.
 Tiny New York Kitchen Household Hints
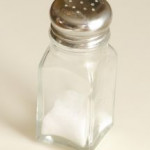
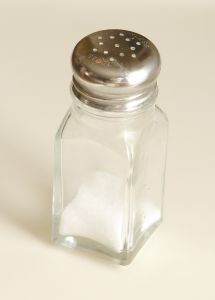
Yesterday I was asked how to keep salt shakers unclogged.
For Clogged Salt Shakers:
Heat a teaspoonful of rice and mix with the salt. You could also use a pinch of ground arrowroot added to the salt. Both methods will prevent the salt for clogging the shaker. To keep the metal tops from being eaten away spread a bit of heated paraffin on the inside of the metal top. When the heated paraffin begins to cool open the holes with a pin or a wooden toothpick.


