
Crunchy, juicy, nutrient packed jicama is an unsung hero of the produce aisle. Technically a cousin to green beans, jicama is a root vegetable from Mexico available year-round that is delicious cooked or raw. With a mild, earthy, slightly sweet flavor and an apple like consistency. It’s a great addition to salads, salsas, slaws, and grazing boards. Jicama also works as lighter swap for potatoes in baked and air fried recipes, and it’s delicious sautéed or boiled, too.
If you’ve never tried jicama, don’t be intimidated. Start by choosing one with a smooth, unblemished surface and thin brown skin. The skin should be thin enough to scrape with your thumbnail to reveal the white flesh inside. Avoid thick skinned, bruised, or shriveled jicama, which are signs of aging.
Once you’re ready to prep, start by trimming off the ends of the jicama and slice in half. Then, use a knife to gently peel away the skin.
For Jicama Sticks:
Step 1: Carefully slice off the rounded parts of the jicama, creating a flat surface.
Step 2: Cut each half into 1/4-inch slices.
Step 3: Stack slices and cut evenly into sticks.
Fresh, raw jicama sticks are a great addition to lunchboxes or served on a vegetable platter with your favorite dip. They can also add unexpected, satisfying crunch to cooked dishes, like a noodle salad with jicama and a miso vinaigrette.
Jicama sticks are delicious roasted, too. Their firm texture can withstand the heat, while the edges get golden brown and tender. Toss together with sweet peppers and spices for a simple, satisfying sheet pan side that pairs well with all kinds of meat and fish.
For Diced Jicama:
Step 1: Follow the steps above to create jicama sticks
Step 2: Line up sticks or stack into a pile, then evenly cut into cubes.
Diced jicama is a vitamin and fiber-rich way to add bulk to all kinds of green, grain, and protein-based salads. I love the combination of crunchy jicama with creamy avocado served with grilled chicken.
Moist and mild flavored jicama also plays well with fruit, especially melon. A refreshing combination of watermelon, jicama, and fresh mint falls somewhere between salad and salsa, delicious scooped onto tortilla chips or just spooned straight from the bowl.
Next time you’re at your local grocery store or market pick up jicama and experiment with ways to incorporate it into your recipes.
©Tiny New York Kitchen © 2021 All Rights Reserved

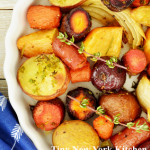
Roasting refers to proteins and vegetables cooked mostly at high temperatures in the oven. Baking uses a lower temperature to cook breads, baked goods, and casseroles.
Roasting makes any vegetable taste better. It brings out their flavor, caramelizes their natural sugars, and adds crunch. If your family doesn’t love certain vegetables like broccoli or Brussels sprouts, roasting is a great way to change their mind. Double what you’re roasting and then turn extra servings into quick meals later in the week. Cooking a little extra with one meal lets you make the most of value-sized packages of proteins and other store sales. With leftover already planned, you won’t need to lean on takeout.
Why we love to roast:
It’s Affordable! Inexpensive ingredients are tastiest when roasted. Root vegetables are browned and crisp, tomatoes and grapes are extra juicy and sweet, and tough cuts of beef are fall-apart tender. You also don’t need any special equipment to roast.
Roasting Is Healthful! Roasted foods need very little fat to cook compared to frying or sautéing. Roasting also intensifies flavors without added salt, sugar, or other ingredients.
It’s Easy! Roasted foods need little prep before they cook. And once the oven door closes, you can walk away. Fewer pans and utensils are needed, making cleanup easier too.
Essential Tools For Roasting:
Rimmed Sheet Pan: The rim keeps vegetables from falling off the sides and catches any juices from meats and fish.
Oven-Save Skillet: Go from stovetop to oven and back. Sear meats before roasting or make a pan sauce with the meat drippings after roasting.
Roasting Pan: Best for large roasts, hams, and turkeys. An inner rack lifts the meat so it can brown and crisp underneath.
Parchment Paper: Line pans to keep foods from burning and sticking, then toss for easy cleanup. If roasting at a higher temp or broiling use foil.
Metal Tongs: Flip and stir foods on a hot pan with ease. Look for tongs with a heat resistant grip.
Silicone Brush: Brush on a sticky glaze or baste foods with sauce. The silicone bristles are easy to clean.
Tips For Sheet Pan Roasting:
Jump Start Browning by preheating your sheet pan before adding vegetables.
Pat foods very dry with paper towels so the outside browns while the inside cooks through.
Cut foods to the same size and thickness so smaller pieces don’t burn.
Space out foods on the sheet pan so they have room to crisp and brown.
Let sheet pans cool before rinsing to keep the metal from warping.
©Tiny New York Kitchen © 2021 All Rights Reserved
This fall Tiny New York Kitchen celebrates sweet parsnips, earthy beets, and mild turnips. These root vegetables offer flavor, nutrition, and versatility.
Look for root vegetables that are firm to the touch with smooth, blemish-free skin. If there are any greens attached, make sure they look fresh, not wilted.
Before storing parsnips, beets, and turnips, remove any greens and brush off any dirt. Wrap in a damp paper towel, place in a plastic bag, and store in the refrigerator crisper; most roots will last up to two weeks.
Root vegetables absorb nutrients from the soil they grow in, including antioxidants, iron, and vitamins A, B, and C. They also provide fiber, which helps you feel fuller longer. To maximize your fiber intake, leave the skin on and give parsnips and carrots a good scrub instead.
Parsnips: These pale, carrot-like root vegetables are sweet and earthy. They can be roasted, sautéed, mashed, and puréed. Choose small to medium parsnips, since larger ones can be woody.
Beets: Beets can be red, golden, or striped. Whether roasted, boiled, or steamed, they’re slow to cook, but packaged precooked versions are also an option. You can even enjoy beets raw. Simply peel and grate or thinly slice.
Turnips: Creamy white with pinkish-purple tops, turnips turn mellow and tender when cooked. Try them roasted, sautéed, mashed, or added to soups and stews.
Greens: If you’re lucky, your beets and turnips will have greens attached. These edible, nutritious, and delicious greens should always be removed for storage, as they pull moisture from the root ends. Wash the greens and use to make pesto, or sauté with garlic and oil for a quick side dish or simple pasta.
“Work With What You Got!”
©Tiny New York Kitchen © 2018 All Rights Reserved

Everything From Apple Sauce To Tzimmes!
For a Sensational Seder you’ll want to have these traditional Passover dishes on hand.
Coconut Macaroons (You’ll Go Coco-Loco For Coconut Macaroons!)
Haroseth (For A Sweet Seder)
Matzo Ball Soup (Keep Your Eye On the Matzo Ball)
Potato Kugel (When Life Gives You Potatoes, Have Kugel)
Apple Sauce (Passover’s Special Sauce For Latkes & More)
Chopped Chicken Liver (What Am I? A Great Topper For Matzo!)
Kosher Passover Soups (A.K.A. Jewish Penicillin)
Karpas (That’s Parsley, For The Gentiles)
Matzo (You Gotsa Have Lotsa Matzo On Passover)
Root Vegetable Tzimmes (Get In Touch With Your Roots!)
Honey Glazed Carrots (Yummy)
Gefilte Fish (Just Like Your Grandmother Used To Make)
Kedem Concord Grape Juice (Tasty Enough For All Four Cups)
Raspberry Jelly Ring (If It’s Kosher, You Shoulda Put A Jelly Ring On It!)
Honey (Make A Nod To The Land Of Milk & Honey)
Beitzah (Don’t Forget The Eggs!)
Whole Kosher Brisket (Braise With Onions & Make Your Bubbe Proud)
Leg Of Lamb (Get A Leg Up On Seder Dinner)
Flourless Cake With Chocolate Glaze (Because 8 Days Without Cake Is A Long Time)
“Work With What You Got!”
© Victoria Hart Glavin Tiny New York Kitchen © 2016 All Rights Reserved

Less Stress Holidays
Holiday time is a wonderful time of year, but let’s face it, there is plenty of stress that comes with it. During the holidays, it’s better to keep things as simple as possible.
Appetizers & Hors D’Oeuvres: Keep it simple. Serve a simple, but beautiful cheese platter. Add bowls of dried fruit and nuts, as they’re always very festive. I like to set up a small snack table set with bowls of olives, savory popcorn, and Marcona almonds. I also like to serve a crudité platter for guests who may not want to eat rich foods or are perhaps trying to eat a bit healthier around the holidays.
Plan Your Menu: If you’re having a sit-down dinner, try to make a menu that can be prepared somewhat in advance. Some great options might be a beef Bourguignon, braised short ribs, coq au vin or any other main dish that can be made the day before. I am a big proponent of choosing things to cook that can be prepped ahead of time. I like to start off a dinner party with a nice salad that incorporates some seasonal ingredients like pomegranates, pears, citrus or candied nuts. A winter squash soup is also a nice way to begin a meal. Dessert can be a simple winter fruit crisp or a spice cake served with ice cream.
Get A Head Count: When it comes to a holiday meal, any time of year, depending on the number of guests, a simple yet broad menu works best. For buffet holiday parties with over a dozen people, you might want to offer a couple of different entrees. Add a vegetable and perhaps roasted potatoes or roasted root vegetables. Offering a nice crisp green salad always rounds out the menu as well. Add some delicious small rolls or a sliced baguette and you’re good to go.
Serving A Nice Beverage: Then there are the beverages. Having a festive specialty drink is always welcomed by your guests. If you’re mixing the drinks yourself, keep it simple. Please don’t spend all of your time being a bartender at your own party. That’s no fun! You could mix a nice holiday punch bowl with an adult kick ahead of time. A splash of pomegranate liqueur or elderflower liqueur is a nice addition to prosecco or champagne. A white Christmas cosmo (made with white cranberry juice) is a holiday favorite. Make it in advance and when you’re ready to serve just shake with ice and serve.
Make In Advance: Many things can be done days before the party. Shopping for non-perishable foods like spices, flour, sugar can all be purchased many days before your party. You can also make your holiday cookie dough or pie crusts in advance. All you need to do is to make sure you freeze them until you’re ready to use them.
Keep Calm & Have Fun: The most important thing is to keep calm and have fun. A holiday party of any kind should be a time of joy for everyone, even the host. If you find yourself working way too hard to throw and plan a party then ask friends or family members for help. Perhaps a few good friends could bring a dish or two to help ease the stress on your kitchen. The goal is to have a good time with family and friends.
Happy Holidays From Tiny New York Kitchen!
“Work With What You Got!”
© Victoria Hart Glavin Tiny New York Kitchen © 2015 All Rights Reserved

 Constitution Week – Foods of Our Forefathers Part IV
The longer winters in New England produced a diet somewhat different from that in Virginia. Not as many varieties of fruits and vegetables grew as in the South, and emphasis was put on those which would store well or which could be converted to something stable through drying, salting, or pickling. The staple grain in the early days was rye, in addition to the new grain, Indian corn. A common bread was called “Rye’ n Injun,” and was baked from a yeast dough of rye, cornmeal, and molasses. Wheat did not grow well in the harsh climate, and the small amount of wheat flour available was used “for best,” as was the refined sugar.
Sweet potatoes and other root vegetables and cabbages were major items on the menu. All cooking was done in cavernous fireplaces, either in kettles or on spits. The cooking range, although invented by Count Rumford in the late 1700’s, didn’t become popular until the Civil War era. The New England boiled dinner of corned beef, potatoes, cabbage and whatever else was available, was a natural outgrowth of fireplace cooking. Beans baked in a pot set in the coals also fit the New England style of cooking and the available found supply.
Although mutton had been the main meat supply in England, pigs were more attractive than sheep in the new land. For one thing, sheep usually had only one lamb at a time, while a litter of pigs a dozen strong was not uncommon. Also, pigs could forage for themselves at an earlier age than sheep, and thrived on the vegetation in forest and field.
Cattle were kept largely for milk and cheese, and although they were scarce at first, they reproduced prolifically in the Northeast. In fact, the Reverend John Cotton once remarked “milk and ministers were the only things cheap in New England.”
In other parts of the country, settlers found more new foods and used them in new ways. In Louisiana, for example, French settlers adapted their old world recipes to accommodate such new foods as tomatoes, okra, crayfish, red snapper, catfish and, of course, corn. The climate was amenable to growing fruits and vegetables year ‘round, making a varied diet easy to get – even if it didn’t taste like home.
In the Charleston and Savannah areas, rice cultivation began very early, in 1694, and soon became a major business. Much of the rice was exported. Oranges were also grown in the Charleston area.
In the Southwest, the Spanish had developed a cuisine all their own, as they moved north from Mexico and Latin America. New varieties of beans, plus the ever-present corn, were cooked with traditional Spanish spices plus something unknown in Spain – hot peppers. With the continual warm weather were also possible, at least where water was available, and there was little emphasis on preservation. In the more arid areas, however, variety was as limited as during winter in New England. Beans, corn and squash were the order of the day.
As time went on, Americans moved west, and the frontiersmen had an entirely new set of problems to meet. Trappers and explorers traveled light, and that usually meant living primarily off the land. Many subsisted almost exclusively on meat, killing bear, venison and small game as they went. One of Pierre LeSeur’s men wrote in his journal of consuming about 10 pounds of buffalo meat each day, plus four bowls of broth. While buffalo meat apparently took some getting used to, this particular explorer wrote that “it made us quite fat, and none was sick.”
One “recipe” called for bear steak fried in tallow and covered with whisky – meat and drink in one meal! Pemmican, made from dried meat, fat and berries ground together, was travelling food. Beef and buffalo cut into strips and dried in the sun was called “jerky,” and kept well, even though it was tough chewing!
Bread was almost unknown, but occasionally a hardtack or ship biscuit could be obtained at a trading post.
The frontiersmen, including migrating settlers, also found the edible wild plants to be helpful sources of nutrients missing from the dried and salted staples. These included such things as dandelions, polk sprouts, sassafras, grapes and various nuts and berries. When they found a place to stay for a season, corn could be planted by simply making a hole with a pointed stick or ax, dropping several kernels into the rich soil – and a crop would grow; plowing simply wasn’t necessary.
To Be Continued…

 Passover Menu Ideas
March 25 to April 2
There can be something wonderfully reassuring about sitting down to a dinner so traditional that you will know exactly what to expect. Each family has their own traditions and favorites. They’ve stood the test of time and families look forward to them year after year.
Seder Plate:
Hard Boiled Egg
Shank Bone
Horseradish
Haroset
Parsley Bouquet
Matzoh
Apple & Walnut Haroset
Persian Haroset
Gefilte Fish With Horseradish
Traditional Gefilte Fish With Carrots & Aspic Served With Matzoh
Traditional Chopped Liver
Pickled Herring In Onion & Sour Cream Sauce
Smoked Whitefish Salad
Herring Salad
Crudité of Fresh Raw Vegetables With Dip
Imported Cheese Board Garnished With Fresh Fruit
Chicken Soup With Matzoh Balls
Roasted Salmon
Traditional Brisket With Gravy
Filet of Beef
Roasted Whole Capon With Rosemary & Shallots
Roast Chicken
Free Range Turkey
Whole Boneless Fresh Turkey Breast
Rolled Spit Roasted Turkey Breast
Smoked Fish Platters With Olives, Capers & Lemons
Smoked Salmon Platter
Whole Boneless Large Whitefish
Matzoh Stuffing With Mushrooms & Caramelized Onions
Tzimmes of Sweet Potatoes, Carrots & Butternut Squash
Potato Pancakes With Applesauce
Potato Kugel
Spinach Kugel
Steamed Spring Vegetables With Dill
Herb Roasted Beets
Sautéed Root Vegetables (Turnips, Parsnips, Carrots, Haricots Vert & Wild Mushrooms)
Steamed Asparagus
Glazed Brussels Sprouts & Pearl Onions
Green Beans With Roasted Garlic
Lemon Meringue Cake
Chocolate Torte
Chocolate Almond Cake
Chocolate Glazed Orange Cake
Walnut Date Torte
Cheesecake
Raspberry Filled Yellow Cake
Orange & Lemon Sponge Cake
Sliced Fruit Platter
Fruit Salad
French Macaroons
Coconut Macaroons
Almond Macaroons
Meringue Clouds
Brownies
NOTE: For Baking Desserts Use Almond Flour, Kosher Potato Starch, Matzo Cake Meal or Matzo Meal As Substitutions. Check Recipes To Determine Which Are The Best Substitutions.


