
English peas (sometimes called garden peas or pod peas) have a fresh, slightly grassy flavor that is the essence of spring. English peas are wonderful puréed and made into a creamy soup or spread. They add bright points of color and flavor to pilafs, risotto, fried rice, pasta, and soups. Steamed and sprinkled with fresh mint or parsley, they make a wonderful side dish.
Pods should be bright green and feel heavy. Each 1 pound of whole pods yields about 1 cup of shelled peas so make sure to pay attention to the desired measurement in your recipe. Their sugars convert quickly to starch so English peas are best eaten the day that they are purchased. If needed, store them in an airtight container in the refrigerator for up to 3 days. To prepare, shell peas right before cooking them in order to keep them from drying out. Once shelled, peas can be briefly cooked in 1/4 inch of steaming water for 3 to 4 minutes. They will quickly turn soggy and lose their vibrant color, so it is important not to overcook them.
“Work With What You Got!”
©Tiny New York Kitchen © 2021 All Rights Reserved
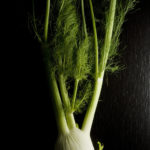
Fennel is a member of the carrot family, though it is not a root vegetable. The base of its long stalk weaves together to form a thick and crisp bulb that grows above ground. Fennel’s leaves, seeds, and stems all have a sweet, faintly anise like flavor. The stems of fennel swell and overlap at the base of the plant to form a bulb with white to pale green ribbed layers that are similar to celery in appearance and texture. Light and feathery, the pretty green leaves slightly resemble fresh dill. Use them as a bed for steaming fish or in small amounts as a garnish.
Originating in the Mediterranean, the fennel bulb appears often in Italian and Scandinavian cuisines. It can be eaten raw, grilled, baked, braised, or sautéed. While grilling, you can toss a handful of dried or fresh fennel stems onto the charcoal to infuse meat or fish with a light anise flavor.
When selecting fennel choose fresh bulbs that are smooth and tightly layered with cracks or bruises. Fat, rounded bulbs with white and pale green color will tend to be more succulent than thin or yellow ones. Avoid any with wilted leaves or dried layers. Now available year-round, fennel is at its peak from late fall through winter. Grocers sometimes incorrectly liable fennel as sweet anise.
When storing, keep fennel bulbs in a perforated plastic bag in the refrigerator for up to 5 days. If kept too long, they will lose their flavor and toughen.
When preparing, remove the green stems and leaves, saving them to flavor or garnish other dishes such as soups or fish. Discard the outer layer of the bulb if it is tough and cut away any discolored areas. Cut the bulb in half lengthwise and remove the base of the core as it is thick and solid. Gently separate the layers with your hands and rinse well to remove any grit between them. Slice or cut as your recipe directs.
©Tiny New York Kitchen © 2021 All Rights Reserved

Heart healthy beets are packed with nutrients and are perfect for late winter meals. You will love them for their vibrant color, sweet flavor, and versatility.
There are just 60 calories in 1 cup of beets. While low calorie, beets are also packed with potassium, iron, vitamin C, and heart healthy nitrates. The greens are rich in vitamins A and K. Try using beets in soups and sautés.
While red beets are the most common variety, other varieties of beets do exist. Golden beets, as their name implies, are a golden yellow color. Chioggia beets contain red and white stripes on the inside, which is why they are often referred to by their nickname – candy cane beets.
To store fresh beets, separate the leaves from the root and place in separate plastic bags in the refrigerator. The greens should be used within a few days while the roots can last up to two to three weeks.
To peel uncooked beets, use a vegetable peeler to remove the thin skin. For roasted beets, use a paper towel to gently rub off the skins. This gives you a better grip and helps keep beet juice from staining your hands.
Beet juice has been used as far back as the 16th century for makeup, hair dye, and fabric dye. It’s still used commercially as a natural food coloring and clothing dye.
To remove beet juice stains from your cutting board, sprinkle with salt and rub with a lemon half before rinsing. You can remove stains from your hands by rubbing them with a little baking soda, then washing with soap.
Beets are high in nitrates, natural compounds that may help lower your blood pressure and help your body use oxygen more efficiently. Many pro athletes and Olympians drink beet juice to improve their performance.
Beets get their deep red color from compounds called betalains, which have strong antioxidant and anti-inflammatory properties.
37% of the recommended daily intake of folate for adults is in 1 cup of raw beets. Folate needs increase during pregnancy, as this vitamin helps babies develop in the womb, making beets a great addition to a pregnant woman’s diet.
©Tiny New York Kitchen © 2021 All Rights Reserved

More and more people are swapping starches for flour in their recipes. If this is something that you have thought about doing then read on to find out more about cornstarch and its uses.
Cornstarch is one of the most versatile starches that there is. Extracted from the starchy endosperm of corn, its white powdery substance is virtually flavorless. It’s a nice ingredient for thickening puddings, soups, pie fillings, and many baked goods recipes. When added to cake, cookie, and shortbread recipes, cornstarch helps create a crumbly and tender texture.
Commercially, cornstarch is often used as an anti-caking agent. When added to packaged goods like shredded cheese, cornstarch coats the cheese and helps to absorb moisture that would otherwise cause spoiling. The absorption process also helps prevent food from clumping over time. Additionally, it is used when making sugars, such as corn syrup.
When cooking with cornstarch, it is best to mix this ingredient into a recipe that is at room temperature. When cornstarch is added to too hot of a mixture, the heat can cause unwanted clumping. Before adding any starch to a recipe, it’s recommended first to make a slurry. To make a slurry, simply mix cornstarch with a cold liquid such as water. This mixture will create a paste-like substance, that you can then add to the desired recipe. Using this slurry method will ensure that the cornstarch is evenly distributed throughout the recipe and not broken down by the heat. It is not recommended to freeze sauce and soups that include cornstarch. Freeing cornstarch can cause the molecules in the starch to break down, and once thawed, the liquid will not hold the same texture as before.
For Thickening:
Cornstarch is often used as a thickening agent when added to soups, stews, and gravies. Denser than flour, less cornstarch is needed to thicken a liquid to the desired consistency.
When cornstarch is added to a recipe, the starch molecules work to absorb water and thicken the mixture. When heated, those molecules swell and consume even more of the liquid in the recipe. Upon thoroughly cooking, the starch in the mix will have expanded size to ten times its size. Once the mixture cools, these same molecules will set. The setting of these molecules can help further solidify the dough, which makes cornstarch a great thickening agent for gooey fillings like pies and pudding. However, this molecule expansion is limited. While a cornstarch enriched recipe can be brought close to boil, it should never be fully boiled. When cornstarch is exposed to too high of temperatures, the starch molecules will begin to deflate, and the mixture will return to its runny state.
For Baked Goods:
Cornstarch not only acts as a thickening agent, but it can also be used in baked goods like cookies, brownies, and cakes. If you’re looking for more structure in your favorite dessert recipe, then you may want to try using cornstarch. Combining cornstarch with other flours can help soften the rigid proteins of the flour, resulting in a light and chewy dessert. Similar to when adding cornstarch to a soup or pudding, if adding cornstarch to a dessert batter, it should first be turned into a slurry. This will ensure that all of the molecules remain intact and that the starch is evenly distributed. Upon adding cornstarch to your baked goods, evaluate it as you would a soup. Has your batter reached the desired consistency? If not, then a bit more cornstarch may be needed. Once your dough looks perfect, bake your dessert like usual. The result should be light, fluffy, and delicious desserts.
Anti-Caking Agent:
Have you ever wondered why your powder sugar ingredients include cornstarch? Cornstarch acts as an anti-caking agent. By keeping moisture and condensation from reaching whatever it is mixed with. It helps to prevent lumps in finely ground foods like sugar. Cornstarch isn’t just used to ward off moisture from sugar. The next time you’re in the grocery store take a look at how many products list cornstarch as an ingredient. From gravy granules to shredded cheese, you might be surprised by the wide variety of foods that cornstarch is added to.
Frying With Cornstarch:
Cornstarch can also be used as a coating for fried foods. While cornstarch shouldn’t be used as a substitute for flour in baked goods, you can very easily substitute it in for flours when coating fried chicken, fish, or other items you’re frying. Not only will cornstarch work in the same way that flours do, but it will hold up better against sauces and absorb less of the frying oil. Less oil means less fat in your meal.
When frying food with cornstarch, I recommend that you coat the items lightly. Applying a light even coat to your food will ensure that it results in a crispy texture. When too much cornstarch is added, the coating often turns out gummy rather than crunchy. For the perfect, gluten-free fried food, consider blending cornstarch with a gluten-free flour like almond flour. This will help create a more breaded result, similar to wheat flour.
©Tiny New York Kitchen © 2021 All Rights Reserved

Red, ripe, sweetly acid tomatoes are certainly one of the most prized of the summer vegetables. Let’s face it, tomatoes are only good during the summer and off-season ones just don’t taste like anything. In season the best solution is to grow your own or to know a gardener nearby. Greenhouse tomatoes are probably your best choice out of season.
Cherry tomatoes often have better flavor than regular tomatoes, and that is usually true out of season because they are greenhouse grown. Keep them at room temperature. Wash them before using, and when cut in half for serving they are certainly easier to eat.
To peel tomatoes, blanch the whole tomatoes. Drop 2 or 3 at a time into a large pot of rapidly boiling water and boil exactly 10 seconds. Cut out the core and peel the skin down from it. You may blanch tomatoes several hours in advance and peel them later. They keep fresher when still in their skins.
Many recipes call for tomato pulp, meaning you must seed and juice your tomatoes. To do so, halve the peeled tomato crosswise (not through the core). Then holding the half over a sieve set in a bowl, gently squeeze to dislodge most of the jelly-like substance, juice, and seeds; finally, poke out the residue with your finger. Press the juices out of the residue in the sieve and use in soups or sauce, or as a refreshing drink.
©Tiny New York Kitchen © 2020 All Rights Reserved

Pesto is one of those spectacularly simple sauces that only takes minutes to make. Essentially, you just have to throw basil, oil, and garlic into a food processor and you have a fresh pesto.
The wonderful thing about pesto is that it can be used for more than a plate of pasta. You can bake it on chicken, mix it into soup, add it to bruschetta, mix it in a skillet with eggs and hash browns, add it to a grilled chicken sandwich, or add it to a quesadilla. You can also add a dollop of mayonnaise to a few tablespoons of pesto to create a quick and easy aioli to use on sandwiches.
Pesto is excellent for transforming leftovers into something quick and delightful. You can take the pesto aioli and pair it with a leftover chicken cutlet, tomato slices, and a crusty slice of baguette to create a delicious sandwich.
“Work With What You Got!”
©Tiny New York Kitchen © 2020 All Rights Reserved
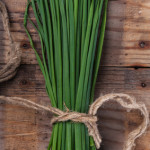
As gardens begin to grow, one of the first perennial herbs to appear are chives. Chives are quite resilient and are particularly easy to grow both in garden beds or in pots. They can stand a bit of shade, tolerate drought, and grow well in any type of garden soil. For first time gardeners, this is an excellent plant that will yield a reliable source of flavorful nutrition.
Chives belong to the lily family and are part of a large genus of over 500 species of perennials that contain bulbs or underground stems. Known for their strong scent and distinct flavor, chives, along with garlic, onions, scallions and leeks are known as allium herbs. Allium species have been cultivated around the world for centuries and are valued both medicinally ad for their fabulous flavor.
If you grow your own chives, you can continually cut them back so the crop will continue into early fall. If you let happen to let them go you will get lovely purple-pink globe shaped chive flowers that make a beautiful garnish as well as a bright addition to spring or summer salads.
Chives are best when used fresh. Rinse and dry them well, then snip with scissors or cut with a very sharp knife. Snipped chives can be placed in freezer bags and frozen for later use, but will not maintain the texture of fresh shoots.
This is an herb that will elevate so many dishes, including soups, stews, salads, sauces, marinades, dressings, and dips. Adding a few tablespoons of chopped chives to cottage cheese will add a pleasing punch to a super simple snack. Make an easy supper of baked potatoes or sweet potatoes topped with Greek yogurt and chives. Mixing chives into cream cheese, along with lemon zest, and a grinding of black pepper will make an excellent spread for sandwiches or crackers. Omelets prepared with chives, parsley, and dill are a nice choice for any meal.
Chives contain valuable vitamin and mineral content. Vitamins K, A, and C are found in chives, as well as calcium, an important mineral. Chives also contain small amounts of magnesium, phosphorus, potassium, and sodium. Purported to be anti-inflammatory, antibacterial and antiviral, eating more chives may boost your immune system and assist in maintaining superior levels of health.
If you buy your own chives at the grocery store, look for a bright green color with no sign of yellowing or wilting. Chives will keep in the crisper drawer of the refrigerator for several days. Before using, rinse and dry well and trim the ends before using.
Enjoy this light and bright spring herb.
“Work With What You Got!”
©Tiny New York Kitchen © 2020 All Rights Reserved

With cold winter days among us, simple soups are a favorite for weeknight dinners. There are plenty of reasons to love soup: lots of tasty choices, simple to make from scratch, stores well for leftovers, and is a delicious way to warm up on a cold winter’s day. There is something extra cozy about soup cooking on the stove when it’s chilly outside. Warm soup is so comforting and is excellent when battling a pesky winter cold or flu.
Don’t be afraid to look through your refrigerator and make up your own recipe.
Make sure to use a large pot or Dutch oven. This gives everything room to brown and cook evenly. Heat up a few tablespoons of butter or oil. The fat is important to draw out the flavors in the soup. Next start by adding vegetables in order of what needs to cook the longest. Onions are a good base of a soup. Add these first and allow them to cook on their own until they are soft and golden. Next add other vegetables like celery, carrots, and potatoes. They can brown and caramelize a bit in the oil or butter as well.
Once these have had a few minutes in the pot add salt and herbs. Add water or broth. Next you could add lentils, bens, or tomatoes. Allow to boil and then turn down the heat to a gentle simmer with the lit partly on the pot to reduce the amount of steam that escapes.
Once everything has cook you may purée the soup or leave as is. If you want to puree an immersion blender is very helpful. Add black pepper and taste to see if the soup needs a bit more salt. Sometimes a squeeze of lemon or lime or a dash of vinegar will brighten the soup and bring all the flavors together. You may garnish with herbs like chopped cilantro or soft greens like spinach.
Ladle into bowls. Some soups are eve better with a little swirl of plain Greek yogurt or a sprinkle of grated parmesan cheese. Or you may decide to add a bit of cooked rice to each bowl to round out the meal.
“Work With What You Got!”
©Tiny New York Kitchen © 2020 All Rights Reserved

Fresh basil can be dried, but freezing holds the flavor better, and there are two easy methods.
1. Freeze Whole Leaves: Blanch basil leaves in boiling water for two seconds and immediately place in an ice bath. Dry the leaves completely, then place in a freezer-safe container, layered with parchment paper or wax paper, and freeze up to four months. For the best flavor, do not thaw before using.
2. Purée And Freeze: Remove the leaves from the stems and wash and dry them. In a food processor, purée the leaves with olive oil (use about a tablespoon of oil per cup of basil). Freeze the purée in ice cube trays, then transfer to a resealable plastic bag and freeze up to four months. To purée works best in soups, stews, and sauces.
“Work With What You Got!”
©Tiny New York Kitchen © 2019 All Rights Reserved
I don’t know what’s more comforting than potatoes. A staple food in many parts of the world, potatoes are an integral part of much of the world’s food supply. Potatoes are the world’s fourth-largest food crop after maize, wheat, and rice.
There are currently over 1,000 different types of potatoes.
White Potatoes: These all-purpose potatoes are moderately starchy with a dense, creamy texture and can be roasted, baked, boiled, or steamed.
Russet Potatoes: Starchy and fluffy, these potatoes are ideal for mashing and baking, as well as French fries and latkes.
Fingerling Potatoes: Small, knobby fingerlings have thin, delicate skin that doesn’t need to be peeled. Their firm texture stands up to roasting, boiling, and pan-frying.
Baby Potatoes: Also known as new potatoes, these tiny potatoes come in a rainbow of colors (another reason to leave the skin on). They are best cooked whole and boiled, steamed, or roasted.
Gold Potatoes: These thin-skinned potatoes (also called yellow potatoes) are beloved for their buttery flesh. They’re fluffy enough to be smashed yet firm enough to be used in soup or stew.
Red Potatoes: Ruby skin gives these potatoes visual appeal, and their firm and waxy texture means they soak up flavor without turning too soft. They are ideal for salads and gratins.
Look for potatoes without any bruises, cuts, wrinkles, or soft spots, which can all be signs of age or poor handling. If they smell like soil, that’s typically an indication of freshness. While fresh is best, potatoes keep for quite some time. Store them in a spot that’s cool, dark, and dry. If eyes sprout, simply cut them off and use the potatoes as normal. Potatoes provide vitamins C and B6, plus iron and potassium. While the whole potato contains fiber, you will get an extra boost if you leave the skin on.
“Work With What You Got!”
©Tiny New York Kitchen © 2019 All Rights Reserved


