
Beer isn’t just for drinking. It’s also the secret ingredient in some of Tiny New York Kitchen’s favorite recipes, from stews to pasta sauce.
Depending on which brew you choose, you can add richness to stews and braises, a bright zing to sauces, and make baked goods extra tender and tasty. It’s great with chocolate. You can also pair it with your meals, just like wine, to make your dishes taste even better.
LAGER
Lager is the most popular beer for drinking. Smooth, light-bodied, and slightly floral, it goes with just about any dish, especially cheese. It’s also great to bake with. The bubbles in this beer add extra lightness and tenderness to all sorts of baked goods.
PILSNER
Clean, crisp, and slightly citrusy, this beer is refreshing on its own. Serve it with seafood or a simple tomato and basil pizza. Use it for quickly simmering shrimp because it won’t overwhelm the delicate, sweet flavor of the seafood.
STOUT
This rich dark beer has notes of coffee and caramel, great for sipping in colder weather. Pair it with heartier dishes like chili or steak and potatoes. In baking and cooking, stout makes chocolate cupcakes taste even more chocolaty and slow-cooked meats even richer.
AMBER ALE
You will know this beer by its reddish-brown color. It has a smooth, malty flavor that makes it a crowd-pleasing choice for your next party. Try this beer with grilled or roasted meats and barbecue. For cooking, it’s great in a glaze for pork or in a cheese sauce.
“Work With What You Got!”
©Tiny New York Kitchen © 2020 All Rights Reserved

Chefs love cast iron’s durability and its ability to evenly retain heat. What’s old is new again. Cast iron comes in all sizes from pans that hold a single fried egg to 20-inch giants that weigh 25 pounds and take up two burners. You can pick up a cast iron pan for $25 to $300. I like 10-inch skillets for everyday cooking, which are between four to six pounds and can comfortably accommodate a pack of chicken thighs. Remember that a bigger pan is a heavier pan, which limits how easily you can maneuver it as you cook.
Make sure to season your cast iron pan. Use a paper towel to rub your pan all over with a very light coat of neutral oil like grapeseed or vegetable oil and then place in a 500-degree oven for an hour. You want your pan to have a matte dark finish. Remove from the oven and let cool. Rub another very light coat of oil all over before storing. The very best thing that you can do to maintain that new seasoning is to get cooking. Each time you cook a steak or chicken thighs, the fat adds another coat to the pan’s surface, which will create a glassy finish over time. Re-season when your pan starts to look dry and dull or if you can’t remember the last time you cooked in it. Always rub you pan down with a thin coat of neutral oil before storing.
Just because you can cook it in cast iron doesn’t mean that you should! There are some foods that you definitely should not cook in your cast iron. Fish is not something that I would cook in cast iron unless I want to infuse next day’s pancakes with the essence of fish. Tomato sauce’s high acidity reacts with cast iron, which creates an unpleasant metallic flavor. I’d skip cooking scrambled eggs in cast iron unless I want to be on dish duty for an hour or two after breakfast.
Wash your pan! Yes, you do need to wash your pan. Each time you cook with cast iron a few burnt and crusty food bits inevitably seem to stick to the pan. If you don’t scrub it clean between uses, those bits will fossilize under subsequent layers of seasoning, which create an irregular surface that will never become truly nonstick (the opposite of what you want). Wash your pan with hot water and a drop of dish soap while it’s still warm. Take care not to let the pan soak in water. Wipe down the pan and then set it over a low flame for a few minutes to fully dry. Rub all over with a very light coat of neutral oil before storing (just like you would after seasoning it). These steps are crucial for keeping your pan in fighting form against Public Enemy Number One – RUST! If you ever do have spot rust just use and old toothbrush dipped in distilled vinegar to scrub it off, let it dry, and then rub in a drop of oil. If you make a regular habit of cleaning your cast iron you’ll have a faithful companion for life.
“Work With What You Got!”
©Tiny New York Kitchen © 2018 All Rights Reserved

Whether you’re a frequent or an occasional restaurant diner it’s nice to know a few inside tips on how to maximize your experience.
If you’re health conscious, don’t buy into claims that the food you order will meet your needs. Most restaurants don’t make food that’s healthy. They’re job is to make it taste good. Restaurants put so much butter on everything they serve. It’s difficult to find a healthy option today.
Always ask your server if there is anything on the menu you should steer away from. If your server say, “That would be the last thing I’d choose,” there is a good reason.
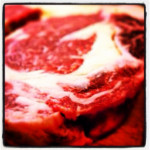
Rib eye is the best steak to order. It’s more flavorful and very tender. Don’t just say “medium rare.” Give your server a description of what the middle of the steak looks like – “all pink from edge to edge” or “I like it all red.” Everyone has a different idea of what the middle should be.
If you drink alcohol, the best bang for your buck is either beer or wine. Hard liquor is the most expensive, for what you’re getting.
“Work With What You Got!”
©Tiny New York Kitchen © 2018 All Rights Reserved
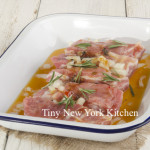
It’s so easy, but takes a tad bit of planning. Just pop meat in a heavy-duty resealable bag with your favorite marinade in the morning, refrigerate, and later in the day all you have to do is throw flavorful meat on the grill. You’ll be so impressed with yourself that you’ll feel like giving yourself a gold star! Make sure to place the bag in a bowl in the fridge to be safe. Sometimes, when I’m particularly crunched for time, I use classic Italian dressing as my go-to marinade.
Five Things To Marinate In Classic Italian Dressing
Flank Steak
Chicken Breasts
Butterflied Leg Of Lamb
Boneless Beef Short Ribs
Most Anything On A Skewer
“Work With What You Got!”
© Victoria Hart Glavin Tiny New York Kitchen © 2017 All Rights Reserved

Grilled Steak 3 Ways
Honestly, you don’t need a barbeque to make grilled steaks. Just go out and get yourself a grill pan and you will be wonder what took you so long in getting one. If you do want to throw your steaks on the barbeque then I certainly hope that you’re using a charcoal grill!
Classic
Rib Eye, Filet Mignon, Porterhouse, T-Bone or Strip Steaks
Olive Oil
Kosher Salt
Freshly Ground Pepper
Buy 1 steak per person. Bring steaks to room temperature. Preheat your grill or grill pan to a medium-high heat. Brush with olive oil, sprinkle with kosher salt, and pepper. Grill, turning 3 times (for crosshatch grill marks), until target temperature is reached – anywhere from about 5 to 15 minutes, depending on thickness. Remove from heat and allow to rest off heat for 10 to 15 minutes before serving.
Black Pepper Crusted
Rib Eye, Filet Mignon, Porterhouse, T-Bone or Strip Steaks
Olive Oil
Coarse Ground Black Peppercorns
Buy 1 steak per person. You will need about 2 tablespoons coarse ground black peppercorns per steak. Preheat your grill or grill pan to a medium-high heat. Brush steaks with olive oil and coat with peppercorns. Grill, turning 2 times (for crosshatch grill marks), until target temperature is reached –anywhere from about 5 to 15 minutes, depending on thickness. Remove from heat and allow to rest off heat for 10 to 15 minutes before serving.
Carne Asada Tacos
2 Pounds Flank or Skirt Steak
Marinade:
5 Cloves Minced Garlic
1 Diced Jalapeno Pepper
2 Teaspoons Cumin
1/2 Cup Chopped Cilantro
Juice of 2 Limes
1/3 Cup Canola Oil
1 Teaspoon Kosher Salt
Place the steaks in large ziplock bag. Pour in the marinade. Place in the fridge for 2 to 12 hours. Preheat grill or grill pan. Grill over a medium-high heat, 3 to 5 minutes per side to target temperature. Medium-rare is suggested. Remove from the heat and let rest 10 to 15 minutes. Slice thinly across the grain, serve with tortillas, salsa, and avocado.


