
I love growing my own vegetables, but I just don’t have the time and energy to grow everything. For me, Sunday is the perfect farm stand day. I love looking over and choosing from what has been grown locally. Besides supporting local farmers the fruit and vegetables always taste so much better than mass produced store bought produce. My advice is to savor the end of the summer season and go out to your local farm stand before it’s too late.

Homemade Fruit & Vegetable Wash
I’ve made the mistake of buying premade produce wash and have spent way too much money to find out that many of them don’t really work that well. It’s easy to make your own and you’ll save plenty of money as well. You’ll just need to invest in a decent spray bottle.
INGREDIENTS
1 Cup Water
1/4 Cup White Vinegar
3 Tablespoons Lemon Juice
Pour into spray bottle and use by spraying produce, wipe thoroughly, and rinse. It’s that easy!
Makes About 1 1/4 Cups
“Work With What You Got!”
© Victoria Hart Glavin Tiny New York Kitchen © 2016 All Rights Reserved

Ways To Make The Most Of Seasonal Citrus
Zest It
Add zip to baked goods, stir-fries or stews. Make citrus salt!
Juice It
Lemons juice helps keep sliced fruits and root vegetables from turning brown. Finish savory dishes with a squeeze of lemon juice to enhance the flavors.
Freeze It
Freeze citrus juice or zest until you’re ready to use it.
Dry It
Bake peels on the lowest possible heat until dry, but still pliable. Use to flavor black tea, roasted chicken or braised meats.
Candy It
Garnish desserts and cocktails with candied peels or enjoy them as a sweet snack.
“Work With What You Got!”
© Victoria Hart Glavin Tiny New York Kitchen © 2016 All Rights Reserved

Paleo Diet
The Paleo Diet (short for Paleolithic) is fashioned around the eating habits and available foods of our hunter-gatherer ancestors. These ancestors had to nourish themselves with the meat, fish, fruits, vegetables, nuts, and fats available to them in nature. With the benefit of large supermarkets, it’s easy today to mimic these foods in wider variety. Specific recommendations for eating Paleo will vary; however, the main ideas are the same: Reduce the risk of debilitating diseases and optimize health by eating whole, fresh, unprocessed foods and avoid foods that were not available prior to the advent of modern agriculture.
Research studies looking at the Paleo Diet have noted that eating a Paleo Diet for a short term improved the glucose control and lipid profiles in people with type 2 diabetes, compared to eating a diet containing low-fat dairy, moderate salt intake, whole grains, and legumes. Additional research indicates similar results may be possible in people without type 2 diabetes as well. The Paleo diet may result in higher levels of satiety (fullness) throughout the day when compared with a low-fat, low-calorie diet.
Paleo Do’s
Eat plenty of non-starchy vegetables and fruits.
Make fresh meat, poultry, fish, and seafood your primary sources calories.
Avoid highly processed meats that contain preservatives, artificial flavors, and sugar, such as some sausages, bacon, deli meats, and smoked fish products.
Consume nuts and seeds.
Use coconut oil, grass-fed butter, olive oil, avocado oil, nut and seed oils, and animal fats, such as goose fat or duck fat, for cooking and eating.
Balance the intake of acid-producing foods (meats, fish, salt, and cheese) with base-producing foods (fruits and vegetables) for optimal health.
Use sea salt to season foods, but try to decrease sodium intake in general.
Paleo Don’ts
Consume highly processed packaged foods.
Get heavy handed with the salt shaker.
Eat grains of any kinds. Quinoa, bulgur, rice, wheat, bread, pasta, etc., are all out.
Consume sugar (including honey and maple syrup), sweets, candy, or desserts.
Use artificial sweeteners, such as monk fruit extract, stevia, NutraSweet or Equal (aspartame), Splenda (sucralose), or sugar alcohols, such as xylitol, sorbitol, or maltitol.
Eat legumes, beans, peas, lentils, or soy, or foods make from soybeans.
Use canola or soybean oils or consume hydrogenated oils (trans fats).
Consume dairy, with the exception of fermented dairy or raw milk cheese on occasion.
“Work With What You Got!”
© Victoria Hart Glavin Tiny New York Kitchen © 2016 All Rights Reserved

Cooking With Lemons
Lemons are a chef’s secret ingredient. Most chefs will tell you that acidity elevates any dish. There is no need to get all fancy by using twenty year old balsamic vinegar. Just finish most of your dishes with a humble squeeze of lemon juice. Most line cooks have quart containers of wedges at their stations for juicing in the moment. Why lemon? Aside from the fact that you can always find one, you’ll taste what it does to the food, not the lemon itself. Along with salt and pepper, it’s all you need to season everything from simple pastas to grilled fish, roasted meats, and sautéed vegetables, as well as pan sauces, grain salads, and even run of the mill lentil soup. In your own kitchen cut lemon wedges ahead of time, then squeeze as you cook for the brightest flavor.
“Work With What You Got!”
© Victoria Hart Glavin Tiny New York Kitchen © 2016 All Rights Reserved

Less Stress Holidays
Holiday time is a wonderful time of year, but let’s face it, there is plenty of stress that comes with it. During the holidays, it’s better to keep things as simple as possible.
Appetizers & Hors D’Oeuvres: Keep it simple. Serve a simple, but beautiful cheese platter. Add bowls of dried fruit and nuts, as they’re always very festive. I like to set up a small snack table set with bowls of olives, savory popcorn, and Marcona almonds. I also like to serve a crudité platter for guests who may not want to eat rich foods or are perhaps trying to eat a bit healthier around the holidays.
Plan Your Menu: If you’re having a sit-down dinner, try to make a menu that can be prepared somewhat in advance. Some great options might be a beef Bourguignon, braised short ribs, coq au vin or any other main dish that can be made the day before. I am a big proponent of choosing things to cook that can be prepped ahead of time. I like to start off a dinner party with a nice salad that incorporates some seasonal ingredients like pomegranates, pears, citrus or candied nuts. A winter squash soup is also a nice way to begin a meal. Dessert can be a simple winter fruit crisp or a spice cake served with ice cream.
Get A Head Count: When it comes to a holiday meal, any time of year, depending on the number of guests, a simple yet broad menu works best. For buffet holiday parties with over a dozen people, you might want to offer a couple of different entrees. Add a vegetable and perhaps roasted potatoes or roasted root vegetables. Offering a nice crisp green salad always rounds out the menu as well. Add some delicious small rolls or a sliced baguette and you’re good to go.
Serving A Nice Beverage: Then there are the beverages. Having a festive specialty drink is always welcomed by your guests. If you’re mixing the drinks yourself, keep it simple. Please don’t spend all of your time being a bartender at your own party. That’s no fun! You could mix a nice holiday punch bowl with an adult kick ahead of time. A splash of pomegranate liqueur or elderflower liqueur is a nice addition to prosecco or champagne. A white Christmas cosmo (made with white cranberry juice) is a holiday favorite. Make it in advance and when you’re ready to serve just shake with ice and serve.
Make In Advance: Many things can be done days before the party. Shopping for non-perishable foods like spices, flour, sugar can all be purchased many days before your party. You can also make your holiday cookie dough or pie crusts in advance. All you need to do is to make sure you freeze them until you’re ready to use them.
Keep Calm & Have Fun: The most important thing is to keep calm and have fun. A holiday party of any kind should be a time of joy for everyone, even the host. If you find yourself working way too hard to throw and plan a party then ask friends or family members for help. Perhaps a few good friends could bring a dish or two to help ease the stress on your kitchen. The goal is to have a good time with family and friends.
Happy Holidays From Tiny New York Kitchen!
“Work With What You Got!”
© Victoria Hart Glavin Tiny New York Kitchen © 2015 All Rights Reserved
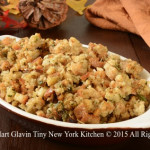
Dressing & Stuffing
I get asked this question every year about this time, “what’s the difference between dressing and stuffing?” The answer is that if you live north of the Mason-Dixon line, you probably call this side dish, baked inside a turkey, stuffing. If you’re a Southerner, you probably call it dressing. In classic cooking, it’s called forcemeat. Until Victorian times it was just called stuffing and then all of a sudden “stuffing” seemed indecent, and “dressing” was the new name.
For many years roast turkey meant stuffed turkey. Then all of a sudden health concerns arose about whether or not stuffed birds were safe. While these concerns are real, they shouldn’t affect careful cooks who follow food safety practices. Here are a few simple rules to follow while stuffing your bird.
Stuffing should always be cooked to at least 160 degrees in order to kill any potentially harmful bacteria. When the turkey is done, insert the meat thermometer deep into the center of the body cavity to check the temperature of the stuffing. If it isn’t at least 160 degrees then scoop the stuffing out of the cavity and transfer to a casserole dish. Cover and bake at 350 degrees until the stuffing reaches 160 degrees.
Always prepare your stuffing just before filling and roasting the turkey. NEVER stuff a bird the night before roasting as the turkey cavity provides a warm, moist environment that encourages bacterial growth. To save time on Thanksgiving morning, you can prepare stuffing ingredients the night before. Chop the vegetables, toast the nuts, etc. and then store them in zip lock bags in the refrigerator. If you are super pressed for time you may cook, cool, and refrigerate the seasoning meat and vegetables the night before. Reheat them thoroughly in a large-size skillet before adding to the bread or grains.
Stuffing should be warm when placed in the turkey. Cold stuffing may not cook to 160 degrees by the time the turkey is ready.
NEVER mix raw meat or vegetables into a stuffing. All meat and vegetables should be thoroughly cooked.
To serve the stuffing, remove it from the turkey and place in a serving bowl. Do not allow the stuffing or turkey to stand at room temperature for longer than 2 hours. Refrigerate any leftover stuffing separately from the turkey and use within 2 days. Reheat leftover stuffing thoroughly before serving.
“Work With What You Got!”
© Victoria Hart Glavin Tiny New York Kitchen © 2015 All Rights Reserved
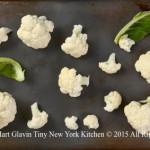
Cauliflower
Whether roasted, mashed, raw or added to pasta dishes, there’s something so comforting about cauliflower’s mild, creamy flavor. Plus, it’s one of the most nutritious vegetables around. What’s not to love?
Cauliflower is a member of the cruciferous family, along with broccoli, cabbage, and kale. These vegetables are an important part of a heart-healthy lifestyle, high in nutrients and fiber and very low in calories.
It’s easier than you might think to separate a whole cauliflower into florets, but if you’re really pressed for time, take advantage of prepared fresh or frozen cauliflower.
To prep cauliflower you will need to first remove the cauliflower’s leaves and cut out the core. Then break into evenly sized florets, cutting any very large ones. Add to a pot of boiling salted water and cook for about 5 minutes. Drain thoroughly. Rinse with cold water if you plan on using it later.
Cauliflower works great as a replacement for higher starch foods like rice, couscous, and potatoes. Steam and mash it to replace potatoes or pulse it in a food processor to create cauliflower “rice” that can be sautéed or steamed and served with curry or chili.
“Work With What You Got!”
© Victoria Hart Glavin Tiny New York Kitchen © 2015 All Rights Reserved
Certain Produce Shouldn’t Be Stored In The Refrigerator
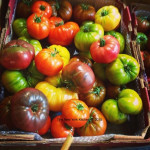
With some fruits and vegetables cold temperatures can lead to unsavory textures and flavors. Let tomatoes sit on the counter at room temperature, and store onions, garlic, and potatoes separately in a cool, dark place in perforated baskets or bins to allow for good airflow. Make sure to keep all fresh produce away from direct sunlight.
Onions & Garlic can lose crispness and become moldy when exposed to the refrigerator’s moisture. They can also impart their flavors on foods stored nearby.
Tomatoes flavor often diminishes when they’re chilled, and the texture can turn mealy as the cold temperature breaks down the membranes inside the fruit.
Potatoes starch content converts to sugar when cold, which leads to an unpleasantly sweet taste and discoloration when they’re cooked.
“Work With What You Got!”
© Victoria Hart Glavin Tiny New York Kitchen All Rights Reserve
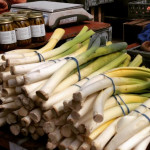
Here in New York City we’ve had a brutal winter. I’m so happy that spring is here at last. Farm to Table Leeks oh my! Bring on the spring and summer produce!


