

Constitution Week – Foods of Our Forefathers Part V
In her food preparation and preservation, the early American housewife was tied tightly to the calendar and the clock – much more tightly than today’s homemaker is. Local availability of foodstuffs and the limitations of existing food preservation techniques meant that nature largely called the shots on timing. Fruits and vegetables had to be picked at the right moment and processed quickly. Animals had to be slaughtered at their peak to keep best, and the peak varied from animal to animal. Even cheese and butter had a better likelihood of successful preservation depending on the season of the year in which they were processed.
Weather conditions played a major role: herbs had to be picked on a dry day to retain color and flavor; slaughter had to be done in cold weather to allow the carcass to cool rapidly; milk winters produced little ice for the following summer.
Also, once begun, preservation techniques sometimes had to be carried uninterruptedly through a long and tedious series of steps. There was no turning back – or time for vacations. Hams being cured had to be turned regularly, fish being dried had to be restacked four times a day, pickles had to have their brine skimmed and changed – or the product would be lost.
The labor involved in such food preservation was frequently heavy, but the routine of the rest of the house went on as usual. Organizational ability and endurance were essential, and woe betide the housewife who didn’t “keep up appearances” with her neighbors.
Just as the make-up of the early American’s diet varied with his geographic location, so did his needs – and abilities – in food preservation.
For example, the southern areas had access to a more varied food supply over the course of the year and consequently had less need to provide stores for the hard winter. At the same time, it was more difficult and expensive to get ice for short-term protection against the warmer climate. Ice was actually shipped from Massachusetts to the Southern states and to Cuba and Jamaica in the early 19th century, but it was obviously only available to the wealthier residents. The ice-box itself didn’t become popular until the mid 1800’s.
The shorter growing season in the North reduced the variety of produce available, but it also made cold storage in root cellars practical in small towns and rural areas. Above-ground ice houses and ice-saws, invented in the mid-nineteenth century, drastically reduced the cost of storing ice into the summer, and simplified storage of dairy products, fish and meat.
In many respects, the northern colonies had the greatest difficulty in providing a nutritious, varied diet throughout the year. Although fruits, berries, and summer vegetables were plentiful from the midsummer to early fall, proving vitamin-rich foodstuffs, during the winter and spring took special care. Many food items, of course, could be stored in relatively simple root cellars – where winter temperatures hovered between 30 and 40 degrees. In especially cold weather, a large tub of water was placed on the floor. This water gave off heat as it froze, which kept the vegetables safe. Turnips, beets and squash were kept in the driest areas. Carrots would keep anywhere. Cabbages and celery were buried in sand, cauliflower was set in holes and covered with straw, while cranberries were floated in water in a tub. Other crops were arranged loosely on slatted shelves for free air circulation, sometimes lying on straw.
Some vegetables, such as summer squash and potatoes, kept better at somewhat higher temperatures, and these were usually stored in the dark basement of the home. Temperatures between 50 and 60 degrees were ideal.
Eggs could also be stored in the root cellar, or in the basement of the house. Two methods were common. In one, the eggs (which the housewife was instructed to collect “in fine weather”) were dipped in boiling water for 20 seconds, then coated all over with butter or “sweet oil” (glycerin) and packed in sawdust. They would keep this way for some two to three weeks. Other housewives kept their eggs in crocks, submerged in “water glass” (sodium silicate). In this technique, it was important not to wash the eggs first, since their shells possess a natural coating which prevented the water glass from penetrating through the shell and ruining the egg. Even stored at room temperature, such eggs would keep for several months, while the hens sulked through the dark winter days.
If a family didn’t have room for a root cellar, it could accomplish somewhat the same effect with a pit, with the vegetables in layers separated by straw, and the whole covered with earth. Obviously, retrieving vegetables thus buried was a messy chore, and needed careful planning.
Under either type of storage, frequent examination was necessary, in order to detect spoilage and eliminate those items of fruit or vegetables which had gone rotten. The proverb about “one rotten apple spoiling the barrel” was not taken lightly! In fact, many housewives wouldn’t put apples in barrels, but spread them out, in order to “pick them over” more easily as the winter progressed. Spoiling apples were cut up, and the good parts made into applesauce as the winter progressed. Early cookbooks instructed the housewife to add a teaspoon of tartaric acid to the apples when making sauce late in the winter, as the apples lost their flavor. New Englanders even had a name for the period after the vegetables had spoiled or been used up, but before the dandelion greens appeared. They called it “the six weeks want.”
In the South, storage of this sort was less necessary, and the typical New England vegetables such as Hubbard squash and turnips were rarely seen on Southern menus.
To Be Continued…

 Constitution Week – Foods of Our Forefathers Part III
The abundance of meat in America was a major change in the diet of the early settlers. Rabbits and squirrels were available year-round nearly everywhere, plus deer and other large game in many regions. As settlers moved west, buffalo gained importance in the diet. Fish, shellfish and wild fowl became common food, and they were all essentially “free.” The existence of these various forms of game was a literal life saver in times of uncertain crops and unbroken land. The game gradually diminished, of course, as the population expanded and settlers pushed west, but it provided a large share of the diet in early and frontier days.
Ham, of course, appeared on almost every settler’s table, rich or poor. It might be the only meat served at a meal or it might appear in company with more exotic roasts and fowl, but it was always there – breakfast, dinner and supper.
Corn was also a staple of the colonists, either fresh in summer, or as hominy or corn meal all year. Corn was also put to another use by an early Virginian, Captain George Thorpe, who may have been the first food technologist in America as he invented Bourbon whiskey shortly before he was massacred by the Indians in 1622.
Meal patterns for working people in rural early America were very different from those common today. Breakfast was usually early and light which consisted of bread, hominy grits, and sometimes fruit in season. Coffee, which was a new beverage at the time, was popular that is if it was available. A drink made from caramelized grain was sometimes substituted. Chicory was popular in the South, either alone or used to stretch the coffee. Tea was often made from local leaves such as sage, raspberry or dittany. Alcohol in some form was often served.
Breakfast in more elegant homes or large plantations might be later in the morning, and include thinly sliced roast and ham.
Dinner was served somewhere between midday and midafternoon, depending on the family’s circumstances, and was the big meal of the day. There was almost always ham, as well as greens (called sallat), cabbage and other vegetables. In the proper season, special dainties would appear – fresh fruits and berries, or fresh meat at appropriate butchering times.
Desserts could be simple such as a scooped out pumpkin, baked until done and then filled with milk, to be eaten right out of the shell. Or dessert could be more complex such as ice cream or other fruit flavored frozen pudding or a blanc mange. Blanc mange was prepared from milk and loaf sugar, flavored with a tablespoon or two of rosewater, thickened with a solution of isinglass (derived from fish bladder, soaked overnight in boiling water). This mixture was boiled for 15 to 20 minutes, then poured into molds to set.
If isinglass was not available (most was imported from England), homemade calves foot jelly could be substituted, but eh dessert was not as fine.
Various alcoholic beverages, including wines, applejack, “perry” (hard cider made from pears), or beer were commonly consumed.
In winter, peaches and other fruit disappeared from the dinner table, to be replaced by dishes made from stored apples and dried fruit of various sorts. Soups or broths also took their place. Milk grew scarce as cows “dried up” in the short days. Vegetables gradually decreased in variety as stored crops wilted.
Apples quickly became a staple in early America. Orchards were easy to start, required a minimum of care, and apples stored well. Housewives devised a multitude of “receipts,” including sauces and butters for off-season, as well as many using dried apples.
Supper was late and a light bread and butter, some of the left-over roast from dinner, fruit (fresh if in season, pickled and spiced otherwise), and coffee or tea.
To Be Continued…


Today is Constitution Day (Constitution Week is from Sept 17th – Sept 23rd), which commemorates the formation, and signing of the U.S. Constitution by thirty-nine brave men on September 17, 1787, recognizing all who, are born in the U.S. or by naturalization, have become citizens. Our Constitution was signed on September 17, 1787, and after an extended period of national conversation and with the promise of a bill of rights, it became the supreme law of the land. We are a proud Nation of immigrants. Throughout our history, immigrants have embraced the spirit of liberty, equality, and justice for all – the same ideals that stirred the patriots of 1776 to rise against an empire, guided the Framers as they built a stronger republic, and moved generations to bridge our founding promise with the realities of time.
Many people wonder what it was like in those days. What did people eat? Today, it is possible to travel from coast to coast, at any time of the year, without feeling any need to change your eating habits. Sophisticated processing and storage techniques, fast transport, and a creative variety of formulated convenience food products have made it possible to ignore regional and seasonal differences in food production – if it is desirable or necessary for personal reasons.
It was not always so. As early Americans moved about, they had to change their eating habits to fit local conditions. Climate was one of the major limiting factors, but soil water and other vegetation play a part. It’s easy to romanticize the food supply of early America, and there is no question that in many ways it was a vast improvement over that available in many of the immigrant’s homelands. Inadequate yields, seasonal availability of produce, nutrition-robbing preservation techniques, constant labor, continual attention to schedules and danger of contamination were some of the factors bearing on the food supply that sustained our forefathers and foremothers as they developed our country.
Most early immigrants from Europe were accustomed to a limited, monotonous diet. Fresh meat was an infrequent main course on the tables of the working classes. Two meal’s worth of meat per week was regarded as good treatment for a servant. Game was the property of the Royal Family in most countries, and killing a deer was a capital offense. “Milk, butter and cheese are the laborers dyet, and a pot of good beer quickens his spirit,” said Breton, an English author, in 1626.
Only a handful of vegetables were known in Europe, prior to the discovery and settling of the New World. The short list included root vegetables such as beets, carrots, radishes, turnips and parsnips, plus cabbages, onions, leeks and lentils. There was a considerable variety of fruits and berries, but they were available only during a short harvest.
To Be Continued…


Knives
Whenever you have finished using a knife, you should hone, or sharpen, it briefly with a honing steel before you put it away. The steel, which is a long, metal rod, actually shaves off the tiniest bit of metal to improve the edge. Every 6 months or so, most knives should be sharpened either by a professional or with an at-home mechanical or manual sharpener (such as a sharpening stone).
Knife Set Essentials
Beyond the essentials, build your collection of knives based on the kind of cooking you like to do. If you roast meat a lot, then a carving knife may be more necessary than a thin-bladed vegetable cleaver.
Start With
8 Inch Chef’s Knife
3 1/2 Inch Paring Knife
9 Inch Serrated Bread Knife
Add
10 Inch Chef’s Knife
5 1/2 Inch Santoku (Metal or Ceramic)
Kitchen Shears
Nice To Have
Boning Knife
9 Inch Carving Knife
Thin-Bladed Vegetable Cleaver
Serrated Tomato Knife
4 Inch Paring Knife
The edge of a knife is made at a 20-degree angle. So, to properly hone a knife, hold the knife at a 20-degree angle to the steel and run each side of the cutting edge across and along the steel three or four times.
If you don’t have a honing steel handy, you can use a ceramic plate or mug. Turn the plate over and draw the knife along the edge of the unglazed bottom ring, holding the blade at a steady 20-degree angle. The ring of the plate will turn gray, but it will clean up with the wipe of a moist sponge.
When knives are stored in a wooden knife block, the blades are hidden, which can make it difficult to identify knives that have similar handles. To help distinguish one knife from another, use red or white nail polish to mark the heel of each knife with an initial, i.e., C for carving, S for serrated, or U for utility.

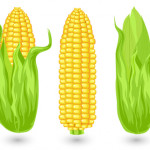
 Corn Basics
Fresh sweet corn is one of life’s pleasures indeed. While corn is available all year-round here in America its true peak season is July through September. This is when corn is at its best.
Buying Tips: Buy ears that are firm and well-shaped under fresh-looking husks with shiny, moist milk. Unshucked corn stays fresh longer. Pick ears that look plump, with kernels running to the tops of the ears. Tiny kernels indicate immaturity, but very large deep yellow kernels can be chewy. The fresher the corn, the sweeter the kernels. With age, the sugar in corn converts to starch. Frozen and canned corn kernels are good substitutes for fresh. Canned baby corn is used in Asian stir-fries. One medium ear of corn yields about 1/2 cup of corn kernels.
Storing: Cook and eat corn as soon as possible after picking. If you must, refrigerate in the crisper drawer up to one or two days.
Preparing: Shuck the corn and remove the silk just before cooking. An exception is corn grilled with the husks intact. To remove the kernels, trim the tips so you can stand the ear on end, then slice down to cut off the kernels, cutting close to the cob.
Cooking: Corn is one of the most versatile vegetables. Sauté the kernels alone or with other vegetables; stir into puddings, fritters, or other batters; or roast, microwave, or boil on the cob. To boil, in a large saucepot, heat 3 inches of water to boiling over a high heat; add the shucked corn and heat to boiling. Do not add salt as it toughens the corn. Reduce the heat to low. Cover and simmer for 5 minutes. Drain.
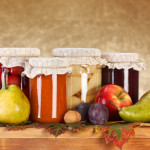
 Canning Basics
It’s that time again! Time to can jams, jellies, fruits, tomato sauces, pickles, vegetables and whatever else you can think up. The good news is that canning is making a comeback as new generations discover the joys of serving and sharing home preserved foods. Here are some basic guidelines to follow for safe and delicious results.
Equipment
Boiling Water Canner
I like to use a Boiling Water Canner and not a pressure canner. A boiling water canner (or water bath) is used for fruits, jams, jellies, pickled vegetables, pickles, relishes and tomatoes. It is a large pot that has a lid and a rack designed to hold canning jars. Any large cooking pot can be used if it has a rack, a tight fitting lid and enough depth for briskly boiling water to cover the jars by 1 inch. A pressure canner must be used for vegetables and other low acid foods. It is a large heavy pot that has a rack and a tight fitting lid with a vent, a dial or weighted pressure gauge and a safety fuse. It sometimes has a gasket. Pressure canners allow foods to be heated to 240° F and held at the temperature as long as necessary. When using a pressure canner, always refer to the manufacturer’s instructions before beginning.
Jars
Canning jars come in many sizes, from 4 ounces to 1 quart; those with wide mouths are perfect for pickles. Use the size and style called for in each recipe.
Use only standard canning jars. These are tempered to withstand the heat inside a canner, and their mouths are specially threaded to seal with canning lids. Inspect all jars before using them, discard any that are cracked or have chipped rims.
Lids
Use screw bands and flat metal lids that have a built-in sealing compound. Prepare them according to the manufacturer’s directions. The flat lids are designed for one-time use only. Screw bands can be reused if they are not bent or rusty.
Other Essentials
Special kits can be purchased that include all the canning essentials in one box. Kits typically contain the following: A jar lifter for removing hot jars from the boiling water; a magnetic lid want for retrieving sterilized lids from the hot water; a nonmetallic spatula which often has measuring increments for judging headspace (You certainly could use a ruler instead); and a funnel for directing hot liquids into jars. You may also want to have a food scale, food mill or sieve and a colander. Make sure to wash any utensils that will directly touch the food with soap and warm water before beginning.
General Canning Steps
For a boiling water canner, pack food into the canning jars by the raw pack (cold pack) or hot pack method. In raw packing, uncooked food is packed into the canning jar and covered with boiling water, juice or syrup. In hot packing, food is partially cooked, packed into jars and covered with cooking liquid. The following applies to both methods.
*Wash empty canning jars in hot, soapy water. Make sure to rinse thoroughly. Place the jars in the boiling water canner. Cover the jars with hot water and then bring to a simmer over a medium heat. For food processed under 10 minutes, boil the jars 10 minutes and keep warm in simmering water until needed. Set screw bands aside; place the lids in a separate saucepan. Cover with water; bring to a simmer over medium heat (do not boil).
*If you are using a separate pot for sterilizing the jars, fill the boiling water canner half full; bring to boiling. Heat additional water in another large pot (to top off water in the canner); keep it hot but not boiling.
*Prepare only as much food as needed to fill the maximum number of jars your canner will hold at one time. Keep your work area clean.
*Remove sterilized jars from the hot water; place the hot jars on cloth towels to prevent them from slipping during packing.
*Pack food into jars using a wide mouth funnel, allowing for adequate headspace. Ladle boiling liquid over the food, leaving adequate headspace.
*Check the headspace. The space between the top of the food and the container rim is the headspace, leaving the correct amount is essential. Headspace allows a vacuum to form and the jar to seal. Use a ruler to make sure that you have the amount specified in each recipe.
*Release trapped air bubbles by gently working a sterilized nonmetal utensil (such as one provided in a canning kit) down the jar’s sides. Add liquid, if needed, to maintain necessary headspace.
*Wipe jar rims with a clean, damp cloth, food on the rims prevents a perfect seal. Place the prepared lids on the jars, add the screw bands, and tighten according to the manufacturer’s directions.
*Set each jar into the rack in the canner as it is filled and sealed. Jars should not touch each other. Replace the canner cover each time you add a jar.
*When all jars have been added, ladle hot water from the extra pot into the canner to cover the jars by 1 inch.
*Cover, heat to a full rolling boil. Begin processing time, following recipe procedures and times exactly. If necessary adjust for altitude. Keep the water boiling gently during the processing, adding additional boiling water if the water level drops. If the water stops boiling when you add more, stop timing, turn up the heat, and wait for a full boil before resuming counting.
*At the end of processing, remove the jars; place them on a rack or on towels in a draft-free area to cool. Leave at least 1 inch of space between jars to allow air to circulate.
*After the jars are completely cooled (12 to 24 hours), press the center of each lid to check the seal. If the dip in the lid holds, the jar is sealed. If the lid bounces up and down, the jar isn’t sealed. Check unsealed jars for flaws. Contents can be refrigerated and used within 2 to 3 days, frozen, or reprocessed within 24 hours. To reprocess, use a clean, sterilized jar and a new lid; process for full length of time specified. Mark the label so you can use any recanned jars first. If the jars have lost liquid but are still sealed, the contents are safe. However, any food not covered by liquid will discolor, so use these jars first.
*Wipe jars and lids. Remove, wash, and dry screw bands; store for future use. Label jars with contents and date; include batch number if you can more than a load a day. If a jar spoils, you can identify others from the same batch. Store jars in a cool (50° to 70° F), dry, dark place. Use within 1 year.

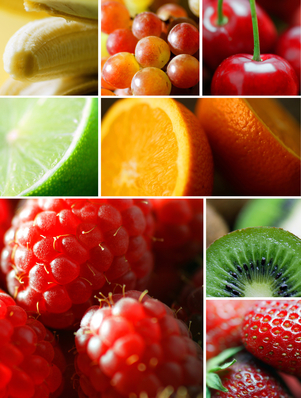 Fruit Essentials
Have you ever come home from the market after purchasing fruit to find that you spent money for nothing? I have plenty of times and it ticks me off every time. Here are some Fruit Essentials that may help you have more fruit shopping success.
Did you know that many plants that are botanically fruits are not sweet? We think of them as vegetables or non-fruits. Avocados, beans, coconuts, corn, cucumbers, eggplants, green peppers, okra, peas, pumpkins, sugar peas, string beans and tomatoes all fall in the fruit category. Some cookbooks make a distinction between fruit, vegetables and fruit vegetables. Fruit vegetables are foods that are botanically fruits, but are most often prepared and served like vegetables. These fruits are considered fruit vegetables: Aubergine, autumn squash, avocado, bitter melon, cantaloupe, chayote, chile, courgette, cucumber, eggplant, gherkin, green bean, green sweet pepper, hot pepper, marrow, muskmelon, okra, olive, pumpkin, red sweet pepper, seedless cucumber, squash, sweet pepper, tomatillo, tomato, watermelon, wax gourd, yellow sweet pepper and zucchini.
Pectin is a substance contained in some fruit which is used for making jams and jellies thicker. High pectin fruits are apples, cranberries, currants, lemons, oranges, plums and quinces. Low pectin fruits are bananas, cherries, grapes, mangos, peaches, pineapples and strawberries.
Low pectin fruits seem to discolor quicker than high pectin fruits ( bananas and eggplants). Lemon juice or vinegar slows the discoloring process. Other fruits and vegetables that discolor quickly are avocados, cauliflower, celery, cherries, figs, Jerusalem artichokes, mushrooms, nectarines, parsnips, peaches, pears, potatoes, rutabaga and yams.
Bruising: When a fruit is bruised the cell walls break down and discoloration begins. The process can be slowed down by refrigeration.
Cleaning: It is important to clean our fruit and vegetables. Rinse fruit in cold running water and scrub as needed before cooking or eating. Soaking fruit in water for more than a few minutes can leach out water soluble vitamins.
Peeling: The fruit skin usually contains a lot of important nutrients, but if you need to peel a thick-skinned fruit cut a small amount of the peel from the top and bottom. Then on a cutting board cut off the peel in strips from top to bottom. A good way to peel thin skinned fruit is to place the fruit in a bowl with boiling water and let stand for about 1 minute. Remove and cool in an ice water bath. You could also spear the fruit with a fork and hold over a gas flame until the skin cracks OR quarter the fruit and peel with a sharp paring knife or potato peeler.
Wax: Oh those beautiful waxed apples that wink at us at the market. They are beautiful because they are waxed. I don’t know about you, but I would rather not eat wax. Wax can be removed from the surface of fruits by washing them with a mild dishwashing soap and then thoroughly rinsing them. This will remove most of the wax, but probably not all of it.
Purchasing Ripe: Purchase these fruits fully ripe: Berries, cherries, citrus, grapes and watermelon. All of the fruits in this list, except berries, can be refrigerated without losing flavor.
Purchasing Not-So-Ripe: Apricots, figs, melons, nectarines, peaches and plums develop more complex flavors after picking. Store these fruits at room temperature until they are as ripe as you would like them.
Refrigeration: You can refrigerate apples,ripe mangos and ripe pears as soon as you get them. Do not refrigerat bananas.
Seasonal Fruit: Winter is the season for citrus. Fall is the season for apples and pears. Late spring is the season for strawberries and pineapples. Summer is perfect for blueberries, melons, peaches and plums.
Washing: Dry fruit with paper towels or kitchen towels and then use a blow dryer on the cool setting to completely dry fruit.
Squeezing: A microwave can be used to get more juice from citrus fruits. Microwave citrus fruits for about 20 seconds before squeezing the fruit for juice.
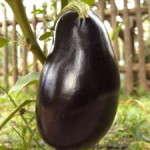
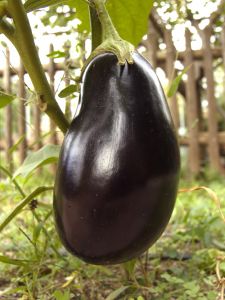 Eggplant Essentials
Eggplant (also known as Aubergine or Melongene) is an egg-shaped vegetable with a typically dark purple, shiny skin, though some are yellow or white. Eggplant was so named because the delicate white varieties that resemble eggs. Eggplant grows on a plant (Solanum Esculentum) in the nightshade family and is actually a fruit and not a vegetable. It is actually technically a berry. Eggplants have not always been popular. They were once known as “mad apples,” because it was thought that they caused insanity or death. They have been used in China since 600 BC. Thomas Jefferson first brought the eggplant to America from France in the eighteenth century. Male eggplants are rounder and smoother at the blossom end. They have fewer seeds which are bitter. Female eggplants are more oval and the blossom end is usually deeply indented. They tend to have more bitter seeds.
Eggplants are at their best from July through September. Select smooth, firm, glossy-skinned eggplants with green caps and stems. Smaller eggplants are sweeter than large ones. The fewer the seeds in an eggplant, the sweeter the eggplant. The more seeds in an eggplant, the older the eggplant.
Store eggplants in perforated plastic bags in the vegetable crisper of the refrigerator for four to five days.
Eggplants should be cooked immediately after peeling or cutting because the exposed flesh discolors rapidly due to oxidation. To prevent this start cooking as soon as you have cut it. If there is an unavoidable delay, promptly coat the surface with lemon juice or submerge with pieces in acidulated water.
Salt the flesh of a large cut-up eggplant to draw out any bitterness. For frying, it is always good to salt the eggplant or otherwise remove excess moisture. Only eggplants with tough, thick skins need to be peeled.
Eggplants should be cooked in only the minimum amount of fat or oil or without any at all because they have inner air pockets. Eggplants can absorb several times their weight in oil, even when breaded. Cooking with too much oil or fat breaks down the eggplant’s texture.
Slicing eggplants is so much easier when using a serrated knife.

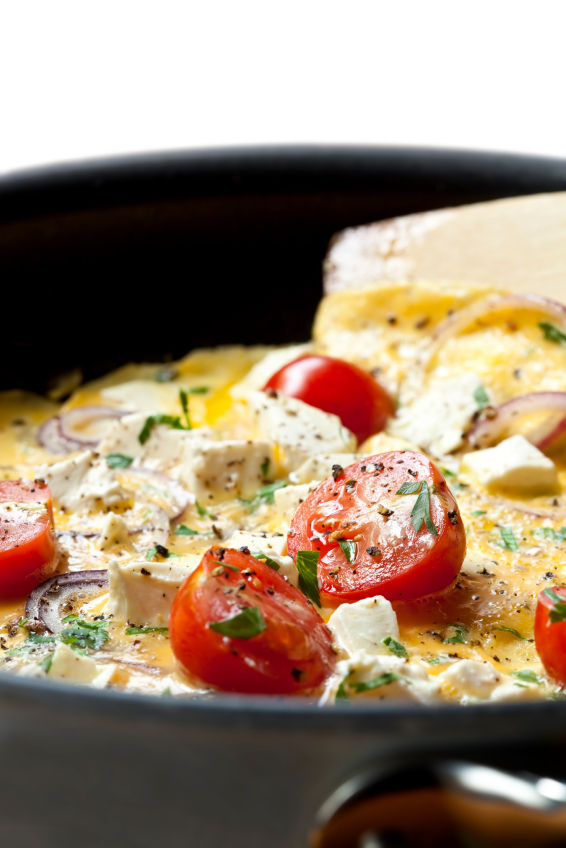 Pack Your Omelet Full Of Goodness
Omelets are one of those dishes that you can have for breakfast, lunch or dinner. The versatile omelet is low in calories too especially if you start with one egg and two egg whites (about 100 calories). Add the fillings of your choice and you have a protein packed meal that will satisfy your hunger.
Cheese Choices
Choose 1/4 cup of one of these cheese for your omelet.
Shredded Swiss
Shredded Cheddar
Crumbled Feta
Vegetables
Choose as many vegetables as you want because they are full of fiber and low in calories.
Chopped Broccoli
Sliced Mushrooms
Chopped Tomatoes
Proteins
Choose1/4 cup of these delicious proteins.
Smoked Salmon
Turkey Bacon
Ham
Optional
Choose one of these for a total treat.
Sautéed Potatoes
Avocado
Crème Fraiche

 Pasta Salad Ideas
Here are some super easy, but versatile Pasta Salad Ideas from Tiny New York Kitchen. All you need to do is add 3 cups of cooked & chilled pasta (of your choice) and 1 tablespoon of extra virgin olive oil to one of these inspiring combinations. Try them all throughout the summer for a whole treasure trove of side salads. If you want to make any of these a main dish then add 1 pound of protein such as grilled chicken breasts, grilled flank steak, grilled shrimp, grilled tuna (or canned tuna) or tofu. All recipes below serve 4.
For the Pasta: Cook 3 Cups of Pasta, Toss With 1 Tablespoon Extra Virgin Olive Oil & Then Chill Until Ready To Use. Add the Pasta to One of the Salad Combinations Below.
Nutty Beans & Greens
1 Cup Trimmed & Steamed Haricot Verts
1 Cup Baby Arugula
3 Tablespoons Toasted & Chopped Walnuts
1 Ounce Shaved Parmigiano-Reggiano Cheese
Snow Peas & Carrots
1/2 Cup Grated Carrot
1 Tablespoon Soy Sauce
1/2 Cup Thinly Sliced Snow Peas
1/2 Cup Shredded Red Cabbage
1/4 Cup Dry Roasted Peanuts
Cheesy Chickpea & Pesto
1/2 Cup Cooked Chickpeas
1 1/2 Ounces Crumbled Feta Cheese
1 Cup Halved Grape Tomatoes
1 Tablespoon Prepared Pesto
Mediterranean Medley
1/3 Cup Chopped Fresh Basil
1/2 Cup Thinly Sliced Cucumber
1 Cup Halved Cherry Tomatoes
1 1/2 Ounces Crumbled Feta Cheese
1 1/2 Ounces Sliced Kalamata Olives
Peppery & Nutty
1 Cup Arugula
2/3 Cup Thinly Sliced Radishes
3 Tablespoons Toasted & Chopped Walnuts
2 Ounces Crumbled Goat Cheese
Melon, Mint & Parm
1/2 Cup Fresh Cubed Cantaloupe
2 Tablespoons Fresh Mint Leaves
2 Ounces Thinly Sliced Prosciutto
1 1/2 Ounces Shaved Parmigiano-Reggiano Cheese
Freshly Ground Pepper
Cherry Almond Crunch
3/4 Cup Pitted Halved Fresh Cherries
1/4 Cup Toasted & Thinly Sliced Almonds
2 Tablespoons Chopped Fresh Basil
1 1/2 Ounces Crumbled Goat Cheese
Picnic Superstar
1/3 Cup Sliced Avocado
1/4 Cup Red Bell Pepper Strips
1/4 Cup Fresh Corn Kernels
2 Cooked Crumbled Center Cut Bacon Slices
2 Ounces Quartered Fresh Baby Mozzarella Balls


