 Oven Roasted Tri-Tip
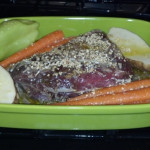
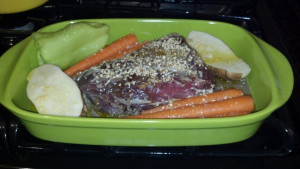
Tri-tip is the cut of beef from the bottom sirloin primal cut. It’s a small triangular muscle that is usually between 1 1/2 to 2 1/2 pounds per side of beef. Tri-tip was typically used for ground beef or sliced into steaks. Then in the late 1950s tri-tip became a local specialty in Santa Maria, California when Otto Schaefer decided to market it. Tri-Tip is full of flavor, lower in fat and typically sliced across the grain before serving.
INGREDIENTS
1 Tablespoon Kosher Salt
1 Teaspoon Freshly Ground Pepper
6 Cloves Minced Garlic
1/2 Cup Olive Oil
1/2 Cup Red Wine
1/2 Cup Beef Stock
1 1/2 to 2 1/2 Pounds Beef Tri-Tip
1 Potato Cut In Half
4 Whole Carrots
1 Cubanelle Pepper
2 Tablespoons Dried Garlic Bits
Kosher Salt & Pepper For Vegetables
In a medium size bowl combine the kosher salt, pepper, minced garlic, olive oil, red wine and beef stock. This will be your marinade. Pierce the tri-tip all over with a fork. Put the meat in a zip lock bag and pour in the marinade. Remove as much air as possible. Put it in the refrigerator overnight. Remove the meat 2 hours before cooking. Preheat your oven to 450° F. Take the tri-tip out of the zip lock bag and throw away the marinade. Put the meat, fat side up, in a roasting pan along with the potatoes, carrots and cubanelle pepper. Sprinkle the dried garlic bits all over the top of the meat. Salt and pepper the vegetables. Cook for 10 minutes at 450° F. Turn the oven down to 350° F and cover with foil for 15 minutes. After 15 minutes remove the foil and roast for another 15 minutes. The tri-tip should be medium rare at this point. Cook longer if you like. Remove the meat from the oven and cover back up with the foil. Let rest for 15 minutes (outside the oven). This will complete the cooking and let the juices stabilize. Transfer the tri-tip to a carving board and slice 1/4 inch slices diagonally across the grain. Transfer the meat and vegetables to a serving platter and have a perfect dinner. Serves 4

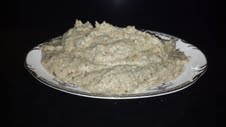 Artichoke & White Bean Dip
Quick, easy and healthy! Use my Artichoke & White Bean Dip as a dip or as a substitute for mayonnaise on sandwiches. The white beans and yogurt make a creamy dip without adding much fat.
INGREDIENTS
12 Ounces Marinated Artichokes (Drained)
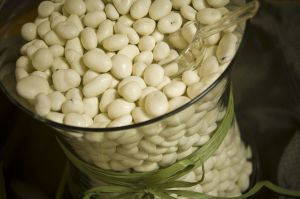
15 Ounces White Beans (Drained)
2/3 Cup Non-Fat Plain Yogurt
1 Tablespoon Red Pepper Flakes
1 Tablespoon Olive Oil
4 Garlic Cloves
1 Tablespoon Lime Juice
1 Teaspoon Kosher Salt
1 Teaspoon Freshly Ground Pepper
Place the artichokes, garlic, white beans, kosher salt and pepper into a blender or food processor. Process until smooth. Add the yogurt, olive oil, lime juice and red pepper flakes and blend. Scoop onto a serving plate or bowl. Refrigerate for at least 1 hour before serving. Use in place of mayonnaise or serve with pita chips or vegetable sticks. Serves 4

 Grilled Shrimp
If you’re too busy to cook or it’s too hot to turn on the oven then I’ve got a delicious and easy grilled shrimp recipe for you. If you don’t have a grill then you can quickly sauté the shrimp. The secret is all in the marinade.
INGREDIENTS
1 Pound Uncooked Shrimp
1/2 Cup Olive Oil
1/2 Cup Chopped Cilantro
3 Minced Garlic Cloves
Juice of 1 Lime
Juice of 1 Lemon
1 Cup White Wine
Zest of 1 Lime
1/8 Teaspoon Kosher Salt
1/8Teaspoon Freshly Ground Pepper
In a small mixing bowl, combine all of the ingredients. Pour into a ziplock storage bag. Make sure the shrimp is deveined. Place the uncooked shrimp into the ziplock bag. Let marinate for 10 minutes only. If you leave the shrimp in for longer the acid from the lemon and lime with “cook” the shrimp. Prepare your grill to medium hot. Cook for 3 minutes on each side. Remove from the grill and transfer to a serving platter. Serve immediately. Serve with a salad and rice. Serves 2
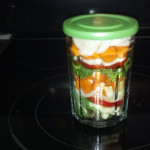
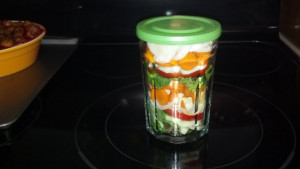 French Jam Jar Salad
Here is a great idea for either a picnic or taking your lunch to work. Put your salad in a French Jam Jar for easy storage and carry. You can layer mixed green salads, fruit salads or any kind of salad you want. Here I layered a simple vegetable salad.
INGREDIENTS
Mache
Peeled Cucumbers
Sliced Tomatoes
Chopped Belgium Endive
Chopped Carrots
French Jam Jars
Peel the cucumbers, slice the tomatoes, and chop the carrots and endive. Layer up the vegetables into as many French jam jars that you need. Put the salad dressing into a separate container. Seal up the jars and pack up for your picnic or work. Enjoy!
I always stock up on French jam jars. They are versatile and quite handy in a pinch. I also use them to store left-over food in the refrigerator. Trust me; left-overs won’t look so pathetic.

 Chopped Fiesta Salad
Sometimes you just need a good salad. I came up with this simple, yet tasty, fiesta salad that is a meal by itself or paired with a main course. I served it with roasted chicken breasts. Serve with salsa dressing.
INGREDIENTS
2 Cups Chopped Spinach
2 Cups Chopped Romaine
1 Chopped Ripe Tomato
1 Medium Chopped Red Bell Pepper
1 Medium Chopped Yellow Bell Pepper
1 Cup Corn
1 Large Chopped Cucumber
5 Chopped Radishes
1 Small Chopped Zucchini
Tortilla Chips
Salsa Dressing
Chop the spinach and romaine lettuce and place in a large bowl. Chop the tomato, red & yellow bell pepper, cucumber, radishes and zucchini. Add to the spinach and romaine. Add the corn. Toss the salad. Arrange tortilla chips around the edges of the bowl and crumble a few on top. Serve immediately as the tortilla chips tend to get a big soggy if left to sit long. Serves 4
To make the salsa dressing all you need to do is to combine 1 cup of ranch dressing to 2 cups of salsa in a food processor or blender. Place in the fridge for 30 minutes.

 Victoria's Iced Coffee
It’s going to be another scorching hot day today. Forget going to an overpriced coffee place and cool off by making yourself a tall glass of iced coffee.
INGREDIENTS
8 Ounces Brewed Coffee
4 Coffee Ice Cubes (Optional)
Milk
Sugar
To make iced coffee it is a good idea to use twice the usual amount of ground coffee, when brewing, because the coffee will get diluted by the melting ice cubes. Or to avoid diluting you could make your own coffee ice cubes by pouring cooled coffee into your ice cube trays and freezing. If you do use the coffee ice cubes then you could regular strength brewed coffee. Pour the coffee into a tall glass. As you would with your regular hot coffee add milk and sugar. Stir and sip until your heart’s content. Stay cool today. Serves 1

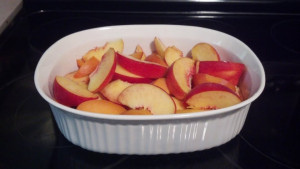
 Peach Crisp
I came across a beautiful stack of organic peaches and ended up buying way too many. They were so juicy and flavorful, but I just couldn’t eat them all so I decided to make a peach crisp. The secret to my peach crisp is crystallized ginger. It just adds a nice little something with each bite.
INGREDIENTS
8 Large Sliced Peaches
1/4 Cup Light Brown Sugar
4 Tablespoons Unbleached Flour
1 Teaspoon Ground Cinnamon
1/4 Cup Crystallized Ginger
Topping
1/2 Cup Old Fashioned Oats
1/2 Cup Unbleached Flour
1/2 Cup Light Brown Sugar
1/2 Cup Sugar
1/2 Teaspoon Ground Cinnamon
12 Tablespoons Cold Butter
Preheat your oven to 350° F. Pour the peaches into a large glass baking dish. In a medium size bowl combine 1/4 cup light brown sugar, 4 tablespoons unbleached flour, crystallized ginger and 1 teaspoon ground cinnamon. Pour the mixture over the peaches and gently mix. For the topping combine 1/2 cup old fashioned oats, 1/2 cup unbleached flour, 1/2 cup light brown sugar, 1/4 cup sugar, 1/2 teaspoon ground cinnamon and 12 tablespoons gold butter in a medium size bowl. Cut in the butter until the mixture looks like coarse crumbs. You can achieve this by using either a pastry blender or two forks. Sprinkle the topping over the peaches and bake in the oven for 50 minutes until your crisp is bubbly around the edges. Remove from the oven and let cool for 10 minutes. Serve warm with vanilla ice cream. Serves 6

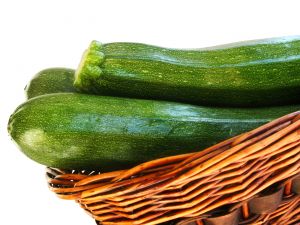 Stuffed Zucchini
As the summer marches on I find myself buried in zucchini and out of cooking ideas. Stuffed Zucchini is a nice side dish or can be served as a main course. If you are buying zucchini make sure to buy firm zucchini with tiny prickly hairs around the stem end. The hairs are a sign of freshness. Seeding the zucchini allows excess moisture to evaporate during cooking. Be sure to rinse the cannellini beans before using.
INGREDIENTS
6 Tablespoons Olive Oil
4 Medium to Large Zucchini (Halved & Seeded)
1/4 Teaspoon Kosher Salt
1/4 Teaspoon Freshly Ground Pepper
2/3 Cup Panko Bread Crumbs
2 Minced Shallots
6 Minced Garlic Cloves
1 3/4 Cup Rinsed Cannellini Beans
2 Large Chopped Tomatoes
6 Ounces Shredded Monterey Jack Cheese
1/2 Cup Chopped Fresh Basil
Preheat your oven to 400° F and move the oven rack to the upper middle position. Put a baking sheet on the rack and heat while preparing the zucchini. Wash and cut the zucchini lengthwise. Remove the seeds by running a small spoon inside each zucchini half to scoop out the seeds. Brush 2 tablespoons of olive oil over the cut sides of the zucchini and sprinkle with the 1/8 teaspoon salt and 1/8 teaspoon pepper. Put the zucchini halves, cut side down, on the hot baking sheet. Bake for 10 minutes until the zucchini is slightly softened and the skins are wrinkled. Turn the zucchini halves over and set aside on the baking sheet. Heat 2 tablespoons of olive oil in a large skillet over a medium heat. Add the bread crumbs, remaining salt and pepper and cook for 5 minutes. Stir often. The bread crumbs should be golden brown. Transfer the bread crumbs to a bowl and set aside. Wipe out the skillet with a paper towel. Heat the remaining olive oil in the skillet. Add the shallots and cook for 3 minutes. Stir in the garlic and cook for 1 minute. Add the cannellini beans and the chopped tomatoes. Cook for 3 minutes. Turn off the heat and stir in 1 cup of the Monterey Jack cheese and the basil. Divide the filling evenly among the zucchini halves. Pack lightly. Sprinkle the remaining cheese on the zucchini and then sprinkle the toasted bread crumbs. Bake the stuffed zucchini for 7 minutes until heated through. Remove from the oven and transfer to a serving platter. Serves 4
 Saint Swithin’s Day Apple Crumble Pie
My Saint Swithin’s Day Apple Crumble Pie is made with fresh apples, cinnamon and a brown sugar and butter topping.
INGREDIENTS
1 Unbaked Pie Shell (9 inches)
6 Cups Peeled & Sliced Apples
3/4 Cup Sugar
1/2 Teaspoon Ground Cinnamon
1/4 Teaspoon Ground Nutmeg
1/8 Teaspoon Kosher Salt
Topping:
1/4 Cup Brown Sugar
1/4 Cup Unbleached Flour
3 Tablespoons Butter
1/2 Cup Chopped Pecans
Preheat your oven to 400° F. Fill the pie shell with the apple slices. In a small mixing bowl combine the sugar, cinnamon, nutmeg and salt. Sprinkle the sugar mixture over the apples. Next, in a small bowl combine the topping ingredients. Sprinkle the topping ingredients over the top of the pie. Bake for 50 minutes until the apples are tender and the topping is browned. Remove from the oven and cool. Serve with ice cream or whipped cream. Serves 8

 Bastille Day Croque Monsieur
Hey, it’s Bastille Day! Don a beret and some tricolor clothes and make a croquet monsieur to celebrate.
INGREDIENTS
4 Slices French or Italian Loaf Bread
2 Teaspoons Dijon Mustard
1 1/2 Cup Grated Gruyère Cheese
2 Slices Ham
2 Tablespoons Butter
Preheat your oven to 350° F. Spread 1/2 teaspoon of the Dijon mustard over each slice of the bread. Place 1/2 cup of the grated Gruyère cheese on top of the two slices of bread. Next, place the ham on top of the grated cheese. Finish with the remaining cheese on top of the ham. Place the other slice of bread on top. In a large skillet heat the butter over a medium heat until the butter is foaming. Carefully add the sandwiches and fry for 2 minutes on each side until they are golden brown. Transfer the sandwiches to a baking sheet and put into the oven for 5 minutes until the cheese has fully melted. Remove from the oven and place the sandwiches on a serving plate. Slice each sandwich in half and serve immediately. Serves 2
Celebrate All Things French!


