
Roasting refers to proteins and vegetables cooked mostly at high temperatures in the oven. Baking uses a lower temperature to cook breads, baked goods, and casseroles.
Roasting makes any vegetable taste better. It brings out their flavor, caramelizes their natural sugars, and adds crunch. If your family doesn’t love certain vegetables like broccoli or Brussels sprouts, roasting is a great way to change their mind. Double what you’re roasting and then turn extra servings into quick meals later in the week. Cooking a little extra with one meal lets you make the most of value-sized packages of proteins and other store sales. With leftover already planned, you won’t need to lean on takeout.
Why we love to roast:
It’s Affordable! Inexpensive ingredients are tastiest when roasted. Root vegetables are browned and crisp, tomatoes and grapes are extra juicy and sweet, and tough cuts of beef are fall-apart tender. You also don’t need any special equipment to roast.
Roasting Is Healthful! Roasted foods need very little fat to cook compared to frying or sautéing. Roasting also intensifies flavors without added salt, sugar, or other ingredients.
It’s Easy! Roasted foods need little prep before they cook. And once the oven door closes, you can walk away. Fewer pans and utensils are needed, making cleanup easier too.
Essential Tools For Roasting:
Rimmed Sheet Pan: The rim keeps vegetables from falling off the sides and catches any juices from meats and fish.
Oven-Save Skillet: Go from stovetop to oven and back. Sear meats before roasting or make a pan sauce with the meat drippings after roasting.
Roasting Pan: Best for large roasts, hams, and turkeys. An inner rack lifts the meat so it can brown and crisp underneath.
Parchment Paper: Line pans to keep foods from burning and sticking, then toss for easy cleanup. If roasting at a higher temp or broiling use foil.
Metal Tongs: Flip and stir foods on a hot pan with ease. Look for tongs with a heat resistant grip.
Silicone Brush: Brush on a sticky glaze or baste foods with sauce. The silicone bristles are easy to clean.
Tips For Sheet Pan Roasting:
Jump Start Browning by preheating your sheet pan before adding vegetables.
Pat foods very dry with paper towels so the outside browns while the inside cooks through.
Cut foods to the same size and thickness so smaller pieces don’t burn.
Space out foods on the sheet pan so they have room to crisp and brown.
Let sheet pans cool before rinsing to keep the metal from warping.
©Tiny New York Kitchen © 2021 All Rights Reserved
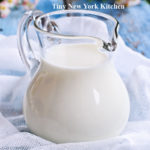
Buttermilk is a fermented dairy drink that was traditionally the liquid left behind after churning butter out of cultured cream. Today, most modern buttermilk is cultured. Cultured buttermilk was first commercially introduced in the US in the 1920s. Commercially produced buttermilk is milk that has been pasteurized, homogenized, and then inoculated with a culture of Lactococcus lactis to simulate the naturally occurring bacteria in the old-fashioned buttermilk. The tartness of cultured buttermilk is primarily due to lactic acid produced by lactic acid bacteria while fermenting lactose, the primary sugar in milk.
Condensed buttermilk and dried buttermilk are very important in the food industry. Liquid buttermilk is used primarily in the commercial preparation of baked goods and cheese. Buttermilk solids are used in ice cream manufacturing as well as being added to pancake mixes to make buttermilk pancakes.
Buttermilk reacts with the baking soda and powder to give quick breads their rise and tender crumb. The reaction is best at the beginning, you’ll want to get the loaf in the oven right after mixing the wet and dry ingredients. Buttermilk can also be used in marinating meats, especially chicken and pork, because the lactic acid helps to tenderize, retain moisture, and allows added flavors to permeate the meats.
©Tiny New York Kitchen © 2021 All Rights Reserved

Holiday baking time is a fun time of the year with the kitchen filled with delicious aromas and an array of treats to share with friends and family. No matter what style or flavor is your favorite, follow these steps for the best cookies you’ve ever baked, every time.
Use Room Temperature Ingredients
Get eggs and butter out of the refrigerator early, so they blend better in your cookie dough. Your cookies will have better texture and volume when all the ingredients are evenly incorporated.
Measure With The Spoon & Sweep Method
Use a spoon to add dry ingredients like flour to a dry (flat edged) measuring cup, then level off with the back of a knife. This method gives you the right amount of flour for the recipe, so your cookies aren’t too dry or dense.
Chill Dough Before Shaping Or Slicing
Refrigerate at least 1 hour or even overnight, so the dough is easier to work with and cookies hold their shape. Giving the ingredients time to meld makes your cookies taste better too.
Flour Your Cookie Cutters As You Go
Keep a small bowl of flour next to your work surface when rolling and shaping cutouts. Dip cookie cutters in flour in between stamping so they release easily and don’t stick to the dough.
Use Parchment Paper To Line Baking Sheets
Ensure that your cookies won’t stick to the baking sheet by using parchment paper liners. Parchment can be used more than once depending on the style of cookie, then can be replaced for more baking and easier cleanup.
Rotate Sheets Halfway Through Baking
All ovens have hot and cold spots. Help cookies bake evenly by switching the sheets between the top and bottom oven racks or rotating the sheets 180 degrees on the rack halfway through the baking time.
Rest On Baking Sheets For 1 To 2 Minutes Before Moving To Cooling Rack
When cookies are removed from the oven, they can still be soft and molten on the inside. Let the cookies settle and cool for a minute or two before transferring to a wire cooling rack with a thin spatula.
Cool Baking Sheets To Room Temperature Between Batches
Unbaked dough can start to melt immediately on a hot baking sheet, causing cookies to spread and overcook in the oven. Let sheets cool to the touch before using again.
Cool Cookies Completely Before Frosting Or Storing
Frosting can soften and melt on warm cookies, while sealing cookies in a container before they are cooled can cause sogginess. Let cookies rest on a rack for at least 1 hour before decorating or packaging.
Add A Small Piece Of Bread Or Orange Peel To the Cookie Tin
The cookies will slowly absorb the moisture from the bread or peel, so they won’t go stale as quickly. Replace the bread or peel every few days as it dries out.
©Tiny New York Kitchen © 2020 All Rights Reserved

Autumn’s bounty is vibrant, varied, and delicious. Apples of all varieties are now available at farmers’ markets and supermarkets, including crunchy, sweet Honeycrisp, gorgeous Galas, MacIntosh mottled with both green and red, pale yellow Ginger Golds, and dark, dusky Paula Reds.
Apples are the perfect snack, satisfying and sweet. Try slicing an apple, place the slices in a plastic baggie, sprinkle liberally with cinnamon, close the bag, and shake until the slices are well coated with cinnamon. The apple slices will stay crisp and white for several days in the refrigerator. Perfect for grab and go school lunches, picnics or work from home snack breaks.
A versatile cooking ingredient, apples go well with both sweet and savory components. Combing apples with plums, cranberries, figs, raspberries or blueberries will yield particularly pleasing desserts, such as pies, puddings, tarts, cobblers, and crisps. Whether baked, poached or sautéed, apples lend marvelous layers of flavor to breads, sauces, slaws, salads, stuffing, coleslaw, chutney, and relishes.
As the weather turns cooler, what could be more comforting than the scent of apples roasting in the oven, mingling with spicy cinnamon. Apples enjoy an easy association with all manner of spices, including allspice, cloves, ginger, and nutmeg.
©Tiny New York Kitchen © 2020 All Rights Reserved

I know that summer baking seems counter intuitive, but for some reason I feel compelled to keep baking in the warmer months of the year. Keeping your home cool can be though enough without the oven adding to the heat. Plus, adding in heat-sensitive ingredients and humidity and you can have less than perfect baking results. Summer does bring wonderful seasonal ingredients like berries and stone fruits that should be missed.
Use your oven in the morning or evening. We all know that your oven can heat up your kitchen quickly. This is why I like to bake early in the morning or in the evening when the outside temperature is lower.
Choose recipes with shorter baking times. In keeping with minimizing the heat from your oven, look for baking recipes that don’t require lots of oven time. A simple cake or a pan of mini cupcakes will bake more quickly than a Bundt cake or even a pan of brownies. If you’re a cookie baker try baking a pan at a time to avoid having the oven on for all the time it takes to bake dozens of cookies. You can refrigerate the dough between batches or even freeze the dough to bake when your cookie cravings strike.
Refrigerate cookie dough and pie crusts. Speaking of cookie dough, keep in mind that a warmer kitchen will also make your cookie doughs warmer. If the butter in the dough begins to melt, you could end up with flat, tough cookies. You can try scooping and baking your cookies quickly, but if you refrigerate the dough before baking and between batches you will avoid these issues. This applies to pie crusts as well. It’s not unusual on a warm day to end up with a too warm, too soft pie crust once it’s rolled out, placed in the pan and the edges fluted. When this happens, just put the pie pan in your refrigerator for a bit to let it cool and rest.
Keep an eye on softening butter. With a warmer kitchen butter will soften faster. The warmer it is the faster butter will soften. If you’re using a recipe that contains softened butter, remember to check for softness sooner than normal to ensure that the butter doesn’t get too soft and affect the texture of your baked goods.
Humid days can definitely affect your baking. If you are baking something with a lot of liquid in it, then it may take longer to bake than usual. Keep an eye on whatever you’re baking and follow the recipe’s directions and your best judgement to check for doneness.
Fresh berries and stone fruits are one of summer’s gifts and it is nice to bake with them. There are so many easy ways to bake with summer fruit. A simple fruit crisp or cobbler is always a welcome treat on a summer day. They are also wonderful garnishes for many desserts like cheesecake and pound cake.
Frosting and heat generally don’t mix well. If you’ve made a cake or cupcakes that are frosted you may want to keep them in the refrigerator until it’s time to serve them. Bring them to room temperature before serving. Refrigerating these types of desserts isn’t a bad idea year-round, especially if the dessert won’t be eaten within a day or two.
No bake desserts may be the way to go. Skipping the oven time can still yield amazing desserts that are perfect for the season with their cool, creamy flavors, and textures. From ice cream to cheesecakes to pies and a whole lot more, you can find plenty of ways to satisfy your sweet cravings.
Support your local bakery. If you are lucky enough to have a great local bakery, take advantage of it. A simple pound cake can be turned into something special with just some fresh fruit and sweetened whipped cream. Brownies can be dressed up in a big way with a scoop of ice cream, a drizzle of caramel sauce, and a sprinkling of nuts. Your grocery store can help, too, with shortcut ingredients like puff pastry.
“Work With What You Got!”
©Tiny New York Kitchen © 2020 All Rights Reserved

Rhubarb is a fabulous spring crop. The sour sweetness of rhubarb is absolutely nice in cakes, breads, pies, cobblers and jams, as well as sweet and savory compotes, chutneys, and sauces. Savory rhubarb chutney, cooked with onions and hot pepper is an exciting accompaniment to grilled pork, chicken, or shrimp. Sweeter versions employing brown sugar and lemon peel are superb served with pancakes, French toast, waffles or pound cake. Ladled atop frozen yogurt or ice cream, sweet rhubarb sauce is perfect for a spring sundae when the sun burns bright. This same sauce can be strained to yield a perfectly pink syrup. Combine with cold sparkling water or seltzer for a refreshing mocktail, or add to prosecco for a beautiful brunch beverage.
Rich in fiber, protein, vitamin C, potassium and calcium, rhubarb provides many valuable nutrients. A natural laxative, rhubarb may help east constipation. In fact, it is written that rhubarb was utilized in ancient Chinese medicine for treating stomach ailments. The vitamin K found in rhubarb may help strengthen bones, as well as possibly inhibiting inflammation in the brain. Rhubarb also supplies the body with vitamin A, which may help diminish signs of aging, particularly skin damage.
When choosing rhubarb at the supermarket or farm markets, look for glossy, firm stalks. Trim the leaves off when you bring your rhubarb home, as they are toxic. Store the stalks wrapped in a paper towel in your vegetable drawer. Wash before using. Rhubarb freezes beautifully, place chopped stalks on a parchment paper lined baking sheet and place in the freezer. When the chunks are frozen, store them in freezer bags and use within one year.
“Work With What You Got!”
©Tiny New York Kitchen © 2020 All Rights Reserved

As many people are staying put inside of their homes avoiding exposure to COVID-19, many have turned to baking. Baking is a form of self-care and mindfulness. There is something meditative about creating a dessert or bread that you pay attention to in the moment. Desserts might be trivial, but sometimes triviality should be embraced. We are living in unusual times, but after all, for the sake of mental and physical health, everyone deserves a coping mechanism that lends some sense of structure in a chaotic world. Consider your baking a gift to yourself.
“Work With What You Got!”
©Tiny New York Kitchen © 2020 All Rights Reserved
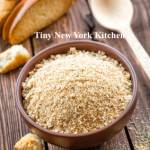
Fresh, or soft, bread crumbs and dried bread crumbs begin at the same place. Both are easily made by processing sliced bread in a food processor or blender. Use white bread with a firm crumb, such as a good quality sandwich loaf. Avoid bread with an open, airy crumb or one with a dark crust. Sourdough bread will lend its own tart flavor, so it isn’t the best choice for bread crumbs, which should be neutral. Whether you keep the crust on or off it up to you.
For fresh bread crumbs, tear the fresh bread into pieces about 2 inches square, and process in a food processor or blender until pulverized. Store them in a resealable bag in the freezer for up to 2 months, they do not have to be thawed before using.
For dried bread crumbs, don’t use old, desiccated bread, or you could get off flavors. Instead, toast the sliced fresh bread until it is firm around the edges but not browned. As the bread cools, it will crisp. Process the lightly toasted bread in a food processor or blender until pulverized. Prepare just the amount of bread you need. Dried bread crumbs don’t store well.
You can make bread crumbs out of more than sandwich bread. Croissants, bagels, and rolls can all be turned into crumbs.
Panko are crisp, fluffy Japanese-style bread crumbs and are usually reserved for dishes where an especially crunchy coating is desired. They can be used in any recipe that calls for dried bread crumbs, either as a binder or filler for moist mixtures like meat loaf, or as breading for dishes like crab cakes.
To ensure a crisp crust on foods coated with bread crumbs and baked, spritz the coatings with cooking oil spray (olive or vegetable oil) before they go in the oven, and once again halfway through baking.
“Work With What You Got!”
©Tiny New York Kitchen © 2020 All Rights Reserved
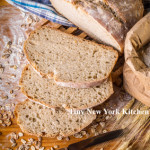
Many people are making bread these days and there’s nothing quite like the smell of bread baking in the house. Here are some answers to frequently asked bread making questions.
Never allow salt to come into direct contact with yeast because it removes the water that yeast needs to live. Instead, add salt to the flour used to make the dough, so the flour can act as a buffer.
A heavy-duty stand mixer is a great appliance for making bread dough. You can use the dough hook for mixing and kneading. If the dough isn’t coming together with the dough hook, switch over to the paddle attachment and mix just until the ingredients are combined, then switch back to the dough hook.
After the dough is mixed, let it rest. Professional bakers call this period, autolyze. It lets the flour fully hydrate and strengthens the gluten in the flour before kneading. Cover the work bowl with plastic and let the dough stand for 20 minutes and then knead on medium speed until the dough is smooth and elastic.
Dough made with a high proportion of whole-grain flour should feel tacky when you are kneading it. In general, moist or even sticky dough makes the best bread. Don’t add too much flour to the dough or the bread will bake up dry and tough.
How can you tell when the dough has been kneaded long enough? Use the windowpane test. Pull off a golf ball knob of dough and pat it into a rectangle. Pulling slowly and consistently from all four corners, stretch the dough into a thin, translucent membrane. If the dough tears easily, knead it longer. This technique won’t work with dough that includes seeds, nuts, or raisins, as they will tear the dough even if it has been kneaded sufficiently. If such ingredients have been used, check for stretchy and resilient dough.
Many bakers use a bowl to hold bread dough, but a straight-sided clear plastic tub is ideal for keeping track of dough as it rises. Mark the beginning level of the dough on the outside with a pen or a piece of tape, and then you can easily see when the dough has doubled. You can also use a glass bowl, but the doubling is a bit harder to define in a slope-sided container. Gently poke a finger into the dough. If the hole doesn’t refill, the dough has probably finished rising.
Many crusty artisanal are baked with steam to help keep the crust soft and pliable, allowing the bread to expand fully. Professional ovens have built-in steam injectors, but home bakers have to be more creative. One recommended method: When you turn on the oven to preheat it, place an empty heavy-duty rimmed baking sheet or pan on a rack near the top of the oven, When the bread dough is added to the oven, toss a handful of ice cubes into the pan and close the door. The ice will melt quickly and create a burst of steam. While the oven door is open, cover the glass on the door with a towel to catch any drips (the cold water could crack the glass) and remove the towel before closing the door.
A common way to test bread for doneness is to rap on the bottom of the loaf and listen for a dull thump. Using a thermometer is more reliable. Insert an instant-read thermometer in the bottom of the loaf, being sure to the tip reaches the center of the loaf. Butter and egg laden breads are finished when their internal temperature reaches 185 to 190 degrees F. Leaner and crispier breads are ready at 200 to 205 degrees F. For breads baked in loaf pans, insert the thermometer just above the rim of the pan, angling the tip down to the center of the loaf.
“Work With What You Got!”
©Tiny New York Kitchen © 2020 All Rights Reserve
These freezer essentials will help you with your weekly meal prep as well as last minute meals that you need to get on the table fast.
Bagged frozen vegetables, like mixed peppers, broccoli, and spinach.
Bagged frozen fruit, like blueberries, mangos, bananas, and strawberries.
Bagged frozen pastas, like tortellini and ravioli.
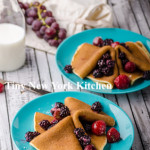
Frozen waffles and pancakes.
Frozen potatoes, like tots, fries, and breakfast potatoes.
Rice and prepared side dishes.
Pre-made dough, pie crusts, and breads.
Frozen foods are not limited to frozen dinners. You can stock your freezer with healthier ingredients to make putting dinner together easy. There are endless possibilities with what you can make with frozen ingredients. As always, be creative and “work with what you got!”
“Work With What You Got!”
©Tiny New York Kitchen © 2020 All Rights Reserved


