
Start small, with goals that work for you and your family. These are the habits you’ll keep in the long run.
1. Add More Color To Your Plate
More color on your plate means more variety, more nutrients, and more flavor. The next time you shop, try putting the rainbow in your cart: orange citrus, yellow pineapple, and dark leafy greens.
2. Eat Seasonally
Keep a produce calendar handy so you know what to look for. In season produce is fresher and typically less expensive. January is good for root vegetables, kale, and citrus.
3. Drink More Water
Stay hydrated by infusing your water with citrus slices, herbs, berries, or cucumber. Making water more interesting will encourage you to drink more.
4. Try A Whole Grain Swap For Pasta And Bread
Once in a while replace regular pasta and bread with a whole grain alternative. These complex carbs will help you feel full. Look for whole wheat, whole grain, and multigrain alternatives.
5. Pack Your Snacks
Opt for high fiber and protein snacks like hummus and pretzels or apples and peanut butter. Unlike sugar and empty carbs, fiber ad protein will keep you full.
6. Eat Breakfast More Often
Stock up on on-the-go options. Egg muffins in the freezer, instant oatmeal in the pantry, and a bowl of fruit on the counter. The morning rush won’t be an excuse for skipping this important meal.
7. Make A Shopping List
Check your refrigerator, freezer, and pantry before making a list. Organize your list based on the layout of your store. You’ll save time at the store and won’t accidently buy what you already have.
8. Try A Plant-Based Swap For Meat
Try a meatless version of a weeknight staple like burgers, pizza, or pasta. You’ll get more nutrients into your meals by swapping meat for plant-based options.
9. Stock Your Freezer
Keep staples like frozen meatballs or chicken tenders and steam-in-bag vegetables for last minute meals. A fully stocked freezer is better than takeout. You’ll save money and get dinner on the table even on busy weeknights.
10. Reduce Your Food Waste
Use overripe fruit in smoothies and muffins. Turn leftover vegetables into stir fries and soups. Turning leftover produce into nutrient-dense meals is a win-win for your wallet and your health.
11. Make A Meal Plan
Write meals on the calendar at the start of the week. Everyone knows the menu and you won’t be scrambling for dinner ideas at 5pm.
12. Bring Your Lunch 3 Days Per Week
Instead of swearing off midday takeout, start with 3 days a week. When you pack school lunches, pack office lunches too. You’ll save time waiting in line, save money, and eat better.
13. Try A New Recipe
Shake up your dinner routine with a recipe or ingredient you haven’t use before. You’ll avoid a recipe rut and learn new kitchen skills.
14. Eat Out One Less Time Each Week
Try a speedy dinner or slow cooker meal that’s ready when you get home. Home cooked meals allow you to control the ingredients and choose more healthful options.
15. Drink Less Soda
Swap for flavored seltzer, iced tea, or sparkling fruit juice. Instead of cutting out soda try drinking 1 less can a day. Quitting cold turkey makes habits hard to break. Start with a smaller goal and eventually it will make a big difference.
16. Eat Together One More Night Each Week
Make dinner device-free, with everyone eating together. Keep it fun with a top-your-own taco, baked potato, or burger night. Enjoying a meal together as a family has been shown to encourage healthy eating habits and better communication.
17. Cook With Your Children Once A Week
Children who help choose, shop for, and prepare a recipe will be more interested in eating it.
18. Get Ahead On Sunday
Prep components instead of entire meals. Roast vegetables, cook grains, and bake extra chicken, then mix and match for quick lunches and dinners during the week. Planning ahead helps you save time, eat better, and reduce the stress of busy weeks.
19. Embrace Healthy Fats
Look for sources of unsaturated fats, like olive oil, nuts, seeds, and avocados. Good-for-you fats help regulate cholesterol, absorb vitamins, and prevent heart disease.
20. Give Plants More Plate Real Estate
Fill about half of your dinner plate with plants, then divide the rest between your starch and protein. Rebalancing your plate is an easy way to eat healthfully.
“Work With What You Got!”
©Tiny New York Kitchen © 2019 All Rights Reserved

Turn out amazing treats with these easy tips and tricks to help you bake your best every time.
Measure Flour Accurately
Using a measuring cup to scoop directly from the bag can pack in too much flour, leading to dry, dense baked goods. Use the “spoon and sweep” method by gently stirring the flour in the bag with a spoon. Spoon the flour into your measuring cup. With the back of a knife, level off the cup and sweep the excess back into the bag.
Warm Eggs To Room Temperature
Room temperature eggs blend more easily in batter and dough, and whites whip up with bigger volume. Take eggs out of the refrigerator a couple hours before baking or add cold eggs to a large-size bowl. Cover with warm, not hot, tap water. Rest for 5 to 7 minutes while you measure other ingredients.
Test Your Baking Soda And Baking Powder
These leaveners help baked goods rise. If they aren’t active, quick breads and pancakes will be flat instead of fluffy. Spoon baking powder and baking soda into separate small bowls. Pour boiling water into baking powder. Pour distilled white vinegar into baking soda. If the ingredients fizz, they’re still active.
Measure Liquid And Dry Ingredients Separately
Too much or too little liquid can change the texture and taste of the finished recipe. Liquid measuring cups give you room to pour right up to the fill line without spilling. Use clear measuring cups with pour spouts for liquids. Use flat-bottomed measuring cups for dry ingredients and use the “spoon and sweep method.”
Prevent Overbaking
Know your oven’s quirks. All ovens run slightly differently, and some spots are hotter than others. Keep an eye on how your baked goods are browning, the temperature, and the time to make the best estimate. Use an oven thermometer to see if your oven runs hot or cold (a few degrees above or below what the dial says), and adjust accordingly. Set a kitchen timer, and check for doneness a few minutes early. Rotate your pan halfway through for even baking.
“Work With What You Got!”
©Tiny New York Kitchen © 2019 All Rights Reserved

One of the best ways to preserve the abundance of fresh herbs from your garden is by making flavored oils. Herb oils can be enjoyed so many ways – drizzled over salads, vegetables, pastas, sandwiches, or grilled items, hot or cold or at room temperature. Not only are they flavorful, but they also add dramatic color when drizzled on plates. If you want to add more flavor add half a clove of smashed garlic and 1/2 teaspoon crushed red pepper to the blender with the other ingredients, which makes a great dipping oil for chunks of rustic bread.
“Work With What You Got!”
© Victoria Hart Glavin Tiny New York Kitchen © 2017 All Rights Reserved

When making cookies make sure not to overcream the butter and sugar. Unlike cake batter baked in a pan, cookie dough is baked free-form. When the dough is heated and the chemical leaveners expand the air bubbles, the bubbles burst without a pan to force the dough upward, producing flat cookies. For cookies, cream the butter and sugar for only 1 to 2 minutes, just until the mixture is smooth but has not lightened in color.
Another insurance policy against flat cookies, chill butter-based cookie dough before baking. Butter has a low melting point, and starts to soften as soon as it is exposed to oven heat. Refrigerate the chilled dough for at least 30 minutes and up to 2 days before shaping and baking. This only works with dough that uses baking powder for leavening. Don’t do this with dough that includes baking soda as the leavener, which loses its rising power soon after it is mixed with wet ingredients.
Professionals use spring-loaded ice cream scoops to portion cookie dough, making cookies the same size that will bake at the same rate. A tablespoon-size scoop is the right capacity for most recipes.
For even baking and easy cleanup, bake your cookies on heavy-duty, rimmed aluminum baking sheets (half sheet pans) lined with parchment paper. To help the paper adhere, butter the baking sheet first. You can also line baking sheets with silicone baking mats instead of parchment paper.
If you’re using silicone mats, you may want to do a test run. Some cookie bottoms won’t crisp as well on the mat as they do on parchment lined baking sheets. Of course, this can be an advantage if you prefer soft, cakelike cookies.
There is no need to transfer cookies to a wire rack to cool. In fact, more harm can be done by transferring warm, delicate, pliable cookies to a rack than by letting them stand on the baking sheet. If you need to remove the cookies to use the baking sheet again, just let them cool on the sheet until they are firm enough to move.
To discourage overbrowned cookie bottoms (which can happen when an oven heats unevenly), insulate the baking sheet by placing it inside a second baking sheet of the same size. The think layer of air between the baking sheets will protect the top sheet from getting too hot.
Don’t store different types of cookies together or they will exchange flavors and textures. Tin or stainless steel covered containers work best for storage, but plastic containers can also be used as long as they are airtight and fragrance free.
To revive crisp cookies that have softened, bake them for 5 to 10 minutes in a 300 degree oven. Let them cool completely before storing.
To help soft cookies keep their texture, store them in an airtight container with a ceramic brown sugar softener, or with a piece of apple on a piece of aluminum foil, or soft bread. Make sure to remove the apple after 24 hours.
“Work With What You Got!”
© Victoria Hart Glavin Tiny New York Kitchen © 2017 All Rights Reserved

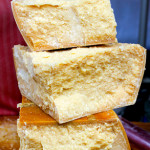
I don’t know a single person who doesn’t love the taste of melted cheese. Not every cheese oozes the same way. Some just melt better than others. When it comes to classic cheesy dishes, you want a cheese that’s going to melt into something creamy and smooth with a strong flavor.
Basically, the more moisture in a cheese, the better it melts. Cheddars and Goudas with high moisture content can make for a nice fondue. Emmental, Challerhocker, Comté, and Gruyere are excellent for making fondue as well. These cheeses beg to be melted. Their smooth, dense texture and nutty flavor make them the top choice for classic fondue. Bread, pickles, crackers, meats, and charcuterie are perfect fondue pot divers.
Cheddars are, of course, excellent for making mac & cheese, grilled cheese, and cheeseburgers. I tend to go for sharp or extra sharp Cheddars because I like to really taste the tanginess.
Soft cow’s milk cheese like Brie and Camembert don’t take much time to get to that beautiful melted soft texture. Just put them in the oven for a few minutes and you’re good to go. Because they come in their own serving vessel you can dip whatever you like in there.
“Work With What You Got!”
© Victoria Hart Glavin Tiny New York Kitchen © 2017 All Rights Reserved
Along with wheat, rye is the other cereal that is widely used to make bread. It is extremely hardy and does well in climates that are too inhospitable to grow wheat. Because of this, rye is a very popular grain for bread making in eastern and northern Europe. There are a countless number of different loaves and the use of rye flour gives them a unique characteristic and tangy flavor.
Kastenbrots are the familiar box-shaped rye breads, and the name actually translates as box bread. The bread is steam-baked for some 20 hours in an enclosed pan, which results in a dense and heavy loaf that is both moist and crumbly with a chewy texture. It has a sour flavor, but with a certain sweet and malty overtone. They are best eaten with strong tasting foods and malty types of drinks such as beer. Among the best-known varieties is pumpernickel, the darkest of the rye breads, vollkornbrot, another strongly flavored rye bread, and roggenbrot.
Weisenkeimbrot, another variety that translates as wheat germ bread, and is made using the wheat germ along with rye grain.
Sonnenblumenbrot is made using a small proportion of wheat flour along with the rye meal and has a distinctive sharp flavor of rye.
Krustenbrot is the popular square rye bread from Germany and is a crusty-style loaf. It is often just known as German rye, but unlike other rye breads it has a pleasant, gentle flavor, owing partly to use of a blend of rye and wheat flours.
Rossisky is made from a sourdough starter, using 100 percent rye flour. It has a distinctive, yet pleasant flavor and is one of the most delicious of all Russian breads.
Borodinsky is another classic Russian bread and is flavored with crushed coriander seeds. It can be made entirely with dark rye or with a blend of rye and wheat meal. Barley meal is also often used, giving an earthy flavor, while buttermilk or yogurt is occasionally added, both of which enhance the naturally tangy sourdough flavor.
Russian Black Bread is a substantial looking loaf flavored with molasses. It is usually made with an equal blend of rye and wheat flour and has a pleasant sweet and sour flavor that is characteristic of many rye breads. The combination of molasses and rye give it a wonderfully dark and moist crumb.
“Work With What You Got!”
© Victoria Hart Glavin Tiny New York Kitchen © 2016 All Rights Reserved

Bread can be either leavened or unleavened. Leavened breads are made with rising agents, like yeast or baking powder, which allows the dough to release gases and expand. Unleavened bread contains no yeast, baking soda, baking powder or other leavening agents that allows dough to rise.
Leavened and unleavened bread are nutritionally similar.
It is generally, not a good idea to refrigerate bread. Although bread will last longer when refrigerated, it tends to dry out faster and to lose its soft texture.
As a general rule, bread should be kept in a somewhat air-tight and dry container or area.
Hot bread should not be put in a sealed container until it cools since the steam will cause dampness, which in turn can cause mold to grow more rapidly.
Storing bread on top of the refrigerator is not recommended. Refrigerator tops are usually very warm and this could either cause your bread to dry out more rapidly or cause condensation in the bag.
“Work With What You Got!”
© Victoria Hart Glavin Tiny New York Kitchen © 2016 All Rights Reserved
Parmesan Cheese Rinds
I tend to use a lot of good quality Parmesan cheese that I grate myself all the way down to the rind. I used to just toss the rinds until one day a chef friend told me all of the ways to use them. I think of them as the bay leaves of the cheese world. Add them when you’re cooking a dish and make sure to remove them at the end of cooking. Seriously, you’ll discover a while new world of flavor.
Throw into sauces, stews, and soups. Adding a Parmesan rind to sauces, stews, and soups will definitely add a nice rich flavor. Add to Italian dishes (both red and white pasta sauces).
Put them in a jar and pour olive oil over them. This makes Parmesan infused olive oil. You could add garlic cloves as well. This is excellent for dipping bread.
Grill them if your rinds are pure cheese with no waxy coating. They’ll become soft and chewy that is delicious on crusty bread.
Make Parmesan broth for cooking with. It’s so easy. Just add a few rinds with some herbs to a pot of water. Simmer for a couple of hours and after the broth has reduced some strain it and use to cook with.
Use them when you’re cooking vegetables.
Put a rind in the pot when you’re cooking rice or risotto.
The great news is that Parmesan rinds freeze well. You don’t need to use them right away and keep for a few months in the refrigerator. They keep for years in the freezer, however. If you don’t have any rinds on hand you may also purchase them from high-end grocers and cheese shops, where they’re super inexpensive.
www.tinynewyorkkitchen.com
“Work With What You Got!”
© Victoria Hart Glavin Tiny New York Kitchen © 2016 All Rights Reserved
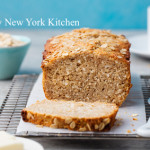
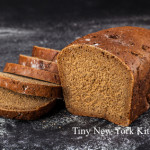
Quick Breads
For mouth-watering breads that don’t require a lot of time, turn to quick breads. By using baking powder, baking soda, steam, or air instead of yeast to leaven dough. An advantage of quick breads is their ability to be prepared quickly and reliably, without requiring time-consuming skilled labor and the climate control needed for traditional yeast breads. Quick breads include banana bread, beer bread, biscuits, cornbread, cookies, muffins, cakes, pancakes, brownies, scones, and soda bread.
Almost all quick breads have the same basic ingredients: Flour, leavening, eggs, fat (butter, margarine, shortening, or oil) and a liquid such as milk. Ingredients beyond these basics are added for variations of flavor and texture. The type of bread produced varies based predominantly on the method of mixing, the major flavoring, and the ratio of liquid in the batter. Some batters are thin enough to pour and others are thick enough to mold into lumps.
There are four main types of quick bread batter:
Pour Batters: Such as pancake batter, have a liquid to dry ration of about 1:1 and so pours in a steady stream – also called a “low-ratio” baked good.
Drop Batters: Such as cornbread and muffin batters, have a liquid to dry ratio of about 1:2.
Soft Doughs: Such as many chocolate chip cookie doughs, have a liquid to dry ratio of about 1:3. Soft doughs stick significantly to work surfaces.
Stiff Doughs: Such as pie crust and sugar cookie doughs, have a liquid to dry ratio of 1:8. Stiff doughs are easy to work in that they only minimally stick to work surfaces, including tools and hands – also called “high-ratio” baked goods.
Preparing a quick bread generally involves two mixing containers. On contains all dry ingredients (including chemical leavening agents or agent) and one contains all wet ingredients (possibly including liquid ingredients that are slightly acidic in order to initiate the leavening process). In some variations, the dry ingredients are in a bowl and the wet ingredients are heated sauces in a saucepan off-heat and cooled.
During the chemical leavening process, agents (one or more food-grade chemicals – usually a weak acid and a weak base) are added into the dough during mixing. These agents undergo a chemical reaction to produce carbon dioxide, which increases the baked good’s volume and produces a porous structure and lighter texture. Yeast breads often take hours to rise, and the resulting baked good’s texture can vary greatly based on external factors such as temperature and humidity. By contrast, breads made with chemical leavening agents are relatively uniform, reliable, and quick. Usually, the resulting baked good is softer and lighter than traditional yeast breads.
Chemical leavening agents include a weak base, such as baking soda (sodium bicarbonate) plus a weak acid, such as cream of tartar, lemon juice, or cultured buttermilk, to create an acid-base reaction that releases carbon dioxide. Quick bread leavened specifically with baking soda is often called “soda bread.” Baking powder contains both an acid and a base in dry powdered form, and simply needs a liquid medium in which to react. Other alternative leavening agents are egg whites mechanically beaten to form stiff peaks, as in the case of many waffle recipes, or steam, in the case of cream puffs.
There are three basic methods for making quick breads, which may combine the “rise” of the chemical leavener with advantageous “lift” from other ingredients.
The Stirring Method: Also known as the quick-bread method, blending method, or muffin method is used for pancakes, muffins, corn bread, dumplings, and fritters. This method calls for measurement of dry and wet ingredients separately, then quickly mixing the two. Often the wet ingredients include beaten eggs, which have trapped air that helps the product to rise. In these recipes, the fats are liquid, such as cooking oil. Using mixing is done using a tool with a wide head such as a spoon or spatula to prevent the dough from becoming over-beaten, which would break down the egg’s lift.
The Creaming Method: Frequently used for cake batters. The butter and sugar are “creamed” or beaten together until smooth and fluffy. Eggs and liquid flavorings are mixed in, and finally dry and liquid ingredients are added in. The creaming method combines rise gained from air bubbles in the creamed butter with the rise from the chemical leaveners. Gentle folding in of the final ingredients avoids destroying these air pockets.
The Shortening Method: Also known as the biscuit method, is used for biscuits and scones. This method cuts solid fat (whether lard, butter, or vegetable shortening) into flour and other dry ingredients using a food processor, pastry blender, or two hand-held forks. The layering from this process gives rise and adds flakiness as the fold of fat melts during baking. This technique is said to produce “shortened” cakes and breads, regardless of whether or not the chosen fat is vegetable shortening.
Quick bread originated in the United States at the end of the 18th century. Before the creation of quick bread, baked goods were leavened with either yeast or by mixing dough with eggs. The discovery of chemical leavening agents and their widespread military, commercial, and home utilization in the United States dates back to 1846 with the introduction of commercial baking soda in New York by Church and Dwight of “Arm & Hammer” fame. This development was extended in 1956 by the introduction of commercial baking powder in Massachusetts, although the best known form of baking powder is “Calumet”, which was first introduced in West Hammond and Hammond, Indiana (later Calumet City, Illinois) in 1889. Both forms of food-grade chemical leaveners are still being produced under their original names.
During the American Civil War (1861-1865) the demand for portable and quickly made food was high, while skilled labor for traditional bread making was scarce. This encouraged the adoption of bread, which was rapidly made and leavened with baking soda, instead of yeast. The shortage of chemical leaveners in the American South during the Civil War contributed to a food crisis.
As the Industrial Revolution accelerated, the marketing of mass-produced prepackaged foods was eased by the use of chemical leaveners, which could produce consistent products regardless of variations in source ingredients, time of year, geographical location, weather conditions, and many other factors that could cause problems with environmentally sensitive, temperamental yeast formulations. These factors were traded off against the loss of traditional yeast flavor, nutrition, and texture.
www.tinynewyorkkitchen.com
“Work With What You Got!”
© Victoria Hart Glavin Tiny New York Kitchen © 2016 All Rights Reserved

Bread And Cherries
“Cherries, ripe cherries!”
The old woman cried,
In her snowy white apron
And basket beside;
And the little boys came,
Eyes shining, cheeks red,
To buy bags of cherries
To eat with their bread.
By Walter John La Mare (1873-1956)
“Work With What You Got!”
© Victoria Hart Glavin Tiny New York Kitchen © 2016 All Rights Reserved


