
The heat of late summer calls for lighter meals packed with fresh produce. Fortunately, there is an abundance of delicious, seasonal produce to pick from. Not only are seasonal items packed with flavor and beneficial nutrients, they tend to be more affordable as well.
Finding unique ways to use summer favorites can help combat any recipe fatigue you may have experienced in recent months. From packing picnics for the beach to firing up the grill to assembling no-cook meals, use Tiny New York Kitchen’s search function to help you find quick and tasty meals for all to enjoy.
Mix up your meals and fuel your family throughout the long days of summer with these ideas:
Grill Seasonal Vegetables
Add some color (along with vitamins, minerals, and fiber) to your menu by tossing fresh vegetables on the grill. Zucchini and summer squash are ideal as they can be diced and cooked in foil, on skewers or cut into uniform planks and placed directly on the grates. Regardless of the method, coat them with a little bit of olive oil and your favorite herbs and spices for the tastiest result.
Enjoy Something Sweet Any Time Of The Day
Melon is the perfect summer treat. Watermelon, cantaloupe and honeydew have just the right amount of sweetness this time of year, plus they have high water content, helping you to hydrate with each bite. Cut up slices for an easy snack on the go or scoop out melon balls to add to a fruit salad for a refreshing dessert.
Take Advantage Of Fresh Herbs
One of the best ways to add flavor to dishes, without added sodium, is to use herbs and spices. Basil, mint, oregano, and cilantro are excellent during warmer months as they pair perfectly with seasonal produce and light proteins such as fish.
Choose A New Fruit Or Vegetable
Pick out a new fruit or vegetable for your family to try during the remaining summer months. Kids love to choose by color! Then, plan a meal around your new produce pick.
Build A Picky Eater Snack Plate
Not only will this quick meal hack keep you out of a hot kitchen, but it is a great way to encourage picky eaters to get a bit more adventurous. Mix & match favorite fruits and vegetables with new options available this time of year. Have a strawberry lover? Put one or two blackberries next to them on the plate. Does your child devour cherry tomatoes? Try adding a few cucumber slices, too. They just may be tempted to try a bite of something new. Then, add in a no-fuss protein, like a hard-boiled egg or shredded rotisserie chicken and some easy whole grains such as crackers, popcorn or pita bread. Round it out with dairy favorites such as string cheese or yogurt. There you have a balanced plate without much hassle.
“Work With What You Got!”
©Tiny New York Kitchen © 2021 All Rights Reserved

Crunchy, juicy, nutrient packed jicama is an unsung hero of the produce aisle. Technically a cousin to green beans, jicama is a root vegetable from Mexico available year-round that is delicious cooked or raw. With a mild, earthy, slightly sweet flavor and an apple like consistency. It’s a great addition to salads, salsas, slaws, and grazing boards. Jicama also works as lighter swap for potatoes in baked and air fried recipes, and it’s delicious sautéed or boiled, too.
If you’ve never tried jicama, don’t be intimidated. Start by choosing one with a smooth, unblemished surface and thin brown skin. The skin should be thin enough to scrape with your thumbnail to reveal the white flesh inside. Avoid thick skinned, bruised, or shriveled jicama, which are signs of aging.
Once you’re ready to prep, start by trimming off the ends of the jicama and slice in half. Then, use a knife to gently peel away the skin.
For Jicama Sticks:
Step 1: Carefully slice off the rounded parts of the jicama, creating a flat surface.
Step 2: Cut each half into 1/4-inch slices.
Step 3: Stack slices and cut evenly into sticks.
Fresh, raw jicama sticks are a great addition to lunchboxes or served on a vegetable platter with your favorite dip. They can also add unexpected, satisfying crunch to cooked dishes, like a noodle salad with jicama and a miso vinaigrette.
Jicama sticks are delicious roasted, too. Their firm texture can withstand the heat, while the edges get golden brown and tender. Toss together with sweet peppers and spices for a simple, satisfying sheet pan side that pairs well with all kinds of meat and fish.
For Diced Jicama:
Step 1: Follow the steps above to create jicama sticks
Step 2: Line up sticks or stack into a pile, then evenly cut into cubes.
Diced jicama is a vitamin and fiber-rich way to add bulk to all kinds of green, grain, and protein-based salads. I love the combination of crunchy jicama with creamy avocado served with grilled chicken.
Moist and mild flavored jicama also plays well with fruit, especially melon. A refreshing combination of watermelon, jicama, and fresh mint falls somewhere between salad and salsa, delicious scooped onto tortilla chips or just spooned straight from the bowl.
Next time you’re at your local grocery store or market pick up jicama and experiment with ways to incorporate it into your recipes.
©Tiny New York Kitchen © 2021 All Rights Reserved
Roasting refers to proteins and vegetables cooked mostly at high temperatures in the oven. Baking uses a lower temperature to cook breads, baked goods, and casseroles.
Roasting makes any vegetable taste better. It brings out their flavor, caramelizes their natural sugars, and adds crunch. If your family doesn’t love certain vegetables like broccoli or Brussels sprouts, roasting is a great way to change their mind. Double what you’re roasting and then turn extra servings into quick meals later in the week. Cooking a little extra with one meal lets you make the most of value-sized packages of proteins and other store sales. With leftover already planned, you won’t need to lean on takeout.
Why we love to roast:
It’s Affordable! Inexpensive ingredients are tastiest when roasted. Root vegetables are browned and crisp, tomatoes and grapes are extra juicy and sweet, and tough cuts of beef are fall-apart tender. You also don’t need any special equipment to roast.
Roasting Is Healthful! Roasted foods need very little fat to cook compared to frying or sautéing. Roasting also intensifies flavors without added salt, sugar, or other ingredients.
It’s Easy! Roasted foods need little prep before they cook. And once the oven door closes, you can walk away. Fewer pans and utensils are needed, making cleanup easier too.
Essential Tools For Roasting:
Rimmed Sheet Pan: The rim keeps vegetables from falling off the sides and catches any juices from meats and fish.
Oven-Save Skillet: Go from stovetop to oven and back. Sear meats before roasting or make a pan sauce with the meat drippings after roasting.
Roasting Pan: Best for large roasts, hams, and turkeys. An inner rack lifts the meat so it can brown and crisp underneath.
Parchment Paper: Line pans to keep foods from burning and sticking, then toss for easy cleanup. If roasting at a higher temp or broiling use foil.
Metal Tongs: Flip and stir foods on a hot pan with ease. Look for tongs with a heat resistant grip.
Silicone Brush: Brush on a sticky glaze or baste foods with sauce. The silicone bristles are easy to clean.
Tips For Sheet Pan Roasting:
Jump Start Browning by preheating your sheet pan before adding vegetables.
Pat foods very dry with paper towels so the outside browns while the inside cooks through.
Cut foods to the same size and thickness so smaller pieces don’t burn.
Space out foods on the sheet pan so they have room to crisp and brown.
Let sheet pans cool before rinsing to keep the metal from warping.
©Tiny New York Kitchen © 2021 All Rights Reserved
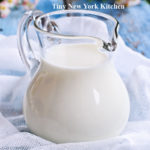
Buttermilk is a fermented dairy drink that was traditionally the liquid left behind after churning butter out of cultured cream. Today, most modern buttermilk is cultured. Cultured buttermilk was first commercially introduced in the US in the 1920s. Commercially produced buttermilk is milk that has been pasteurized, homogenized, and then inoculated with a culture of Lactococcus lactis to simulate the naturally occurring bacteria in the old-fashioned buttermilk. The tartness of cultured buttermilk is primarily due to lactic acid produced by lactic acid bacteria while fermenting lactose, the primary sugar in milk.
Condensed buttermilk and dried buttermilk are very important in the food industry. Liquid buttermilk is used primarily in the commercial preparation of baked goods and cheese. Buttermilk solids are used in ice cream manufacturing as well as being added to pancake mixes to make buttermilk pancakes.
Buttermilk reacts with the baking soda and powder to give quick breads their rise and tender crumb. The reaction is best at the beginning, you’ll want to get the loaf in the oven right after mixing the wet and dry ingredients. Buttermilk can also be used in marinating meats, especially chicken and pork, because the lactic acid helps to tenderize, retain moisture, and allows added flavors to permeate the meats.
©Tiny New York Kitchen © 2021 All Rights Reserved

July has given us bright sunny days, low humidity and cool evening temperatures and a great way to capture summer’s splendor is with a picnic. Whether you find respite under the shade of a magnificent tree, spread a blanket on a sandy beach or enjoy your own patio or yard, dining “en plein air” is a delightful diversion to current world conditions.
Simplicity is key for a pleasant picnic. With farm markets opening, stock up on fresh fruits, berries, and vegetables for the picnic basket. Luscious, seasonal asparagus can be lightly grilled, steamed or roasted, then spritzed with fresh lemon juice and adorned with fresh parmesan cheese shavings for a light and lovely picnic lunch that packs easily. Freshly picked asparagus can also be served raw. Shave each stalk using a vegetable peeler, into long strips and dress with olive oil, rice vinegar, salt and pepper. Embellish at will with goat or feta cheese, pine nuts or almonds and plenty of minced herbs.
Fresh herbs perk up picnic recipes and eliminate the need for excess sodium. Chives will add a slightly sharp bite to potato, egg or pasta salads, as well as a nice little nip of flavor to deviled eggs. Poach a nice piece of salmon and dot it with creamy dill sauce for an elegant picnic entrée. Cilantro and Thai basil elevate rice noodle salads, and the snappy tang of fresh parsley is just the right addition to grain bowls. Fresh basil with ripe tomatoes is a classic combination. For something sweet, pack fresh berries, such as native strawberries, blueberries or raspberries, sprinkled with cinnamon and drizzled with honey.
If your picnic involves grilling use sturdy rosemary to imbue vegetables, meat, and fish with Mediterranean flavor and flair. Marinate chunks of lamb, beef or chicken with fresh rosemary, garlic, and olive oil. Let rest for several hours, then grill as desired.
Have picnic supplies at the ready to take advantage of gorgeous weather. Stash a small roll of garbage bags, hand sanitizer, salt and pepper packets, a small cutting board and knife, bug spray, sunscreen, and a blanket in your picnic basket. Keep small ice packs in the freezer. Gather your food and drink and enjoy the healthy benefits of picnicking all summer long.
“Work With What You Got!”
©Tiny New York Kitchen © 2020 All Rights Reserved
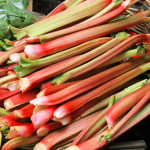
Rhubarb is a fabulous spring crop. The sour sweetness of rhubarb is absolutely nice in cakes, breads, pies, cobblers and jams, as well as sweet and savory compotes, chutneys, and sauces. Savory rhubarb chutney, cooked with onions and hot pepper is an exciting accompaniment to grilled pork, chicken, or shrimp. Sweeter versions employing brown sugar and lemon peel are superb served with pancakes, French toast, waffles or pound cake. Ladled atop frozen yogurt or ice cream, sweet rhubarb sauce is perfect for a spring sundae when the sun burns bright. This same sauce can be strained to yield a perfectly pink syrup. Combine with cold sparkling water or seltzer for a refreshing mocktail, or add to prosecco for a beautiful brunch beverage.
Rich in fiber, protein, vitamin C, potassium and calcium, rhubarb provides many valuable nutrients. A natural laxative, rhubarb may help east constipation. In fact, it is written that rhubarb was utilized in ancient Chinese medicine for treating stomach ailments. The vitamin K found in rhubarb may help strengthen bones, as well as possibly inhibiting inflammation in the brain. Rhubarb also supplies the body with vitamin A, which may help diminish signs of aging, particularly skin damage.
When choosing rhubarb at the supermarket or farm markets, look for glossy, firm stalks. Trim the leaves off when you bring your rhubarb home, as they are toxic. Store the stalks wrapped in a paper towel in your vegetable drawer. Wash before using. Rhubarb freezes beautifully, place chopped stalks on a parchment paper lined baking sheet and place in the freezer. When the chunks are frozen, store them in freezer bags and use within one year.
“Work With What You Got!”
©Tiny New York Kitchen © 2020 All Rights Reserved
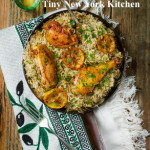
One skillet meals are easy when you have a busy schedule, but want a home cooked meal. Fewer dishes means less cleanup, which makes life a bit easier.
“Work With What You Got!”
©Tiny New York Kitchen © 2020 All Rights Reserved

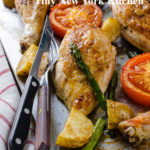
Pantry staples like coconut milk and curry paste liven up simple chicken in the fast and flavorful weeknight meal.
“Work With What You Got!”
©Tiny New York Kitchen © 2019 All Rights Reserved

Shop the peripheries of the supermarket and stay out of the middle. Most supermarkets are laid out the same way. Processed food products dominate the center aisles of the store, while the cases of mostly fresh food (produce, meat, fish, dairy) line the walls, Keep to the edges of the store and you’ll be much more likely to wind up with real food in your shopping cart. This strategy is not foolproof, however, since things like high-fructose corn syrup have crept into the dairy case under the cover of flavored yogurts and the like.

How to cook rich, perfectly roasted winter squash without any prep work. This method works for winter squash of any size, so adjust the roasting time as needed.
Preheat oven to 400 degrees.
Roast the whole squash on a baking sheet until the skin is papery and a fork inserted into two or three different spots reveals very tender flesh (45 minutes per pound).
Remove from oven and set aside until cool.
Breakfast. Lunch. Dinner. Have squash for them all!
Start by cooking a whole winter squash.
Breakfast
Add cooked cubes of butternut squash, grated Gruyere cheese and chopped sage to a frittata mixture.
Lunch
Meal-prep lunches by layering cooked spaghetti squash, marinara sauce and meatballs or shredded chicken.
Dinner
Add thick slices of cooked acorn squash (you can keep the skin on) to soup or stew during the last few minutes of cooking.
“Work With What You Got!”
©Tiny New York Kitchen © 2018 All Rights Reserved


