
Cannellini beans, which are widely used in Italian cooking, actually originate from Argentina.
These creamy white Italian beans are slightly larger and fatter than the white haricot beans and are more like a kidney in shape. They are related to the larger French Soissons and, like them, have a fluffy texture when cooked. They are a popular addition to classic minestrone and a variety of other soups. Cannellini beans are an essential ingredient for tonno e fagioli (tuna and bean salad) and Florentine fagioli all’uccelletto, where the beans are stewed with sage, tomatoes, and garlic. They are also delicious cooked with olive oil, onion ring slices, garlic, and parsley.
I prefer to cook with dried beans rather than canned beans. I do keep a few cans of beans in my pantry, however, as they’re useful in short notice circumstances. When you purchase canned beans make sure that the ingredients do not include sugar or salt.
To cook Cannellini Beans: Sort and rinse 3/4 cup Cannellini Beans. Place in a medium-size pot with 3 cups water. Cover and bring to a boil. Reduce heat to a medium-low and cook 60 to 90 minutes until beans are soft. Add more water as needed while cooking to keep beans covered. Makes about 2 cups/4 servings.
To reduce cooking time, soak beans in water overnight in the refrigerator. Drain and throw away soaking water before proceeding.
“Work With What You Got!”
© Victoria Hart Glavin Tiny New York Kitchen © 2016 All Rights Reserved
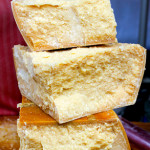
Parmesan Cheese Rinds
I tend to use a lot of good quality Parmesan cheese that I grate myself all the way down to the rind. I used to just toss the rinds until one day a chef friend told me all of the ways to use them. I think of them as the bay leaves of the cheese world. Add them when you’re cooking a dish and make sure to remove them at the end of cooking. Seriously, you’ll discover a while new world of flavor.
Throw into sauces, stews, and soups. Adding a Parmesan rind to sauces, stews, and soups will definitely add a nice rich flavor. Add to Italian dishes (both red and white pasta sauces).
Put them in a jar and pour olive oil over them. This makes Parmesan infused olive oil. You could add garlic cloves as well. This is excellent for dipping bread.
Grill them if your rinds are pure cheese with no waxy coating. They’ll become soft and chewy that is delicious on crusty bread.
Make Parmesan broth for cooking with. It’s so easy. Just add a few rinds with some herbs to a pot of water. Simmer for a couple of hours and after the broth has reduced some strain it and use to cook with.
Use them when you’re cooking vegetables.
Put a rind in the pot when you’re cooking rice or risotto.
The great news is that Parmesan rinds freeze well. You don’t need to use them right away and keep for a few months in the refrigerator. They keep for years in the freezer, however. If you don’t have any rinds on hand you may also purchase them from high-end grocers and cheese shops, where they’re super inexpensive.
www.tinynewyorkkitchen.com
“Work With What You Got!”
© Victoria Hart Glavin Tiny New York Kitchen © 2016 All Rights Reserved

Freezing Fresh Herbs
Spring is here and it’s time to grow a variety of herbs, but what do you do when you have an abundance that you don’t want to go to waste? The answer is to freeze them. To freeze hardy herbs like thyme or rosemary, chop the leaves and put them in an ice cube tray. Cover with olive oil and freeze them for up to 6 months. When you’re ready to use them just melt as many as you need in a skillet and use for sautéing.
“Work With What You Got!”
© Victoria Hart Glavin Tiny New York Kitchen © 2016 All Rights Reserved
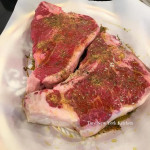
Now That I Have These Beautiful Butcher Shop Steaks I Am About To Put Them On The Grill. Before I Grill Them, However, I Let Them Sit Out For 1 Hour On A Platter So That They Come To Room Temperature. I Drizzle Them With Olive Oil And Sprinkle With A Favorite All-Purpose Spice Mixture That I Created. These Are Thick Steaks So They’ll Cook On The Grill 7 To 10 Minutes Per Side.
“Work With What You Got!”
© Victoria Hart Glavin Tiny New York Kitchen © 2016 All Rights Reserved
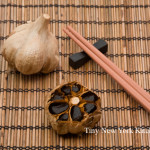
Black Garlic
Black Garlic has been around for quite awhile and is an ingredient that chefs have been using across the country. Think of it as “sweet meets savory.” Black garlic is made when heads of garlic are aged under very specialized conditions until the cloves turn black and have a sticky date-like texture. The taste is delicious and unique with a sweet and earthy umami flavor that intensifies nearly any dish you’re creating.
Garlic bulbs are kept for weeks at low temperatures in a humid environment. The enzymes that give fresh garlic its sharpness break down. These conditions also facilitate the Maillard reaction, the chemical process that produces wild new flavor compounds responsible for the deep taste of seared meat and fried onions.
Black garlic’s flavor is described as tasting like aged balsamic, prunes, licorice, molasses, caramel, and tamarind. Use the cloves as you would roasted garlic. Purée with olive oil for a dense and sweet flavor all its own that compliments steaks, chicken, fish and seafood. Smear the paste on crostini or incorporate it into dressings. Use in a braise to intensify the umami-rich flavor of spare ribs. Add to soups, risotto, noodle and rice dishes, and cheese dips. Black garlic also pairs well with blue cheese.
Black garlic also comes in a dehydrated powder that is considered an umami pixie dust. Just sprinkle a bit of it on anything that begs for depth and earthiness.
Most likely you won’t find black garlic at your local neighborhood market, but some Whole Foods will carry it. I’m lucky enough to get mine at Kalustyan’s in New York City. You can certainly get it online at Amazon or other specialty online food sources.
“Work With What You Got!”
© Victoria Hart Glavin Tiny New York Kitchen © 2016 All Rights Reserved
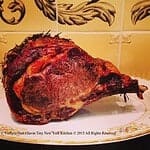
Now that the weather has begun to get cooler it’s time for roasts. Standing rib roast is my all-time favorite minus the price tag.
So easy to make, too. Turn oven to roast at 350 degrees. Thyme and basil on top along with garlic and olive oil. Place uncovered in oven until it’s how you like to eat it. Remember to let it stand for a bit when removed from the oven as it will continue to cook while it’s resting.
“Work With What You Got!”
© Victoria Hart Glavin Tiny New York Kitchen © 2015 All Rights Reserved

Watermelon
Watermelon is the ultimate summer snack. As a kid growing up in Nebraska, my favorite way to eat watermelon was outside, with the juice running down my face and arms. Here is how I’m eating watermelon this summer.
Treat It Like A Steak
Cut watermelon into 2 inch slabs and drizzle with olive oil. Sprinkle with kosher salt and red pepper flakes. Eat with a steak knife.
Make A BLW
Forget the tomato and use a few thin slices of watermelon on your sandwich instead. Add some cheese for good measure.
Blitz It
Purée watermelon (seeds and all), strain, then add honey, and lime juice. Serve on ice with a mint sprig. Add rum or tequila if you want to be naughty.
“Work With What You Got!”
© Victoria Hart Glavin Tiny New York Kitchen © 2015 All Rights Reserved
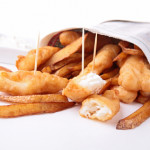
Tips For Deep-Frying
Deep-frying is such a guilty pleasure because no cooking technique gives food that irresistible crunchiness. Because it is also one of the least frequently used cooking methods, here are some important tips to help you achieve Deep-frying nirvana.
Choose the right pot. To deep-fry properly, the food should cook in 2 to 3 inches of hot oil. Choose a pot that is at least 6 inches deep to allow for bubbling without bubbling over. Cast iron (enameled or not) holds the heat well, which makes a good choice.
Use reasonably priced cooking oil. Canola, cottonseed, safflower, or a generic vegetable oil blend will all do. Much is made of the smoke point of oil (the temperature where the oil starts to smoke and break down) for deep-frying, and expensive peanut oil is often singled out as being especially desirable (watch those peanut allergies). Food should not be deep fried at temperatures above 400-degrees because it will burn before it has a chance to cook through. Most refined clear cooking oils have a smoke point of about 425-degrees (except for olive oil), so if you are deep frying at the correct temperature, the oil’s smoke point is not an issue.
Don’t reuse deep frying oil. This is another reason to use reasonably priced oil. Although you can strain the cooled oil for another round or two of deep-frying, this is a sure way of transferring unwanted flavors to your food, and the freshness of the oil obviously is reduced with storage. You don’t want to cook your tortilla chips in the same oil you used for cooking fish and chips. Just budget the price of the oil into the cost of the recipe, throw away after using, and leave it at that.
Use a deep-frying thermometer. It’s the only way to get an accurate reading of the oil temperature. Be sure the end of the thermometer is totally submerged in the oil. Keep the heat on high to maintain the correct oil temperature.
To reduce deep-frying odors, cook outside if possible. There is no reliable way to avoid the odors caused by deep-frying inside. But when the weather is cooperating, plug in an electric kettle and do your frying on your porch or patio.
Let the oil return to its correct frying temperature between batches. In most cases, you may add the food to 375-degree oil, but the temperature will drop to 335-degrees or so for the actual cooking. After removing the food, be sure to reheat the oil over high heat to its original starting temperature.
Use a wire skimmer to remove food from the oil. Also called a spider, these wide-mesh skimmers do a better job of draining away oil than a slotted spoon or slotted skimmer. They are commonly used in Asian cooking, so look for them at kitchenware stores near the woks.
Don’t drain fried foods on paper. Most people use paper towels or brown paper bags to absorb the fat from drained foods. A crunchy coating can soften where it comes into contact with the paper because the steam builds up at the contact point and has nowhere to go but into the coating. For the crispiest result, drain the food on a wire cooling rack set over a rimmed baking sheet, so the food comes into contact only with thin wires.
Keep deep-fried foods warm in the oven before serving. Deep-fried food is best served piping hot right out of the pot, which isn’t always possible when cooking multiple batches. Once you have put the food on the wire rack and baking sheet setup, slip the whole thing into a preheated 200-degree oven for up to 10 minutes.
Add salt JUST before serving. Salt can soften homemade potato chips and other fried foods, so to keep them from losing their crunch, sprinkle on the salt at the last minute.
“Work With What You Got!”
© Victoria Hart Glavin Tiny New York Kitchen
Perplexing Foodstuffs
There are those foods that can be rather difficult to figure out how to eat without looking like you were born in a cave. Here are some useful tips for properly eating perplexing foodstuffs.
Artichokes
Pluck off artichoke leaves and scrape the tender part (not the prickly point) between your teeth (preferably after dipping in melted butter). Work your way to the delicate inner leaves, and then use a knife to cut off the remaining small leaves and feathery innards. Cut the artichoke “heart” into bite-sized pieces and eat with a fork.
Asparagus
Eat asparagus with your fingers if served raw as crudités. Eat with a fork and knife if served with dinner.
Bread
Break bread into bite-sized pieces, and butter it or dip it into olive oil just one piece at a time.
Crab (Soft-Shelled)
Eat entire crab, including shell, either in sandwich form or using a fork and knife. Remove inedible pieces from your mouth with a fork.
Fajitas
Place meats, vegetables, and other fillings on a flat tortilla. Roll up and use your fingers to eat fajitas from one end.
Fondue
Spear bread, vegetables, or fruit with a fondue spear and dip into cheese or sauce. Remove food from spear using a dinner fork, and eat from a plate. DO NOT double dip. Spear uncooked meat cubes and place spear into fondue broth or sauce. When cooked, transfer meat to a plate using a dinner fork and cut into smaller pieces to eat.
Lobster
Wear a lobster bib to avoid fishy splatters, Crack shells with shellfish crackers and extract meat with a small fork or pick. Cut larger pieces with a knife, and eat with a fork after dipping in melted butter. Clean your hands by dipping fingers into finger bowls, and use lemon (if provided) to cut extra grease. Dry your hands with your napkin.
Peas
Use a knife to push peas onto a fork. Do not mash peas before eating, or eat peas from a knife.
Raw Shellfish
Use a small fork to extract mussels, clams, or oysters from the half-shell. Season with fresh lemon or cocktail sauce. In informal settings, you may quietly slurp shellfish from shells.
Soup
Using a soup spoon, spoon soup away from your body and then quietly sip from side of spoon. Tilt bowl away from you to spoon up remaining drops.
Spaghetti
Twirl pasta with fork tines into bite-sized portions, and allow any dangling pieces to fall back onto your fork. You may also rest fork tines against the bowl of a spoon while you twirl pasta.
Steamers
Extract clam from shell using a small fork, and use a fork and knife to remove inedible neck. In informal settings, it is permissible to use fingers.
“Work With What You Got!”
© Victoria Hart Glavin Tiny New York Kitchen
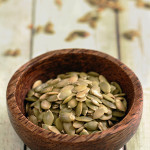
Don’t Forget The Seeds!
Just like pumpkins, the seeds of butternut and other hard winter squashes can be tossed with a splash of olive oil and a pinch of kosher salt, then toasted for a crunchy every occasion snack.


