Have you ever reached into the cavity of a fresh chicken and found it frozen inside? Poultry can be chilled to 26 degrees and still be considered fresh. Water may freeze at 32 degrees, but poultry flesh doesn’t freeze solid until it reaches 25 degrees. The extra few degrees will lengthen the shelf life of the chicken.
While many cooks are in the habit of rinsing poultry before cooking, it really isn’t necessary. You always cook poultry to a temperature that kills any harmful bacteria. In fact, it could be more dangerous to rinse the poultry, as you can end up splashing contaminated water all over the sink and kitchen counter.
After preparing poultry, reduce the chance of bacteria contamination by washing the cutting board, prep utensils, and your hands with hot, soapy water. It’s a good idea to reserve one cutting board for raw meat and poultry and a second board for other ingredients.
Broiler-fryer chickens are the all-purpose chicken, but you usually see them labeled simply as whole chicken. They used to average 3 1/2 pounds, but these days, you’ll find them up to 5 pounds, which means you get more servings per chicken. Roaster chickens tip the scales at 5 to 7 pounds, and are usually cooked whole in the oven. Even if you are serving a small group, it is worth roasting one of the larger chickens so you have leftovers for other meals.
The standard supermarket chicken is grown according to USDA standards, which allow antibiotics in the feed. Hormones and growth stimulants have been outlawed in poultry production since the 1950s.
Free-range chickens have access to the outdoors, which does not mean they live outdoors. The standards for organic chickens vary from state to state. In general, these birds, which are often also free range, must be fed organically grown feed and raised without antibiotics. Many cooks believe the flavor of free-range or organic birds is superior to that of supermarket chickens.
If you need to roast a chicken in record time, then butterfly it and roast it at a high temperature. With its entire surface exposed to the oven heat, the skin will be crisp and golden brown.
Be sure that whatever vessel you use for roasting a chicken can also be used on the stove top, so you can deglaze the drippings and turn them into a pan sauce. Enameled cast-iron baking dishes are a good choice.
You’ve paid for the entire chicken, so don’t throw anything away. The neck, heart, kidneys, and fat can be turned into quick chicken stock that will make just enough for many recipes, including a sauce for serving with the chicken. Don’t use the liver, as it will make the stock bitter. If you have butterflied the chicken, chop up the backbone and add the pieces to the stock, too. The stock won’t be as rich as a long simmered one, but it’s just fine when combined with pan juices.
Herbs are a wonderful flavoring for roast chicken, but they can burn if simply rubbed onto the skin. Combine the herbs with softened butter, and carefully slip the herb butter under the chicken skin, spreading it evenly. Roast away without worrying about singed herbs.
“Work With What You Got!”
© Victoria Hart Glavin Tiny New York Kitchen © 2017 All Rights Reserved
The Secret Ingredient For Ridiculously Crispy Chicken
For years I experimented with ways to make chicken extra crispy until one day a chef friend and I were discussing this issue. He told me that the trick is to use baking powder on “skin-on” poultry. I was a bit surprised and put it to the test myself. Holy smokes it does work!
Apparently, baking powder raises the skin’s pH levels, which will allow proteins to break down, giving you a crispier and more evenly browned outcome. Combining with poultry’s natural juices, it forms carbon dioxide gas that creates a layer of small bubbles. These bubbles will increase the skin’s surface area, which allows it to develop a crunchy texture once cooked.
It’s so simple. All you need to do is mix together 1 part baking powder to 3 parts kosher salt (for example 1 tablespoon baking powder & 3 tablespoons kosher salt – of course it all depends on what size poultry you’re cooking). Evenly sprinkle over the skin’s surface and then place in the refrigerator, uncovered, between 12 to 24 hours. Without rinsing cook it any way you want to (roast, grill, fry). It’s really that easy. You just need a bit of planning, but it’s worth it.
You can use it on chicken, turkey, duck, game hens, or goose. Thanksgiving is coming up so you may want to give it a try on your Thanksgiving turkey.
“Work With What You Got!”
© Victoria Hart Glavin Tiny New York Kitchen © 2016 All Rights Reserved
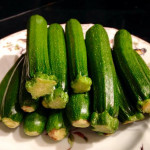
Baby Zucchini
Baby zucchini are very tender, tasty simple vegetables that have more flavor than the larger Italian zucchini as well as being very easy to prepare and enjoy. Archeologists think that they are indigenous to Central America. They are very nutritious and are a good source of Vitamin A, C B6, thiamin, niacin, and Pantothenic acid. Baby zucchini are also a very good source of fiber, protein, folate, iron, magnesium, phosphorus, zinc, and copper.
Quick Roast: Cut lengthwise and roast with sliced onions for 25 minutes at 350 degrees.
Blanching: Drop zucchini into boiling water for 1 to 2 minutes. Then remove to an ice bath. Zucchini are now ready to cut lengthwise and add to salads, sauté with mushrooms, onions, and garlic.
Grilling: Brush zucchini with olive oil, sprinkle with fresh herbs or spices, and either grill on BBQ or grill in a grill pan for about 2 to 3 minutes on each side.
Microwave: Place zucchini in ziplock bag. Cut corner of bag and microwave on high for 3 to 4 minutes.
For Salads: Baby zucchini makes a great salad addition. Shred or grate raw and add to salads, or cut lengthwise and add to vegetable platters.
Raw: To eat raw make sure to wash before eating.
“Work With What You Got!”
© Victoria Hart Glavin Tiny New York Kitchen
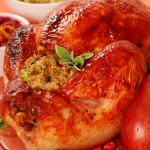
Turkey Roasting Guide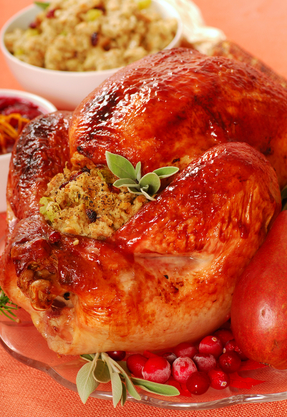
Every year I tell everyone not to overcook his or her turkey and to purchase a meat thermometer AND USE IT! The objective, of course, is to have moist and juicy breast meat with succulent thighs! The turkey is the main attraction after all.
Start with a completely defrosted bird or better yet purchase an organic fresh turkey. If your turkey is frozen, however, allow 24 hours in the fridge for every 5 pounds. This is the safest way to defrost your turkey.
The turkeys of today tend to be young, moist and tender and take much less time to cook than tougher turkeys that I grew up on. If a turkey is dry, then it has been cooked too long. The breast meat is what tends to suffer the most.
A stuffed turkey may cook at the same rate as an unstuffed one, but be prepared to allow 30 to 50 minutes more. Most turkeys take about the same time to roast in regular ovens, but a convection oven does a much better job of browning the turkey all over.
When removing the turkey legs, if you find that the meat around the thigh joint is still too pink, then cut off the drumsticks from the thighs and put the thighs into a shallow pan, place in a 450 degree oven for 10 to 20 minutes until no longer pink.
Always use a meat thermometer to gauge doneness. For a stuffed turkey, use the meat thermometer to check the temperature of the stuffing. The center of the stuffing inside the turkey must reach a temperature of 165 degrees. For an unstuffed turkey, place the meat thermometer in the thickest part of the thigh, taking care that it does not touch any bone. Roast the turkey until the meat thermometer reaches 165 degrees. Don’t forget to let the turkey rest for at least 30 minutes before carving to allow the juices to re-absorb into the flesh. You do not want the moisture to drain out.
This chart will help you determine approximately how long to roast a stuffed or unstuffed turkey.
Roasting times are for a preheated 325 degrees oven:
Approximate Roasting Times For Stuffed Turkey
Turkey Weight: 6 to 8 Pounds 3 to 3 1/2 Hours
Turkey Weight: 8 to 12 Pounds 3 1/2 to 4 1/2 Hours
Turkey Weight: 12 to 16 Pounds 4 1/2 to 5 1/2 Hours
Turkey Weight: 16 to 20 Pounds 5 1/2 to 6 Hours
Turkey Weight: 20 to 24 Pounds 6 to 6 1/2 Hours
Approximate Roasting Times For Unstuffed Turkey
Turkey Weight: 6 to 8 Pounds 2 ½ to 3 Hours
Turkey Weight: 8 to 12 Pounds 3 to 4 Hours
Turkey Weight: 12 to 16 Pounds 4 to 5 Hours
Turkey Weight: 16 to 20 Pounds 5 to 5 1/2 Hours
Turkey Weight: 20 to 24 Pounds 5 1/2 to 6 Hours

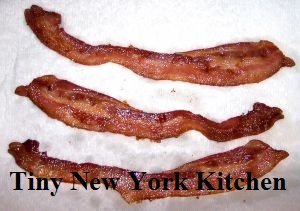
 A Few Words About Bacon
Bacon is salted, dried, cured or smoked meat from the back or sides of a pig. The term is derived from the Germanic bache/backe “back meat,” though at first the word referred to any part of a pig. Flitch (or slab bacon) designates a whole chunk of bacon before it is cut into slices. Burned bacon can be dangerous because burning it will produce carcinogens.
If you’re not doing it already then I have 3 words for you…BAKE YOUR BACON! Frying is the traditional way to cook bacon, but as we all know the high heat can make the bacon fat splatter all over the place. Baking applies lower heat, reducing splattering and shrinkage. It is also the best way to cook large amounts of bacon. Arrange the bacon slices side by side on a large, parchment paper lined, baking sheet. It’s a good idea if the baking sheet has a large rim on it. Bake in a preheated oven at 400º F for about 20 minutes or until the bacon is crisp and browned. Cooking food in the oven at this temperature is actually roasting, but there are times when the terms roasting and baking can be used interchangeably. Remove the rendered fat as it accumulates with a bulb baster, if necessary. When done it’s a good idea to transfer the bacon to paper towels to drain.
Generally bacon is about 50% fat. As it cooks, the fat becomes liquid and separates from the meat. This process is called rendering. The rendered fat can be put in a tightly covered container and stored in the fridge or freezer for sautéing or frying other foods.
Purchasing the leanest bacon can be counterproductive, as the fat gives the bacon most of its desirable flavor and crispness. Most of the extra fat melts off during cooking. The fat on bacon should be about 1/2 to 1/3 of the total weight. If you buy bacon from a butcher, you can ask for the rind to be removed and for the bacon to be sliced. A whole slab stays fresher longer. A butcher-cut slab can be stored for two weeks in the fridge or two months in the freezer. The freezing does create ice crystals which causes the bacon to splatter when fried stovetop.
Did you know that bacon can be frozen for up to 4 weeks? The curing process affects the stability of the fat, which means that bacon can turn rancid even when frozen. Although you can freeze the unopened package, it is usually better to separate the slices into conveniently sized amounts (about 4 ounces or so for breakfast). Wrap the bacon tightly in plastic wrap, then overwrap with aluminum foil. For added protection place in a ziplock bag. Long-term freezing is not recommended. Thaw thoroughly in the fridge before cooking.
Once the vacuum pack is opened, bacon will usually keep for only about a week in the fridge, although sometimes it will keep for a couple of weeks. The ends may darken and dry out and they should be sliced off and thrown away before using. To make bacon crumbles, chop the bacon first and then cook it.
Keep Calm and Eat Bacon!