
When cooking meats, it’s important to know the various temperatures.
Beef: Rare 120F to 125F (45C to 50C), Medium Rare 130F to 135F (55C t 60C), Medium 140F to 145F (60C to 65C), Medium-Well 150F to 155F (65C to 70C), Well Done 160F and above (70C and above)
Pork: Medium Rare 145F (63C), Medium 160F (70C), Well Done 170F (76C)
Poultry: Well Done 165F (75C)
Lamb: Medium Rare 145F (65C), Medium 160F (70C), Well Done 170F (76C)
Fish: Well Done 145F (65C)
To find out what temperature your meat is at, remove food from oven, turn on the digital display by pressing the on/off button. Select F/C. Insert thermometer in the thickest part of the meat, immersing the stem at least 1 inch, but not to contact with bone, fat or gristle and wait for the temperature to stabilize.
The digital display will automatically give you the cooking temperature. If additional cooking time is needed, remove the thermometer from the food and return the dish to the oven.
“Work With What You Got!”
©Tiny New York Kitchen © 2021 All Rights Reserved
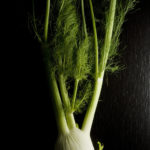
Fennel is a member of the carrot family, though it is not a root vegetable. The base of its long stalk weaves together to form a thick and crisp bulb that grows above ground. Fennel’s leaves, seeds, and stems all have a sweet, faintly anise like flavor. The stems of fennel swell and overlap at the base of the plant to form a bulb with white to pale green ribbed layers that are similar to celery in appearance and texture. Light and feathery, the pretty green leaves slightly resemble fresh dill. Use them as a bed for steaming fish or in small amounts as a garnish.
Originating in the Mediterranean, the fennel bulb appears often in Italian and Scandinavian cuisines. It can be eaten raw, grilled, baked, braised, or sautéed. While grilling, you can toss a handful of dried or fresh fennel stems onto the charcoal to infuse meat or fish with a light anise flavor.
When selecting fennel choose fresh bulbs that are smooth and tightly layered with cracks or bruises. Fat, rounded bulbs with white and pale green color will tend to be more succulent than thin or yellow ones. Avoid any with wilted leaves or dried layers. Now available year-round, fennel is at its peak from late fall through winter. Grocers sometimes incorrectly liable fennel as sweet anise.
When storing, keep fennel bulbs in a perforated plastic bag in the refrigerator for up to 5 days. If kept too long, they will lose their flavor and toughen.
When preparing, remove the green stems and leaves, saving them to flavor or garnish other dishes such as soups or fish. Discard the outer layer of the bulb if it is tough and cut away any discolored areas. Cut the bulb in half lengthwise and remove the base of the core as it is thick and solid. Gently separate the layers with your hands and rinse well to remove any grit between them. Slice or cut as your recipe directs.
©Tiny New York Kitchen © 2021 All Rights Reserved

Roasting refers to proteins and vegetables cooked mostly at high temperatures in the oven. Baking uses a lower temperature to cook breads, baked goods, and casseroles.
Roasting makes any vegetable taste better. It brings out their flavor, caramelizes their natural sugars, and adds crunch. If your family doesn’t love certain vegetables like broccoli or Brussels sprouts, roasting is a great way to change their mind. Double what you’re roasting and then turn extra servings into quick meals later in the week. Cooking a little extra with one meal lets you make the most of value-sized packages of proteins and other store sales. With leftover already planned, you won’t need to lean on takeout.
Why we love to roast:
It’s Affordable! Inexpensive ingredients are tastiest when roasted. Root vegetables are browned and crisp, tomatoes and grapes are extra juicy and sweet, and tough cuts of beef are fall-apart tender. You also don’t need any special equipment to roast.
Roasting Is Healthful! Roasted foods need very little fat to cook compared to frying or sautéing. Roasting also intensifies flavors without added salt, sugar, or other ingredients.
It’s Easy! Roasted foods need little prep before they cook. And once the oven door closes, you can walk away. Fewer pans and utensils are needed, making cleanup easier too.
Essential Tools For Roasting:
Rimmed Sheet Pan: The rim keeps vegetables from falling off the sides and catches any juices from meats and fish.
Oven-Save Skillet: Go from stovetop to oven and back. Sear meats before roasting or make a pan sauce with the meat drippings after roasting.
Roasting Pan: Best for large roasts, hams, and turkeys. An inner rack lifts the meat so it can brown and crisp underneath.
Parchment Paper: Line pans to keep foods from burning and sticking, then toss for easy cleanup. If roasting at a higher temp or broiling use foil.
Metal Tongs: Flip and stir foods on a hot pan with ease. Look for tongs with a heat resistant grip.
Silicone Brush: Brush on a sticky glaze or baste foods with sauce. The silicone bristles are easy to clean.
Tips For Sheet Pan Roasting:
Jump Start Browning by preheating your sheet pan before adding vegetables.
Pat foods very dry with paper towels so the outside browns while the inside cooks through.
Cut foods to the same size and thickness so smaller pieces don’t burn.
Space out foods on the sheet pan so they have room to crisp and brown.
Let sheet pans cool before rinsing to keep the metal from warping.
©Tiny New York Kitchen © 2021 All Rights Reserved

Hungry for halibut or craving clams? There’s an easy way to prepare fish and seafood to perfections. Fish is ready when you can flake it easily with a fork. Shrimp and shellfish are done when they are opaque in color.
Bake: Best for fish fillets. Baking or roasting fish is an easy, hands-off method, especially good if you have a crowd to feed. As with any fish cooking technique, follow the recipe to avoid overcooking.
Wrap: Best for any fish fillet and shellfish. Cooking fish in foil is one of the most versatile ways to prepare fish, resulting in moist, flavor-packed dishes. And because you can load up on tasty ingredients, like herbs, citrus and spices, it’s a great way to cut back on fat and sodium without sacrificing flavor. Plus, cleanup is a breeze.
Poach: Best for any fish fillet and shellfish. Poaching simply means gently cooking the fish in liquid, such as water, broth, beer, or wine. It ads subtle flavor without drying out the fillets or adding any extra fat. To poach, simply cover the fish or seafood with liquid and bring to a simmer, just don’t let the liquid boil. You’ll only need a few minutes for your fish or seafood to be ready. You can also use the poaching liquid as a base for a sauce when you’re done.
Broil: Best for thick and meaty fish fillets, shrimp, and lobster tails. This method is especially good when you want to quickly bake fish and seafood. This is also a good method when you don’t have access to a grill or you’re adding a glaze. To make sure it doesn’t cook or brown too quickly, cook the fish at least 6 inches away from the broiler and watch carefully.
Steam: Best for clams and mussels. The traditional cooking method for clams and mussels, steaming is an easy way to add delicate flavor quickly without overcooking. Just add the seafood to a lidded saucepan with a little liquid like beer, wine, or broth, cover and bring to a simmer until the shells open up. Discard any that don’t open. You can also steam lobster, but it’s worth checking to see if your store’s fish department will steam lobsters for you.
Sear: Best for scallops, shrimp, and fish fillets. Use this cooking method for fish with a crisp, browned crust and a tender interior. Use a non-stick pan if possible and add a little oil before adding your fish, in batches if necessary, Don’t crowd the pan. Cook without stirring or turning for 2 to 3 minutes to brown the fish and crisp up any breading.
Grill: Best for any fish fillet or shellfish. Once grilling season rolls around don’t forget to add fish, shrimp, and even clams and mussels to your summer menus. Fish fillets take well to grilling and are easy to flip. Use a grilling basket for anything that might slip through the grate. Don’t forget skewers, which are the perfect way to grill shrimp.
“Work With What You Got!”
©Tiny New York Kitchen © 2020 All Rights Reserved
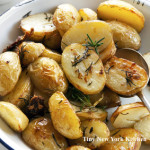
I don’t know what’s more comforting than potatoes. A staple food in many parts of the world, potatoes are an integral part of much of the world’s food supply. Potatoes are the world’s fourth-largest food crop after maize, wheat, and rice.
There are currently over 1,000 different types of potatoes.
White Potatoes: These all-purpose potatoes are moderately starchy with a dense, creamy texture and can be roasted, baked, boiled, or steamed.
Russet Potatoes: Starchy and fluffy, these potatoes are ideal for mashing and baking, as well as French fries and latkes.
Fingerling Potatoes: Small, knobby fingerlings have thin, delicate skin that doesn’t need to be peeled. Their firm texture stands up to roasting, boiling, and pan-frying.
Baby Potatoes: Also known as new potatoes, these tiny potatoes come in a rainbow of colors (another reason to leave the skin on). They are best cooked whole and boiled, steamed, or roasted.
Gold Potatoes: These thin-skinned potatoes (also called yellow potatoes) are beloved for their buttery flesh. They’re fluffy enough to be smashed yet firm enough to be used in soup or stew.
Red Potatoes: Ruby skin gives these potatoes visual appeal, and their firm and waxy texture means they soak up flavor without turning too soft. They are ideal for salads and gratins.
Look for potatoes without any bruises, cuts, wrinkles, or soft spots, which can all be signs of age or poor handling. If they smell like soil, that’s typically an indication of freshness. While fresh is best, potatoes keep for quite some time. Store them in a spot that’s cool, dark, and dry. If eyes sprout, simply cut them off and use the potatoes as normal. Potatoes provide vitamins C and B6, plus iron and potassium. While the whole potato contains fiber, you will get an extra boost if you leave the skin on.
“Work With What You Got!”
©Tiny New York Kitchen © 2019 All Rights Reserved

We at Tiny New York Kitchen get it! Especially during the holidays you don’t want to ruin a good piece of meat. Here are some general guidelines for producing the best results for your holiday meal.
Remove meat from the refrigerator at least an hour before roasting so it can come closer to room temperature.
Start the roast at 450 degrees for 15 minutes to develop a nice crust.
Drop the oven to 350 degrees for an additional 15 to 20 minutes per pound.
Remember, you must cook to temperature, NOT time, because every oven and piece of meat is unique. So, take the temperature of the roast every 20 to 30 minutes to avoid overcooking. 120 degrees (50C) for rare and 130 degrees (55C) for medium-rare.
Always use a meat thermometer. An instant-read probe thermometer helps dispel any guesswork.
Remove from oven and loosely cover roast with foil to keep warm and rest it for 30 minutes. Don’t be alarmed when you see the temperature of the roast creep upwards a few degrees while it rests. This is perfectly normal and expected.
These directions will work for nearly all holiday roasts. The exceptions are thinner/smaller roasts like beef tenderloin or rack of lamb. These can be cooked at 400 degrees for the entire time, using a meat thermometer to monitor progress.
“Work With What You Got!”
©Tiny New York Kitchen © 2018 All Rights Reserved

Choosing A Bird
How big should you buy? If you don’t want leftovers then estimate 1 pound of turkey per person. If you do want leftovers then estimate 1 1/2 pounds per person.
Fresh Or Frozen
Should you buy fresh or frozen? Fresh will keep for 4 days in the refrigerator. There is no need to thaw it and some believe that fresh is more flavorful. Frozen is often more affordable, can be purchased weeks in advance, but requires thawing time.
Defrosting
There are two ways to defrost your frozen turkey. 1. In the refrigerator; if you have more time, allow the bird to thaw in the refrigerator in its original packaging. Allow 24 hours of thawing for every 5 pounds of turkey. 2. Cold water bath; if you’re short on time submerge the turkey in a cold water bath. Change the water every 30 minutes. Allow 30 minutes of thawing for every pound of turkey.
Roasting
Remove the giblets. The giblets typically include the heart, liver, and gizzard (often gathered in a bag), plus the neck. You can throw them away or simmer them in stock or water to make your own broth to use in gravy or stuffing.
Tie The Legs
For even roasting, use butcher’s twine to loosely tie the turkey legs together, and then tuck the wings under the shoulders. Don’t wash the bird. Washing can easily spread bacteria. To kill any bacteria, roast the turkey until it reaches an internal temp of 165 degrees.
Brush With Melted Butter
Bump up the flavor by adding herbs, spices, and citrus zest to the butter.
Take The Temperature
Ignore the pop-up timer, they’re unreliable. Instead use an instant read thermometer and take the temperature in the thickest part of the thigh (it takes the longest to cook) and make sure the thermometer isn’t touching any bone. 165 degrees is the magic number.
Let It Rest
Once the turkey comes out of the oven, cover loosely with foil and let it rest at room temperature for 15 minutes. This allows the juices to reabsorb for moist and delicious meat.
Storing
Leftovers should be put away right when you’re done serving. If anything is left out for more than 2 hours, throw it away. Store leftovers in airtight containers in the refrigerator for up to 4 days or in the freezer for up to 3 months. Reheat to 165 degrees and cover to preserve moisture and texture.
“Work With What You Got!”
©Tiny New York Kitchen © 2018 All Rights Reserved

How to cook rich, perfectly roasted winter squash without any prep work. This method works for winter squash of any size, so adjust the roasting time as needed.
Preheat oven to 400 degrees.
Roast the whole squash on a baking sheet until the skin is papery and a fork inserted into two or three different spots reveals very tender flesh (45 minutes per pound).
Remove from oven and set aside until cool.
Breakfast. Lunch. Dinner. Have squash for them all!
Start by cooking a whole winter squash.
Breakfast
Add cooked cubes of butternut squash, grated Gruyere cheese and chopped sage to a frittata mixture.
Lunch
Meal-prep lunches by layering cooked spaghetti squash, marinara sauce and meatballs or shredded chicken.
Dinner
Add thick slices of cooked acorn squash (you can keep the skin on) to soup or stew during the last few minutes of cooking.
“Work With What You Got!”
©Tiny New York Kitchen © 2018 All Rights Reserved

Sometimes, the best way to cook fresh produce is the simplest way of all.
For roasting vegetables, put them on a baking sheet, sprinkle with olive oil and a bit of kosher salt, and cook in a hot oven until tender, turn once or twice.
For steaming vegetables, put a small amount of water in a saucepan and heat over a medium-high heat until tender, as little as 2 minutes or up to 10, depending on the vegetable.
“Work With What You Got!”
©Tiny New York Kitchen © 2018 All Rights Reserved
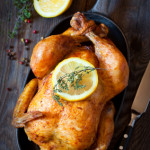
Pulling a tender, juicy roast chicken with crisp, golden brown skin out of the oven is so rewarding. For a simple side, roast a pan of in-season produce like spring onions, ramps, new potatoes or carrots during the last 20 minutes of cooking.
INGREDIENTS
1 Whole Chicken (4 Pound)
1 Teaspoon Sea Salt
1/2 Teaspoon Freshly Ground Pepper
Preheat oven to 425 degrees.
Remove neck and giblets from chicken. Trim off any excess fat from neck and tail end of chicken. Rinse bird with cool running water. Pat dry with paper towels, and season all over with salt and pepper.
Place chicken, breast side up, on a rack in a small-size roasting pan or a 9×13 inch-baking dish. Tuck wings back and behind bird to hold them in place. Roast, basting once or twice with pan juices, until skin is deep golden brown and juices run clear, about 1 1/2 hours.
An instant-read thermometer inserted in the thickest part of the thigh should read 165 degrees. Let chicken rest for 15 minutes and then carve.
To add fragrant flavor, stuff the cavity with a halved lemon or orange and a handful of fresh herbs like rosemary, thyme, and oregano.
Serve with an easy salad of greens topped with cherry tomatoes, mozzarella, and a drizzle of olive oil.
Serves 4
Prep Time: 20 Minutes
Cook Time: 90 Minutes
Total Time: 110 Minutes
“Work With What You Got!”
©Tiny New York Kitchen © 2018 All Rights Reserved


