
Whether you’re hosting your first Thanksgiving or you’ve been making the family feast for decades, refer to our Thanksgiving timeline checklist to keep your prepping, shopping, and cooking on track for the big day.
1 TO 2 WEEKS BEFORE THANKSGIVING
Confirm the number of guests and plan your menu
Order your turkey
Plan your table setting, serving dishes, and decorations
Read through all your recipes to determine the food and cooking equipment you will need
Make your shopping and to-do lists
Shop for nonperishable food items, plus any cooks’ tools, cooking equipment and tableware you need
A FEW DAYS BEFORE
Prepare the turkey brine, but do not add the turkey, cover and refrigerate
Prepare food that can be made several days ahead of time, such as pie pastry and cranberry sauce
THE DAY BEFORE
Complete your food shopping
If you ordered a fresh turkey, pick it up or have it delivered
If you are brining the turkey, place it in the brine and refrigerate
Prepare dishes that can be made in advance such as soups and pies
Chop vegetables for side dishes; refrigerate in covered bowls or sealable plastic bags
Peel and cut the potatoes, place in cold water and refrigerate
Set the table
THANKSGIVING DAY
Refrigerate wines that need chilling
Prepare the stuffing and other side dishes
Prepare the turkey for roasting and put in the oven at the determined time
If you plan to stuff the turkey, do not stuff it until just before you put it in the oven
While the turkey is roasting, make the mashed potatoes
While the turkey is resting, make the gravy and cook or reheat the side dishes
Carve the turkey and serve your guests
Have a wonderful Thanksgiving!
“Work With What You Got!”
©Tiny New York Kitchen © 2018 All Rights Reserved

Beautiful autumn! The tapestry of autumn is tinged with splendor, as nature sheds its robe of green and garbs itself in the richly textured colors of fall. As leaves begin to turn deep shades of burnt orange, russet, gold, umber burgundy, cooks seek out lavish and luscious seasonal ingredients.
Apples
Pears
Cranberries
Persimmons
Pomegranates
Cabbage
Rutabaga
Turnips
Cauliflower
Beets
Sweet potatoes
Pumpkins
Squash
“Work With What You Got!”
©Tiny New York Kitchen © 2018 All Rights Reserved

Tiny New York Kitchen Wishes You And Your Loved Ones A Very Happy Thanksgiving!

The holiday season is in full swing and soon you’ll be living on Thanksgiving leftovers. Ever had pumpkin pie for breakfast followed by a full turkey meal for lunch and another for dinner? It’s easy to get in the habit of holiday indulging.
The average American gains more than a pound each holiday season. Over a decade that really adds up. As they say, “It’s easy to put it on and hard to take off.”
There are ways to enjoy the holidays, but keep yourself in check so that you don’t fall into the trap of complete abandon.
High Fat Foods
Pigs In A Blanket: High In Fat, Salt, and Carbs.
Fried Cheese Balls: High In Fat And Small So It’s Easy To Overeat.
Baked Brie: Fatty And Addictive, Plus You Have To Slather It Onto Some Carb Calories.
Chips: They Have No Nutritional
Eat In Moderation
Cheese And Crackers: Calorically Dense And Super Easy To Eat. They’re Not Special So Spend Your Holiday Calories On Something More Festive.
Once-A-Year Favorites: You Only Eat Stuffing, Latkes, And Eggnog Once Or Twice A Year. If You’ve Been Coveting Aunt Martha’s Chiffon Pie Or Cousin Tommy’s Cooked Goose, Enjoy In Moderation.
Be My Guest
Crispy, Crunchy Crudités: Make The Brightly Colored Vegetables Your First Stop For Noshing. Add Hummus To Slow Digestion.
Pork Tenderloin, Ham Or Turkey: Protein Is Going To Suppress Your Appetite Due To The Fact That It Is Slow Digesting And Triggers The Release Of Several Satiety Hormones.
Shrimp Cocktail: Low In Fat, High In Protein And A Perfect First Course For A Low Calorie Tour Of The Buffet.
Swedish Meatballs: Another Protein Packed Option That Stands Out Amid A Carbohydrate Heavy Table.
Prosciutto Wrapped Asparagus: A Great Choice To Fuel Your Body While Keeping Your Appetite In Check.
Enjoy the holidays, but enjoy them in moderation.
“Work With What You Got!”
© Victoria Hart Glavin Tiny New York Kitchen © 2017 All Rights Reserved
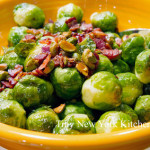
Brussels sprouts have a pronounced and sweet nutty flavor, quite unlike cabbage, although the two are closely related. They are traditionally served at Thanksgiving and Christmas and have an affinity with certain nuts, such as almonds, pistachios, and chestnuts. Brussels sprouts taste great with onions, and ginger, or with nuts.
Brussels sprouts should be small and hard with tightly wrapped leaves. Avoid any that are turning yellow or have loose leaves. They will keep in a cool place or in the salad drawer of a refrigerator for several days.
When preparing and cooking Brussels sprouts trim away the base of the stalk and remove the outer leaves. If the sprouts are large, cut them in half or quarters, or slice thinly for stir-frying. Cook very briefly in small amounts of fast-boiling water. Alternatively, stir-fry with onions and ginger, in a little oil and butter.
“Work With What You Got!”
© Victoria Hart Glavin Tiny New York Kitchen © 2016 All Rights Reserved

The turkey came originally from America and was first domesticated by the Aztecs in Mexico. The Spanish introduced turkeys into Europe and they soon became a popular choice in France, Italy and Britain.
When early settlers from Britain, France and Holland crossed the Atlantic to North America, the vast flocks of turkey that roamed wild provided them with sustenance. They were plentiful and so easy to trap or shoot that the older children of the family were given the responsibility of catching them. The Native Americans meanwhile taught the new settlers the rudiments of farming, and in November 1621, on the first anniversary of their arrival, the Pilgrims entertained the locals to a feast, at the center of which was the turkey. Ever since, this has been the traditional bird served at Thanksgiving.
Turkeys are available fresh, chilled, or frozen all year round. When buying a whole bird, look for a plump well-rounded breast and legs and clear, soft and evenly colored skin. Avoid birds that are bruised, with blemishes or torn skin or any that have been badly or unevenly plucked. Turkeys vary enormously in weight.
When you’re ready to purchase your turkey it’s easy to get confused on what size to get. A good guild to go by is to figure approximately 1 1/4 pounds per person. This makes enough for the meal and provides a decent amount of leftovers.
To store your turkey place it in a large, deep dish and cover it completely with plastic wrap. Store it in the coolest part of the refrigerator; making sure that it does not come in contact with other foods.
Thaw a frozen turkey in the refrigerator for 2 to 4 days. Estimate 24 hours for every 5 pounds, so 2 days for a 10 pounder, 3 days for a 15 pounder, etc.
And then there is always the frozen turkey emergency that goes like this, “Help, help, it’s Wednesday, and my turkey is still frozen!!!” It’s been a long time, but I’ve been in this predicament. What you do is leave the turkey in its wrapper and put it in a large-size container. A lobster pot works well. Fill the container with cold tap water and let it sit for 30 minutes. Dump out the water and refill. Let it sit another 30 minutes. Repeat until the turkey is thawed, then roast immediately or transfer to the refrigerator.
The good news is that you can brine or dry cure your turkey while it defrosts in the refrigerator. What a Godsend that is! Use a lighter brine solution, which is about 1/2 cup kosher salt per gallon of water, plus sugar and spices). If you’re dry curing, use the standard recipe. You’re turkey should stay below 40 degrees while brining. You don’t need to brine or cure a kosher or butterball type supermarket frozen turkey. These come pre-brined. If you want to be able to put your own flavor stamp on your meal, then get a natural or untreated bird and do it yourself. If you plan on brining for 2 days use the weaker solution that I just mentioned. If you plan to brine for 24 hours or less, then bump it up to 1 cup kosher salt per gallon of water. Then add an equal amount of sugar. I don’t always brine, but when I do I’ve been known to throw an assortment of flavorings in the brine. Flavorings that you could add to your brine could be: apples, lemons, oranges, onions, garlic, shallots, peppercorns, bay leaves, cinnamon sticks, cloves, allspice berries, juniper berries, mustard seeds, fennel seeds, coriander seeds, rosemary, sage, thyme, savory, parsley, or oregano. You can also replace half the water with sweet cider, hard cider, vegetable stock, turkey stock, chicken stock, beer, white wine, or red wine. If you want to dry cure then use about 1/2 teaspoon kosher salt for every pound of turkey. Then add spices to your taste.
Stuffing your turkey is a personal preference. I always stuff the bird because I love how it tastes when cooked inside the turkey. It does slow down the cooking process, however. Never stuff the turkey in advance of cooking. The stuffing can be made in advance, but the turkey should not be stuffed until just before it is placed in the oven. Weigh the stuffing and add this to the weight of the bird before calculating the cooking time. Thoroughly rinse the body cavity of the bird under cold running water, and then drain it well. Wipe the turkey, inside and out, with paper towels. Press the stuffing inside the shallow neck cavity. Make sure not to pack it in too tightly. Turn the bird over and pull the neck skin over the stuffing. Now it’s time for a little turkey bondage and truss the bird (tuck the wing tips under the breast and tie the legs together) and then cook for the calculated time. Never shorten the cooking time because although the meat may appear cooked, extra time must be allowed for cooking the stuffing thoroughly.
If you choose not to stuff your turkey then place aromatics in the body cavity of the bird. Cut a large onion in half and stud each half with 4 to 6 cloves. Place this in the body cavity of the bird. Cut an orange and a lemon into quarters and add these, together with 3 or 4 bay leaves, 4 to 6 fresh sage sprigs, and 2 to 3 fresh thyme sprigs. Add 1 cinnamon stick or 1 blade of mace for a festive hint of warm spice.
Turkeys are super easy to roast, but require a little more attention than smaller birds. Check to make sure the oven shelves are in the correct position before heating the oven. Preheat the oven to 350 degrees. Place the prepared bird on a rack in a large-size roasting pan. Smear the turkey breast generously with butter, season with salt & pepper and place in the oven. Baste the turkey from time to time during cooking. When the breast has browned, cover with foil to protect it and continue cooking. Remove the covering foil for the final 20 minutes of cooking. To check if the meat is cooked, insert a skewer into the thickest part of the thigh. If the juices run clear and the meat is white, it is cooked. If the juices are pink and the meat is soft and pink, the turkey is not ready. Return it to the oven and check again after 20 minutes. Cooking times will differ depending on whether your bird was purchased fresh or frozen. Plan on 20 minutes per pound in a 350 degree oven for a defrosted turkey and 10 to 15 minutes per pound for fresh. Remember to add more time if you’re turkey is stuffed. You should have an instant-read thermometer in your kitchen drawer. Insert the thermometer into the breast (all the way to the bone) and if it reads 160 degrees you’re good to go. You may also measure the thigh by inserting the thermometer into the thickest part, but not touching the bone, and it should read 165 degrees.
Remove the turkey from the oven and cover it closely with foil. Leave it to rest for at least 30 minutes. This will even out the temperature and make it easier to carve. I know some chefs who let it rest for 2 hours, but I don’t think that one needs to wait that long. If you wish to make gravy in the roasting pan, transfer the bird to a carving plate.
When you’ve let your bird rest awhile remove the trussing string. Hold the bird steady in position with a carving fork. Cut off the legs, then cut these in half or carve the meat from the bones. Make a horizontal cut across the breast above the wing. Carve neat and even vertical slices off the breast. Repeat on the other side of the bird. Arrange slices on a warmed platter. Add the turkey legs or sliced meat to the platter or set them aside for serving separately. Scoop out the stuffing and serve with the meat.
“Work With What You Got!”
© Victoria Hart Glavin Tiny New York Kitchen © 2016 All Rights Reserved
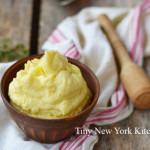
Old-School Mashed Potatoes
Mashed potatoes are as American as Thanksgiving itself. Variations range from sriracha to pumpkin spice foie gras mashed potatoes (I wouldn’t recommend that latter). At Thanksgiving, nothing beats a well-made bowl of classic mashed potatoes, however. As with many other deceptively simple dishes, there are reasons why sometimes you have good mashed potatoes, and other times you have fabulous mashed potatoes. Here are my well-kept secrets to make those fabulous ones, served piping hot, and ready for that giant ladle of gravy.
Potatoes with a high starch content (the kind used for baking) provide the traditional flavor and texture. The same starch that gives a baked potato its fluffy interior also contributes to perfect mashed potatoes. Yellow-fleshed varieties like Yukon golds or yellow Finns are excellent as well, but they turn out the same color as mashed turnips, which may be disconcerting to potato purists. If you live near a farmers’ market, take the potato farmers’ advice on local favorites as they may suggest an interesting heirloom variety that will become your favorite.
Purchase your potatoes about a week ahead of time and age them in a cool, dark place. Do not place them in the refrigerator. Mature potatoes are drier and mash up lighter. Please don’t let them sprout eyes, though.
Make mashed potatoes just before serving. Reheated mashed potatoes leave me shivering.
Make sure not to overcook the potatoes. They should just yield to a sharp knife when pierced. If the drained potatoes seem soggy, just return them to the pot and cook over a low heat for about 2 minutes, stirring constantly until they begin to stick to the bottom of the pot. Doing this forces the excess steam out of the potatoes and dries them out.
Mash the drained potatoes in the still warm cooking pot with HOT milk. A cold bowl and cold milk make for lumpy and lukewarm potatoes. The precise amount of milk is a matter of taste, so use more or less to reach your desired consistency.
You’ll need an efficient mashing utensil. Some cooks swear by a potato ricer (which does make the smoothest potatoes by the way), as long as you enlist another pair of hands to make the job go quickly. You may use an electric hand mixer. If you want to use a low-tech, old school hand potato masher, go to a restaurant supply store and get a big one, or the job will take forever. The potatoes will be cooling off by the second and we don’t want that happening. Never ever mash potatoes in a food processor or you’ll get starchy, sticky, gummy mashed potatoes that could be used for gluing kindergarten craft projects.
Season well with salt and pepper. Use your taste to determine amounts. I use kosher salt mostly, but you may use your favorite type of salt. White pepper is spicier than black pepper, but will give you pristine looking mashed potatoes. But, of course, use black if you want to.
www.tinynewyorkkitchen.com
“Work With What You Got!”
© Victoria Hart Glavin Tiny New York Kitchen © 2016 All Rights Reserved

Family & Thanksgiving
More than any other holiday, Thanksgiving has evolved as a time to gather together. On Christmas most Americans stay at home, but on Thanksgiving, many pack up and leave home to spend the holiday with relatives and friends. This is nearly as old a custom of the day as having turkey and pumpkin pie.
The reunion tradition arose in the early eighteenth century as families began dispersing across New England to settle on the frontiers of New England (western Massachusetts, Vermont, New Hampshire, and Maine). Gradually, before and after the Revolutionary War, New Englanders pressed into New York State, Ohio, and even parts of the southern colonies and territories. In the nineteenth century, hundreds of New Englanders went west during the Gold Rush and subsequent westward migrations. And as Boston, New York, and other towns grew into cities, young people left farms to join businesses or to work in industries in urban centers. Thanksgiving was the time people chose for family reunion, to go back to the old homestead for a visit. It still is.
“Work With What You Got!”
© Victoria Hart Glavin Tiny New York Kitchen © 2016 All Rights Reserved

Sweet Potatoes
Sweet Potatoes have a distinctive sugary and spicy flavor, which makes them an excellent addition to many savory dishes. There are two types of this highly nutritious tuber. One has cream-colored flesh and the other has an orange flesh. The orange flesh variety has a higher nutritional content because it is richer in the antioxidant beta-carotene. Both types are a good source of potassium, and contain plenty of nutritional fiber, vitamin C and carbohydrate.
When buying sweet potatoes, choose small or medium-size specimens, as the larger ones tend to be rather fibrous. They should be firm and evenly shaped. Avoid any that seem withered, have damp patches or are sprouting. They will keep for about 8 days if stored in a cool place.
Sweet potatoes can be cooked in any of the ways you would cook ordinary potatoes – roasted, boiled, mashed or baked. They also make delicious fries. If baking, scrub the potatoes well and cook exactly as you would ordinary potatoes. To boil, either cook in their skins and remove them after cooking, or peel and place in acidulated water. This prevents them from turning brown.
“Work With What You Got!”
© Victoria Hart Glavin Tiny New York Kitchen © 2016 All Rights Reserved

Friendsgiving
I’ve had friends, who for years, have been celebrating “Friendsgiving” and look forward to it every year. Friendsgiving is another way to celebrate the season with those who mean the most to you. A friend-focused feast is a great way to include those who don’t have plans on Thanksgiving or to try those new recipes you’ve been checking out. Whether you celebrate on Thanksgiving Day itself or hold a separate dinner altogether, Friendsgiving is a tradition that we, at Tiny New York Kitchen, can get behind.
“Work With What You Got!”
© Victoria Hart Glavin Tiny New York Kitchen © 2016 All Rights Reserved


