
To flavor your food reach for herbs and spices rather than high-sodium table salt. Make sure to read the labels of seasoning mixes because many of them contain salt.
Seasoning Suggestions
Pasta: Basil, Fennel, Garlic, Paprika, Parsley, Sage
Potatoes: Chives, Garlic, Paprika, Parsley, Rosemary
Rice: Cumin, Marjoram, Parsley, Saffron, Tarragon, Thyme, Turmeric
Seafood: Chervil, Dill, Fennel, Tarragon, Parsley
Vegetables: Basil, Caraway, Chives, Dill, Marjoram, Mint, Nutmeg, Oregano, Paprika, Rosemary, Savory, Tarragon, Thyme
“Work With What You Got!”
©Tiny New York Kitchen © 2019 All Rights Reserved
This Year Tiny New York Kitchen Is Focusing On How To Get More Vegetables Worked Into A Regular Diet.
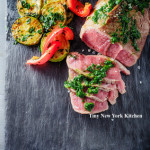
We at Tiny New York Kitchen get it! Especially during the holidays you don’t want to ruin a good piece of meat. Here are some general guidelines for producing the best results for your holiday meal.
Remove meat from the refrigerator at least an hour before roasting so it can come closer to room temperature.
Start the roast at 450 degrees for 15 minutes to develop a nice crust.
Drop the oven to 350 degrees for an additional 15 to 20 minutes per pound.
Remember, you must cook to temperature, NOT time, because every oven and piece of meat is unique. So, take the temperature of the roast every 20 to 30 minutes to avoid overcooking. 120 degrees (50C) for rare and 130 degrees (55C) for medium-rare.
Always use a meat thermometer. An instant-read probe thermometer helps dispel any guesswork.
Remove from oven and loosely cover roast with foil to keep warm and rest it for 30 minutes. Don’t be alarmed when you see the temperature of the roast creep upwards a few degrees while it rests. This is perfectly normal and expected.
These directions will work for nearly all holiday roasts. The exceptions are thinner/smaller roasts like beef tenderloin or rack of lamb. These can be cooked at 400 degrees for the entire time, using a meat thermometer to monitor progress.
“Work With What You Got!”
©Tiny New York Kitchen © 2018 All Rights Reserved
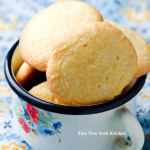
If you’re looking for some useful tips on making and baking the best cookies you and your family has ever tasted then these basics will get you on the right path for cookie success.
Butter
It’s true that nothing is better for the flavor, richness, texture, and color of cookies than butter. If you have a dairy allergy then margarine can be substituted for butter if it contains enough fat. For best results, choose a stick margarine with at least 80 percent vegetable oil or one that contains at least 100 calories per tablespoon. Substituting shortening for butter will give cookies a softer, more cakelike texture and a different flavor.
Sheet Success
If your cookie sheets are thin, warped, or dark from years of baked-on grease, it’s time to go shopping. Purchase shiny, heavy-gauge cookie sheets that have low or no sides. Use jelly-roll pans (15x10x1 inch baking pans) only for bar cookies since their 1-inch sides prevent other cookie types from browning properly. Let hot cookie sheets cool between batches. Using a nonstick baking mat prevents cookies from sticking to cookie sheets by lining the sheets with this reusable mat. Parchment paper works well, too.
To The Freezer
Are you concerned you’ll have no time for last-minute holiday cooking baking? Get a head start by freezing baked and cooled cookies. Most cookies can be frozen for month, ready to be pulled out at a moment’s notice. Use airtight plastic bags and containers specifically labeled for freezer storage. Separate layers of cookies with sheets of waxed paper. Tightly seal filled bags and containers and freeze for up to three months. For best results, don’t frost or glaze cookies before freezing. Instead, freeze unfrosted cookies, thaw, then frost before serving. Most cookie dough (except bar batters and meringue or macaroon mixtures) can be frozen in an airtight freezer container for up to six months. Thaw dough in its container in the refrigerator. Shape and bake as directed.
Shipping
Sending cookies, not crumbs, to loved ones through the mail is possible – with a little care. For best results, send crisp or firm varieties (including most slice & bake) and avoid frosted moist, thin, or filled types. Wrap baked and cooled cookies individually, in back to back pairs, or in stacks in plastic wrap. Line a sturdy box with bubble wrap and pack cookies in layers of packing, peanuts or tissue paper so they won’t have room to shift. Write “perishable” on the box and ship early in the week so your package won’t be delayed over the weekend.
“Work With What You Got!”
©Tiny New York Kitchen © 2018 All Rights Reserved

Nothing says romance like a rolling pin or so thought sailors around the turn of the 18th century who often brought home decorative glass rolling pins for their loved ones. The pins were typically hollow and could hold additional gifts like salt, tea, cocoa, and other rare commodities from far off places. Today we view rolling pins as either mundane, practical kitchen utensils or family heirlooms passed down through generations. Though simple in design, rolling pins are revolutionary in utility, shaping dough to a uniform thickness that could never be achieved by bare hands alone. No one knows when the rolling pin was first invented, and while there may be variations for specialized uses, the basic design of a weighted cylinder remains the same. Two main styles dominate today’s market: the baker’s pin and the French rolling pin.
The Baker’s Pin
The baker’s pin, sometimes known as the American rolling pin, features two handles that attach to a rod that spins inside a heavy cylinder. The handles make for easy rolling forward and backward, and the pin itself is typically weighty enough that you don’t have to put much effort into flattening dough. Baker’s pins are available in a variety of materials – hardwood cylinders being the most common. Pins made with a marble, silicon, or stainless steel barrel are also available for those interested in an easier to clean rolling pin. When chilled, marble and metal rolling pins are better at holding a cold temperature, making them ideal for working pastry and other doughs that must be kept cold.
The French Pin
French pins, by comparison, have no handles; you use the heel of your hand to press down and roll the pin to flatten the dough. Among French pins, you’ll find straight (dowel) and tapered designs. Bakers who use straight pins often laud their ability to produce consistently smooth and even dough, while those who prefer tapered pins tout maneuverability. The tapered design is ideal for creating circular shapes, such as pie crusts and pizzas, and shaping edges. French pins, like baker’s pins, are also available in different materials.
Clean With Care
Wooden rolling pins require special care when cleaning. Immediately after use, wipe them down with a dry cloth or paper towel or use a damp cloth to remove any dough residue and dry to remove excess moisture. Avoid using soap, which can strip away the wood’s natural oil. Be sure to periodically oil the wood (mineral or butcher block oil works well) to prevent cracks. These simple steps should keep your wooden rolling pin in like-new condition. Someday it might become a prized family heirloom – a memento of cherished moments in the kitchen baking for people you love.
“Work With What You Got!”
©Tiny New York Kitchen © 2018 All Rights Reserved

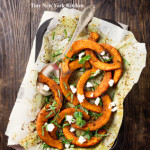
If you need a break from Thanksgiving leftovers make rich and buttery Gnocchi With Butternut Squash, Spinach & Tomatoes.

Tips & Tricks
While many foods are naturally gluten-free, gluten can be especially difficult to avoid in baked goods. Gluten is a complex protein found in wheat (and other grains) that functions like glue in baked goods and pastas. Gluten’s elastic structure helps baked goods rise and become light and fluffy by trapping gas produced by yeast. It’s the key ingredient that makes breads, pizza crusts, and quick breads tender and chewy. But gluten-free enthusiasts and savvy bakers are reaching new heights by getting creative in the kitchen.
Measure By Weight
In most recipes, a blend of gluten-free ingredients is necessary to create baked goods with a conventional shape and texture. For this reason, most health food stores and many grocers sell blended, all-purpose gluten-free flour mixes that simplify gluten-free baking. There are some notable differences when baking with gluten-free substitutes, including a few that break the conventional rules of baking. Gluten-free flours are, in general, milled finer than wheat-based flours. The fine grind helps gluten-free flours blend better with other ingredients and prevents your baked goods from becoming gritty. On the other hand, the fine flour is more difficult to evenly pack into measuring cups and dense gluten-free flours have different weight to volume ratios than conventional wheat flours. In short, you can’t always substitute a cup of gluten-free flour for a cup of wheat flour, and you’re better off using a kitchen scale to measure gluten-free flour for accurate measurements. The labels on most gluten-free flours feature a cup-to-grams conversion to ensure accuracy.
Consistency & Shape
Even with the right flour mix and measurements, a gluten-free batter or dough won’t usually handle exactly like a conventional dough. For example, gluten-free pie crust tends to be more crumbly and is more apt to split when you try to fold it. To keep the dough in one piece, roll it between two sheets of wax or parchment paper, which also makes it easier to transfer the dough to a pie plate. Be sure to use and egg wash on pie dough, instead of a milk wash, as a milk wash will more easily soak into the dough instead of resting on its surface. With gluten free breads, be sure to use a pan with sides, because the dough typically won’t stand easily on its own.
Moisture Matters
The strong and sticky bonds formed by gluten play many roles in baking, including moisture retention. While gluten-free flours typically include gums and starches to hold moisture, the resulting dough still tends to dry out faster. To avoid a tough texture or crummy edge on cakes and cookies, consider adding things like egg yolks, yogurt, and fruits (where appropriate) to increase moisture and add flavor. After baking, you can freeze gluten-free baked goods (tightly wrapped in freezer-safe bags) to prevent them from drying out.
Times & Temps
Traditional doneness indicators, such as a clean, dry toothpick in a cake or the hollow sounds when thumping a loaf of bread, are not always accurate for gluten-free baked goods. In fact, some gluten-free baked goods might feel soft to the touch and look wet inside even though they’re completely cooked – requiring a cool-down time to firm up. Follow the time and temperature recommendations in gluten-free recipes closely, because the traditional visual cues aren’t the same as wheat-based goods. Oftentimes, gluten-free recipes feature lower oven temperatures and extended baking times to drive out excess moisture.
Try It
If you’re new to gluten-free baking, don’t be intimidated, but do follow reliable recipes closely – as gluten-free recipes don’t always take well to adjustments, swaps, and add-ins. There are some good gluten-free cookbooks out to help with finding good recipes. I suggest, Gluten-Free Baking Classics, by Annalise Roberts for beginners, who know they need (or just want) to switch over to gluten-free or alternative flours when baking, but aren’t totally sure how to make the conversion. Gluten-Free Baking With the Culinary Institute of America: 150 Flavorful Recipes From The World’s Premier Culinary Collage, by Richard J Coppedge Jr.is geared toward professional bakers or those with an interest in the food-science side of things.
“Work With What You Got!”
©Tiny New York Kitchen © 2018 All Rights Reserved

When you have a house full of guests consider making a gluten-free cheesecake.

Choosing A Bird
How big should you buy? If you don’t want leftovers then estimate 1 pound of turkey per person. If you do want leftovers then estimate 1 1/2 pounds per person.
Fresh Or Frozen
Should you buy fresh or frozen? Fresh will keep for 4 days in the refrigerator. There is no need to thaw it and some believe that fresh is more flavorful. Frozen is often more affordable, can be purchased weeks in advance, but requires thawing time.
Defrosting
There are two ways to defrost your frozen turkey. 1. In the refrigerator; if you have more time, allow the bird to thaw in the refrigerator in its original packaging. Allow 24 hours of thawing for every 5 pounds of turkey. 2. Cold water bath; if you’re short on time submerge the turkey in a cold water bath. Change the water every 30 minutes. Allow 30 minutes of thawing for every pound of turkey.
Roasting
Remove the giblets. The giblets typically include the heart, liver, and gizzard (often gathered in a bag), plus the neck. You can throw them away or simmer them in stock or water to make your own broth to use in gravy or stuffing.
Tie The Legs
For even roasting, use butcher’s twine to loosely tie the turkey legs together, and then tuck the wings under the shoulders. Don’t wash the bird. Washing can easily spread bacteria. To kill any bacteria, roast the turkey until it reaches an internal temp of 165 degrees.
Brush With Melted Butter
Bump up the flavor by adding herbs, spices, and citrus zest to the butter.
Take The Temperature
Ignore the pop-up timer, they’re unreliable. Instead use an instant read thermometer and take the temperature in the thickest part of the thigh (it takes the longest to cook) and make sure the thermometer isn’t touching any bone. 165 degrees is the magic number.
Let It Rest
Once the turkey comes out of the oven, cover loosely with foil and let it rest at room temperature for 15 minutes. This allows the juices to reabsorb for moist and delicious meat.
Storing
Leftovers should be put away right when you’re done serving. If anything is left out for more than 2 hours, throw it away. Store leftovers in airtight containers in the refrigerator for up to 4 days or in the freezer for up to 3 months. Reheat to 165 degrees and cover to preserve moisture and texture.
“Work With What You Got!”
©Tiny New York Kitchen © 2018 All Rights Reserved

Use this simple guide to help you plan your Thanksgiving gathering. Remember to save some for leftovers.
Appetizers
5 People: 1 10 People: 2 15 People: 2 20 People: 3
Turkey
5 People: 6 to 8 lbs 10 People: 15 to 16 lbs 15 People: 22 to 23 lbs 20 People: 24 to 28 lbs
Starchy Sides/Vegetables
5 People: 1 10 People: 2 15 People: 2 to 3 20 People: 3
Non-Starchy Sides/Vegetables
5 People: 1 10 People: 2 15 People: 3 20 People: 4
Salad
5 People: 1 10 People: 1 15 People: 2 20 People: 3
Gravy
5 People: 2 to 3 cups 10 People: 5 to 6 cups 15 People: 1 to 2 quarts 20 People: 2 quarts
Desserts
5 People: 1 10 People: 1 to 2 15 People: 2 to 3 20 People: 3 to 4
Wine
5 People: 3 Bottles 10 People: 5 Bottles 15 People: 8 Bottles 20 People: 10 Bottles
Coffee
5 People: 5 Cups 10 People: 10 Cups 15 People: 15 Cups 20 People: 20 Cups
“Work With What You Got!”
©Tiny New York Kitchen © 2018 All Rights Reserved


