
Cut Into Pieces (like you would broccoli)
Steam
Add 1 to 2 Tablespoons, Butter, Ghee or Clarified Butter
Add 1 Tablespoon Spice Mixture Of Your Choice
OR
Preheat Oven to 425 degrees. Line Baking Sheet With Parchment Paper
Scatter Pieces Onto Baking Sheet
Drizzle With Olive Oil
Season With Kosher Salt & Pepper
Place In Oven 15 to 20 Minutes Until Tender
“Work With What You Got!”
©Tiny New York Kitchen © 2018 All Rights Reserved

One of the great things about winter is soup weather. I make all sorts of soups and stews. If I make a Sunday roast then the next week I usually make a stew. Soups and stews are a perfect way to use leftovers and they make great next day lunches. Be creative and make up different soups with what you have on hand. Remember “Work With What You Got!”
“Work With What You Got!”
©Tiny New York Kitchen © 2018 All Rights Reserved
Standing Beef Rib Roast
How Much To Buy: A 54 to 5 Pound Roast Serves 8 to 10
Keep meat at room temperature for an hour or so. Preheat oven to 450 degrees. Rub roast with lots of olive oil, cracked peppercorns, minced garlic, kosher salt, and 2 tablespoons of an herb or spice rub, if desired. Place roast meat-side down in a roasting pan and cook 30 minutes. Reduce heat to 425 degrees. Continue roasting for about 3 minutes per pound. Turn oven back up to 450 degrees and roast another 15 minutes, or until meat thermometer reaches 125 degrees for rare, 140 degrees for medium-rare or 160 degrees for well-done. Remove from oven and let rest 15 minutes. Skin fat from juices, and pour some dry red wine into the pan with the drippings. Over a low heat, stir wine, scraping up any browned bits on bottom of pan. Serve over roast as a sauce.
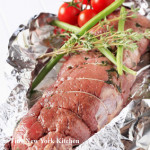
Roasted Beef Tenderloin
How Much To Buy: A 4 to 5 Pound Tenderloin Serves 8
Position oven rack in center. Preheat oven to 425 degrees. Lightly oil a roasting pan. Mix 2 tablespoons olive oil, 1 tablespoon minced garlic, 2 teaspoons each of rosemary and thyme, and kosher salt and freshly ground pepper to taste. Rub over entire surface of meat. Place meat into roasting pan and cook until thermometer inserted into thickest part of the roast reads 125 degrees for rare, 140 degrees for medium-rare or 160 degrees for well-done. This should take 35 to 55 minutes. You may baste with pan juices halfway through cooking, if desired. Remove from oven. Let rest 15 minutes and serve.
“Work With What You Got!”
© Victoria Hart Glavin Tiny New York Kitchen © 2017 All Rights Reserved

Pumpkins range in size from small, creamy white specimens to giant orange globes. Ever so useful as autumnal décor, pumpkins are a versatile and vital source of healthy nutrition.
This festive fall fruit offers a rich source of vitamin C and potassium, both of which may be effective at lowering the risk of heart disease, as well as normalizing blood pressure. The brilliant orange hue of many pumpkin varieties is the result of an abundance of beta-carotene, an antioxidant that transforms into vitamin A in the body. This vitamin may have an effect on boosting the efficiency of immune systems, as well as helping to repair free radical damage to cells.
Pumpkin adds a fabulous, smooth, silky texture and unique flavor to risotto, soup, muffins, cakes, breads, stews, chili, pasta, shakes and so much more. Fresh pumpkin is delightfully delicious and contains an added bonus; pumpkin seeds! Also known as pepitas, roasted pumpkin seeds are lightly crunchy, little gems that are a potent source of zinc, which may be helpful in promoting prostate health.
Pumpkin seeds also offer a significant amount of magnesium, phosphorous, copper, iron, manganese, and omega-3 fatty acids, which may help relieve symptoms of high cholesterol, depression, high blood pressure, and arthritis.
“Work With What You Got!”
© Victoria Hart Glavin Tiny New York Kitchen © 2017 All Rights Reserved

Fall has always been my favorite season because it’s full of lush abundance. I get to return to roasting, baking and slow simmering. My kitchen is full of foods that are slightly heavier with rich, robust flavor. Beautiful orange pumpkins, dark green winter squash, juicy, crisp apples, and luscious, ripe pears usher in savory creations.
Pears are particularly beautiful with their undulating curves and unique shades of pale green, ivory and deeper buckskin tan. When perfectly ripe, the creamy flesh is succinctly sweet and supremely satisfying. On their own pears may be considered rather a simple ingredient. But they become quite sophisticated when roasted and caramelized and served with maple mascarpone or honey cinnamon ice cream. Those same roasted pears may be laid upon a bed of frisee or baby kale leaves, drizzled with fig balsamic vinegar and showered with shards of blue cheese for an arresting autumn salad.
For a refreshing change from applesauce, prepare pear sauce, combining the cooked down pears with plump raisins and chunks of walnuts. Sauté pears in butter, a bit of rum and plenty of cinnamon and ginger and serve atop steel cut oatmeal, or tucked into tender crepes. Pears love to be combined with all the traditional cold weather spices such as nutmeg and cloves that make a home smell so wonderful.
Add pears to apple crisp, or try them in cakes, cobblers, pancakes or tea breads. Pears poached in red wine are a healthy and simply gorgeous ending to a holiday meal. Combine pears with hot peppers, cinnamon, allspice, onion, and garlic for an emphatic accompaniment to roast pork or chicken.
The perfect pear offers many health benefits. They are an excellent source of fiber, which is a boon to the intestines and may be effective in lowering cholesterol levels. Foods high in fiber may also be cancer preventative and reduce the risk of heart disease. Pears provide vitamins B2, C, E, as well as copper and potassium. Pear juice may provide relief from inflammation and soothe and nourish sore throats. Pear juice may also be tremendously effective in relieving a fever.
Enjoy the beauty of pears as you prepare your delicious life!
“Work With What You Got!”
© Victoria Hart Glavin Tiny New York Kitchen © 2017 All Rights Reserved

I like to eat seasonal fruits and vegetables. Brussels sprouts are a hearty winter vegetable and are sweetest and most tender after a hard frost. They are a good source of fiber, antioxidants, and vitamin C. Look for young, small green sprouts that have tightly formed buds. Avoid any yellowing, which means that the sprouts will be bitter, sulfurous, and tough. Use fresh sprouts within a few days after purchasing. Sprouts sold on the stalk tend to keep longer. Brussels sprouts can be boiled, braised, or steamed. Cut an X at the base of each sprout to allow for a more even cooking. Add a bit of butter, olive oil, salt, pepper, garlic, onions, or herbs of your choice. Brussels sprouts also make a nice addition to stir fry, noodles, and other dishes. As always, be creative and “work with what you got!”
“Work With What You Got!”
© Victoria Hart Glavin Tiny New York Kitchen © 2017 All Rights Reserved

Steaming eggs is the secret to hard-boiled eggs that are consistently perfect.
Don’t place an egg in boiling water. That lowers the temperature of the water and makes it hard to nail down a precise cooking time.
Do steam in a steamer basket. The eggs don’t touch the water, which means they don’t lower the water temperature, so you get consistently perfect results.
Bring 1 inch water to rolling boil in medium-size saucepan over a high heat. Place eggs in steamer basket. Transfer basket to saucepan. Cover, reduce heat to a medium-low and cook eggs for 13 minutes. When eggs are almost finished cooking, combine 2 cups ice cubes and 2 cups cold water in medium-size bowl. Use tongs or spoon to transfer eggs to ice bath. Let sit for 15 minutes. Peel before using.
“Work With What You Got!”
© Victoria Hart Glavin Tiny New York Kitchen © 2017 All Rights Reserved

We’re coming to the end of the last wave of beautiful warm weather. It’s a perfect time to take advantage of wonderful days and delicious late summer crops. Farmers’ markets are bursting with baskets of delectable produce that can be preserved in many ways. If you have plenty of peppers they can be roasted in the oven or grilled to get that fabulous smokiness to both sweet and hot varieties. Whichever method of heat you choose, continually turn peppers until they are blackened on all sides. Place the charred peppers into a paper bag and let them steam for at least thirty minutes. When cooked, remove the skins with a gentle rubbing motion, slice the peppers into strips, remove the ribs and seeds, and place the strips in small freezer containers. To each container add several peeled garlic cloves, fresh basil, oregano, and thyme. Cover with olive oil. Cover containers and let the peppers infuse on your countertop for a day. Store in the refrigerator for up to a week or place in the freezer to use over the winter months. Use the smoky, sweet strips to enliven a winter antipasto, add rich flavor to sandwiches or crostini or a vibrant soup that will remind you of summer.
“Work With What You Got!”
© Victoria Hart Glavin Tiny New York Kitchen © 2017 All Rights Reserved

For cooking, seek out small, sweet varieties with a thick flesh and a fairly small seed cavity, such as the Sugar, Pie, Baby Bear, or Cheese pumpkin. Field pumpkins have a fibrous flesh that is not good for cooking. Keep them for jack-o’-lanterns.
For convenience, you can use canned pumpkin puree. Some are unsweetened and plain, while others, labeled as pie filling, include sugar and spices. It’s also easy to make your own puree.
Choose pumpkins that feel solid and heavy for their size. As pumpkins age, they dry out and become lighter. The skin should be hard with no cracks, blemishes or soft spots.
Hard shells protect pumpkins from easy spoilage. Most will keep for a month or longer if stored in a cool, dry place. Once cut, pumpkins should be wrapped tightly in plastic, refrigerated and used within 3 to 4 days.
To cut open a pumpkin, steady it on a thick towel, very carefully insert a large, heavy knife near the stem and cut down through the curved side. Always cut away from you. Turn the pumpkin 180 degrees and repeat on the other side. A more dramatic, messier method is simply to drop the pumpkin onto newspapers spread on a hard floor. The pumpkin will break into pieces.
Once you’ve cracked into the pumpkin use a large metal spoon to scrape out the seeds and any fibrous strings in the seed cavity. Save the seeds for roasting if you want to.
“Work With What You Got!”
© Victoria Hart Glavin Tiny New York Kitchen © 2017 All Rights Reserved

Whether you’re baking summer pies or getting ready for holiday baking it’s important to have some key information about pie dough.
Blind Baking
Blind baking is prebaking a crust before you add an unbaked or especially wet filling. To ensure that your crust turns out crisp while blind baking, you can either dock it or use pie weights.
Docking
Docking is pricking the dough all over with the tines of a fork. The tiny holes allow steam to escape, so that the crust doesn’t puff up. After rolling out your dough and pressing it into the pan, gently prick it, leaving an inch or two between each mark. Be sure to check your crust several times throughout its bake time. If you notice it puffing up in any way, simply prick the puffy spots a few times and keep baking.
Pie Weights
Pie weights are tiny ceramic or metal balls or a thin metal chain that prevent the bottom of your crust from forming air pockets and bubbling up while baking. While docking is less fussy than using pie weights, I prefer pie weights because of the additional support they give the crust. Line your unbaked crust with parchment paper or aluminum foil before adding the weights to keep them from baking into the dough. I prefer parchment paper because its permeable structure allows the crust to breathe and brown more evenly. If you don’t own pie weights, dried beans work just as well.
Blind Bake Ahead
You can blind bake a crust up to three days ahead of time. Allow the crust to cool completely in the pan, wrap with plastic wrap, and store at room temperature until you are ready to fill and serve.
Happy Pie Baking!
“Work With What You Got!”
© Victoria Hart Glavin Tiny New York Kitchen © 2017 All Rights Reserved


