
The heat of late summer calls for lighter meals packed with fresh produce. Fortunately, there is an abundance of delicious, seasonal produce to pick from. Not only are seasonal items packed with flavor and beneficial nutrients, they tend to be more affordable as well.
Finding unique ways to use summer favorites can help combat any recipe fatigue you may have experienced in recent months. From packing picnics for the beach to firing up the grill to assembling no-cook meals, use Tiny New York Kitchen’s search function to help you find quick and tasty meals for all to enjoy.
Mix up your meals and fuel your family throughout the long days of summer with these ideas:
Grill Seasonal Vegetables
Add some color (along with vitamins, minerals, and fiber) to your menu by tossing fresh vegetables on the grill. Zucchini and summer squash are ideal as they can be diced and cooked in foil, on skewers or cut into uniform planks and placed directly on the grates. Regardless of the method, coat them with a little bit of olive oil and your favorite herbs and spices for the tastiest result.
Enjoy Something Sweet Any Time Of The Day
Melon is the perfect summer treat. Watermelon, cantaloupe and honeydew have just the right amount of sweetness this time of year, plus they have high water content, helping you to hydrate with each bite. Cut up slices for an easy snack on the go or scoop out melon balls to add to a fruit salad for a refreshing dessert.
Take Advantage Of Fresh Herbs
One of the best ways to add flavor to dishes, without added sodium, is to use herbs and spices. Basil, mint, oregano, and cilantro are excellent during warmer months as they pair perfectly with seasonal produce and light proteins such as fish.
Choose A New Fruit Or Vegetable
Pick out a new fruit or vegetable for your family to try during the remaining summer months. Kids love to choose by color! Then, plan a meal around your new produce pick.
Build A Picky Eater Snack Plate
Not only will this quick meal hack keep you out of a hot kitchen, but it is a great way to encourage picky eaters to get a bit more adventurous. Mix & match favorite fruits and vegetables with new options available this time of year. Have a strawberry lover? Put one or two blackberries next to them on the plate. Does your child devour cherry tomatoes? Try adding a few cucumber slices, too. They just may be tempted to try a bite of something new. Then, add in a no-fuss protein, like a hard-boiled egg or shredded rotisserie chicken and some easy whole grains such as crackers, popcorn or pita bread. Round it out with dairy favorites such as string cheese or yogurt. There you have a balanced plate without much hassle.
“Work With What You Got!”
©Tiny New York Kitchen © 2021 All Rights Reserved
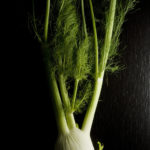
Fennel is a member of the carrot family, though it is not a root vegetable. The base of its long stalk weaves together to form a thick and crisp bulb that grows above ground. Fennel’s leaves, seeds, and stems all have a sweet, faintly anise like flavor. The stems of fennel swell and overlap at the base of the plant to form a bulb with white to pale green ribbed layers that are similar to celery in appearance and texture. Light and feathery, the pretty green leaves slightly resemble fresh dill. Use them as a bed for steaming fish or in small amounts as a garnish.
Originating in the Mediterranean, the fennel bulb appears often in Italian and Scandinavian cuisines. It can be eaten raw, grilled, baked, braised, or sautéed. While grilling, you can toss a handful of dried or fresh fennel stems onto the charcoal to infuse meat or fish with a light anise flavor.
When selecting fennel choose fresh bulbs that are smooth and tightly layered with cracks or bruises. Fat, rounded bulbs with white and pale green color will tend to be more succulent than thin or yellow ones. Avoid any with wilted leaves or dried layers. Now available year-round, fennel is at its peak from late fall through winter. Grocers sometimes incorrectly liable fennel as sweet anise.
When storing, keep fennel bulbs in a perforated plastic bag in the refrigerator for up to 5 days. If kept too long, they will lose their flavor and toughen.
When preparing, remove the green stems and leaves, saving them to flavor or garnish other dishes such as soups or fish. Discard the outer layer of the bulb if it is tough and cut away any discolored areas. Cut the bulb in half lengthwise and remove the base of the core as it is thick and solid. Gently separate the layers with your hands and rinse well to remove any grit between them. Slice or cut as your recipe directs.
©Tiny New York Kitchen © 2021 All Rights Reserved

Cheese Boards are a no-cook, sure-to-please option for any holiday celebration. Build a cheeseboard that’s affordable yet special. Then toast the season with festive cocktails.
A few inexpensive ingredients and simple homemade touches are all you need for a spectacular, special occasion-worthy spread. Here are some smart tips to deck your board with festivity and flavor without breaking the bank.
For a classic, colorful centerpiece, make your own cranberry and herb cheeseball. Start with a container of spreadable cheese and form into a ball. Use a sheet of plastic wrap to avoid messy hands. Roll the ball in a combination of finely chopped dried cranberries, parsley, and chives until thoroughly coated. Let sit at room temperature for 15 minutes before serving.
No need to buy expensive cheeses. Inexpensive cheddar is always a crowd pleaser. Skip the pre-cut cubes and cut the block yourself. Orange or white, mild or extra sharp. Cheddar is always a favorite.
Upgrade affordable goat cheese by rolling the log in herbs and spices, like dried thyme, dried oregano, or crushed rainbow peppercorns for a beautiful, flavorful crust. You could also keep it plain and top with jarred pepper jelly or mango chutney.
Instead of mixed nuts, opt for crunchy snack mixes, which are often less expensive and just as delicious. For the board, look for one with little or no seasoning.
Give a budget-friendly feta or mini mozzarella balls a flavor boost by marinating cubes in olive oil with herbs like parsley, oregano, or rosemary, and other seasonings like sliced chilis, crushed garlic, or lemon zest. Refrigerate overnight or up to 3 days.
Round out your cheese board with other delicious items like fresh or dried fruit (dried apricots, figs, grapes, and sliced pears), pitted olives, and plain crackers.
Pair your cheese board with a festive holiday beverage and enjoy!
©Tiny New York Kitchen © 2020 All Rights Reserved

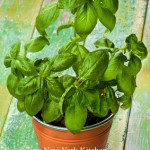
You may try to keep basil through the winter, however, sweet basil is meant to live its life cycle within one year and then go to seed. At the end of the season, though, you may try to keep it alive by moving potted basil indoors to enjoy them for months to come.
Inspect And Transplant
Before you bring your basil indoors make sure to inspect it thoroughly for any insects. Flush the soil with water and rinse off the foliage, using a blast of water from the garden hose to chase away any pests and avoid later problems. Then, you can gently dig up your basil from the garden any time before the ground freezes.
Transfer To A Pot
Select a container large enough to accommodate your basil plus a little room for growth. Place a layer of potting mix on the bottom of the pot, then set the basil on top of that. Fill in the spaces around the roots with more potting mix. Press the soil firmly around the basil’s roots, leaving about an inch between the soil and the rim of the pot. For smaller basil plants, try placing several together in a window box that fits on a sunny sill. After settling your basil into its new container, water until it drains out the bottom of the pot.
Acclimate Your Basil
When bringing your basil indoors, it will need a little time to adjust to the new surroundings. You might notice that your basil drops a few leaves and grow more slowly. Ease your basil into life on the inside by setting them in a spot with indirect light. Don’t put them in bright sun right away. After a couple of weeks, you may move the pots to a spot that will get a least four hours of sun or bright light. If you don’t have a window that provides plenty of sunlight, you can also grow your herbs under fluorescent bulbs or with a grow light setup.
Give Your Basil Some Love
Turn pots once a week or so to help all sides of your basil get enough light. Water when the soil feels dry to a depth of 1 inch. Mist the leaves daily to boost the humidity level. You can also tilt the pots over the sink and gently rinse their foliage with tap water every once in a while, to keep them clean and deter any pests that might show up. You may want to boost the humidity around your basil by placing their pots in a pebble filled tray. Water the pot regularly, allowing excess water to over flow into the tray.
Cuttings
To make sure you always have access to fresh basil throughout the winter, places cuttings in a small vase of water and they will soon develop roots. When the roots are a couple of inches long, put the cuttings to expand you supply of fresh basil. Or you may snip sprigs whenever you need some fresh basil for your favorite dishes. Either way, this will encourage your basil to produce new growth and stay compact until you can move them outdoors again in the spring.
With a little preparation, basil can come indoors for the winter. Growing them in containers will give you a fresh supply for cooking all year long and you will be able to take them back outside and replant when spring arrives.
©Tiny New York Kitchen © 2020 All Rights Reserved

Pesto is one of those spectacularly simple sauces that only takes minutes to make. Essentially, you just have to throw basil, oil, and garlic into a food processor and you have a fresh pesto.
The wonderful thing about pesto is that it can be used for more than a plate of pasta. You can bake it on chicken, mix it into soup, add it to bruschetta, mix it in a skillet with eggs and hash browns, add it to a grilled chicken sandwich, or add it to a quesadilla. You can also add a dollop of mayonnaise to a few tablespoons of pesto to create a quick and easy aioli to use on sandwiches.
Pesto is excellent for transforming leftovers into something quick and delightful. You can take the pesto aioli and pair it with a leftover chicken cutlet, tomato slices, and a crusty slice of baguette to create a delicious sandwich.
“Work With What You Got!”
©Tiny New York Kitchen © 2020 All Rights Reserved

Feta From The Block
Feta sliced from a block is a bit creamier and less salty than feta crumbles, though you can use either. For a quick appetizer, cut into cubes and toss with herbs, olives, and lots of olive oil.
“Work With What You Got!”
©Tiny New York Kitchen © 2020 All Rights Reserved

Hungry for halibut or craving clams? There’s an easy way to prepare fish and seafood to perfections. Fish is ready when you can flake it easily with a fork. Shrimp and shellfish are done when they are opaque in color.
Bake: Best for fish fillets. Baking or roasting fish is an easy, hands-off method, especially good if you have a crowd to feed. As with any fish cooking technique, follow the recipe to avoid overcooking.
Wrap: Best for any fish fillet and shellfish. Cooking fish in foil is one of the most versatile ways to prepare fish, resulting in moist, flavor-packed dishes. And because you can load up on tasty ingredients, like herbs, citrus and spices, it’s a great way to cut back on fat and sodium without sacrificing flavor. Plus, cleanup is a breeze.
Poach: Best for any fish fillet and shellfish. Poaching simply means gently cooking the fish in liquid, such as water, broth, beer, or wine. It ads subtle flavor without drying out the fillets or adding any extra fat. To poach, simply cover the fish or seafood with liquid and bring to a simmer, just don’t let the liquid boil. You’ll only need a few minutes for your fish or seafood to be ready. You can also use the poaching liquid as a base for a sauce when you’re done.
Broil: Best for thick and meaty fish fillets, shrimp, and lobster tails. This method is especially good when you want to quickly bake fish and seafood. This is also a good method when you don’t have access to a grill or you’re adding a glaze. To make sure it doesn’t cook or brown too quickly, cook the fish at least 6 inches away from the broiler and watch carefully.
Steam: Best for clams and mussels. The traditional cooking method for clams and mussels, steaming is an easy way to add delicate flavor quickly without overcooking. Just add the seafood to a lidded saucepan with a little liquid like beer, wine, or broth, cover and bring to a simmer until the shells open up. Discard any that don’t open. You can also steam lobster, but it’s worth checking to see if your store’s fish department will steam lobsters for you.
Sear: Best for scallops, shrimp, and fish fillets. Use this cooking method for fish with a crisp, browned crust and a tender interior. Use a non-stick pan if possible and add a little oil before adding your fish, in batches if necessary, Don’t crowd the pan. Cook without stirring or turning for 2 to 3 minutes to brown the fish and crisp up any breading.
Grill: Best for any fish fillet or shellfish. Once grilling season rolls around don’t forget to add fish, shrimp, and even clams and mussels to your summer menus. Fish fillets take well to grilling and are easy to flip. Use a grilling basket for anything that might slip through the grate. Don’t forget skewers, which are the perfect way to grill shrimp.
“Work With What You Got!”
©Tiny New York Kitchen © 2020 All Rights Reserved
Fresh basil can be dried, but freezing holds the flavor better, and there are two easy methods.
1. Freeze Whole Leaves: Blanch basil leaves in boiling water for two seconds and immediately place in an ice bath. Dry the leaves completely, then place in a freezer-safe container, layered with parchment paper or wax paper, and freeze up to four months. For the best flavor, do not thaw before using.
2. Purée And Freeze: Remove the leaves from the stems and wash and dry them. In a food processor, purée the leaves with olive oil (use about a tablespoon of oil per cup of basil). Freeze the purée in ice cube trays, then transfer to a resealable plastic bag and freeze up to four months. To purée works best in soups, stews, and sauces.
“Work With What You Got!”
©Tiny New York Kitchen © 2019 All Rights Reserved

Most vegan foods are quite obvious, but it’s important to check the label for ingredients like egg whites, gelatin, honey, or milk.
When in doubt at a restaurant, ask your server to confirm your order is vegan. Dishes are often enriched with non-vegan ingredients like chicken stock or fish sauce.
Rather than focus on what you can’t eat, celebrate what you can. Vegans can enjoy a wide range of foods, including all fruits and vegetables, beans and other legumes, pasta and grains, soy-based foods like tofu and tempeh, and herbs and spices.
“Work With What You Got!”
©Tiny New York Kitchen © 2019 All Rights Reserved

This Year Tiny New York Kitchen Is Focusing On How To Get More Vegetables Worked Into A Regular Diet.


