
 Spicy Wok Green Beans
BUT Victoria I don’t have a wok! No problem at all if you don’t have a wok then use a large cast-iron skillet, but if you DO have a wok then drag that baby out for this dish. Searing green beans in a dry wok really gives them a mild smoky flavor. This dish tends to be a bit spicy because the chiles are sliced and cooked with their seeds (the seeds are the hottest part of the chiles). If you want to tone down the spiciness then don’t cook the seeds and just throw them away. Make sure not to touch your mouth or eyes after slicing the Serrano chiles. Trust me I’ve done it plenty of times. OUCH!
INGREDIENTS
1 Pound Trimmed Green Beans
4 Sliced Garlic Cloves
2 or 3 Thinly Sliced Red Serrano Chiles
1 Tablespoon Black or White Sesame Seeds
3 Tablespoons Water
2 Tablespoons Tamari
Place your wok or cast-iron skillet on the burner and turn the heat up to high. Heat the wok until it’s very hot. Place the green beans into the wok and cook for 5 minutes. Stir constantly. You will want the green beans to begin to blister and brown in spots. Now add the garlic, chiles and sesame seeds. Cook for another minute continuing to stir. Add the water and then place a lid on the wok and cook for 2 to 3 minutes. You will want the green beans to be crisp-tender. Take the lid off and cook for another minute until there is no water left and the ingredients are dry. Remove from the heat and stir in the tamari. Transfer to a serving bowl and serve immediately. Serves 4
Tamari is made from soybeans, water and salt. Tamari has a more intense and more complex flavor than regular soy sauce. It also has a higher concentration of minerals, has a thicker consistency and is darker than regular soy sauce.


 Three Bean Insalata
I love beans and they are full of protein, vitamin B and iron. They are low in fat as well (about 1 gram of fat per cup) and loaded with fiber. If you are using canned beans please be aware that they are higher in sodium so make sure to rinse them well to reduce the salt content.
INGREDIENTS
2 Cups Cooked & Drained Red Kidney Beans
2 Cups Cooked & Drained Black Beans
2 Cups Cooked & Drained Pinto Beans
2 Cups Cooked & Drained Yellow Hominy
5 Large Chopped & Seeded Tomatoes
2 Cups Chopped Onions
1 Cup Chopped Fresh Cilantro
4 Tablespoons Fresh Lime Juice
2 Tablespoons Olive Oil
3 Teaspoons Chili Powder
3 Teaspoons Ground Cumin
1 Tablespoon Kosher Salt
1 Tablespoon Freshly Ground Pepper
In a large size bowl combine the red kidney beans, black beans, pinto beans, yellow hominy, tomatoes, onions, cilantro, lime juice, olive oil, chili powder, ground cumin, kosher salt and pepper. Mix well. Cover with plastic wrap and refrigerate for 3 to 4 hours. Remove from the fridge when ready to serve and transfer to a serving bowl. Serves 10

 Okra Tomato Soup
This soup is super fresh and super yummy! If you don’t want to use beef stock then use a vegetable stock.
INGREDIENTS
1 Pound Peeled & Chopped Ripe Tomatoes
1 Cup Water
1 Pound Trimmed Fresh Okra
4 Cups Beef Stock or Vegetable Stock
1 Teaspoon Kosher Salt
1 Teaspoon Freshly Ground Pepper
3 Tablespoons Brown Sugar
1 Tablespoon Worcestershire Sauce
In a heavy pot place the tomatoes and water and bring to a boil. Add the trimmed okra. Reduce the heat to a simmer and cook until the okra is nice and tender. Add the beef stock, kosher salt, pepper, brown sugar and Worcestershire sauce. Simmer for 20 minutes. Remove from the heat and transfer to a large serving bowl. Serves 4

 Grilled Duck Breasts
I don’t often eat duck because quite frankly I forget about it. While I was at the market last weekend I ran across duck breasts and decided to throw them in my cart not knowing what I was going to do with them of course. Here is what I came up with.
INGREDIENTS
8 Duck Breasts (2 per Person)
1 Bottle Beer
1/4 Cup Meat Rub
8 Tablespoons Olive Oil
Ziplock Bag
Most of you know that I’m really into marinating things in the ziplock bags. For these duck breasts you really need to marinate them overnight in the beer. Place the duck breasts into the ziplock bag and pour the beer in. Zip up the bag and give it a gentle shake to evenly distribute the beer. Place the filled bag onto a plate in case there is any drip and put into the fridge overnight. Remove from the fridge when you are getting ready to grill. Remove the duck from the beer and throw the beer away. Place the duck onto a large plate and drizzle both sides with the olive oil. Then rub your favorite meat rub onto both sides of the duck breasts. I used Victoria’s Dry Rub which was fabulous. After preparing the duck breasts let them rest on the counter while you prepare the grill. Get the grill to a medium-high heat. Place the prepared duck breasts onto the grill and close the lid. Cook for 6 to 8 minutes per side depending on how rare you like them. Remove from the grill when done and place onto a serving platter. Let rest for 10 minutes. Slice or serve whole. Serves 4
Note: If you don’t have a grill or can’t barbeque remember that whatever you can do on a grill you can do under an oven broiler or in a grill pan on top of a burner.

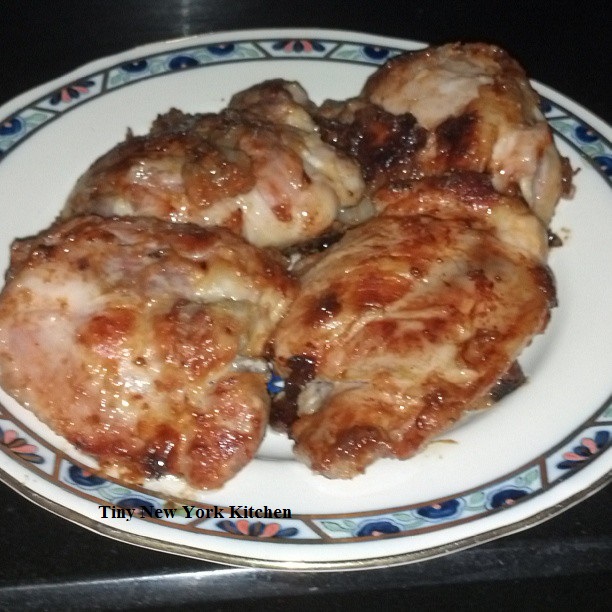 Tender Salt Chicken
If you’re looking for a new way to make chicken here is a nice change of pace. It’s made with a wonderful Asian ingredient called Shio-Koji. Shio-Koji is a Japanese traditional condiment made from malted rice and salt. Its salty flavor can be a great substitute for salt, by lowering the overall salt content to less than 50%. Shio-Koji is a live food that is rich in enzymes. It brings out the umami in foods. Shio-Koji imparts a rich savory flavor making any dish delicious. It is excellent to use when marinating fish or meat and can be found in most Asian grocery stores.
INGREDIENTS
2 Tablespoons Miso
1 Tablespoon Shio-Koji
1 Pound Chicken Thighs
4 Tablespoons Plain Yogurt
3 Tablespoons Olive Oil
In a medium size bowl combine the yogurt, miso and Shio-Koji. Mix well to combine. Place the chicken thighs in a large ziplock bag and pour the Shio-Koji mixture in the bag to cover the chicken. Zip up the bag and give a good shake to ensure that all of the chicken is nicely covered. Place in the fridge and let sit for at least 2 hours. Place a large size sauté pan on the stove and pour in the olive oil. Turn the heat to medium-high and place the chicken thighs into the sauté pan. Cook one side for 3 minutes and then turn over. Cook the other side for another 3 minutes. Reduce the heat to medium-low and cook for15 to 20 minutes. Remove from the heat and transfer to a serving plate. Serves 2


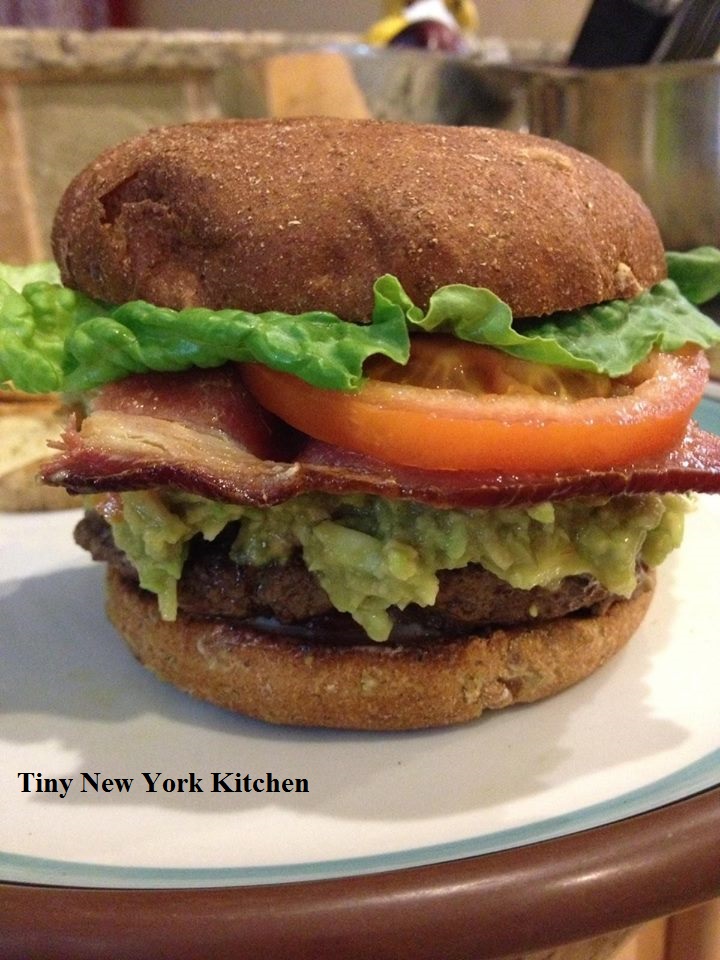 Camille’s Guacamole Bacon Burgers
Add some green to your Red, White & Blue! This July 4th kick up the classics and put a little green in your Red White & Blue with fresh avocado.
INGREDIENTS
1 Pound Ground Beef
1 Tablespoon Worcestershire Sauce
1 Egg
1 Pound Thick Cut Bacon (About 8 Slices)
2 Avocados
1 Chopped Tomato
1/4 Cup Chopped Cilantro
1/2 Cup Salsa
1/2 Lemon or Lime
1/2 Teaspoon Kosher Salt
1/2 Teaspoon Freshly Ground Pepper
Lettuce for Garnish
1 Tomato for Garnish
Pickles for Garnish
Start by cooking the bacon, in a large size skillet over a medium heat, on the stove until you have your desired crispiness. While the bacon is cooking put the ground beef into a large size bowl. Add the Worcestershire sauce and the egg. Mix together. With your hands separate the meat mixture into 4 equal balls. Have one of the meat balls in one hand and with the other hand press down with your palm to make a patty. Repeat this process until you have finished with all four. Place onto a plate and set aside. After the bacon is cooked place onto paper towels to drain. With the same pan that you used to cook the bacon place the beef patties. Obviously, this is definitely a calorie splurge, but it really does add a lot of flavor to the burgers. Cook the patties for 6 to 8 minutes per side. If you have a meat thermometer then the temperature goal is 160º F on the inside of the burger.
While the burgers are cooking make the guacamole. Cut up one of the tomatoes into small cubes and put into a medium size bowl. Add the 2 avocados. The avocados should be ripe so that they are easy to mash plus tastes much better. Add the cilantro, salsa, lemon or lime juice, kosher salt and pepper. Mash together with a potato masher, but leave somewhat chunky. This is really easy to do and super delicious! Now that the burgers are done cooking and you’ve made the guacamole take 4 buns and place the patties on the buns. Top with guacamole, bacon and add the toppings of your choice: Mustard, mayonnaise, ketchup, lettuce, tomatoes and pickles and enjoy! Make 4

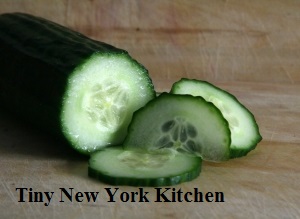 Marinated Cucumber & Onion Salad
I love this salad. It’s easy to make and makes a great side dish. If you plan on marinating the salad overnight make sure to cut the cucumber a tad thicker. This way it will keep more of a crunch. You may use any type of onion that you like, but a sweet onion (like Vidalia) is a good choice. I’ve made this salad with red onions as well.
INGREDIENTS
1/3 Cup Rice Vinegar
3 Tablespoons Chopped Fresh Mint
2 Tablespoons Honey
1 Tablespoon Sugar
1/2 Teaspoon Kosher Salt
1/4 Teaspoon Freshly Ground Pepper
3 1/2 Cups Sliced Cucumber
1 Cup Sliced Onion
In a large size bowl combine the rice vinegar, chopped mint, honey, sugar, kosher salt and pepper. Wisk until the sugar dissolves. Add the cucumber and onion slices. Toss well and cover with plastic wrap. Place in the fridge for 4 or more hours. While in the fridge go in and toss a few times to ensure that all of the cucumber and onion slices are getting marinated. Remove from the fridge and serve. Serves 4


 Classic Black Beans & Rice
Everyone needs a few easy weekend night meals to pull out of their hat. Here is a wonderful Classic Black Beans & Rice recipe that is truly a faithful friend. If you want to add meat then either add chicken or fish. Shrimp is a good choice for a homespun Cajun night.
INGREDIENTS
3 Tablespoons Olive Oil
3/4 Cup Finely Chopped Onion
1/2 Cup Chopped Green or Red Bell Pepper
3 Minced Garlic Cloves
2 Cups Cooked Black Beans (Undrained)
3/4 Cup Water
1 Teaspoon Oregano
2 Teaspoons Chili Powder
1 Tablespoon Vinegar
In a medium size saucepan heat the oil over a medium heat. Add the onions, peppers and garlic. Cook for 8 minutes until they are nice and tender. Stir in the beans, water, oregano, chili powder and vinegar. Bring to a boil and then turn the heat down to low. Simmer for 10 minutes. Remove from the heat and transfer to a serving bowl. Serve over hot white or brown rice. Serves 4


 Super Easy Chicken Fajitas
I’ve really been in a Mexican food mood as of late. Since getting back from Tucson a couple of months ago I have really been yearning for good South of the Border cuisine. Keeping in line with easy weeknight meals here is a quick and easy family dinner.
INGREDIENTS
1 Tablespoon Olive Oil
1 Pound Chicken Breast Strips
1 Cup Salsa
3 Tablespoons Fresh Lime Juice
1 Teaspoon Worcestershire Sauce
1 Bell Pepper (Cut into Thin Strips)
1 Medium Onion (Cut into Thin Strips)
10 Flour Tortillas for Fajitas or Soft Tacos
In a medium size skillet add the olive oil and chicken strips. Cook over a medium-high heat for 4 minutes. Add the salsa, lime juice and Worcestershire sauce. Add the peppers and onions. Give a good stir. Cook for 5 minutes until the vegetables are crisp-tender. Remove from the heat and spoon the filling into tortillas. Add additional salsa as a topping if you like. Roll these babies up and serve. Makes 10 fajitas.
Tip: Feel free to add shredded cheese, sliced mushrooms, tomatoes or anything your heart desires.


 Grilled Lime Marinated Flank Steak
Father’s Day is one special occasion when many families try to pull out all the stops to make sure that Dad knows that he’s appreciated. No one wants Dad to go hungry and most (not all) Dads love steaks…especially grilled steaks. You may want to serve with either baked potatoes or homemade onion rings.
INGREDIENTS
2 1/2 Pounds Choice Grade Flank Steak
3 Chopped Garlic Cloves
1 Large Chopped Chipotle Chile
1 Tablespoon Chopped Cilantro
1/4 Cup Olive Oil
12 Tablespoons Freshly Squeezed Lime Juice (Approx. 5 Limes)
1/2 Teaspoon Kosher Salt
1/2 Teaspoon Freshly Ground Pepper
In a large size ziplock bag place the flank steak. In a medium size bowl mix together the olive oil, garlic, chipotle chile, chopped cilantro and lime juice. Pour the lime mixture over the flank steak. Zip up the bag and place into the fridge for 6 hours or overnight. Turn occasionally to evenly distribute the marinade. When ready to grill remove from the fridge. Prepare the grill. Remove the flank steak and place onto a plate. Salt and pepper the steak and let come to room temperature. Grill over a high heat for about 5 minutes per side. Grilling time depends on how rare or well done you want your steak. Remove from the grill and place onto a platter. Let rest for 5 minutes. With a sharp knife thinly slice the steak across the grain and at a sharp angle. Serve the steak with homemade onion rings or baked potato. Serves 4